Laying down a fillet.

B.B.
I've been doing a little practice with fillet brazing on some 4130. Been getting good results on the tinning, but not so good on the fillet side of the process and I need a little guidance on how to lay down a fillet.
Can someone outline an approach to laying down a fillet after a joint has been tinned?
Cheers,
Ben.

Mark Bulgier
Someone who goes by “Ben” wrote:
I've been doing a little practice with fillet brazing on some 4130. Been getting good results on the tinning, but not so good on the fillet side of the process and I need a little guidance on how to lay down a fillet.
Can someone outline an approach to laying down a fillet after a joint has been tinned?
I’m trying to imagine describing the motions, and what’s harder, all the things you’re monitoring to modify and calibrate your motions. I can’t even begin to describe it, and I have probably a couple thousand hours of fillet brazing over about 20 years. And normally no shortage of words either. I think your chances of “learning how to fillet braze over the internet” are very slim.
Maybe someone with more teaching experience, like Doug Fattic, can do more good in words than I can. But I’m not inclined to even try, and here’s why: A good 10 minute video would do you more good than all the words I could ever write, and a half-hour class with an experienced brazer would be infinitely better than that. Sorry to be so blunt, but if you’re even considering risking your life on a bike frame you brazed, then it would be stupid of you to not seek someone out for some real in-person tutoring and critiquing your work. Not only will you not learn it over the Internet, but you won’t even know how much you don’t know. I really believe that someone with years of experience making bikes that have proven themselves not to break needs to watch you brazing and confirm that you’re doing it well enough to risk a human rider. Even if you’re above average, you shouldn’t trust yourself to make that decision.
There will always be a few incredibly driven, insightful and gifted people who can do it on their own without a teacher, but there are more people out there who think that describes themselves, and they’re wrong. And even the gifted ones would save themselves some time and frustration if they just had a few minutes with a good journeyman brazer.
I always encourage people to say where they’re from, like in your sig, so we can suggest someone local to you.
Mark Bulgier
Seattle
B.B.
I'm not a skilled welder. I'm not a skilled builder either. Like you said - I'd be completely stupid to consider myself to be even remotely able to produce anything that could be considered sound. I'm no masochist, and I'd never let anyone, myself included, near anything that would put them, or myself, in harms way.
I'm also in a bit of a corner, well less of a corner and more an island, a bloody big one. I live in Melbourne, Australia. I've done a little digging around and have yet to find anyone who is offering tutoring or classes on such a specific subject, or even in bicycle building in the land of OZ. A handful of people have been helpful in learning a bit about the building process, which has been great, but I'm not digging up much on where I can go to learn the process of brazing, here in Australia. The closest I got to was a night course at a technical college, but that focused mainly on welding for the construction industry (using Tig, Mig etc). I'd love to head over to one of the schools in the U.S. but that's a bit of a stretch, funds wise.
And so the reason for my question.
However, is there anyone tuning in that lives in our Great Southern Land with a suggestion of who to speak to about learning fillet brazing?
Cheers,
Ben.

DancesWithCars
inline below
---
odd nonstandard keyboard so who knows what I intended to type...
On Feb 5, 2013 6:22 AM, "B.B." <ben...@gmail.com> wrote:
>
> Right you are Mark. Honestly, you can never be too honest.
>
> I'm not a skilled welder. I'm not a skilled builder either. Like you said - I'd be completely stupid to consider myself to be even remotely able to produce anything that could be considered sound. I'm no masochist, and I'd never let anyone, myself included, near anything that would put them, or myself, in harms way.
>
> I'm also in a bit of a corner, well less of a corner and more an island, a bloody big one. I live in Melbourne, Australia. I've done a little digging around and have yet to find anyone who is offering tutoring or classes on such a specific subject, or even in bicycle building in the land of OZ. A handful of people have been helpful in learning a bit about the building process, which has been great, but I'm not digging up much on where I can go to learn the process of brazing, here in Australia. The closest I got to was a night course at a technical college, but that focused mainly on welding for the construction industry (using Tig, Mig etc). I'd love to head over to one of the schools in the U.S. but that's a bit of a stretch, funds wise.
>
after lurking here for a long time,
I'm now in one of those classes,
and the auto shop guys, as well as the welding supply,
and many others get giggles out of the thought of welding
bikes...
from what I've seen in a few weeks,
pipe welding (round tubes, no?),
TIG (4130?)
and well, the safety stuff the other poster mentions,
not necessarily for the rider, but for the welder
seem a little relevant, but again I'm a noob...
and there are a lot of used bikes
and old bikes out there too,
but they don't have my name on them <cough>
> And so the reason for my question.
>
> However, is there anyone tuning in that lives in our Great Southern Land with a suggestion of who to speak to about learning fillet brazing?
>
I would find it hard to believe no one builds
bikes or something close in Australia
I saw international bike videos at the Bike Film Festival
and wonder if something was relevant there,
even if builders are too remote and busy,
the film and culture may point towards something.
I ran into WhirleyGigs (or similar in North Carolina)
who was an old military guy (helicopters)
and they created a museum of his art sculptures,
(where I was originally considering learning some
welding (saw my first oxy as as kid) and still may
try to hook up some studio/ shop space with someone
as flakey as moi <smile>
I'll throw in another question, how long do you think
it would take to learn to fillet braze/ weld to do
a first bike?
I've met people who have built their own bike
(and trailers and welders in general),
but am no longer in close proximity.
Mark Bulgier
Well you could get up to Brisbane, right? Ask Llewellyn what his consulting rate is for an hour of his time. I don’t know him personally, but I’ll bet he won’t say no as long as he knows you aren’t trying to get something for nothing. Whatever his rate is, it’s worth it. If he says yes to an hour, then see if he’ll give you a deal on a half-day.
He’s mostly known for lugs, but I’ve never met a framebuilder who wasn’t at least good enough at fillet brazing to tutor a beginner. He’s probably awesome at it actually.
If he says no, then I’m pretty sure he’s not the only FB in Oz. There was just an Australian bike builder’s show in Melbourne, in December, here’s the list of exhibitors. A couple of them are even in Melbourne. Looks like Baum is welding only, but you never know, a lot of TIG guys know how to braze too. I’m seeing Cog Bicycles in Warburton, says he does nothing but fillet brazed frames. That’s just the top of the list, I’ll let you go through the rest. Looks like Gellie and Wigham are Melbourne too.
OMG, Ken Evans! “The dean of Australian framebuilders.” He’s been doing it since the 70s, he should know a thing or two. They only give the address as Victoria, but that can’t be all that far from you.
Where’s Primate Cycles? They specialize in fillet brazed and have a “build your own frame course”. The slide show on the blog shows a really nice (lugged) frame that a student made in the class.
Actually even if Dazza says yes, try to visit a couple other framebuilders too, because you’ll see things done a little differently everywhere, and that really helps IMHO.
I came across pretty strong in my first response – this is on purpose, to weed out the ones who don’t have the confidence to see this through. In reality, I do think you can do it on your own, if you are patient, smart and hard working. Miter up enough scrap tubing and make enough test braze joints, break ‘em in the vise* with a cheater bar, and/or cut up cross-sections to see how you did, and eventually you will learn what works. It’s just that a hands-on session with a pro will speed that process up by a lot.
*I just today learned that you lot spell it “vice”, and only in America is it spelled vise. I’m sort of old but still learning! Well not much, but hey, every little bit helps.
Mark Bulgier
Seattle
--
--
You received this message because you are subscribed to the Google
Groups "Framebuilders" group.
Searchable archives for this group can be found at
http://groups.google.com/group/framebuilders (recent content) and
http://search.bikelist.org (older content).
To post to this group, send email to
frameb...@googlegroups.com
To unsubscribe from this group, send email to
framebuilder...@googlegroups.com
For more options, visit this group at
http://groups.google.com/group/framebuilders?hl=en
---
You received this message because you are subscribed to the Google Groups "Framebuilders" group.
To unsubscribe from this group and stop receiving emails from it, send an email to
framebuilder...@googlegroups.com.
For more options, visit https://groups.google.com/groups/opt_out.

Alex Wetmore
Sent: Tuesday, February 05, 2013 5:09 AM
To: B.B.
Cc: frameb...@googlegroups.com
Subject: RE: [Frame] Laying down a fillet.

Tony Pereira
I taught myself how to fillet braze. It's difficult and takes a lot of
practice. I'm now a guest instructor at UBI, so I've had to think a lot
about how to explain fillet brazing. It's still far easier to
demonstrate than explain. Here are a few key concepts to think about.
First and foremost: heat control. Your goal is to evenly bring the tubes
up to the temperature at which the filler will melt, then add a uniform
amount of filler all the way around the joint and then get it to stay
there in that nice smooth shape we call a fillet. If you control the
heat precisely, then this will all happen. You can best tell how hot
things are by watching your flux. I like to spend some time (a few
minutes) pre-heating the entire joint until the flux starts to get
bubbly. Flux goes through a few changes as you heat the metal. Carefully
watch what it is doing and it will tell you a lot. First the water
evaporates, then it gets crusty. As it starts to melt it will get syrupy
and have small bubbles. Once the bubbles go away it should be active and
the metal hot enough to melt the filler. So, preheat the joint
uniformly, then get ready to braze. We'll leave sequence out of the
equation for now. Just start in one spot and work your way around until
you get the hang of it.
When you are ready to start brazing position the work so that you can
braze about 1/6 of the joint in a "flat" position. This keeps the filler
from flowing away from you. As you get better you will be able to braze
with it less flat, but for now make it easier on yourself.
You'll want to point your flame in the direction you'll be going around
the joint, so that you can add filler in the hottest spot and preheat
where you will braze next. So, get in there with your torch. Hold the
tip of the primary cone (neutral flame, cone about 6mm long) about
5-10mm from the surface with the flame pointing about 45 degrees
"down-joint." If you are right handed you will be brazing from right to
left with the torch in your right hand and the filler in your left.
Carefully watch the flux and the metal. With your glasses on you won't
really see much color change in the steel, but the flux tells you what
you need to know. Move the torch in a circular motion, making circles
with the flame a bit larger than the width you want the fillet to help
the fillet flow out on to the tubes. When it is hot enough to melt the
filler, feed some in until it builds up a bit, then flick your flame
away for a moment to let the fillet freeze. Get right back in there with
the torch, remelt the leading edge of that fillet, build up, freeze,
repeat. This is where there's no substitute for practice. Once the area
you are brazing is no longer level, stop and reposition the work and get
right back in there with the heat. You've got to train yourself to pay
close attention to lots of things at once. You'll start to get good once
you've built about 100 frames.
At UBI we miter a bunch of 80mm long tube pieces at 60 degrees and have
the students braze them to the end of a longer tube, similar to a DT/HT
joint. Cut it in half and then cut if off the end of the long tube to
look inside. Check for good internal fillet and to make sure you don't
have any voids. Look for signs of overheating where the flux has
blackened or the copper has boiled out of the filler. Do another, and
another, and another...
Mark's warning is sound. Don't let anyone ride bikes you make unless you
are sure they will not spontaneously fly apart. You'll have to figure
out how to judge that. Post some pics.
I'm getting back to work. Have fun.
Cheers,
Tony
Pereira Cycles
Portland, Oregon, USA
www.pereiracycles.com
503.333.5043
twitter: @pereiracycles
Tony Pereira
http://vimeo.com/16776471
Not the best video, but everything helps.
Pereira Cycles
Portland, Oregon, USA
www.pereiracycles.com
503.333.5043
twitter: @pereiracycles
On 2/5/2013 12:08 AM, B.B. wrote:

David Porter
ready and the tubes are at filler melt temp, so must be the filler! So add
the filler into the flame or you may overcook the area you are first
applying the filler too.. hope that makes sense.
dave
fro...@porterscustom.com
Porter Customs 2909 Arno NE
Albuquerque, NM USA 87107
505-352-1378
1954 BN2 1959 AN5
Porter Custom Bicycles
cars:
www.britishcarforum.com/portercustoms.html
gallery:
http://picasaweb.google.com/porterscustombicycles/PorterCustomBicyclesStuff
GO HERE: http://porterbikes.com/ nice pictures-fun facts-my world
-----Original Message-----
From: frameb...@googlegroups.com [mailto:frameb...@googlegroups.com]
On Behalf Of Tony Pereira
Sent: Tuesday, February 05, 2013 10:36 AM
To: frameb...@googlegroups.com
Subject: Re: [Frame] Laying down a fillet.

Nick Foley
--
--
You received this message because you are subscribed to the Google
Groups "Framebuilders" group.
Searchable archives for this group can be found at http://groups.google.com/group/framebuilders (recent content) and http://search.bikelist.org (older content).
To post to this group, send email to frameb...@googlegroups.com
To unsubscribe from this group, send email to
framebuilder...@googlegroups.com
For more options, visit this group at
http://groups.google.com/group/framebuilders?hl=en
---
You received this message because you are subscribed to the Google Groups "Framebuilders" group.
To unsubscribe from this group and stop receiving emails from it, send an email to framebuilder...@googlegroups.com.
For more options, visit https://groups.google.com/groups/opt_out.
Nick Foley

Tim Neenan
Tim
www.lighthouscycles.com

Jona Aal
- For Course: Intro to Welding - MIG, Arc & Oxyacetylene
- Name of the Person: Larissa Salinas
- Contact No.: +61392691666
- Email: intern...@nmit.vic.edu.au
Ben,
I have been doing Oxy Acetylene welding making things for theatres and farm hydro electric plants for about ten years, I've been OK, but always known I needed proper tuition to improvce beyond a certain point that can be reached by books, videos and HOURS of finding certain things frustrating.
In september I started a course, an evening class, 2hours a week, the curriculum and examination is overseen by City and Guilds here in the UK, i'm sure you will have an equivalent industry training scheme in oz. I found some details for you on the internet that seemed similar to what I found when applying for my course, see above.
The level one course covered both welding and 'bronze welding' (fillet brazing in Old English), both are very similar in terms of movement, the fine motor control of the torch, and also the need for careful heat control, of both the parent metal and filler. The brazing operation is made more challenging in one way by the flux confusing the issue (visually), but the welding is very helpful in learning how to control melting of metal, a molten pool, and rapidly freezing metal, all at the same time!
Because of previous experience (muscle memory as Nick put it), I covered level 1 in about a third of the normal time and am now moving on well on level 2, and have spent quite a bit of time on the TIG machines too. I am planning on carrying on next year.
I would say that you will learn far more from a frame builder if you go the them with the basics of attaching the tubes together, as there is so much more to bike building than the plumbing bit. You might also learn how to not get into bad habits which might be hard to get rid of if you don't get the basics sorted out by someone who teaches people HOW TO WELD, without the clutter of discussions on geometry, materials, thread sizes, paint finishes, carbon fibre, etc etc that are all the rage on the framebuilders forum!
Good luck, have fun!
Jona
--
--
You received this message because you are subscribed to the Google
Groups "Framebuilders" group.
Searchable archives for this group can be found at http://groups.google.com/group/framebuilders (recent content) and http://search.bikelist.org (older content).
To post to this group, send email to frameb...@googlegroups.com
To unsubscribe from this group, send email to
framebuilder...@googlegroups.com
For more options, visit this group at
http://groups.google.com/group/framebuilders?hl=en
---
You received this message because you are subscribed to the Google Groups "Framebuilders" group.
To unsubscribe from this group and stop receiving emails from it, send an email to framebuilder...@googlegroups.com.
For more options, visit https://groups.google.com/groups/opt_out.
--
Jona Aal
H 01434 345 620
M 07940 731 375

Steve Carter

Ken Cline
B.B.
And yup we use the Old English here, mostly. We have a specialised skill in bashing the U.S. dictionary and U.K. dictionary together. You fellas use 's' instead of 'c' and 's' instead of 'z'.
Ben.
B.B.
I've seen some examples of Trees as a learning tool. Looks like a good aid, but I need to know more about whats going on during the fillet process so that I'm sure that its a consistent and strong joint. Like Mark suggested, I think I'll track down an experienced builder and get some proper know how, and learn the process from top to bottom.
Ben.
B.B.
B.B.
I now understand that I've been using a fusion weld technique: the the torch leading the weld pool and traveling from left to right; completely backwards from what you have described. I'll definitely put that advice into play next time I'm in the shop. I'm still going to see if one of the lads in Melbourne can share some knowledge, it'd be for the best.
Ben.
David Porter
..if one watches that video… it was clear to me that he was using a very, very small flame, but with a God awful lot of oxygen. So his “heat affected” zone at any one time was very small and it was subsequent to laying out the large (ah, huge) filets.
He was moving a very small puddle that was fairly distant to the tubes and probably did little damage with the heat to the tubes. Having said that, I think all of us have at one time or another used excessive heat to “fix” a spot and aside from a little extra clean up time those fixes are all still very likely alive and well, no doubt thanks to the robustness of steel alloys.. and I have some reservations to say that using heat versus a file is “always a good idea” My opinion.
Dave
fro...@porterscustom.com
Porter Customs 2909 Arno
NE
Albuquerque, NM USA
87107
505-352-1378
1954 BN2 1959 AN5
Porter Custom Bicycles
cars:
www.britishcarforum.com/portercustoms.html
gallery: http://picasaweb.google.com/porterscustombicycles/PorterCustomBicyclesStuff
GO HERE: http://porterbikes.com/ nice pictures-fun facts-my world
From:
frameb...@googlegroups.com [mailto:frameb...@googlegroups.com] On Behalf Of Ken Cline
Sent: Tuesday, February 05, 2013
4:49 PM
To: Framebuilders
Subject: Re: [Frame] Laying down a
fillet.
Is there a risk of weakening the heat affected zone from the extra heating?
On 5 Feb 2013, at 12:31 PM, Tim Neenan wrote:
He was basically doing the file work with his torch, always a good idea.
Harold Bielstein
On Feb 5, 2013, at 6:40 PM, David Porter <fro...@porterscustom.com> wrote:
> ..if one watches that video… it was clear to me that he was using a very, very small flame, but with a God awful lot of oxygen. So his “heat affected” zone at any one time was very small and it was subsequent to laying out the large (ah, huge) filets.
> He was moving a very small puddle that was fairly distant to the tubes and probably did little damage with the heat to the tubes. Having said that, I think all of us have at one time or another used excessive heat to “fix” a spot and aside from a little extra clean up time those fixes are all still very likely alive and well, no doubt thanks to the robustness of steel alloys.. and I have some reservations to say that using heat versus a file is “always a good idea” My opinion.
> Dave
>
>
> fro...@porterscustom.com
>
> Porter Customs 2909 Arno NE
> Albuquerque, NM USA 87107
> 505-352-1378
> 1954 BN2 1959 AN5
> Porter Custom Bicycles
>
> cars:
> www.britishcarforum.com/portercustoms.html
> gallery: http://picasaweb.google.com/porterscustombicycles/PorterCustomBicyclesStuff
>
> GO HERE: http://porterbikes.com/ nice pictures-fun facts-my world
>
hkbie...@rap.midco.net

GREG KEEFER
ride, which has some footage brazing the frame in his hands:
http://vimeo.com/47207697
I'll see if I have better search results later.
Cin cin,
Keefer
On 2/5/13 9:28 PM, "Harold Bielstein" <hkbie...@rap.midco.net> wrote:
>I've been looking for that video - anybody have a link?
>
>On Feb 5, 2013, at 6:40 PM, David Porter <fro...@porterscustom.com>
>wrote:
>

Mark Stonich
Mark Stonich;
5349 Elliot Ave S.
Minneapolis MN 55417-1741
612-824-2372
http://bikesmithdesign.com
http://mnhpva.org

Johan Larsson
Framebuilders are scarce around here in Scandinavia (Patrik Tegnér and Truls beeing the only ones I know of), and just getting to actually see just a little of how a fillet braze is made would probably help me a lot, and smoothen out the first bump in the learning curve at least... The videos with Bilenky and Ritchey are helping with an understanding of the workflow in large, but I'd really love to see closeups of the flame and puddle control. (I guess that is what Alex is talking about - "didynium filter", huh?)
/Johan Larsson
Sweden

koy...@aol.com
CMatt
Sent from my Verizon Wireless Smartphone
Johan Larsson <seven....@gmail.com> wrote:
B.B.
Haven't got back into the shed yet to try out some of the tips you've listed. I was wondering though... do you tin up your joints first?
Ben.
On Wednesday, February 6, 2013 4:36:27 AM UTC+11, Tony Pereira wrote:

tommie t
If you don't mind me asking, what size tip do you use?

Bubba
https://vimeo.com/42600479
Tony Pereira
I do not. I tack on the centerline of the joints, then braze in quarters
starting on the obtuse angle side. I've tried tinning and it just seems
like extra heat and extra work.
-Tony
> twitter: @pereiracycles
>
> On 2/5/2013 12:08 AM, B.B. wrote:
> > Builders,
> >
> > I've been doing a little practice with fillet brazing on some
> 4130. Been
> > getting good results on the tinning, but not so good on the
> fillet side
> > of the process and I need a little guidance on how to lay down a
> fillet.
> >
> > Can someone outline an approach to laying down a fillet after a
> joint
> > has been tinned?
> >
> > Cheers,
> >
> > Ben.
> >
> > --
> > --
> > You received this message because you are subscribed to the Google
> > Groups "Framebuilders" group.
> >
> > Searchable archives for this group can be found at
> > http://groups.google.com/group/framebuilders
> <http://groups.google.com/group/framebuilders> (recent content) and
> > http://search.bikelist.org (older content).
> >
> > To post to this group, send email to frameb...@googlegroups.com
> > http://groups.google.com/group/framebuilders?hl=en
> <http://groups.google.com/group/framebuilders?hl=en>
> >
> > ---
> > You received this message because you are subscribed to the Google
> > Groups "Framebuilders" group.
> > To unsubscribe from this group and stop receiving emails from it,
> send
Tony Pereira
http://bikesmithdesign.com/welding/tips.html
Beginners might find it a little on the big side, but once you get your
heat control dialed you want to braze as quickly as you can. A bigger
flame helps.
-T

Olivier Alonzo
If so I'd recommend using a bigger tip. Propane has different flame characteristics than acetylene: it has 1/2 less heat in the inner flame, and 2x the heat in the outer flame. I've had better success with a Victor #4 and 1/8" rod but it's a work in progress.
Olivier
B.B.
Yeah, I'm using a Propane kit and yup, I've been using larger tips as per the discussion in another thread on this forum. Doug Fattic put me onto a neat little table of tip sizes which cross references most tip sizes for Oxy/Fuel setups.
Ben.
B.B.
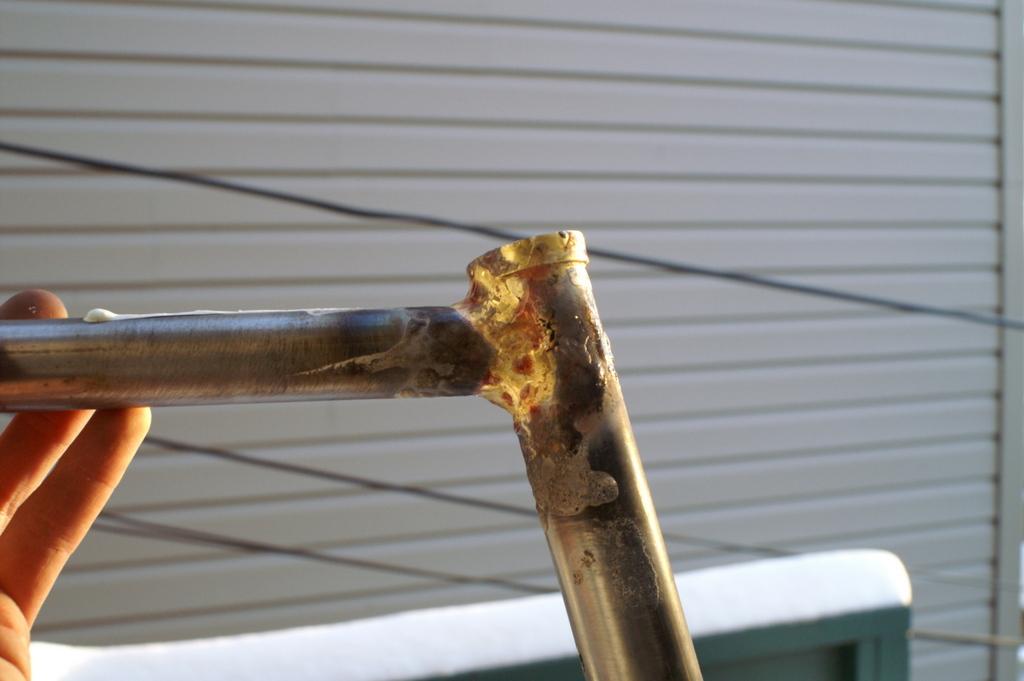
I'm fresh back from the shed after loosing a few kilograms while trying to weld in this massive heatwave we're having in Melbourne. Managed to snap a few photos before I melted. I've still got a long way to go, but I need to get something straight first, if I can. I want to address how the joint is failing in the attached file: No5–3.jpg.
I'm finding that my joints are not holding. When I lever them apart by placing a 4.5' tube into the end of the tube while the base plate of the part is secured into a vise I find they are popping apart in this fashion and not failing outside the fillet as it should. Is this a result of getting the base metal too hot? I think I'm heating them to the right temperature.
As Tony Pereira suggested I've been observing the flux, watching for the right moment:
"You can best tell how hot things are by watching your flux. I like to spend some time (a few minutes) pre-heating the entire joint until the flux starts to get bubbly. Flux goes through a few changes as you heat the metal. Carefully watch what it is doing and it will tell you a lot. First the water evaporates, then it gets crusty. As it starts to melt it will get syrupy and have small bubbles. Once the bubbles go away it should be active and the metal hot enough to melt the filler."
Does anyone have a suggestion on where I might be going wrong?
Cheers,
Ben.

M-gineering
On 2/17/2013 7:51 AM, B.B. wrote:
>
> I'm finding that my joints are not holding. When I lever them apart by
> placing a 4.5' tube into the end of the tube while the base plate of the
> part is secured into a vise I find they are popping apart in this
> fashion and not failing outside the fillet as it should. Is this a
> result of getting the base metal too hot? I think I'm heating them to
> the right temperature.
>
point where the tube/plate deforms most (peelstress highest) and then
travel around the joint.
This sort of ' testing' looks great on Youtube but is only of value if
the use of the bike is to crash it in the biggest tree you can find on
it's first outing.
What it tells you now is that you had the entire gap filled with braze
(good) and a whopping great flux inclusion in the fillet (bad)
-
Marten Gerritsen
Kiel Windeweer
Netherlands
Jerry
---
<No5–1.JPG>
<No5–2.JPG>
<No5–3.JPG>
B.B.
Ah... fluxing hell! How did it get in there, or better still how do I stop that from getting in there?! Would this be due to tinning the joint, letting it cool, then putting more flux on over the old flux on the joint, then proceeding to weld over the tinning and old flux? Or is it that I may be taking to long to lay filler and baking the flux, or is this due to lack of preheating?
Ben.
B.B.
I reckon I'm alright on the pre-prep.
The tubes and plate are buffed on a nylon wheel to get rid of any rust or coating on the tubes and plates. Then its some 80 grit for both, to give the material a rough finish for the flux to wet-out properly and some texture for the filler to grab onto. Then its some Methylated Spirits (Denatured Alcohol) to get rid of any dirt and oil.
Ben.
Ben Bates
Ben.
Steven Shand
Sif No 1 will be fine for 4130 but for what it's worth, if you get the
chance, try out some Sif 101 which has added manganese and flows a
little better allowing for slightly smoother surfaces, cutting down on
finish time.
I don't think it'll affect your brazing problem though. What you have
is a pretty good example of a joint that looks good externally but
internally tells a different story.
Why are you bothering with a tinning pass? What are you hoping it
gives you? It looks like during the tinning pass you're getting good
penetration and nice internal fillet. I'm sure if you just cut to the
chase and do a single pass you also get a good internal coverage and
you'll have eliminated an unnecessary heat cycle.
It's difficult to tell from the pics but my money is on your joint not
being hot enough. If it was too hot, you'd see separation of the
copper. What prep work are you doing between the 2 passes if any?
Also, how long is a joint like that taking you to do?
Cheers
Steven
http://www.shandcycles.com
UK Bicycle Manufacturer
01506 668 966
07789 430 720
M-gineering
On 2/17/2013 10:18 AM, B.B. wrote:
> Thanks Marten,
>
> proceeding to weld over the tinning and old flux? Or is it that I may be
> taking to long to lay filler and baking the flux, or is this due to lack
> of preheating?
>
>
flux
Try
more oxigen
less flux
don't layer molten brass on the solid & cold start of the joint but fuse
them with both sides liquid
--
B.B.
I'll have a shot with that Sif 101, sounds it'd go on like butter on hot toast.
So the tinning pass. Well being the beginner I found a post that goes through building a lug-less frame that uses a tinning pass to set everything in place in the main triangle while in the jig. Then it was out of the jig and into the park stand to lay the fillets. So I thought it would be good practice to start with a tinning pass, then a fillet pass to get used to the process. I'll give the single pass s shot next time I'm in front of the fire.
I thought I might have been not hot enough. Tony mentioned: "You can best tell how hot things are by watching your flux. I like to spend some time (a few minutes) pre-heating the entire joint until the flux starts to get bubbly". Today I found that if I let the joint get right up to, what seem to me, a bright red I get a bubbling effect. I thought this may have been the flux boiling and failing. Also later in the same post by Tony he mentioned: "Flux goes through a few changes as you heat the metal. Carefully watch what it is doing and it will tell you a lot. First the water evaporates, then it gets crusty. As it starts to melt it will get syrupy and have small bubbles. Once the bubbles go away it should be active and the metal hot enough to melt the filler". All good, but I took this as the temperature point to work to. Maybe Tony was talking about the bubbling effect that I mentioned previously? At any rate I will try a higher temperature.
As for prep work between the two passes – almost zilch. All I was doing was let it cool to room temp and adding a splash of fresh flux. And as far as time goes... I really can't tell you. I've been focusing a things like temp, flux changes, pool control, pre-prep, and how much my forearm in starting to hurt from holding the torch a little too tight and how hot it is in the tin shed that I'm in while its 35 degrees outside, and close to 40 inside. Actually, good point Steven, I may be rushing it a bit, so I can get a drink.
Cheers,
Ben.
B.B.
I've got to work on my pool control some, occasionally I'll let it get away from me and it cools too much and I find it really difficult to get it to remelt, its probably not ideal to remelt it again anyway. And I'll try getting the flux right too. I've been using an old flux that I have for a few months which dried out. I had to get some filtered water into it to rehydrate it. I'd say that this contributed to the problems that I'm having. I've got a fresh batch that should help things.
Ben.

omar-...@cox.net
I'm fresh back from the shed after loosing a few kilograms while trying to weld in this massive heatwave we're having in Melbourne. Managed to snap a few photos before I melted. I've still got a long way to go, but I need to get something straight first, if I can. I want to address how the joint is failing in the attached file: No5–3.jpg.
I'm finding that my joints are not holding. When I lever them apart by placing a 4.5' tube into the end of the tube while the base plate of the part is secured into a vise I find they are popping apart in this fashion and not failing outside the fillet as it should. Is this a result of getting the base metal too hot? I think I'm heating them to the right temperature.
As Tony Pereira suggested I've been observing the flux, watching for the right moment:
"You can best tell how hot things are by watching your flux. I like to spend some time (a few minutes) pre-heating the entire joint until the flux starts to get bubbly. Flux goes through a few changes as you heat the metal. Carefully watch what it is doing and it will tell you a lot. First the water evaporates, then it gets crusty. As it starts to melt it will get syrupy and have small bubbles. Once the bubbles go away it should be active and the metal hot enough to melt the filler."
No virus found in this
message.
Checked by AVG - www.avg.com
Version: 2012.0.2238 / Virus
Database: 2639/5608 - Release Date: 02/16/13
B.B.
I like your style. And yes I was over thinking things, partly due to the loads of info that one gets when trying to get the facts.
Thanks,
Ben.
Tony Pereira
at is a hole in the base plate.
Ben, am i right?
B.B.
Ben.

Mike Scammon
Ben,
I taught myself how to fillet braze. It's difficult and takes a lot of practice. I'm now a guest instructor at UBI, so I've had to think a lot about how to explain fillet brazing. It's still far easier to demonstrate than explain. Here are a few key concepts to think about.
First and foremost: heat control. Your goal is to evenly bring the tubes up to the temperature at which the filler will melt, then add a uniform amount of filler all the way around the joint and then get it to stay there in that nice smooth shape we call a fillet. If you control the heat precisely, then this will all happen. You can best tell how hot things are by watching your flux. I like to spend some time (a few minutes) pre-heating the entire joint until the flux starts to get bubbly. Flux goes through a few changes as you heat the metal. Carefully watch what it is doing and it will tell you a lot. First the water evaporates, then it gets crusty. As it starts to melt it will get syrupy and have small bubbles. Once the bubbles go away it should be active and the metal hot enough to melt the filler. So, preheat the joint uniformly, then get ready to braze. We'll leave sequence out of the equation for now. Just start in one spot and work your way around until you get the hang of it.
When you are ready to start brazing position the work so that you can braze about 1/6 of the joint in a "flat" position. This keeps the filler from flowing away from you. As you get better you will be able to braze with it less flat, but for now make it easier on yourself.
You'll want to point your flame in the direction you'll be going around the joint, so that you can add filler in the hottest spot and preheat where you will braze next. So, get in there with your torch. Hold the tip of the primary cone (neutral flame, cone about 6mm long) about 5-10mm from the surface with the flame pointing about 45 degrees "down-joint." If you are right handed you will be brazing from right to left with the torch in your right hand and the filler in your left.
Carefully watch the flux and the metal. With your glasses on you won't really see much color change in the steel, but the flux tells you what you need to know. Move the torch in a circular motion, making circles with the flame a bit larger than the width you want the fillet to help the fillet flow out on to the tubes. When it is hot enough to melt the filler, feed some in until it builds up a bit, then flick your flame away for a moment to let the fillet freeze. Get right back in there with the torch, remelt the leading edge of that fillet, build up, freeze, repeat. This is where there's no substitute for practice. Once the area you are brazing is no longer level, stop and reposition the work and get right back in there with the heat. You've got to train yourself to pay close attention to lots of things at once. You'll start to get good once you've built about 100 frames.
At UBI we miter a bunch of 80mm long tube pieces at 60 degrees and have the students braze them to the end of a longer tube, similar to a DT/HT joint. Cut it in half and then cut if off the end of the long tube to look inside. Check for good internal fillet and to make sure you don't have any voids. Look for signs of overheating where the flux has blackened or the copper has boiled out of the filler. Do another, and another, and another...
Mark's warning is sound. Don't let anyone ride bikes you make unless you are sure they will not spontaneously fly apart. You'll have to figure out how to judge that. Post some pics.
I'm getting back to work. Have fun.
Cheers,
Tony
Pereira Cycles
Portland, Oregon, USA
www.pereiracycles.com
503.333.5043
twitter: @pereiracycles
On 2/5/2013 12:08 AM, B.B. wrote:
Builders,
I've been doing a little practice with fillet brazing on some 4130. Been
getting good results on the tinning, but not so good on the fillet side
of the process and I need a little guidance on how to lay down a fillet.
Can someone outline an approach to laying down a fillet after a joint
has been tinned?
Cheers,
Ben.
--
--
You received this message because you are subscribed to the Google
Groups "Framebuilders" group.
Searchable archives for this group can be found at
http://groups.google.com/group/framebuilders (recent content) and
http://search.bikelist.org (older content).
To post to this group, send email to frameb...@googlegroups.com
To unsubscribe from this group, send email to
For more options, visit this group at
http://groups.google.com/group/framebuilders?hl=en
---
You received this message because you are subscribed to the Google
Groups "Framebuilders" group.
To unsubscribe from this group and stop receiving emails from it, send
an email to framebuilders+unsubscribe@googlegroups.com.
For more options, visit https://groups.google.com/groups/opt_out.
--
--
You received this message because you are subscribed to the Google
Groups "Framebuilders" group.
Searchable archives for this group can be found at http://groups.google.com/group/framebuilders (recent content) and http://search.bikelist.org (older content).
To post to this group, send email to frameb...@googlegroups.com
To unsubscribe from this group, send email to
For more options, visit this group at
http://groups.google.com/group/framebuilders?hl=en
--- You received this message because you are subscribed to the Google Groups "Framebuilders" group.
To unsubscribe from this group and stop receiving emails from it, send an email to framebuilders+unsubscribe@googlegroups.com.
B.B.
So laid down the fillet. Popped it into the vice, put the tube in and attempted a bend. It wouldn't budge! I pulled it to about 45 degrees and it just kept bending. A little further and snap, it broke at the top edge of the fillet, not until after I bend the crap out of my tube. Decided to check the opposite side and sure enough it just popped the weld. I was pretty happy right up till that point. Then I neglected to take a photo. It was pretty much the same result as the previous example though, except just under a quarter of the weld held.
B.B.
Tony when I asked what are we looking at, what I meant is if its not a flux inclusion then do you an idea what I'm missing or possibly doing wrong? When the guys mentioned flux inclusion I thought that meant the grey colouring that is on the brass where it has separated from the base metal.
Ben
dave bohm
Just to be clear you are using propane?
Dave B
From:
frameb...@googlegroups.com [mailto:frameb...@googlegroups.com] On Behalf Of B.B.
Sent: Tuesday, February 19, 2013
12:06 AM
To: frameb...@googlegroups.com
Subject: Re: [Frame] Laying down a
fillet.
And this happened today...
--
--
You received this message because you are subscribed to the Google
Groups "Framebuilders" group.
Searchable archives for this group can be found at http://groups.google.com/group/framebuilders
(recent content) and http://search.bikelist.org
(older content).
To post to this group, send email to frameb...@googlegroups.com
To unsubscribe from this group, send email to
For more options, visit this group at
http://groups.google.com/group/framebuilders?hl=en
---
You received this message because you are subscribed to the Google Groups
"Framebuilders" group.
To unsubscribe from this group and stop receiving emails from it, send an email to framebuilder...@googlegroups.com.
For more options, visit https://groups.google.com/groups/opt_out.
No virus found in this message.
Checked by AVG - www.avg.com
Version: 10.0.1430 / Virus Database: 2639/5614 - Release Date: 02/18/13
B.B.
Here's the just:
I'm using Oxy/LPG (Propane) with a size No. 8 tip (the smallest I could find). When its fired up My neutral flame is around 7 - 8 mm in length.
I'm brazing 4130N tubing using Sif Bronze No.1 and Cycle designs Flux to suit.
dave bohm
in and of itself is going to cause you issue. Propane is a great fuel.
Great for lugs, silver or bronze and great for grillin up a steak on the BBQ
but not so great for fillet work.
The propane flame is just different than the Acetylene flame. The
acetylene flame has a hotter cone than the propane flame and with the more
intense localized heating you can so a superior job with it. The flame is
smaller and quieter and the gas velocities are less as well.
Dave B
-----Original Message-----
From: frameb...@googlegroups.com [mailto:frameb...@googlegroups.com]
On Behalf Of B.B.
--
You received this message because you are subscribed to the Google
Groups "Framebuilders" group.
Searchable archives for this group can be found at
http://groups.google.com/group/framebuilders (recent content) and
http://search.bikelist.org (older content).
To post to this group, send email to frameb...@googlegroups.com
To unsubscribe from this group, send email to
framebuilder...@googlegroups.com
For more options, visit this group at
http://groups.google.com/group/framebuilders?hl=en
---
You received this message because you are subscribed to the Google Groups
"Framebuilders" group.
To unsubscribe from this group and stop receiving emails from it, send an
email to framebuilder...@googlegroups.com.
For more options, visit https://groups.google.com/groups/opt_out.
Version: 10.0.1430 / Virus Database: 2639/5616 - Release Date: 02/19/13
Olivier Alonzo
Olivier
dave bohm
Just a serious question. Can anyone point me to a picture of a well done fillet braze that was accomplished with propane?
Dave Bohm
From: frameb...@googlegroups.com [mailto:frameb...@googlegroups.com] On Behalf Of Olivier Alonzo
Sent: Tuesday, February 19, 2013
5:24 PM
To: frameb...@googlegroups.com
--
--
You received this message because you are subscribed to the Google
Groups "Framebuilders" group.
Searchable archives for this group can be found at http://groups.google.com/group/framebuilders
(recent content) and http://search.bikelist.org
(older content).
To post to this group, send email to frameb...@googlegroups.com
To unsubscribe from this group, send email to
framebuilder...@googlegroups.com
For more options, visit this group at
http://groups.google.com/group/framebuilders?hl=en
---
You received this message because you are subscribed to the Google Groups
"Framebuilders" group.
To unsubscribe from this group and stop receiving emails from it, send an email
to framebuilder...@googlegroups.com.
For more options, visit https://groups.google.com/groups/opt_out.
Alex Wetmore
Sent: Tuesday, February 19, 2013 4:27 PM
To: 'Olivier Alonzo'; frameb...@googlegroups.com
Subject: RE: [Frame] Laying down a fillet.
dave bohm
Hi Alex,
I was thinking of putting together a natural gas or propane setup, mostly for lug work and show that it can be done but legit question. Why does anyone want to use propane other than the hassle of picking up cylinders and if you use Chemtane you still have to get a cylinder? Acetylene is not as stable as propane but then again it is lighter than air making it safer if it leaks than propane which can build up near floor level. I am missing something.
Dave B

Doug Fattic
I believe as a brazing instructor that a certain foundation of knowledge and experience should to be laid before it is possible to get the best results trying to fillet braze. In other words learn basic fundamentals before diving into the deep end of the swimming pool. That foundation includes choosing and properly adjusting the right equipment, selecting the appropriate materials and learning how to move both hands independently of each other with simple brazing exercises. After that one can memorize the specific hand motions (preferably learned from a master) to fillet braze a specific joint. A person’s attention can then be focused on the heat indicators while their hands automatically make adjustments.
In the framebuilding classes that Herbie and I teach almost every student does a fillet brazed practice joint good enough so that it requires little cleanup. However this result comes only after lots of information giving, demonstrations and then increasing-in-difficulty brazing practices. Cutting corners to this process can actually make it take longer to learn. Trial and error can be a slow teacher.
I believe it is almost impossible to diagnosis brazing problems by looking at a picture of a finished result because it doesn't show the hand motions. Of course one can tell if it got too hot or whatever but that just begs the question why was it too hot? Most commonly a poor result comes from some mismanagement of the left and right hand cooperating together. It is a complex relationship and one can't see the flaws in how the hands are moving when looking at a picture of how 2 tubes are held together. It is like looking at a picture of a skier crashed into a tree trying to understand what went wrong.
I thought Tony did a nice job of giving an overall description to fillet brazing. Here are a couple more specific tips. Let's go back to the beginning to check that enough brazing practice of any kind (silver or brass) has happened so that both hands can do something different at the same time. Most learner mistakes begin there. What happens is that while they are thinking about how to position and move the rod as it melts they lose track of what the flame is doing. Or if they have the right flame pattern going they aren't keeping the rod in the right place as it melts. Some motions need to be put into muscle memory so the mind is free to concentrate on the heat indicators.
Try a little finger exercise to see how well your hands work independently of each other. Point your left and right hand index fingers at each other and begin moving one in a circle around the other while it is still. Once you have that action going, move the other finger in a circle going the opposite direction. Most can't do this at first or they think they are but in reality they are still moving their fingers like 2 pursuit riders on opposite sides of a track. You are doing it right when your fingers pass each other twice in one rotation. If you are good you should be able to make round circles and stop and go in the opposite direction any time. This illustrates the challenge of operating your hands independently of each other. Practice unlocks their chained together reaction.
Another common mistake beginners make is not keeping their hand motions compact enough. There is a tendency to relax either hand a bit too far away when there is any kind of pause. It then takes too much time or attention to bring them back into the action so things go south. The brass rod and flame should barely move off of the fillet when adding material or removing heat. And the third thing to keep in mind controlling brass flow is heating it just enough to keep it barely above melting temperature so that by adding and removing heat (what is most commonly called “heat control”), it moves and stops and is shaped by the flame. Keeping the brass in a liquid state slightly too long and it runs away. This is why a bigger torch tip is harder to control. And finally Tony said it should be in the “flat position” and I’ll describe it as having both tube sides equal angled from vertical so the brass basically flows to the valley and up each side the same amount. Same concept.
I agree with Dave that oxyacetylene is easier to fillet braze than propane. I still can do fine with propane anyway. It requires more split second movement.

OBCA
Olivier Alonzo
Propane pros: a 20 lbs BBQ tank will last for a looong time (it's equiv. to 170 ft3 of gas), and the refill is down the block. And it has no withdrawal rate limit so I can run a rosebud to braze heavy crowns. I don't think it's any safer than acetylene. I combine it with an oxygen concentrator, so propane is a logical choice.
olivier
dave bohm
Oh and of course the Cre’me Brule’es
DB
dave bohm
ps. for me for bike building with lugs oxy/propane (Chemtane) is nice as it is a broad flame and also there is no soot to boot.
Yes, also why I would want it. The broad flame would be very nice. I have never used propane but Andy, you are the propane expert. Do you do fillets with propane?
Dave B
OBCA
Harold Bielstein
hkbie...@rap.midco.net
omar-...@cox.net
Version: 2012.0.2238 / Virus Database: 2639/5617 - Release Date: 02/19/13
omar-...@cox.net
I use 1/8" Gasflux C-04 brass rods for fillets.
Oasis Custom Cycles LLC.
From: "Harold Bielstein" <hkbie...@rap.midco.net>
Sent: Tuesday, February 19, 2013 8:08 PM
To: "dave bohm" <dave...@cox.net>
Cc: "'OBCA'" <strawber...@gmail.com>; <frameb...@googlegroups.com>
Subject: Re: [Frame] Propane and Cre'me Brule'e
B.B.
Getting a bit off topic here but...
I use Propane for it ease of refill and what seems me to be much stabler and safe to store. For the past two years there have been a spate of deaths related to Acetylene explosions. The explosions were due to the cylinders leaking overnight and then the next morning being ignited when the trade person opened their vehicle. So I'm a little timid when it comes to the stuff. After looking into LPG I found that it was safer to store and less intimidating to people who visit me in the shed.
Ben.
B.B.
Thanks a bunch for the advice. I was just trying my finger coordination. Its not bad. With a bit of practice and your sagely advice in mind it'll be spot on.
I think I'm getting the hang of it. I'm no where near being good, but I'm finding that I can actually get the parts to hold to a certain degree, which is my number one concern at the moment. I've attached some crappy photos that show the results.
So spending an hour with a guy in Melbourne who is a competent brazer I found that it was as many people suggested on previous posts: I wasn't getting hot enough. All of my heat was focused in small spots due to my lack of torch control (and my sheer frustration and panic). After upping a few tip sizes I've found that I'm getting that nice cherry red colour in a much broader area and I'm finding it much easier to lay down some filler and get it to go to the places it should. I still get a little out of sync here and there though (as Doug explained so brilliantly my co-ordination is letting me down some). Its mainly in the early stages I'm not getting the base metals quite hot enough, hence the failures in the photos. But I'm getting there, and I'm finally seeing where I'm going wrong during my process.
Gonna get back into the shop on the weekend.
Till then,
Ben.
dave bohm
Hi Ben,
To preface I do intend to either set up a propane/NG system. Mostly for cost (it is cheaper than acetylene) and the differing flame quality which looks like it may be superior for lugs but many people choose propane for the safety concerns and this is where I don’t believe propane to be safer. In fact it may be more dangerous.
You are from Australia yeah? There have been two? Major explosions I believe in the last couple of years. One I saw a gent left a cylinder leaking in his service van and he went into it in the morning and lit a cigarette? The explosion was pretty incredible, leveling the homes on either side. Then again he was the poster boy for what not to do….storing a cylinder in a closed container and then lighting up a smoke in the morn….
The same thing would have happened with propane. It would have happened with any fuel gas for that matter. All fuels should be highly respected. Natural gas leaks in homes can lead to asphyxiation and explosions. The main issue and I just want to clarify here is that propane is heavier than air and will settle to the floor. If the concentration builds and an ignition source is present then you will get quite a boom. Acetylene is lighter than air and will typically dissipate through the roof. This makes acetylene safer in a condition where it is leaking slowly out of a cylinder. Now, we all know that acetylene can ignite under certain pressures (greater than atmospheric) but the simple answer to that is be religious when it comes to storing and handling them. Then again the same should be true for propane.
Dave Bohm
Version: 10.0.1430 / Virus Database: 2639/5617 - Release Date: 02/19/13
Alex Wetmore
To: frameb...@googlegroups.com
Subject: RE: [Frame] Laying down a fillet now propane
Olivier Alonzo
In a way the LP gasses are a bit safer because they last a long time (a BBQ tank is equivalent to 4 B acet. tanks in gas), which mean less handling and transporting for refills. And yes the soaking flame means quick and even heating for lugs. For fillet-brazing you step up in tip size to mimic the amount of heat one would have in the inner cone of an acetylene flame from a smaller tip. Add a bit more oxy. to shorten the inner cone and it works okay. I don't know if the pics I send demonstrate that but I'm sure that with practice you could get decent results, as the more experienced propane users surely have achieved.
Olivier

wade barocsi
Hi Hal--
I use 1/8" Gasflux C-04 brass rods for fillets.
Omar Khiel
Oasis Custom Cycles LLC.
--------------------------------------------------
From: "Harold Bielstein" <hkbie...@rap.midco.net>
Sent: Tuesday, February 19, 2013 8:08 PM
To: "dave bohm" <dave...@cox.net>
Cc: "'OBCA'" <strawber...@gmail.com>; <framebuilders@googlegroups.com>
Subject: Re: [Frame] Propane and Cre'me Brule'e
Whats the general consensus on what dia rod works best for laying down filets?
On Feb 19, 2013, at 7:06 PM, dave bohm <dave...@cox.net> wrote:
ps. for me for bike building with lugs oxy/propane (Chemtane) is nice as it is a broad flame and also there is no soot to boot.
Yes, also why I would want it. The broad flame would be very nice. I have never used propane but Andy, you are the propane expert. Do you do fillets with propane?
Dave B
--
--
You received this message because you are subscribed to the Google
Groups "Framebuilders" group.
Searchable archives for this group can be found at http://groups.google.com/group/framebuilders (recent content) and http://search.bikelist.org (older content).
To post to this group, send email to frameb...@googlegroups.com
To unsubscribe from this group, send email to
For more options, visit this group at
http://groups.google.com/group/framebuilders?hl=en
--- You received this message because you are subscribed to the Google Groups "Framebuilders" group.
To unsubscribe from this group and stop receiving emails from it, send an email to framebuilders+unsubscribe@googlegroups.com.
For more options, visit https://groups.google.com/groups/opt_out.
--
--
You received this message because you are subscribed to the Google
Groups "Framebuilders" group.
Searchable archives for this group can be found at http://groups.google.com/group/framebuilders (recent content) and http://search.bikelist.org (older content).
To post to this group, send email to frameb...@googlegroups.com
To unsubscribe from this group, send email to
For more options, visit this group at
http://groups.google.com/group/framebuilders?hl=en
--- You received this message because you are subscribed to the Google Groups "Framebuilders" group.
To unsubscribe from this group and stop receiving emails from it, send an email to framebuilders+unsubscribe@googlegroups.com.
For more options, visit https://groups.google.com/groups/opt_out.
Hal Bielstein
hkbie...@rap.midco.net
--
--
You received this message because you are subscribed to the Google
Groups "Framebuilders" group.
Searchable archives for this group can be found at http://groups.google.com/group/framebuilders (recent content) and http://search.bikelist.org (older content).
To post to this group, send email to frameb...@googlegroups.com
To unsubscribe from this group, send email to
For more options, visit this group at
http://groups.google.com/group/framebuilders?hl=en
--- You received this message because you are subscribed to the Google Groups "Framebuilders" group.
To unsubscribe from this group and stop receiving emails from it, send an email to framebuilders+unsubscribe@googlegroups.com.
----- Version: 2012.0.2238 / Virus Database: 2639/5617 - Release Date: 02/19/13
--
--
You received this message because you are subscribed to the Google
Groups "Framebuilders" group.
Searchable archives for this group can be found at http://groups.google.com/group/framebuilders (recent content) and http://search.bikelist.org (older content).
To post to this group, send email to frameb...@googlegroups.com
To unsubscribe from this group, send email to
For more options, visit this group at
http://groups.google.com/group/framebuilders?hl=en
--- You received this message because you are subscribed to the Google Groups "Framebuilders" group.
To unsubscribe from this group and stop receiving emails from it, send an email to framebuilders+unsubscribe@googlegroups.com.
Mark Bulgier
Wade Barocsi wrote:
It is my experience that 1/16 is the most popular, followed by 3/32, which sells about half as well.
We ship far less 1/8 than the other diameters.
Larger diameters work fine, but generally take more experience.
My practice was 1/16” for lugs, 3/32” for small fillets, and 1/8” for large fillets. Since I was forever trying to get away from large fillets, that meant less and less 1/8”. Some customers wanted the Schwinn Varsity look (especially for tandems), but later in my career when I had more confidence and “gravitas” I was always able to talk people out of it. A small fillet not only weighs less but makes the frame stronger, due to reduced heat input, and the slow cooling of large brass “heat sinks” – as long as you don’t go below a certain minimum size. I think a lot of framebuilders might be surprised how small that minimum is though.
To arrive at your minimum safe fillet size, do a lot of test joints and break them. Make Tom Ritchey-size fillets if that’s what your artistic muse demands, just realize the frame is weaker and heavier for it.
As Wade said, you can use 1/8” for everything, and it does mean picking up a new rod less often, but I think I got slightly neater fillets with 3/32” when the fillets are small. Most of my small-fillet frames went out with no filing (that includes no rotary filing with burrs, or sanding with “cartridge rolls”). Laying them down very neat not only saves filing time, it makes an at least slightly stronger frame, since any filing/sanding will thin the steel adjacent to the fillet (if only slightly for an experienced and careful fillet finisher).
That and the reduced heat damage allows you to use thinner tubes safely. Well, my framebuilding was mostly all before air-hardening steel came out, so the HAZ argument may be less important now – or completely obsolete, what say you FBs?
Mark Bulgier
Seattle