Google Calendar API / App Inventor 2 Tutorial

Steve Marcus
GOOGLE CALENDAR API / APP INVENTOR 2 TUTORIAL
How to view and INSERT calendar events using App Inventor 2 (with no web service scripts).
What's new for AI2?
- The Parse procedure has gone. I found an easier way to extract data from the json response - the lookup in pairs block. This block is great as it does most of the work for you. You can see where it is being used in the screenshots.
- I have provided the .aia file here for you. In order for it to work, you must first get your own clientID by signing up to google apis (as per the instructions below), and enter it into the strClientID variable in the blocks editor.
- I have only used global variables in this example, in AI2 you now have the option of using local variables, which can make the app slightly more efficient. For an exercise, see if you can convert some of the globals to locals.
1. SETUP
First you need to register your app to use google api here https://console.developers.google.com/project
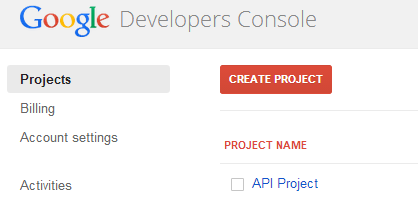
At the top select ‘CREATE PROJECT’
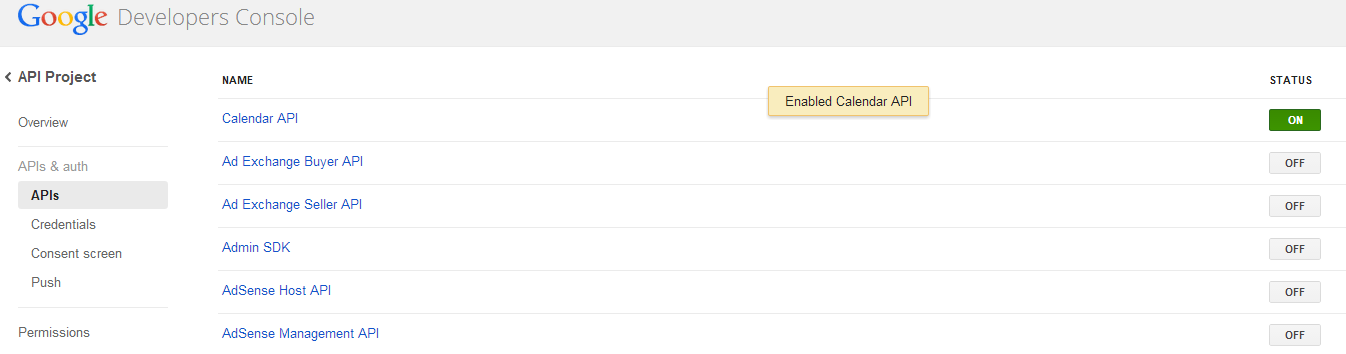
Then on the top left, select APIs & Auth, then select Calendar API and turn ON.
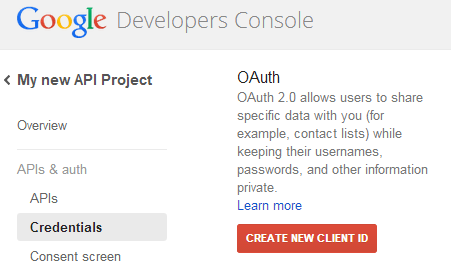
Then go to Credentials and click on ‘CREATE NEW CLIENT ID’.
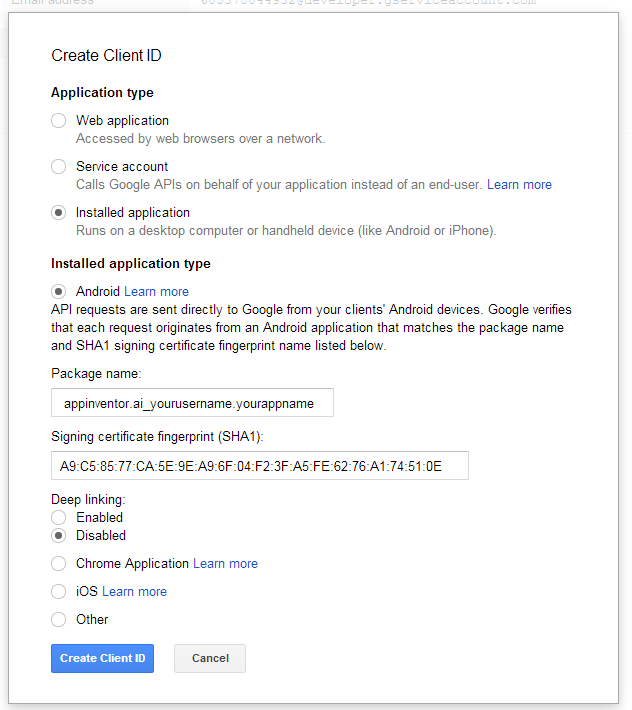
In the pop-up box, select ‘Installed Application’. For Installed Application Type, select ‘Android’.
It will then ask you for your package name* and SHA1 fingerprint**. Enter these into the boxes.
* Your package name is of the form appinventor.ai_<yourusername>.<yourappname>
(without the <>).
**How to get SHA1 fingerprint (on PC):
Open Command Prompt on your PC. Navigate to your Java bin directory and type:
keytool -list -keystore c:\path_to_your_key_here.keystore
It will prompt to enter your keystore password, then will display your SHA1 fingerprint. Copy and paste it into the above screen. Then click Create Client ID.

You will then get a summary of your Client ID etc. We need to put these into your app.
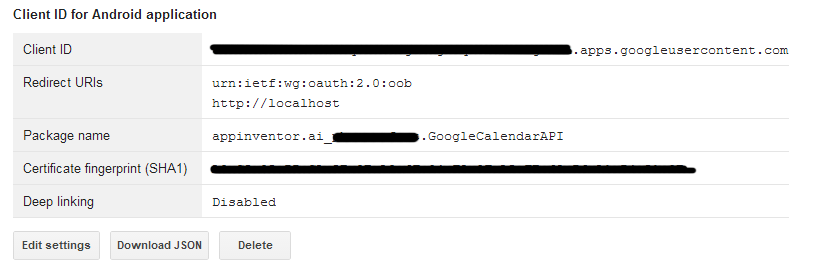
2. GETTING AUTHORISATION
a). Get the user to login using Oauth
These sections take place in AppInventor. Here we will use a Webviewer component and some variables.
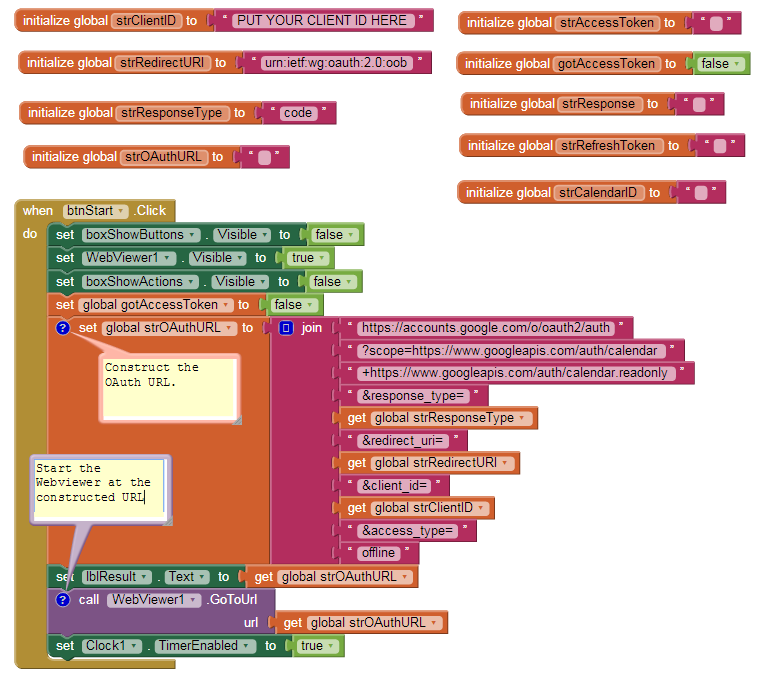
Enter your Client ID and Redirect URI (the urn:ietf:wg:oauth:2.0:oob one) into two variables (see screenshot below). The variable strResponseType should be initialized as the string “code”.
Construct the OAuth URL as outlined here https://developers.google.com/accounts/docs/OAuth2Login.
The scopes we need to use are:
read/write access to Calendars | |
read-only access to Calendars |
We also need to make sure to include &access_type=offline.
Then start the Webviewer at the constructed URL:
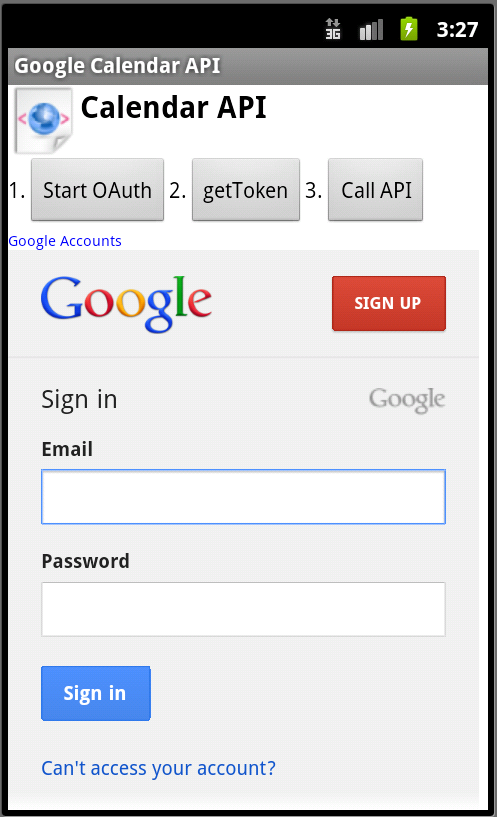
In the Webviewer, the user is then prompted to enter their google account info and then to ‘Allow access’.

We will use Taifun’s trick of using a clock to monitor the WebViewer PageTitle. This returns an AuthCode. So we want to put this in a variable.
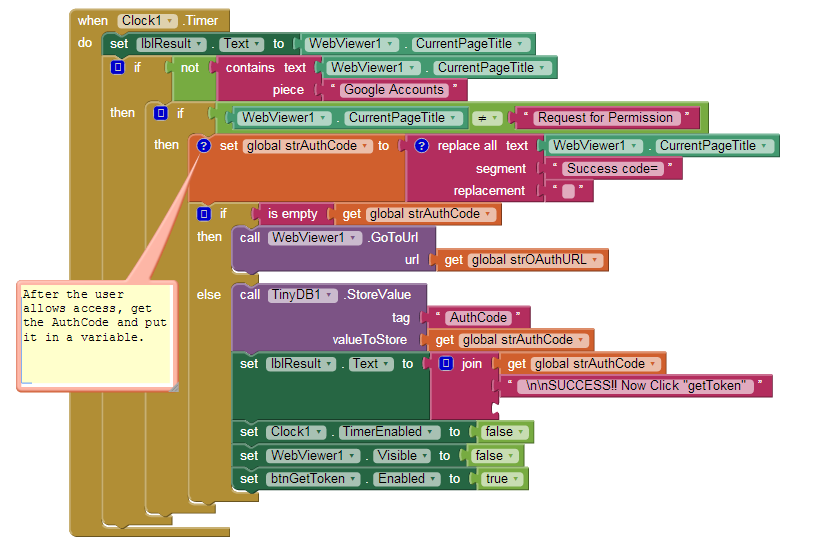
We can now exchange this AuthCode for an Access Token and a Refresh Token.
b). Get an Access Token and Refresh Token -
We then need to do a Web POST using the Web component, to get an access token and a refresh token. We point the Web url to https://accounts.google.com/o/oauth2/token.
We then construct the headers, URL and POST data like so (note the AuthCode we got in the previous step is sent in the POST data):

NOTE: As you can see above, the Request Header must contain
Content-Type: application/x-www-form-urlencoded.
The Post Data must contain the following key value pairs, which are put in lists:
Code: {your AuthCode}
client_id: {your ClientID}
redirect_uri: {your RedirectURI}
grant_type: authorization_code
You can see in the above screenshot we are using the AuthCode from step 2a) in this call.
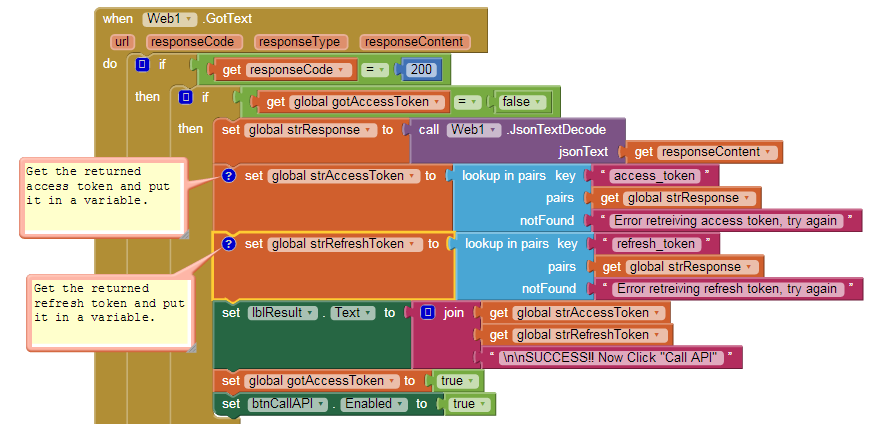
Now we use the Web1.GotText block to let us know if the response was successful, and if so, extract from the response content the access token and refresh token, using some lookup in pairs blocks.
We then put these values into two variables strAccessToken and strRefreshToken:
NOW WE HAVE ACCESS AND WE CAN DO LOTS OF CALENDAR THINGS! Here are three examples from the app:
3. GETTING A LIST OF CALENDARS
A user can have more than one calendar, so we can get a list of all of their calendars so they can choose which one they want to work on. We do this by using the Web component again and doing a Web1.Get to the following URL:
https://www.googleapis.com/calendar/v3/users/me/calendarList?access_token={your access token}
(Note we are using the access token we received in the previous step). Here’s the blocks to do that:

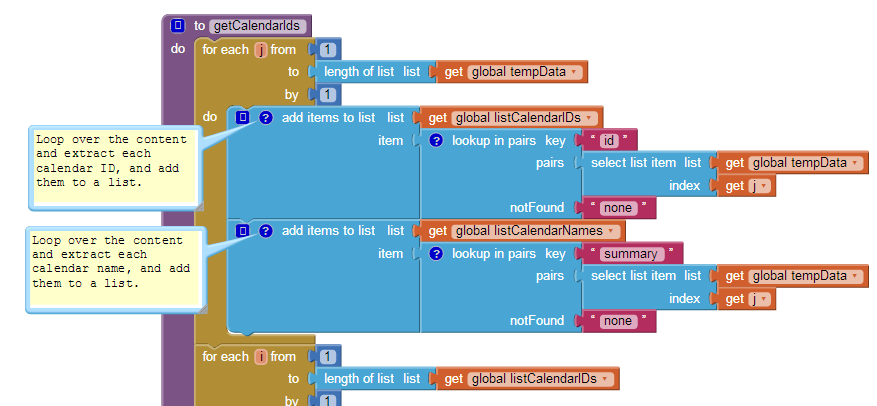
We then use the Web1.GotText block for the response. When the response is successful (if response code = 200), we can get all their calendar IDs and put them in a list:

The getCalendarIds procedure we have called above is shown here: Note we are using lookup in pairs again to extract the data.
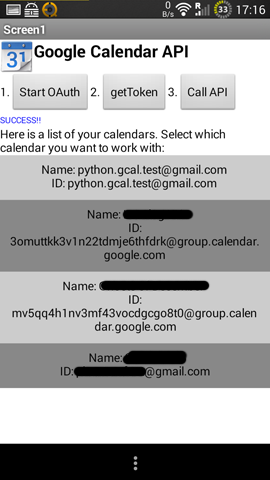
We can then stick these values into some buttons and offer the user an option to choose which calendar they want to work on:
The example .apk and .aia contains 2 further examples of working with the calendar API - displaying calendar entries, and inserting a calendar entry.
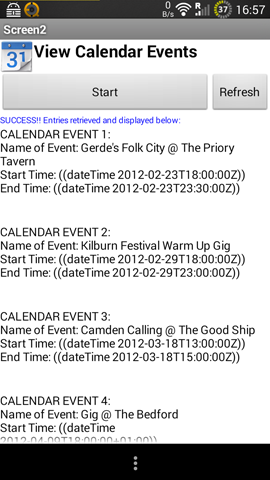
4. DISPLAYING CALENDAR ENTRIES
Now that the user has selected a calendar, we can retrieve a list of entries from their calendar and display it in the app.
We do this by using Web1.Get again. According to the API docu, the URL for getting calendar entries is:
https://www.googleapis.com/calendar/v3/calendars/calendarId/events
So we simply construct this URL (including the access token) in App Inventor like so (note we are using the selected CalendarID from the previous step). For the example we are also making MaxResults=5 and SingleEvents=true.

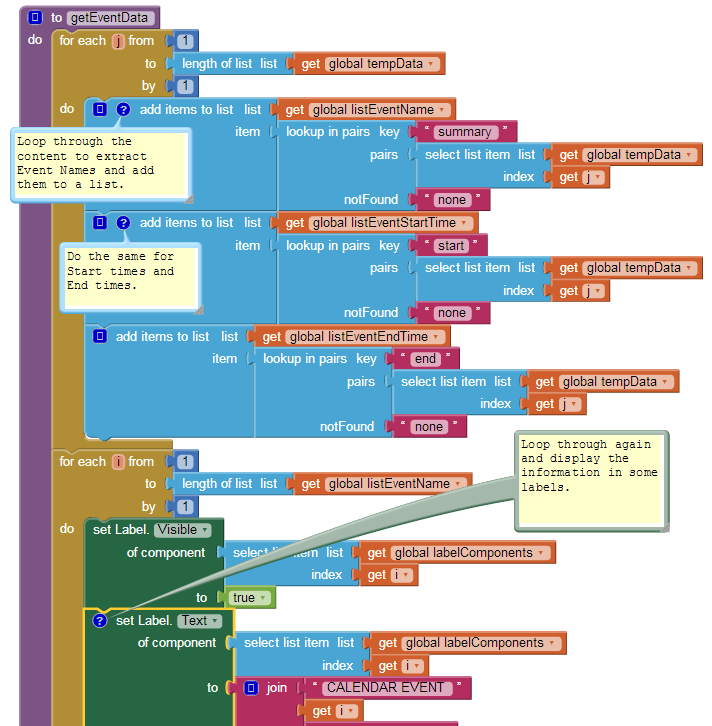
Then we use Web1.GotText again to see if we get a successful response. If successful, we can again start a procedure which uses lookup in pairs to extract the results and display the items on the screen:
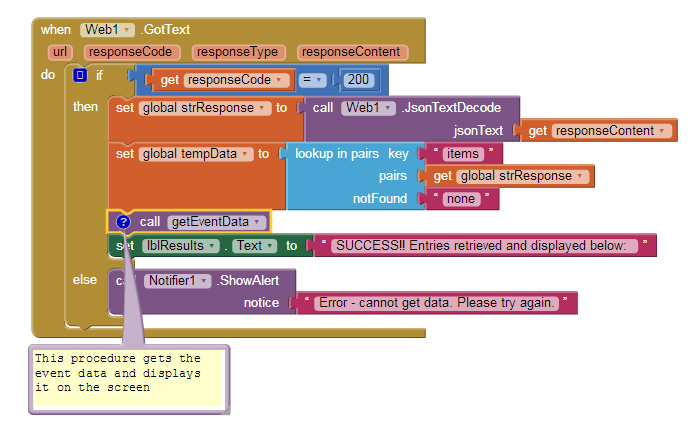
Here is the procedure getEventData that grabs the data and displays it on the screen:
And the result:
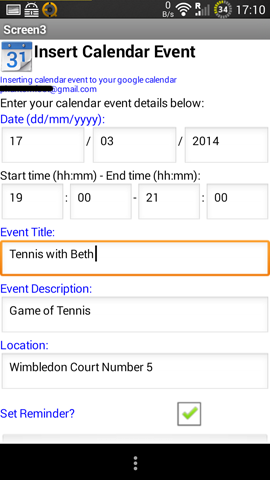
5. INSERTING A CALENDAR ENTRY
Now we come to inserting a calendar entry. According to the API docu, we need to do a Web HTTP POST to the following URL.
https://www.googleapis.com/calendar/v3/calendars/calendarId/events
We have done a POST before so we can do the same again easily enough.
The example app uses Textboxes so the user can enter the details of the event. We want the following things from the user:
Date
Start Time
End Time
Event Title
Event Description
Location (where is it?)
Do they want a reminder?
When the user submits this form, first we need to construct the start dateTime and end dateTime in RFC3339 format, which is what google calendar accepts. We can do this by using a text join block, getting the items from the text boxes and interspersing them with the correct text pieces (note we are also setting addReminder to true or false depending on the checkbox input):

Next we need to construct the POST Data in JSON format as outlined here. I made a variable called strPostText and constructed it there, again using a make text block, the previously constructed RFC3339 dateTimes, and the remaining textbox inputs:

Atfer that is done, we now make another POST call using the Web component.
In the header we need
Content-Type: application/json
Authorization: Bearer {your access token}
Then we use Web1.PostText to post the strPostText variable we constructed above:

Then we use Web1.GotText again to receive the response:
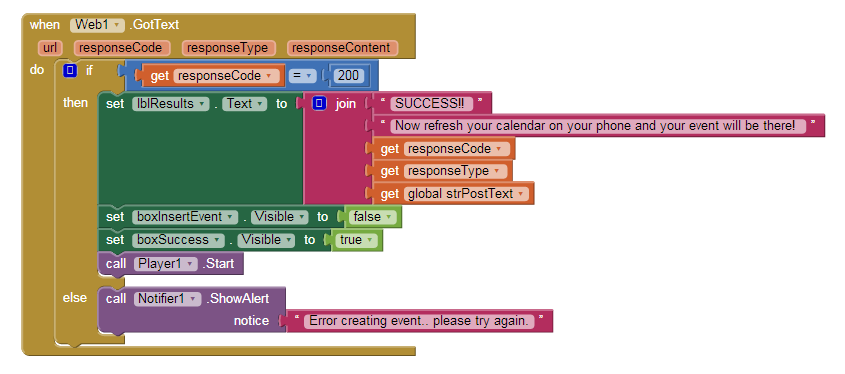
THAT’S IT! If we get a successful response, the event was created!
Now refresh/re-sync the calendar on your phone, or jump on the internet, go to your google calendar, and you will see the event has been created!
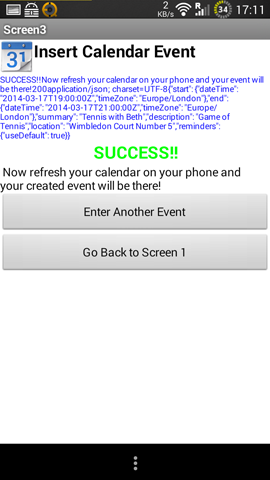
So there you have it. Happy google calendar API’ing!

Scott Ferguson
...Now we come to inserting a calendar entry. According to the API docu<span style="font

Zoran Kukulj
--
(you have received this message from the App Inventor Developers Library)
---
You received this message because you are subscribed to the Google Groups "App Inventor Developers Library" group.
To unsubscribe from this group and stop receiving emails from it, send an email to app-inventor-develope...@googlegroups.com.
For more options, visit https://groups.google.com/d/optout.

Akash Pi
Now we come to inserting a calendar entry. According to the API docu<span style="font
...
phantomfoot

Forest chung
Great stuff, thanks Marcus!
...<s
phantomfoot

TripleT
phantomfoot
Forest chung
Forest chung
phantomfoot
phantomfoot

Susan M.
-- Susan
...The example .apk and .aia contains 2 further examples of working with the calendar API - <span style="font-siz
phantomfoot
Susan M.
I posted to the App Inventor forum and got the answer. For others: I imported the .aia using Chrome (I was using Firefox), closed all of the comment bubbles, and switched back over to Firefox. No error message and all of the code was there! Thanks so much! -- Susan
Scott Ferguson

Shay Ben Dov
I'm getting error 400 when start using the GoogleCalendarAPI demo apk
...The example .apk and .aia contains 2 further examples of working with the calendar API - <span style="font-siz
Scott Ferguson

Gabriele Cozzolino
Scott Ferguson
![]()
Scott
Gabriele Cozzolino
Scott Ferguson
phantomfoot
Gabriele Cozzolino
I'm using the aia, but I'll try the apk too. The error occurs right after I press get token button
As stated before I cannot replicate the error, so I am not sure why you are getting it. Are you using the apk or aia? And where exactly is the error occurring?
--
(you have received this message from the App Inventor Developers Library)
---
You received this message because you are subscribed to a topic in the Google Groups "App Inventor Developers Library" group.
To unsubscribe from this topic, visit https://groups.google.com/d/topic/app-inventor-developers-library/x4GBw8wVI0I/unsubscribe.
To unsubscribe from this group and all its topics, send an email to app-inventor-develope...@googlegroups.com.
Gabriele Cozzolino
Ok I tried the apk and getting the same error
Gabriele Cozzolino
Ok I finally get to adapt your tutorial for authenticate an user by oauth, just like the taifun's tutorial. I'll post the aia some of this days if it can be useful for somebody
Scott Ferguson

JVG
phantomfoot
https://groups.google.com/forum/#!topic/mitappinventortest/uP9cqB3Q8EY
Basically, open with chrome, close comment bubbles, then open with Firefox.
JVG
phantomfoot
JVG

84JakeV84
Steve
Those are all just comments, telling you what each set of blocks does. You don't need to do anything for any of those. Just get your API clientid info and enter it in the variables as instructed.
5. You would have to share the calendar with everyone you want to access. Other than that it should be ok. Run the app and see. But you may need some experience first in using ai and APIs, this could be considered fairly advanced for beginners.
--
Albert
To my case, it was the message that google returns back, its not in english, because i were in non western country, so u have to modify that message to match it
Hope this help
Al
Hi,I download and installed the apk file, the first step OAuth, I have no problem, but when I click the 2. get Token, it return Error getting data - try again. may I know did I miss some steps that I might have to do before I can get it run?
Al
On Sunday, March 16, 2014 4:08:52 PM UTC+8, ruuddude wrote:
Great stuff, thanks Marcus!
2014-03-16 5:05 GMT+01:00 Scott Ferguson <scottfr...@gmail.com>:
Nicely done, Steve!Thanks for sharing this :)---hAPPy INVENTORing!
Scott
The example .apk and .aia contains 2 further examples of working with the calendar API - displaying calendar entries, and inserting a calendar entry.
4. DISPLAYING CALENDAR ENTRIES
Now that the user has selected a calendar, we can retrieve a list of entries from their calendar and display it in the app.
We do this by using Web1.Get again. According to the API docu, the URL for getting calendar entries is:
https://www.googleapis.com/calendar/v3/calendars/calendarId/events
So we simply construct this URL (including the access token) in App Inventor like so (note we are using the selected CalendarID from the previous step). For the example we are also making MaxResults=5 and SingleEvents=true.
<s
...

S H Yip
Hello,
I am new in AI2. I cannot get the SHA1 fingerprint by keytool. Is it necessary to generate the keystore before hand? If so, how to create? I just get no keystore file after typing the keytool cmd. Thanks a lot.
yip
*How to get SHA1 fingerprint:
You will need your keystore file. Open Command Prompt on your PC. Navigate to your Java bin directory and type:
keytool -list -keystore c:\path_to_your_key_here.keystore
It will prompt you to enter your keystore password, then will display your SHA1 fingerprint.
phantomfoot
Is it necessary to generate the keystore before hand?


gh0ul
For anyone trying to go through the tutorial, like I did, I would suggest just alter the AIA file to suit.
I've been working on it for days and I only just realised there was a file... my bad.
Thanks anyway
gh0ul

Thomas Dierksen
Just a question...while using the demo app I clicked the second button " get token"....then I get an error called
Error getting data try again. ..
AT the first step I am not able to input my Google name/password because it seems that the Web viewer is closed after 2 seconds....is it normal? The first step "start oAuth" works...I get the message "successful..."
Thanks a lot for helping
Best regards
phantomfoot
Thomas Dierksen
I tried ur apk at three different devices with different android versions....apk friend of mine told me that Google switched their system to ssl about one year ago...might that be a reason? Or has anybody of u create an up-to-date version of using the Google API?
I am trying to find out which error I got back...
Thank u for ur tips
Best regards
Tommii
Thomas Dierksen
Thanks a lot and best regards tommii
Thomas Dierksen
Thanks again and
best regards
Scott Ferguson
phantomfoot
Thomas Dierksen
I am just working at an single screen version with different arrangements which are shown as visible and not visible...I got the problem, that sometimes the screens don't switch to the other...So I am just including your .aia in my little organiser. ..It is almost ready. Thanks again ;-)
Best regards tommii
Thomas Dierksen
I got another question. Everytime, when I start the app and try to connect to the google calendar google asks me for "Request for Permission" (see the picture) so that I first have to change the script, that the webviewer is visible until I clickt "access"
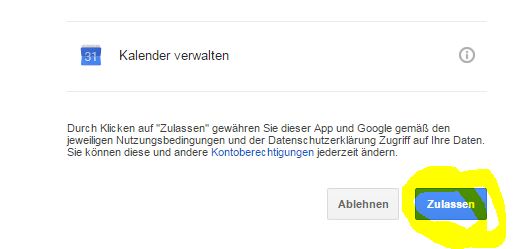
So what is my mistake? Have I setted something wrong in my developer console with my appname, the fingerprint, client ID or something else? Or ist this a normal step in this google api aia?
thanks again for help
best regards tommii
Scott Ferguson
Thomas Dierksen
If that doesn't work I really don't know what I am doing wrong with the oauth request scope stuff and the other things I don't understand ;-)
Thank u
Gonna tell u what happens tomorrow
phantomfoot

Amy Harris

Bill DeWitt
Baerdric
--
Bill DeWitt
To unsubscribe from this group and all its topics, send an email to app-inventor-developers-library+unsubscribe@googlegroups.com.
Scott Ferguson

Taifun
is a Google Developers Console account required for this? We aren't sure where the username comes from. Thanks!
Taifun
I can't tell if it works because I can't get past the SHA1 Fingerprint
Baerdric
--
(you have received this message from the App Inventor Developers Library)
---
You received this message because you are subscribed to a topic in the Google Groups "App Inventor Developers Library" group.
To unsubscribe from this topic, visit https://groups.google.com/d/topic/app-inventor-developers-library/x4GBw8wVI0I/unsubscribe.
To unsubscribe from this group and all its topics, send an email to app-inventor-develope...@googlegroups.com.
Taifun
But Amy may still be wondering exactly what username is expected in the application package name ("appinventor.ai_<USERNAME>_<applicationname>").
but in case you have the same question (?) the username is the username you are using for your Google login
Baerdric
But Amy may still be wondering exactly what username is expected in the application package name ("appinventor.ai_<USERNAME>_<applicationname>").
well, I guess in case she has a question she will ask? I could not find that question somehow?
but in case you have the same question (?) the username is the user name you are using for your Google loginbtw. don't hesitate do do a search in the MIT App Inventor forum, that question has been answered several times...
--

Kevin Hernandez
**How to get SHA1 fingerprint (on PC):
Open Command Prompt on your PC. Navigate to your Java bin directory and type:
keytool -list -keystore c:\path_to_your_key_here.keystore
It will prompt to enter your keystore password, then will display your SHA1 fingerprint. Copy and paste it into the above screen. Then click Create Client ID.
Steve
Did you navigate to your Java bin directory first? The command for change directory is cd. The Java bin directory is usually in c:\program files\java
Kevin
Scott Ferguson
**How to get SHA1 fingerprint (on PC):
Open Command Prompt on your PC. Navigate to your Java bin directory and type:
keytool -list -keystore c:\path_to_your_key_here.keystore
I would think that you would enter the path which includes '...jre1.7.0_73...' (replacing jre1.7.0_73 with your java version, of course) plus the rest of the path to where the .keystore file is located.
---
sf
phantomfoot
So you would type for example cd Program Files (x86)\Java\jre1.7.0_73\bin
It's whatever directory on your PC where Java is installed.
Then you type in the keytool command.
Kevin
Kevin
Steve
urn:ietf:wg:oauth:2.0:oob

https://accounts.google.com/o/oauth2/v2/auth?
  scope=whatever_scope_you_need&
  redirect_uri=urn:ietf:wg:oauth:2.0:oob&
  response_type=code&
  client_id=812741506391-h38jh0j4fv0ce1krdkiq0hfvt6n5amrf.apps.googleusercontent.com

something...@gmail.com
On Sunday, August 31, 2014 at 11:31:40 AM UTC-7, 84JakeV84 wrote:
Hi everyone. As part of a high school project, I ended up here. I am looking to create a calendar app for students at my high school to download and view the school's events. I downloaded the .aia file and got it opened up in AI2. However, I am new to this and still have a few questions:1. Screen1 has a ton of blocks at the top it, most with a text box but no text. Do I need to fill these in?2. A note on the second set of blocks says something like, "After the user allows access, get the AuthCode and put it in a variable." What does this entail? Exactly which variable do I put the AuthCode into?3. The next note says, "Get the calendar IDs and put them in a list". What does this entail?4. Next is, "Loop over the content and extract each calendar ID, and add them to a list." Again, totally clueless as to what this means.5. Is this even a good way to go about having hundreds of people view the same google calendar? Will they all have to log in once they download the app?Sorry if I sound completely clueless. I am. But I guess this is just step one at getting good at making apps.
On Saturday, March 15, 2014 5:37:23 PM UTC-6, phantomfoot wrote:GOOGLE CALENDAR API / APP INVENTOR 2 TUTORIAL
How to view and INSERT calendar events using App Inventor 2 (with no web service scripts).
What's new for AI2?
- The Parse procedure has gone. I found an easier way to extract data from the json response - the lookup in pairs block. This block is great as it does most of the work for you. You can see where it is being used in the screenshots.
- I have provided the .aia file here for you. In order for it to work, you must first get your own clientID by signing up to google apis (as per the instructions below), and enter it into the strClientID variable in the blocks editor.
- I have only used global variables in this example, in AI2 you now have the option of using local variables, which can make the app slightly more efficient. For an exercise, see if you can convert some of the globals to locals.
1. SETUP
First you need to register your app to use google api here https://console.developers.google.com/project
At the top select ‘CREATE PROJECT’
Then on the top left, select APIs & Auth, then select Calendar API and turn ON.
Then go to Credentials and click on ‘CREATE NEW CLIENT ID’.
In the pop-up box, select ‘Installed Application’. For Installed Application Type, select ‘Android’.
It will then ask you for your package name* and SHA1 fingerprint**. Enter these into the boxes.
* Your package name is of the form appinventor.ai_<yourusername>.<yourappname>
(without the <>).
**How to get SHA1 fingerprint (on PC):
Open Command Prompt on your PC. Navigate to your Java bin directory and type:
keytool -list -keystore c:\path_to_your_key_here.keystore
It will prompt to enter your keystore password, then will display your SHA1 fingerprint. Copy and paste it into the above screen. Then click Create Client ID.
You will then get a summary of your Client ID etc. We need to put these into your app.
2. GETTING AUTHORISATION
a). Get the user to login using Oauth
These sections take place in AppInventor. Here we will use a Webviewer component and some variables.
Enter your Client ID and Redirect URI (the urn:ietf:wg:oauth:2.0:oob one) into two variables (see screenshot below). The variable strResponseType should be initialized as the string “code”.
Construct the OAuth URL as outlined here https://developers.google.com/accounts/docs/OAuth2Login.
The scopes we need to use are:
read/write access to Calendars
read-only access to Calendars
We also need to make sure to include &access_type=offline.
Then start the Webviewer at the constructed URL:
In the Webviewer, the user is then prompted to enter their google account info and then to ‘Allow access’.
We will use Taifun’s trick of using a clock to monitor the WebViewer PageTitle. This returns an AuthCode. So we want to put this in a variable.
We can now exchange this AuthCode for an Access Token and a Refresh Token.
b). Get an Access Token and Refresh Token -
We then need to do a Web POST using the Web component, to get an access token and a refresh token. We point the Web url to https://accounts.google.com/o/oauth2/token.
We then construct the headers, URL and POST data like so (note the AuthCode we got in the previous step is sent in the POST data):
NOTE: As you can see above, the Request Header must contain
Content-Type: application/x-www-form-urlencoded.
The Post Data must contain the following key value pairs, which are put in lists:
Code: {your AuthCode}
client_id: {your ClientID}
redirect_uri: {your RedirectURI}
grant_type: authorization_code
You can see in the above screenshot we are using the AuthCode from step 2a) in this call.
Now we use the Web1.GotText block to let us know if the response was successful, and if so, extract from the response content the access token and refresh token, using some lookup in pairs blocks.
We then put these values into two variables strAccessToken and strRefreshToken:
NOW WE HAVE ACCESS AND WE CAN DO LOTS OF CALENDAR THINGS! Here are three examples from the app:
3. GETTING A LIST OF CALENDARS
A user can have more than one calendar, so we can get a list of all of their calendars so they can choose which one they want to work on. We do this by using the Web component again and doing a Web1.Get to the following URL:
https://www.googleapis.com/calendar/v3/users/me/calendarList?access_token={your access token}
(Note we are using the access token we received in the previous step). Here’s the blocks to do that:
We then use the Web1.GotText block for the response. When the response is successful (if response code = 200), we can get all their calendar IDs and put them in a list:
The getCalendarIds procedure we have called above is shown here: Note we are using lookup in pairs again to extract the data.
We can then stick these values into some buttons and offer the user an option to choose which calendar they want to work on:
<p dir=
phantomfoot
https://www.googleapis.com/calendar/v3/calendars/calendarID/events?maxResults=5&access_token=your_access_token&singleEvents=true&timeMax=2016-03-22T10:00:00Z&timeMin=2016-01-01T10:00:00Z
something...@gmail.com

Abraham Getzler
orderBystringThe order of the events returned in the result. Optional. The default is an unspecified, stable order.
Acceptable values are:
- "
startTime": Order by the start date/time (ascending). This is only available when querying single events (i.e. the parametersingleEventsis True)- "
updated": Order by last modification time (ascending).
--
(you have received this message from the App Inventor Developers Library)
---
You received this message because you are subscribed to the Google Groups "App Inventor Developers Library" group.
To unsubscribe from this group and stop receiving emails from it, send an email to app-inventor-develope...@googlegroups.com.
something...@gmail.com
To unsubscribe from this group and stop receiving emails from it, send an email to app-inventor-developers-library+unsubscribe@googlegroups.com.
Abraham Getzler
To unsubscribe from this group and stop receiving emails from it, send an email to app-inventor-develope...@googlegroups.com.
For more options, visit https://groups.google.com/d/optout.
--
(you have received this message from the App Inventor Developers Library)
---
You received this message because you are subscribed to the Google Groups "App Inventor Developers Library" group.
To unsubscribe from this group and stop receiving emails from it, send an email to app-inventor-develope...@googlegroups.com.
something...@gmail.com
To unsubscribe from this group and stop receiving emails from it, send an email to app-inventor-developers-library+unsubscribe@googlegroups.com.
For more options, visit https://groups.google.com/d/optout.
--
(you have received this message from the App Inventor Developers Library)
---
You received this message because you are subscribed to the Google Groups "App Inventor Developers Library" group.
To unsubscribe from this group and stop receiving emails from it, send an email to app-inventor-developers-library+unsubscribe@googlegroups.com.

Patricia Prado


chs.cale...@gmail.com

frontie...@gmail.com
**How to get SHA1 fingerprint (on PC):
Open Command Prompt on your PC. Navigate to your Java bin directory and type:
keytool -list -keystore c:\path_to_your_key_here.keystore
It will prompt to enter your keystore password, then will display your SHA1 fingerprint. Copy and paste it into the above screen.
something...@gmail.com

Scott Ferguson
Scott Ferguson

Massimo Antonini

coder...@gmail.com

Ottawa Chapter
On Saturday, March 15, 2014 at 7:37:23 PM UTC-4, phantomfoot wrote:
GOOGLE CALENDAR API / APP INVENTOR 2 TUTORIAL
How to view and INSERT calendar events using App Inventor 2 (with no web service scripts).
What's new for AI2?
- The Parse procedure has gone. I found an easier way to extract data from the json response - the lookup in pairs block. This block is great as it does most of the work for you. You can see where it is being used in the screenshots.
- I have provided the .aia file here for you. In order for it to work, you must first get your own clientID by signing up to google apis (as per the instructions below), and enter it into the strClientID variable in the blocks editor.
- I have only used global variables in this example, in AI2 you now have the option of using local variables, which can make the app slightly more efficient. For an exercise, see if you can convert some of the globals to locals.
1. SETUP
First you need to register your app to use google api here https://console.developers.google.com/project
At the top select ‘CREATE PROJECT’
Then on the top left, select APIs & Auth, then select Calendar API and turn ON.
Then go to Credentials and click on ‘CREATE NEW CLIENT ID’.
In the pop-up box, select ‘Installed Application’. For Installed Application Type, select ‘Android’.
It will then ask you for your package name* and SHA1 fingerprint**. Enter these into the boxes.
* Your package name is of the form appinventor.ai_<yourusername>.<yourappname>
(without the <>).
**How to get SHA1 fingerprint (on PC):
Open Command Prompt on your PC. Navigate to your Java bin directory and type:
keytool -list -keystore c:\path_to_your_key_here.keystore
It will prompt to enter your keystore password, then will display your SHA1 fingerprint. Copy and paste it into the above screen. Then click Create Client ID.
The example .apk and .aia contains 2 further examples of working with the calendar API - displaying calendar entries, and inserting a calendar entry.
4. DISPLAYING CALENDAR ENTRIES
Now that the user has selected a calendar, we can retrieve a list of entries from their calendar and display it in the app.
We do this by using Web1.Get again. According to the API docu, the URL for getting calendar entries is:
https://www.googleapis.com/calendar/v3/calendars/calendarId/events
So we simply construct this URL (including the access token) in App Inventor like so (note we are using the selected CalendarID from the previous step). For the example we are also making MaxResults=5 and SingleEvents=true.
Then we use Web1.GotText again to see if we get a successful response. If successful, we can again start a procedure which uses lookup in pairs to extract the results and display the items on the screen:
Here is the procedure getEventData that grabs the data and displays it on the screen:
And the result:
5. INSERTING A CALENDAR ENTRY
Now we come to inserting a calendar entry. According to the API docu, we need to do a Web HTTP POST to the following URL.
https://www.googleapis.com/calendar/v3/calendars/calendarId/events
We have done a POST before so we can do the same again easily enough.
The example app uses Textboxes so the user can enter the details of the event. We want the following things from the user:
Date
Start Time
End Time
Event Title
Event Description
Location (where is it?)
Do they want a reminder?
When the user submits this form, first we need to construct the start dateTime and end dateTime in RFC3339 format, which is what google calendar accepts. We can do this by using a text join block, getting the items from the text boxes and interspersing them with the correct text pieces (note we are also setting addReminder to true or false depending on the checkbox input):
Next we need to construct the POST Data in JSON format as outlined here. I made a variable called strPostText and constructed it there, again using a make text block, the previously constructed RFC3339 dateTimes, and the remaining textbox inputs:
Atfer that is done, we now make another POST call using the Web component.
In the header we need
Content-Type: application/json
Authorization: Bearer {your access token}
Then we use Web1.PostText to post the strPostText variable we constructed above:
Then we use Web1.GotText again to receive the response:
THAT’S IT! If we get a successful response, the event was created!
Now refresh/re-sync the calendar on your phone, or jump on the internet, go to your google calendar, and you will see the event has been created!
So there you have it. Happy google calendar API’ing!
Taifun
Taifun

vincenzo celano
I hope there is soon a solution. thank you
Baerdric
Unfortunately there is still no one who has found a solution. First I used a webview to authorize the use of the calendar and insert an event from my app, now Google no longer allows me to use the webview and my app reports: Error 403. That's an error.Error: disallowed_useragent.
I hope there is soon a solution. thank you
--
(you have received this message from the App Inventor Developers Library)
---
You received this message because you are subscribed to a topic in the Google Groups "App Inventor Developers Library" group.
To unsubscribe from this topic, visit https://groups.google.com/d/topic/app-inventor-developers-library/x4GBw8wVI0I/unsubscribe.
To unsubscribe from this group and all its topics, send an email to app-inventor-developers-library+unsubscribe@googlegroups.com.
vincenzo celano

Is there anyone who knows how to provide the date and time in the new calendar event?
thank you
vincenzo celano
Hai risolto con il calendario?
I sto cercando una soluzione, ma non ci sono riuscito.
Massimo Antonini
guarda se ti può essere di aiuto questa extension:
https://community.thunkable.com/t/releasing-the-web-viewer-dialog-extension/3956
Fammi sapere.

Nathan Kotzen
Abraham Getzler
--
(you have received this message from the App Inventor Developers Library)
---
You received this message because you are subscribed to the Google Groups "App Inventor Developers Library" group.
To unsubscribe from this group and stop receiving emails from it, send an email to app-inventor-developers-library+unsubscribe@googlegroups.com.

Bill Butler
On Friday, November 20, 2015 at 2:29:18 AM UTC+11, Amy Harris wrote:
I apologize for the very beginner question, but is a Google Developers Console account required for this? We aren't sure where the username comes from. Thanks!