Replicator 2X Warping Bed Fix

1,038 views
Skip to first unread message

Adam P.

unread,
Mar 14, 2014, 10:30:11 PM3/14/14
to make...@googlegroups.com
Hi all, 

I'm a new Rep 2X "owner". We got it at work and I'm the "guy" for the machine. I have several machines at home including a repraped Cupcake CNC, 3DR Simple delta printer and a Prusa I3. 

Anyways, right off the bat, I noticed that my Rep 2x HBP was not flat as advertised and was actually quite warped. A straight edge indicated a gap of approximately .4-.5mm at least at the long edges of the platform. I ended up calling MBI and they sent me a new HBP. In the mean time, being a Mechanical Engineer, I decided to noodle on it a bit. I found that loosening the screws securing the HBP baseplate to the aluminum HBP alleviated the warping and resulted in a completely flat HBP. I also made the realization that the baseplate is stainless steel. This is bad. The aluminum HBP is being directly heated and the stainless is not. Even if it were being directly heated, there would be issues. This uneven heating and REALLY uneven expansion rate between the baseplate and the HBP AND the fact that they are rigidly bolted together via M3 hardware and close fitting clearance holes means the aluminum part of this sandwhich is going to want to expand more but will be constrained by the stainless baseplate. This causes warping. I ended up accidentally letting the preheat time out and low and behold, the HBP is flatter BUT not flat. This means that the stainless was catching up but the two materials have different thermal expansion coefficients meaning they'll never equally expand given that they're heated to the same temperature (which they're not in this application). 

So, to make a long story long, I ended up drilling out the stainless baseplate holes through which the aluminum is bolted to .150in (#24 drill bit). The size was chosen purely at random and by calibrated eyeball (TLAR method). I then heated the aluminum plate up to its preheat temperature and then screwed the unit together. I lightly torqued - LIGHTLY - the screws since the whole idea of the clearance holes is to allow the bolts to "slide" (translate) lengthwise and widthwise to follow along with the aluminum HBP. 

this has resulted in completely warp free heating and ZERO wait time past the time it takes to get to 110ºC. I was waiting up to 30 minutes for the plate to resemble something close to flat but not anymore. 

I thought someone would find this useful.

As a technical note, I installed M3 (#4 will work too) washers under the bolt heads since the new clearance hole is quite large. 

What do you think? Sorry for the long story. 
20140314_211114-1200.jpg
20140314_211212-1200.jpg
20140314_221608-1200.jpg
20140314_221613-1200.jpg

Ryan Carlyle

unread,
Mar 14, 2014, 11:06:15 PM3/14/14
to make...@googlegroups.com
I'm definitely going to try this. Unfortunately I won't get a chance to take my machine apart for a week or two, but it looks very promising. Almost seems too easy! Surely MBI has engineers who know that aluminum and steel expand different amounts? But I guess if I didn't think of it, I can't blame anyone else for not thinking of it.

I think we had all been blaming uneven heating, but this makes a ton of sense. The R2x has crazy thermal behavior through the extruder / hot end assembly... why wouldn't it be crazy in the build plate too? 

Adam P.

unread,
Mar 15, 2014, 12:07:04 AM3/15/14
to make...@googlegroups.com
I wouldn't be so quick to claim that mbi has good mechanical engineers. There are many things on my r2x that make me scratch my head. For instance, the gantry idlers have bearings supporting them and the x axis doesn't?

Dan Newman

unread,
Mar 15, 2014, 12:34:58 AM3/15/14
to make...@googlegroups.com
On 14/03/2014, 8:06 PM, Ryan Carlyle wrote:
> I'm definitely going to try this. Unfortunately I won't get a chance to
> take my machine apart for a week or two, but it looks very promising.
> Almost seems too easy! Surely MBI has engineers who know that aluminum and
> steel expand different amounts? But I guess if I didn't think of it, I
> can't blame anyone else for not thinking of it.

It's been suggested on several occassions to MBI that they go with a
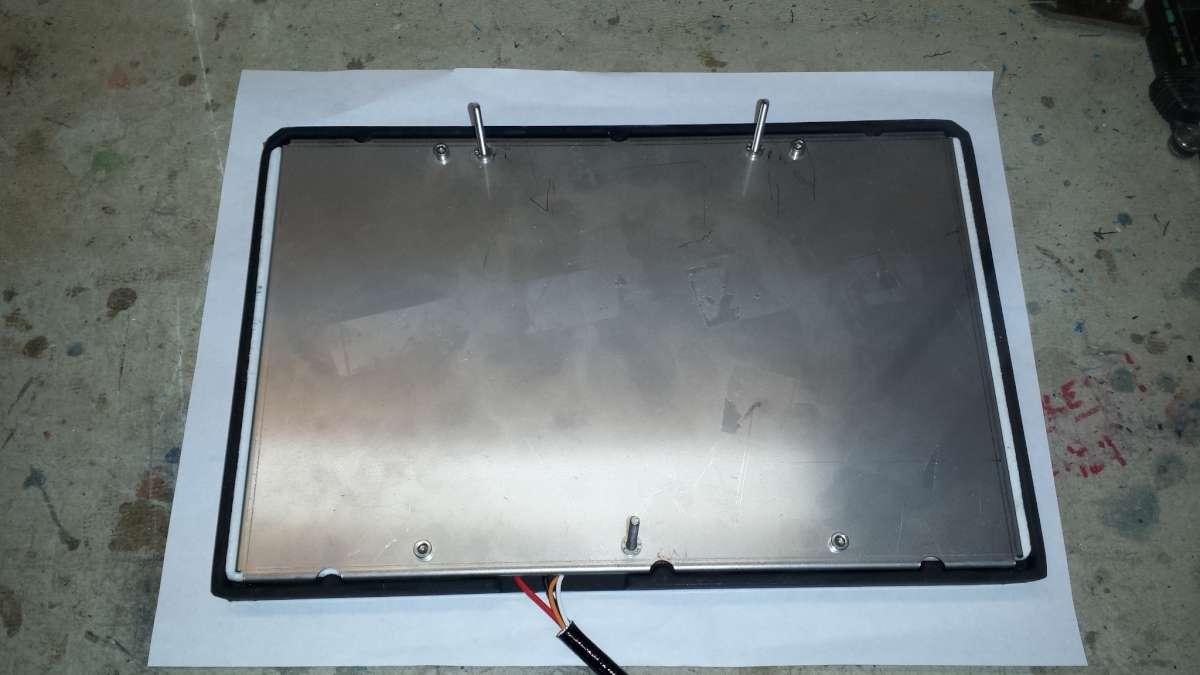
fastening mechanism that allows for expansion of the Al plate relative
to whatever it is attached too. I remember this coming up back in the
Thing-o-Matic days and again with the Rep 1. Another issue of course
is that the Al plate dissipates heat faster at the edges than at the center
which is another effect that can lead to some crowning when the edges are
rigidly fixed to something else.

Dan

Scottbee

unread,
Mar 15, 2014, 10:50:49 AM3/15/14
to make...@googlegroups.com
I like this approach a lot and I am sure I will be replicating it.

The only change that I might make:  After I create the clearance holes I will probably locate some appropriately sized belleville washers to put under the cap screw heads ( in lieu of flat washers), and then use some blue Loctite on the screws after I lightly torque them down.  That should allow for a more reliable lateral shear while still ensuring the Z-height registration is consistent.  A compliant heat-resistant low-creep plastic washer would probably work well also.

Well done!

Scottbee

unread,
Mar 15, 2014, 10:55:09 AM3/15/14
to make...@googlegroups.com
<Grrrr... can't edit an errant post>

"Put some blue Loctite on the screws and *then* lightly torque them down".  Just enough to get some compression on the belleville washers.

Adam P.

unread,
Mar 15, 2014, 11:27:48 AM3/15/14
to make...@googlegroups.com
Scott, 

I agree. I would have rather used teflon washers under the head of the bolts to reduce the static friction and allow the bolts to move more easily with the aluminum plate. I didn't have any. I do also plan on loctiting the bolts. I didn't because I wasn't sure if I would have to disassemble again. Is blue loctite suitable to 110C? I hvaen't checked and I'm feeling particularly lazy ATM. 

Scottbee

unread,
Mar 15, 2014, 12:13:36 PM3/15/14
to make...@googlegroups.com
Based on my experience it will "cook" a little bit and perhaps change color, but it doesn't appear to lose its holding power.... nor does it become "permanent".

Ryan Carlyle

unread,
Mar 15, 2014, 12:15:31 PM3/15/14
to make...@googlegroups.com
Loctite de-rates a lot at higher temps, as I recall. You might want to bump up to green if it's going to thermal cycle a lot. Or use primer with blue. Probably should start with blue and upgrade if it works loose.

I like the Belleville / wave washer idea. I wouldn't use Teflon, it'll creep and you'll lose compression.

Is there room for longer bolts and small compression springs? That's going to be easier for most people to get than bellevilles I think?

Scottbee

unread,
Mar 15, 2014, 12:20:51 PM3/15/14
to make...@googlegroups.com
Yes, there is room.  A little less room (~2.5mm) if you're running the Chinese arm wraps.... but still enough.

Scott D

unread,
Mar 15, 2014, 12:28:45 PM3/15/14
to make...@googlegroups.com
Well as I sit hear lookimg for something to do, and keep my mind off the pain from a surgery yesterday I thunk I may have to try this project. I still have an Al MBI bed that I was debating in selling since I don't own the R2X. I have the bottleworks HBP on order for my R2 and received the new power suply 2 days ago. So I might as well install it and try it for now until the bottleworks one arrives.
I just have to convince my watcher to give me a ride to the hardware store for Teflon washers. I also need lock tight since I can't find mine, so I'll check the specs to see what one would be good for 110C and let you know when I get back.

Ryan Carlyle

unread,
Mar 15, 2014, 2:01:00 PM3/15/14
to make...@googlegroups.com
Now that I check the datasheets, Loctite 243 (blue) is perfect for this -- the heat aging performance actually goes up and plateaus for the 100-110C operating range. Other color grades have worse performance.

Mark Valenti

unread,
Mar 19, 2014, 1:08:33 PM3/19/14
to make...@googlegroups.com
Adam, SHWEET! thanks for the info.  I suspected as much. Back in the day when I was involved with designing thermo-chucks for silicon wafer testing equipment, we used tiny 0-80 studs. we used small disc washers and a light torque (in-oz).  I applaud MB for what it has done, although not the best design in some areas.  We will never know what the engineer designed and what the manufacturing engineer "improved"...  I've been there, it aint pretty.....

-Mark

Adam P.

unread,
Mar 19, 2014, 11:25:12 PM3/19/14
to make...@googlegroups.com

Thanks, Mark. I habitually check my r2x bed many times while heating every time is warmed up and no warps have come back.

On Mar 19, 2014 1:08 PM, "Mark Valenti" <ipsu...@gmail.com> wrote:
Adam, SHWEET! thanks for the info.  I suspected as much. Back in the day when I was involved with designing thermo-chucks for silicon wafer testing equipment, we used tiny 0-80 studs. we used small disc washers and a light torque (in-oz).  I applaud MB for what it has done, although not the best design in some areas.  We will never know what the engineer designed and what the manufacturing engineer "improved"...  I've been there, it aint pretty.....

-Mark

--
You received this message because you are subscribed to a topic in the Google Groups "MakerBot Operators" group.
To unsubscribe from this topic, visit https://groups.google.com/d/topic/makerbot/uOFOiMATI5o/unsubscribe.
To unsubscribe from this group and all its topics, send an email to makerbot+u...@googlegroups.com.
For more options, visit https://groups.google.com/d/optout.

John Yaron

unread,
Mar 21, 2014, 11:58:28 PM3/21/14
to make...@googlegroups.com
Adam.

Does the al plate shift during builds? Would it be best to only expand Qty-3 SS holes and torque the last hole tight to minimize any plate translation? 

Ryan Carlyle

unread,
Mar 23, 2014, 10:37:58 PM3/23/14
to make...@googlegroups.com
I just took apart my stock R2x HBP and did this fix, and I can confirm that it significantly reduces warping. I still have a little bit of warping but it's less than 1/4 as much as it used to be.

I took apart the HBP, drilled out the internal mounting holes a little bigger, and put a #6 washer and an M3 washer between the steel backing plate and M3 bolt. Then I put some blue loctite in the holes, and tightened the bolts JUST A HAIR past hand-tight. The washers were a bit stiff but could be slid around by hand, so I think I got the tightness dialed in right. 

I did go up to an 8mm bolt instead of the stock 6mm bolts, but the 6mm still had enough thread engagement that I think it would have been fine.

Steve Johnstone

unread,
Mar 24, 2014, 4:34:18 PM3/24/14
to make...@googlegroups.com
Hi Adam,

Thanks very much for posting this. I did the mod over the weekend and the printer has been running most of the day without any problems.

I put up a video of what I did for those interested - http://youtu.be/O2coChvmnWY

Thanks again Adam!

Adam P.

unread,
Mar 25, 2014, 1:02:31 AM3/25/14
to make...@googlegroups.com
Great job, Steve. I appreciate the effort you went through. I don't have the patience to do that. John, I have noticed ZERO horizontal shift in my prints. I'm very glad to hear everyone who has tried it is having good results. I'm excited to have contributed to the community do quickly.

Scott D

unread,
Jun 3, 2014, 8:32:19 PM6/3/14
to make...@googlegroups.com
I wanted to bring this back to the top, and figured I would share the video I did a few months back at the same time.

http://youtu.be/7uEYUvwy8Fk

Thanks for that fix Adam, now when I sell the HBP it will be a fixed one :-)
I was going to sell it never used, but I just had to try this. And now I know I will be selling a item that works since I plugged it in.

Adam P.

unread,
Jun 3, 2014, 8:37:30 PM6/3/14
to make...@googlegroups.com

No problem, Scott. I'm glad to contribute to the community and I'm glad it's working for you.

Mine is working very well. I had to loctite the screws as they loosened up. After that, though, it's been great. I still have an extra HBP that MBI sent me. I modded that   one too.

Adam P.

unread,
Jun 3, 2014, 8:43:38 PM6/3/14
to make...@googlegroups.com

Great video too!

On Jun 3, 2014 8:32 PM, "Scott D" <scot...@gmail.com> wrote:

Scott

unread,
Jun 3, 2014, 9:05:42 PM6/3/14
to make...@googlegroups.com
Thanks Adam. I had the new MBI HBP collecting dust and decided to try your fix, worked great by the way. Then I received my bottle works HBP so I out the MBI back in the box after only a few prints. So now I get to sell it with your fix, that may be a selling point :-)

Scott

Ryan Carlyle

unread,
Jun 3, 2014, 10:01:39 PM6/3/14
to make...@googlegroups.com
I switches to my Bottleworks HBP simply because I like the cradle to put removable plates into. I'm keeping my stock plate but I might turn it into something else. Filament dry box heating element? I dunno.
Reply all
Reply to author
Forward
0 new messages