Replicator 2 - First Impressions

Bartholomew
Bartholomew
On Thursday, October 25, 2012 3:17:37 PM UTC-7, Mark wrote:
Have you been able to do any high resolution prints? Mine just sits there at 0% when I tell it to print at high resolution.Thanks,Mark

Clinton Hoines

Justin Ribeiro
Clinton Hoines

Big-E
I just discovered this today.
Bartholomew
Big-E

mbsteed

Bartholomew

John Biehler

My first time using the natural PLA (normally use various other colors)...love it so far.
My thoughts so far:
- unboxing was pretty much just like the video MakerBot posted....although instead of what looks like masking tape in the video to secure all the motors for shipping was actually the beefiest zip ties I've ever seen...which were quite a pain to remove due to their closeness to the parts they were protecting...actually scratched the frame (minor) cutting them loose.
- levelling was easier than my Prusa but not quite as simple as it was implied....surprised they didn't have better thumbwheels on the screws underneath the platform...and the levelling script seems to be a little off on the left side during the final verification pass...the nozzle is just a little off the platform (horizontally)
- viewing angle of the LCD could be better as the contrast looks off when standing over the bot...and the menus seem a little slow to refresh
- wondering about the durability of the acrylic build platform...mine came with a blob/scratch on the smooth side on one end and my first levelling attempt seems to have been too low so there is shadows of previous print outlines on it...I guess that's why they include the sheets of blue tape
- haven't upgraded the firmware yet and am in the middle of long print so it'll be awhile before that happens, just upgraded MakerWare. Didn't see a changelog though which would be nice.

Mark
On Thursday, October 25, 2012 3:17:37 PM UTC-7, Mark wrote:
Have you been able to do any high resolution prints? Mine just sits there at 0% when I tell it to print at high resolution.Thanks,Mark
On Thursday, October 25, 2012 9:24:07 AM UTC-7, Bartholomew wrote:

Gian Pablo
...As far as software, Makerware 1.0.1 has worked well, although like the others, using the High Quality (0.1mm layer height) setting results in an absurdly long slicing and g-code generation time. It is worth it, since the prints at this height are stunning. However, I am usually tempted to use Medium quality for the faster solution time. It's orders of magnitude different; there's something wrong with the code....
SteedMaker
Okay it took all day to slice the model shown above but the printout didn't work at all it started lifting off the build plate. I then tried the bracelot model and it printed out skewed to one side:

I then tried printing the comb - but I had to leave it unattended and resulted in a gummed up extruder, see the image below:


c f
--To view this discussion on the web visit https://groups.google.com/d/msg/makerbot/-/eUFRq2ULz40J.
You received this message because you are subscribed to the Google Groups "MakerBot Operators" group.
To post to this group, send email to make...@googlegroups.com.
To unsubscribe from this group, send email to makerbot+u...@googlegroups.com.
For more options, visit this group at http://groups.google.com/group/makerbot?hl=en.

Doogiekr
for cleaning... i dont use PLA, but for ABS i knock off as much as I can by hand, and then preheat the nozzle and use a 20mm calibration cube and slowly press it onto the nozzle. after it cools i pull it off and it takes the extra gunk off with it.
Doogiekr
Mark

Dan Newman
On 27 Oct 2012 , at 8:42 AM, Mark wrote:
> Mine printed fine right out of the box, once I leveled the build plate. I
> have noticed that preheating the extruder is required, otherwise the
> initial laydown of plastic doesn't stick.
the build surface, correct?
> I might even move to using the
> load utility to make sure the print head is really ready to print prior to
> starting a print.
to temp? You could add an M71 to the start gcode after the M6 "wait for tool temp",
M71 (Press the "M" when ready")
or for automatic operation, add a pause
G04 P5000 (Wait 5000 ms = 5 seconds)
I have noticed that the software PID used for the extruder temp. control does
initially cutoff the heating power early, expecting an overshoot and as such
things can start printing a few degrees C below the target temp. Is that what
you're seeing? From looking at the firmware sources, I can also see that MBI
now has two different sets of thermocouple handling routines: one for the Rep1
and one for the Rep2. As such, my experiences with the Rep 1 and earlier, may
not translate to the Rep2.
SteedMaker
On Saturday, October 27, 2012 12:20:52 PM UTC-6, Steve wrote:
Can you leave the machine un-attended during long prints, and when it is finished with a print does it turn off the heat to the extruder nozzle?Steve
SteedMaker

Steve
SteedMaker

SteedMaker

Ian Lougheed
Ian Lougheed
SteedMaker
John Biehler
Clinton Hoines
SteedMaker


MakeALot
SteedMaker
SteedMaker
SteedMaker
Bartholomew
Steve

itzalak2
El sábado, 3 de noviembre de 2012 13:01:00 UTC+1, itzalak2 escribió:
Hi everybody,I have the new rep 2 since yesterday and I made some test prints.the first one was "bolt & nut" form the SD card and the result looks great but it was "impossible" to screw one each other.The second was an own piece that curls a lot (medium quality). I tried using the raft and works great.The third was a small piece with high quality first but the result was very bad. Then I tried again with medium quality with a lot better result. The only problem was that the small hole (5 mm) was 0,4 mm smaller.

Andrew Plumb
--
You received this message because you are subscribed to the Google Groups "MakerBot Operators" group.
To view this discussion on the web visit https://groups.google.com/d/msg/makerbot/-/a5uzMumxOEAJ.
To post to this group, send email to make...@googlegroups.com.
To unsubscribe from this group, send email to makerbot+u...@googlegroups.com.
For more options, visit this group at http://groups.google.com/group/makerbot?hl=en.
<la foto-4.JPG><Sin título.tiff>
"The future is already here. It's just not very evenly distributed" -- William Gibson
Me: http://clothbot.com/wiki/
itzalak2

tunell
Dan Newman
>> While the ability to pull in multiple models is nice, this sw seems less
>> capable than ReplicatorG.
in RepG and slice and print from RepG. (If you're really adventuresome,
you can speed up SF from RepG by a factor of around 5 by getting a copy
of PyPy for your platform and then pointing RepG at it as the Python
to use. That's done via the Preferences panel. The advanced section,
I believe. I've done that myself, but often fall back to normal Python
to ensure that I'm testing Sailfish using the same tools most other
users are using.)
Dan

big_red_frog

Darrell jan
Dan Newman
On 5 Nov 2012 , at 4:07 PM, big_red_frog wrote:
> Nut and bolt printed straight and true.
>
> Does up nicely with no unwanted friction.
>
Note that Makerbot's blog shows as of this afternoon a release
of a new version of MakerWare and a new firmware release for
the Replicator 2.
http://www.makerbot.com/blog/2012/11/05/makerbot-makerware-update/
Dan
Dan Newman
On 5 Nov 2012 , at 4:20 PM, Darrell jan wrote:
> Dan,
>
> Is there more to that than what you said? I downloaded PyPy for Mac and
> then set RepG preferences to use it. But it said that something was missing
> (a message that I guess I lost when I reset the preferences.)
% /usr/local/pypy-1.9/bin/pypy
Python 2.7.2 (341e1e3821ff, Jun 07 2012, 15:42:54)
[PyPy 1.9.0 with GCC 4.2.1] on darwin
Type "help", "copyright", "credits" or "license" for more information.
And now for something completely different: ``"Somewhere inside the large
lumbering blob of PyPy there is an elegant core trying to get out." - cfbolz''
>>>>
But to get RepG pointed at it, I've had to play games since the file window
it pulls up doesn't like to list /usr so I've usually gone the expedient
route of setting up a sym link in /
% cd /
% sudo ln -s /usr /foo
Then point at /foo/local/pypy-1.9/bin/pypy. First time you slice, you get a
pop up about "Multiple Python binaries have been found …. Please select one
from the list below…". I select the pypy one and click OK and let things
rip and snort and it just works for me.
If you ever want to undo it, just use the plist editor to edit
~/Library/Preferences/com.apple.java.util.prefs.plist
and remove the setting entirely. (It's either that or remember where RepG
was pointing to originally and restore that.)
Dan
Dan
Steve
big_red_frog
John Biehler
Steve
Anthony Tod
John Biehler
big_red_frog
To unsubscribe from this group, send email to makerbot+unsubscribe@googlegroups.com.
big_red_frog
itzalak2
To unsubscribe from this group, send email to makerbot+u...@googlegroups.com.
Dan Newman
On 5 Nov 2012 , at 10:52 PM, itzalak2 wrote:
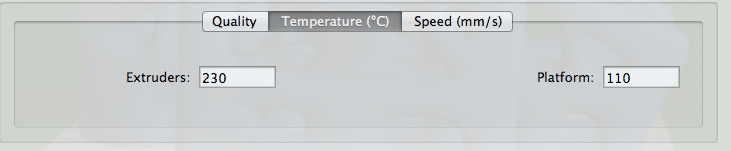
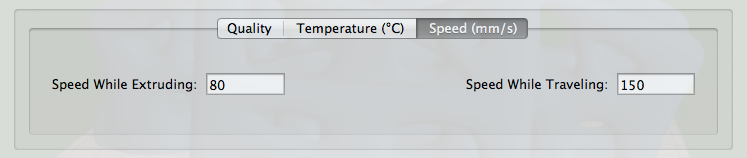
> Yesterday I tried new prints with 220 ºC and this solved the curling
> problem with bigger pieces like I the pieces in the picture uploaded
> yesterday (flat discs). Now the same piece is printed very well without
> using rafts to avoid curling. Great improvement for me and hope for you too.
>
> The high quality process is still looking as styrofoam so it is unusable.
> Any body has tried high quality prints?
Dan
Dan Newman
seem relevant to any high quality cottage cheese issues.
Dan
itzalak2

lassikin
-lassi
itzalak2
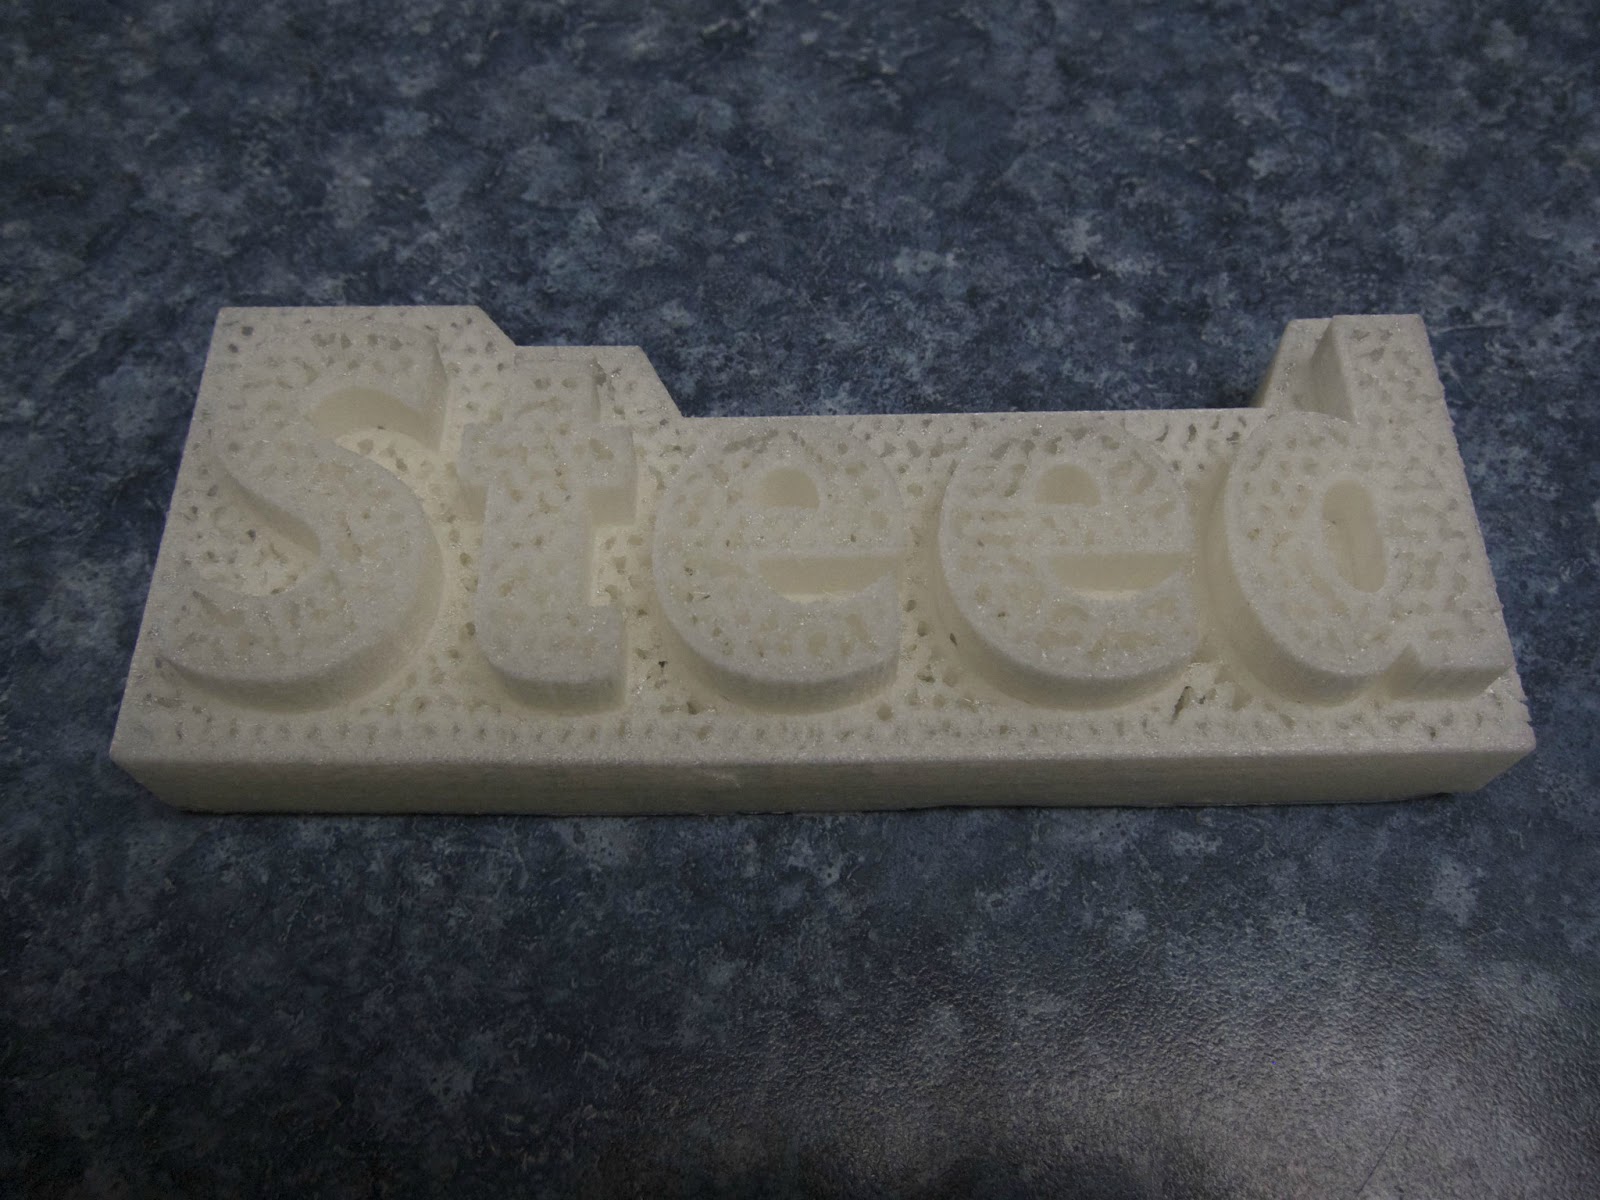
SteedMaker
I tried another high quality print from Makerware after the upgrade to 6.2 and it is slightly better but still has the styrofoam quality. The medium quality prints from Makerware seem to be working.
Another problem I am having is that the print job quits mid way through a print regularly. I have taken apart print head and cleaned it numerous times - sometimes that seems to help but other times not. Any suggestions for that problem.
One other note: I have noticed that after I have printed something out and if I try to print something else - it is messed up. I have to turn off the Makerbot and then turn it on again and then it seems to work again.
Finally a successful self-created object (with the latest medium settings from Makerware), see the attached image. This took a lot of work and two jobs that quit mid way through.

SteedMaker
Dan Newman
On 7 Nov 2012 , at 7:17 AM, SteedMaker wrote:
>
>
> I tried another high quality print from Makerware after the upgrade to 6.2
> and it is slightly better but still has the styrofoam quality. The medium
> quality prints from Makerware seem to be working.
>
> Another problem I am having is that the print job quits mid way through a
> print regularly.
SD card. That eliminates USB comms stalling or otherwise being interrupted
from the list of possible suspects.
> if I try to print something else - it is messed up.
sits idle in a very hot extruder for a period time. You may want to feed some
of the filament out right before the second print?
Dan
Anthony Tod
From: itzalak2 Sent: Wednesday, 7 November, 2012 5:43:46 AM PDT To: make...@googlegroups.com Reply To: make...@googlegroups.com Subject: Re: [MakerBot] Re: Replicator 2 - First Impressions |
SteedMaker
Dan Newman
no default Replicator 2 profile in RepG 39…. However, there is one in
the current MBI RepG repo on github,
https://github.com/makerbot/ReplicatorG/tree/master/skein_engines/skeinforge-50/skeinforge_application/prefs
If you installed RepG 39 from
https://code.google.com/p/replicatorg/downloads/list
you could then drop that directory into the appropriate location in the installed RepG directory
and then give things a try.
The attached .zip file is the "Replicator 2 Slicing Defaults" directory from
github. I have no idea what state MBI considers them in -- I'm just suggesting
you give them a try if you feel up to it.
Dan
John Biehler

Avandss
i guess i will find out soon enough when i get my machine (dont get me wrong i am sure with a few updates and a little tweaking it will be better then advertised.. but right now the quality does not have the "100 micron" look
Steve
John Biehler
Steve
On Thursday, November 8, 2012 11:02:50 AM UTC-8, Mose Andre wrote:
I've had mine for a week or so and it definitely hasn't been out of the box 100 micron prints. My problems seem related to the slicer being used (and settings). For the 'high' (100 micron) resolution it uses Skeinforge and most of the settings are hidden from you (in MakerWare). At the 'medium' (270micron) quality I was almost printing nicely out of the box, but have had to clean out the drive gear in the extruder system and adjust the tension and play with the temperature a little. But, at 'medium' it uses the Miracle Grue slicer which works nicely (albeit at lower resolution).I've tried ReplicatorG to slice and generate an s3g file but I'm not sure Replicator2 is truly supported -- the 039 release has a Replicator2 machine profile, but no default slicing settings. The GitHub repo has some slicing profile checked in, but copying it into my 0039 ReplicatorG directory as recommended in this thread didn't seem to result in generating gcode that my Replicator2 enjoyed. In fact, during all of this the machine shut down oddly several times (LED display goes off, no communication, LED build area light stays on). So, I'm not sure what I should be able to do with ReplicatorG and my Replicator2 right now -- jog the axes? Or send an s3g file MakerWare exports?I've also tried printing from the SD card. Printing from an SD card requires an s3g file. An s3g file is a little more than a gcode file and the https://github.com/makerbot/s3g repo has some tools for dealing with s3g (e.g. converting from s3g, decompiling). My idea was to try Slic3r to generate gcode, create s3g using makerbot/s3g example scripts and then drop that on the SD card. Unfortunately, I was not able to create gcode in Slic3r that Makerbot's s3g was happy to convert -- there are PreProcessors (recently renamed GcodeProcessors) in to convert gcode from, e.g., Slic3r to Makerbot dialect, before generating the s3g from the processed gcode, but I haven't had time to figure out why it isn't converting nicely.All that said, I am new to operating a 3d printer. I did not expect to have this much difficulty when I bought a Replicator2 but I still like the thing more than most things. I expect some of these issues are my fault being new and kinda dumb sometimes, and some of this Makerbot will release software fixes for in the near future.
On Wednesday, November 7, 2012 11:34:17 PM UTC-8, Avandss wrote:
John Biehler

Mose
Steve
John Biehler
Dan Newman
On 8 Nov 2012 , at 11:02 AM, Mose Andre wrote:
> I've had mine for a week or so and it definitely hasn't been out of the box
> 100 micron prints. My problems seem related to the slicer being used (and
> settings). For the 'high' (100 micron) resolution it uses Skeinforge and
> most of the settings are hidden from you (in MakerWare). At the 'medium'
> (270micron) quality I was almost printing nicely out of the box, but have
> had to clean out the drive gear in the extruder system and adjust the
> tension and play with the temperature a little. But, at 'medium' it uses
> the Miracle Grue slicer which works nicely (albeit at lower resolution).
>
> I've tried ReplicatorG to slice and generate an s3g file but I'm not sure
> Replicator2 is truly supported -- the 039 release has a Replicator2 machine
> profile, but no default slicing settings. The GitHub repo has some slicing
> profile checked in, but copying it into my 0039 ReplicatorG directory as
> recommended in this thread didn't seem to result in generating gcode that
> my Replicator2 enjoyed.
with my Replicator 1. RepG then misparses the gcode and generates some
"interesting" s3g.
If, in the RepG directory you navigate to the subdirectory machines/replicator2/
you will see the start & end gcode files. The Single_Head_start.gcode file
is missing a terminating ")" on line #8. I reported that to MBI last night and
they indicated that they would fix it. (Indeed, I can see that they did this
morning.)
That may not be the only issue… but it's the one I hit last night.
> In fact, during all of this the machine shut down
> oddly several times (LED display goes off, no communication, LED build area
> light stays on).
> I've also tried printing from the SD card. Printing from an SD card
> requires an s3g file. An s3g file is a little more than a gcode file
Units are converted from mm to steps. All the max feed rates are applied
(decompose the velocity into components and apply along each axis), and
per machine interpretations of various details made.
Dan
Steve
Dan Newman
On 8 Nov 2012 , at 4:58 PM, Steve wrote:
> dnewman:
>
> Should we edit the start code and add the missing ')' or download a newer version of the software?
by MBI). What I pulled yesterday worked for me modulo that one error.
What you pull down tonight or tomorrow will possibly have other changes.
> What is the effect of making this change?
code isn't something you want to be doing. You need to be comfortable with
diagnosing problems if you will be using under development code. And not
my recommendation had merely been to use the SF profile for the Replicator 2.
Not to download and use the development copy of ReplicatorG itself.
> What do you use for default settings in ReplicatorG/Skeinforge when using the Replicator 2?\
The default settings are, well, the default settings.
Dan
Dan Newman
>
> Well, if you're uncertain of the change, then perhaps using under development
> code isn't something you want to be doing. You need to be comfortable with
> diagnosing problems if you will be using under development code. And not
> my recommendation had merely been to use the SF profile for the Replicator 2.
> Not to download and use the development copy of ReplicatorG itself.
by that file. Namely, the comment introduced by the '(' wasn't terminated with a ')'
and thus made additional lines of the gcode be ignored. And it also seems to have
thrown RepG for a loop as witness the bad s3g I found generated as a result.
>
>> What do you use for default settings in ReplicatorG/Skeinforge when using the Replicator 2?\
>
> The default settings are, well, the default settings.
files are,
https://github.com/makerbot/ReplicatorG/tree/master/skein_engines/skeinforge-50/skeinforge_application/prefs
and those are the default Skeinforge (SF) slicing profiles for the Replicator 2, Replicator 1,
and other bots. They are the default settings.
Dan
Steve
Dan Newman
On 8 Nov 2012 , at 9:35 PM, Steve wrote:
>
>
> dnewman:
>
>
> Thanks. I just edited the the start code file on my system to add the ')' to make
> the comment line valid.
>
> I was wondering if there was a single file with all the default
> Skeinforge values for the Replicator 2.
SF is maintained by yet another group, disjoint from MBI.
> I see from your link that changes to different
> sections of Skeinforge settings are checked in as changes/improvements are necessary.
However, you can think of them as MBI's default SF settings for a given bot. To
use SF with a bot using MBI's recommended base settings -- MBI's recommended default
settings -- you select one of the SF profiles which MBI has supplied with a ReplicatorG
release from MBI.
> Do these then get combined into the next release of Skeinforge?
> And if you want to try then out
> prior to the next release then you can look through the files you linked to and make any
> changes you are interested in manually?
1. In RepG, select GCode > Edit Slicing Profiles...
2. In the popup window, select a profile and click "Duplicate"
3. Then select the duplicated profile and edit it.
> I have just started to work on getting familiar with
> Skeinforge settings and what they do. I am making progress, and your inputs have helped.
RepG's Print-o-Matic tries to make using SF easier.
Dan
SteedMaker

Eighty
Here's what I don't understand...
Dan Newman


Dan Newman
On 9 Nov 2012 , at 2:30 PM, Dan Newman wrote:
> FWIW,
>
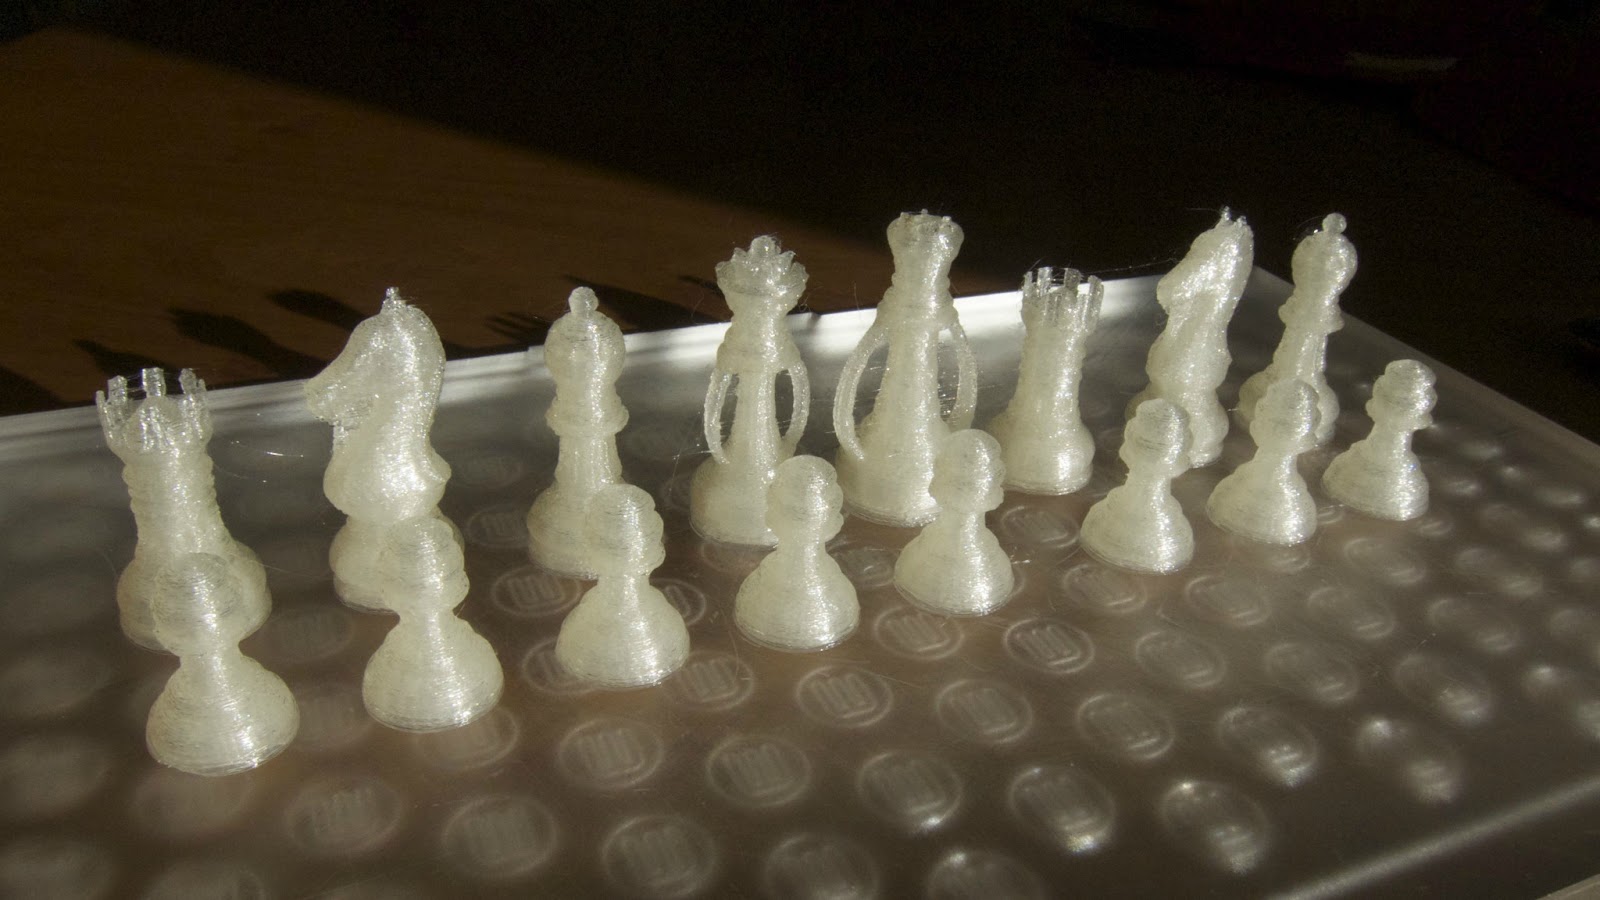
> I successfully used ReplicatorG 0040 to slice at a layer height of 0.1mm a squirrel,
>
> http://www.thingiverse.com/thing:11705
>
> Indeed, it was the first print I've done on a Replicator 2. I did make one deviation
> from the supplied SF slicing profile, "Replicator 2 slicing defaults". Namely, I dumped
> the s3g file for Mr. Shark and noticed that it begins at a Z=0.14mm height. With that
> default SF profile, it would have started the print at a height of Z=0.05mm (which is
> one-half the layer height). So, I edited the profile and enabled the Bottom plugin and
> set the Altitude to 0.09mm. That way, Mr. Squirrel began at the same height as Mr. Jaws --
> 0.14mm. NOTE: doing that isn't necessary and you can instead tweak the Z home offset.
> However, I wanted to have things set up so that RepG prints and prints from the MBI
> SD card would BOTH print without my having to make levelling or Z home offsets tweaks.
Use Raft/Support -- not checked
Use support material -- none
Use default start/end gcode -- checked
Use P-o-M -- checked
Object infill 20%
Layer Height -- 0.1
Number of shells -- 2
Feedrate (mm/s) -- 60
Travel Feedrate -- 150
Print temperature -- 240
Filament Diameter (mm) -- 1.75 (I didn't measure -- just went with that)
Nozzle Diameter (mm) -- 0.4
Dan
Aimar Egaña
--
You received this message because you are subscribed to the Google Groups "MakerBot Operators" group.
Dan Newman
On 9 Nov 2012 , at 10:45 PM, Aimar Egaña wrote:
> Good news for rep2 users. thanks a lot Dan.
>
>
> I will try today and expose my experience.
using RepG.
Again, the most important thing for me was good leveling of the
build platform. I tend to just use a sheet of normal printer
paper to test the gap after first ensuring that there's no plastic
stuck to the bottom of the extruder nozzle. I didn't need to use
a dial indicator, feeler guage, or anything else exotic. (Mind you,
it's okay to use such things. They aren't however, necessary to
get a 0.1mm layer height print.)
Dan
Aimar Egaña
Dan
Dan Newman
On 9 Nov 2012 , at 11:42 PM, Aimar Egaña wrote:
> The only thing I have not clear is the offset adjustment told before. If
> the piece is laid on the build platform must I modify code or something
> else?
I told RepG to use what it calls a starting "Altitude" of 0.09 mm. That way,
when I sliced the model at a 0.1 mm layer height, I knew that RepG would produce
an initial starting heigth of 0.09 mm + (layer height / 2) = 0.14 mm.
I accomplished that by activating RepG's "Bottom" plugin ( Gcode > Edit Slicing Profiles… )
and in the Bottom plugin settings the Altitude to 0.09.
So you don't modify code. You edit the slicing profile using RepG's "GCode" menu item.
On that menu, select the submenu "Edit Slicing Profiles…". Then duplicate the "Replicator 2 Slicing Defaults"
and edit that duplicate. Select "Bottom", check the "Activate" button in it, and set the Altitude
to 0.09 mm. Then select "Save and Close" from the File menu. Then click "Done" in the winodw
which let you select the profile to edit.
Then when you click the "generate gcode button", be sure to select your edit profile in
the drop down list of possible profiles.
Dan
Aimar Egaña
Dan
itzalak2
To unsubscribe from this group, send email to makerbot+unsubscribe@googlegroups.com.
Aimar Egaña
To view this discussion on the web visit https://groups.google.com/d/msg/makerbot/-/7YYU8fuc-m0J.
To unsubscribe from this group, send email to makerbot+u...@googlegroups.com.
Aimar Egaña
Dan Newman
On 10 Nov 2012 , at 2:16 AM, Aimar Egaña wrote:
> Ok, but this "adjustment" is only for the Mr. Jaws file?
I've not actually printed anything from the sample SD card. I've only
printed models of my own or from Thingiverse which I sliced myself with
RepG 40.
Dan
Dan Newman
On 10 Nov 2012 , at 3:43 AM, Aimar Egaña wrote:
> Ok, I'm stupid. I discovered that I have to use "export" file.
>
> This code is much bigger but when I try to print the it starts instantly
> without waiting to heat the header. Why?
That's definitely not the correct gcode. Even towards the very beginning
it deviates from what I would expect to see. (I'm running on Mac OS 10.7.)
I'm guessing that you went into the Skeinforge slicing profile and
changed a number of things which you should not have. Otherwise, why did you
discover that you needed to enable the Export plugin? Do NOT try to setup
your on Skeinforge slicing profile. Use MBI's supplied default profile,
"Replicator 2 slicing defaults". Using RepG's GCode > Edit Slicing Profiles…
duplicate it to make your own private copy. Then in that copy simply
activate the Bottom plugin, set the Altitude to 0.09mm, and use "Save and Close".
Then, to generate your GCode, click the "Generate GCode" button when in the
"Model" view. In the popup window be sure to select your private slicing
profile in the drop down list at the very top of that popup window.
And start with a much simpler model such as the "20mm_Calibraton_Box".
A much better whistle to try is
http://www.thingiverse.com/thing:16286
I've never tried that one in PLA, but in ABS it works quite well.
Dan
Here's the start of what I see in the gcode.
(** This GCode was generated by ReplicatorG 0040 **)
(* using Skeinforge (50) *)
(* for a Single headed Replicator 2 *)
M103 (disable RPM)
G1 X-141 Y-74 Z150 F3300.0 (move to waiting position)
G4 P2000 (Create Anchor)
(<version> 12.03.14 </version>)
(<created> 12.11.10|8:48 </created>)
(<extruderInitialization>)
(<craftTypeName> extrusion </craftTypeName>)
….
Aimar Egaña
--
You received this message because you are subscribed to the Google Groups "MakerBot Operators" group.
To post to this group, send email to make...@googlegroups.com.
Dan Newman
On 10 Nov 2012 , at 12:09 PM, Aimar Egaña wrote:
> Hi,
>
> I have bad news. This morning suddenly the X axis stops working. And the
> problem is the control of the X motor. I have verified the X motor and
> works well with other printer. I disconnected belt to see what happens when
> moving x axis and the motor goes forward and backward all the time. This
> causes a hard vibration and no displacement in x axis. I verified the
> drivers are fine changing X and Y as markerbot support says to me.
>
> After all those verifications the only thing could be firmware or eeprom
> problem. I tried restoring all but nothing changes. Hope Makerbot give me a
> solution soon. :(
Dan
Aimar Egaña
Dan Newman
On 10 Nov 2012 , at 12:30 PM, Aimar Egaña wrote:
> No, it starts to vibrate (fast forward and backward small movements) and
> can't do nothing,
Since you saw the same behavior when swapping the little stepper driver cards,
you're left with a motor issue. That the motor worked fine with no load
isn't surprising. That leaves either something up with the X axis
mechanics (e.g., too much friction, out of alignment and binding, etc.)
or the stepper motor itself (failure in the motor or for some reason it's
simply not getting enough current and binding). The Vref values from
RepG's Machine > Onboard Preferences should be 118, 118, 40,
118, and 118. They show up on the second tab, "Homing/VREFs".
Before connecting to the bot over USB with RepG, make sure
that you've first selected "Replicator 2" as the Machine > Machine Type (driver).
Dan
Aimar Egaña
Dan
Dan Newman
On 10 Nov 2012 , at 12:52 PM, Aimar Egaña wrote:
> Hi Dan,
>
> 1) I removed the X motor from its support and verified the movement without
> load. It makes the "crazy forward-backward" movement when I pulse x
> direction in jog mode.
>
> 2) Then I connected the Y motor to the X motor connector and the Y motor do
> the same movement as the X motor.
>
> 3) I connect the X motor to the Y connector and it works flawlessly
>
> 4) I swapped the drivers of the X and Y motors and same result.
>
> 5) With steppers off I can move by hand X axis applying the same force of
> the Y axis.
>
>
> Conclusion: The problem looks like something with the eeprom or similar.
>
> ¿Any idea?
For instance, if you used the homing utility to home the axes, then
the X axis homing merely runs the stepper motor step-step-step-step-step
at a given speed. Not much which can go wrong in the firmware.
Some *hardware* possibilities still remain:
1. I could be the wiring for the X stepper motor. You've not eliminated
that variable.
2. It could be the X axis endstop is stuck on or turning on and off
at a high frequency. Eliminating that from the equation involves
looking at it -- does it look like its red LED is lit or dimly lit?
(Dimly lit would indicate it's switching on/off quickly.) I do not
know if the electronics will behave correctly if you simply disconnect
the X endstop cable briefly to test.
If I had to guess, I'd guess it's some sort of problem with the X stepper
motor wiring harness.
Dan