Interior walls
276 views
Skip to first unread message

Andrew Masters
Sep 11, 2013, 6:21:17 AM9/11/13
to wikihouse...@googlegroups.com
I'm brand new to this, and a software engineer not a architect or builder, so please forgive me if you think this proposal is naive.
I started thinking about the interior of a wiki house and 'finishing' rooms. Painting walls sucks. Here's a wiki house proposal for walls:
To create interior walls, use vertically mounted roller-blinds of a tough, semi-transparent, flexible white plastic. The height of the roller blind exactly matches the wiki house room height, the width is variable (so you might get a 5m roller, 10m roller etc), but you can unroll the 'wall' to any width you need.
Unfurl the wall-blind to the correct width and attach the wall-blind to the building substructure by using protuding pins and suction cups to adhere to the blind. (a bit of thought might need to go into dealing with corners.)
Voila - a nice interior wall in minutes. Completely disassemble-able - just unsuck the cups and roll the blind back in.
Now here's the cool bit - put rows of RGB led lighting strips in the gap behind the wall and you can have any colour wall you like (only switched on when someone is in the room).
For utilities like power sockets, it might be possible to engineer a 'zip' at 15cm height.
Opinions?

John Beck
Sep 11, 2013, 3:45:17 PM9/11/13
to wikihouse...@googlegroups.com
I had a very different idea for interior walls. The issue I was facing is that in many homes when one mounts furniture such as shelving,it leaves a permanent set of hopes in the wall which are uneven. My solution was to make all the walls in the wikihouse interior similar to the porous pegboards used in workshops and garages. It is easy to mount anything on such boards, and since the holes are evenly spaced one can design with dense storage in mind.
The walls for this would have to be able to hold lots of weight if it was to be terribly useful. A strong enough set of walls could hold a hammock or a fold-up desk.
Another option would be a wall with much larger holes more spaced out designed to have panels hooked on them. This means easy messing with insulation and electricity, the ability to hook more heavy duty weights where needed. The panels that cover unused wall could have a variety of features from being a painted pannek, being made out of a different material, being made with a shelf in mind, or being holed for the pegboard idea in mind.
John Beck
Sep 11, 2013, 3:47:14 PM9/11/13
to wikihouse...@googlegroups.com
It is unfortunate that I can't edit my post in any obvious ways. Auto-correct changed holes to hopes. There may be other errors.
Matthew Gardner
Sep 12, 2013, 3:46:34 PM9/12/13
to wikihouse...@googlegroups.com
In terms of the RGB led in the wall itself, Nick Godfrey has done something just like this with ambient lighting stored in the walls.
He sent me the photos of it. It was pretty cool.

nick
Sep 20, 2013, 9:35:05 AM9/20/13
to wikihouse...@googlegroups.com

nick
Sep 20, 2013, 9:40:01 AM9/20/13
to wikihouse...@googlegroups.com

Some RGB's during a mock up.
nick
Sep 20, 2013, 9:42:19 AM9/20/13
to wikihouse...@googlegroups.com


Paul Pangrazzi
Sep 20, 2013, 10:58:48 AM9/20/13
to nick, wikihouse...@googlegroups.com
That's terrific. Thanks for sharing (and beam me up!)
【ツ】paul

Eric Hunting
Sep 28, 2013, 4:26:03 PM9/28/13
to wikihouse...@googlegroups.com
This has possibilities. There are actually some pre-finished veneer lumber materials designed to 'roll up' (though not too tightly) in order to accommodate curving surface. They have a thin flexible veneer front surface and the back is cut with slots to allow it to bend. But also something like bamboo slat wall hangings and curtains might work, offering an interesting texture and rolling up easily.
Maintaining demountability for easy repairs while achieving a comfortable interior, or resilient exterior, is a challenge. I'm in full agreement about the hassle of paint and conventional finishing like plaster. And the stuff often isn't healthy in general. To me, paint, glue, and nails are design sins because they represent a kind of 'destructive construction' that dooms materials to landfill rather than reuse or recycling. I long studied the use of aluminum T-slot framing (which, sadly, hasn't proven as cost-effective as I'd hoped it would...) and the addition of continuous slots with a post & beam structure offered many panel and utilities mounting possibilities. You could make wall panels rather like shoji or fusuma panels or just veneer covered composite panels that could snap-on, pop-in, or be held in place by cover strips in a variety of ways. For instance, a very simple method would be to just place a panel between aluminum joists and then snap-in or bolt-in a wooden cover strip into the front-facing T-slot with enough overhang that it held the edges of the panels in place. Or things like tongue-in-groove plank could be milled at the ends and just slide into the slots.
As long as one kept to a regular topology as the Wikihouse system intends, I think there are many interesting modular mounting schemes to explore. As a dual surface 'stressed skin' structure, Wikihouse has some similarities to SIPs (structural insulated panel) structures in the way it might potentially be finished. The same approaches would work fine--though most conventional ones are non-demountable. But it has a big advantage in that it's not so monolithic as SIPs so you can get into the interstitial space between wall surfaces and employ non-destructive mechanical attachment or even use things like industrial velcro for lighter materials. Base panels on one or both surfaces of the structure could be opened up making it, more or less, a space frame. Simple hole patterns and slots in the surface panels and T-notches (as used with a lot of laser-cut projects) on spar edges offer endless attachment possibilities.
For instance, a fast and cheap temporary exterior cladding could be made simply by bolting down GripClip anchors ( http://shelter-systems.com/gripclips/ ) along the exterior to hold an overlapping skin of conventional tarps or sheet plastic. But then one can almost just as easily (though probably nowhere as cheaply...) bolt-on the alloy frames/strips/clips though a drainage plane sheeting for commercial com[posite hanging wall cladding like Alucabond ( http://www.alucobondusa.com/images_dynamic/attachment_methods_600.jpg ), metal panel ( http://www.metposite.com/Images2/F-2-ISO-midsize.jpg ), or pre-finished nail-free wood, cement board, polylumber, or terracotta siding systems. ( http://www.mataverdedecking.com/architectural-specifications/ ) Things like Alucabond can also be CNC cut and are now made with wood and stone veneer too.
Modular interior wall, ceiling, and floor panels can attach using velcro--if light enough--nylon rivets and snap-lock posts, twist locks, even zip ties have potential. A rough-and-ready structure probably needs little to no interior finishing with some choices of plywood. And a system based on panels attached by through-hole screws to the base wall surface is simple enough, if you don't mind the visible edge bolts/holes and seams. But we usually want to find ways to conceal attachment in some way and try to create contiguous-looking surfaces.
Modular interior wall, ceiling, and floor panels can attach using velcro--if light enough--nylon rivets and snap-lock posts, twist locks, even zip ties have potential. A rough-and-ready structure probably needs little to no interior finishing with some choices of plywood. And a system based on panels attached by through-hole screws to the base wall surface is simple enough, if you don't mind the visible edge bolts/holes and seams. But we usually want to find ways to conceal attachment in some way and try to create contiguous-looking surfaces.
I mentioned before the idea of holding panels in place between T-slot beams by use of snap-in cover strips that lock into the beam slots. A similar thing could be done with the Wikihouse spars by using T-notches. T or 'cross' notches are a common way of making simple boxes with laser/cnc cut wood or lexan. You can see a great example in the construction of the original Makerbot, Ultimaker, and other DIY 3D printers. ( http://farm4.staticflickr.com/3371/3415495821_6c3e30ba95_o.jpg ) The way they work is that you put a little hex nut in the notch and then you can attach a panel perpendicular to it with through-hole bolt. The plywood used with Wikihouse is also thick enough that it might hold small embedded screw sockets or 'fixing inserts' as they're sometimes called. ( http://www.halfen.no/bilder//produktbilder/Demu%20hylser.JPG http://media.jetpress.com/iicvjtah15/Insert-Nut-Knock-in-Large-Flange-Fixing-Holes.jpg) One type installed in pop-rivet fashion is called a Rivkle or blind rivet nut, though this is more commonly used for sheet metal. ( http://www.business-actu.fr/files/2013/04/procedure-pose-ecrou-rivkle-aero.jpg ) But an even simpler approach would be to design a notch that accommodate a snap-lock clip. ( http://www.amsisupply.com/graphics/clips/clips%202011/178-SL-18-S-large.gif ) This way you just push the clip in and it lock in--though getting it out again can sometimes be an issue... With these kinds of fasteners you could then make a thin cover strip to hold materials in place on the Wikihouse walls while concealing the seams along the line of the spars. You add the necessary notches to the spar edges then make finished thin flexible cover strips with snap-lock fasteners or discreet counter-sunk through-hole bolts at the right intervals. You put up panels, roll-up materials in vertical sections, fabric with some sheet padding underneath, or thin tongue-in-groove planks and attach the cover strips, bolting or locking them down as you go. It would be a fairly clean-looking wall covering system that could apply to a large assortment of materials.
Another approach suited more to rigid panels would use a metal mounting angle on the finished panel edges. These would be in alternating left and right hand intervals so that the panel edges interleave over the common line of the spar. Simple through-bolts or snap-lock pins would then attach them to the T-notches on the spars and a press-fit flush cover strips of wood or alloy would conceal the bolts along the spar. This would call for a relatively thick wall panel, like a fusuma or office partition panel, which you would want a light core material for. Using fabric, a springy soft edge would neatly conceal the bolt points under them without cover strips, the panel edges 'squishing' together.
Hanging panels are another possibility. This would rely on a kind of metal or wood 'hook' attached to the back of panels which engage slots in the base panels. They would, of course, need a certain amount of free movement room to engage the hooks. Snap-lock clips and pins eliminate that adjustment room but would harder to disengage later unless friction-held instead snap-locked.
Hanging panels are another possibility. This would rely on a kind of metal or wood 'hook' attached to the back of panels which engage slots in the base panels. They would, of course, need a certain amount of free movement room to engage the hooks. Snap-lock clips and pins eliminate that adjustment room but would harder to disengage later unless friction-held instead snap-locked.
One of the most interesting new kinds of fasteners, introduced by the Lamello Corp., are magnetically driven bolts and studs. ( http://www.youtube.com/watch?v=BpImijk1cB0 http://www.youtube.com/watch?v=IR820heX2_w http://www.youtube.com/watch?v=K3lW-K3_-o8 ) These use a special magnetic driver to engage them that attaches to a power drill and provides a totally 'bilnd' method of connection, though with the limitation that the magnetic bolt must be in parallel to the magentic driver. It's intended mostly for furniture applications allowing for totally concealed attachment between pieces. A system of panels could be made that fit between the spars of the Wikihouse or within large openings in the base panels and then use magnetic studs to lock them in place. This could work for covering every surface in the Wikihouse with modular panels. It would be awesome, but probably ridiculously expensive.
Lots of fun possibilities to explore with this.
nick
Sep 29, 2013, 10:55:35 AM9/29/13
to wikihouse...@googlegroups.com

Eric Hunting
Oct 3, 2013, 1:11:34 AM10/3/13
to wikihouse...@googlegroups.com
This looks pretty clever. I recall there was a German company some years back that was making a small panel wall system out of gypsum and terracotta but, though the planks interlocked neatly like two-direction tongue-in-groove, they needed some kind of bonding to fix them to conventional walls.

Philip X. Diaz
Oct 4, 2013, 11:22:07 AM10/4/13
to Eric Hunting, wikihouse...@googlegroups.com
One fastener I've been experimenting with lately is the two-part barbed push rivets. They require no tools, have an adjustable grip range, are super cheap and are incredibly strong. Maximum holding thickness is 1.375" for the largest size.
I successfully used them to build a lath wall for a yurt which required several hundred connectors.
http://www.richco-inc.com/products/rivetsscrewswashersnuts/99-rivets-screws-washers-nuts-catalog.html?PartNum=&country=RICHCOUSA&grpcode=C1220
I successfully used them to build a lath wall for a yurt which required several hundred connectors.
http://www.richco-inc.com/products/rivetsscrewswashersnuts/99-rivets-screws-washers-nuts-catalog.html?PartNum=&country=RICHCOUSA&grpcode=C1220
Eric Hunting
Oct 6, 2013, 12:20:35 PM10/6/13
to wikihouse...@googlegroups.com, Eric Hunting
These look pretty versatile. Does the bottom/back half of the fastener grip into material on its own, or do both halves need to be held in place as they're pushed together? I could see this also working with that T-notch, since it wouldn't need to resist turning when the other half is just pushed straight in. It just has to hold the one half from the back. A simple and cheap tool-less connector. I could see this working especially well with some thinner wall coverings, like some of the flexible paper boards or the sheet plastics for lighting diffusers. You could make a large area light panel--especially one conforming to a curved shape--by putting in a series of light fixtures between the structure ribs then putting a light diffuser sheet over the space.
I really need to get some space to start experimenting with these things. So many great ideas to try.

Charlie
Oct 9, 2013, 6:29:53 AM10/9/13
to wikihouse...@googlegroups.com
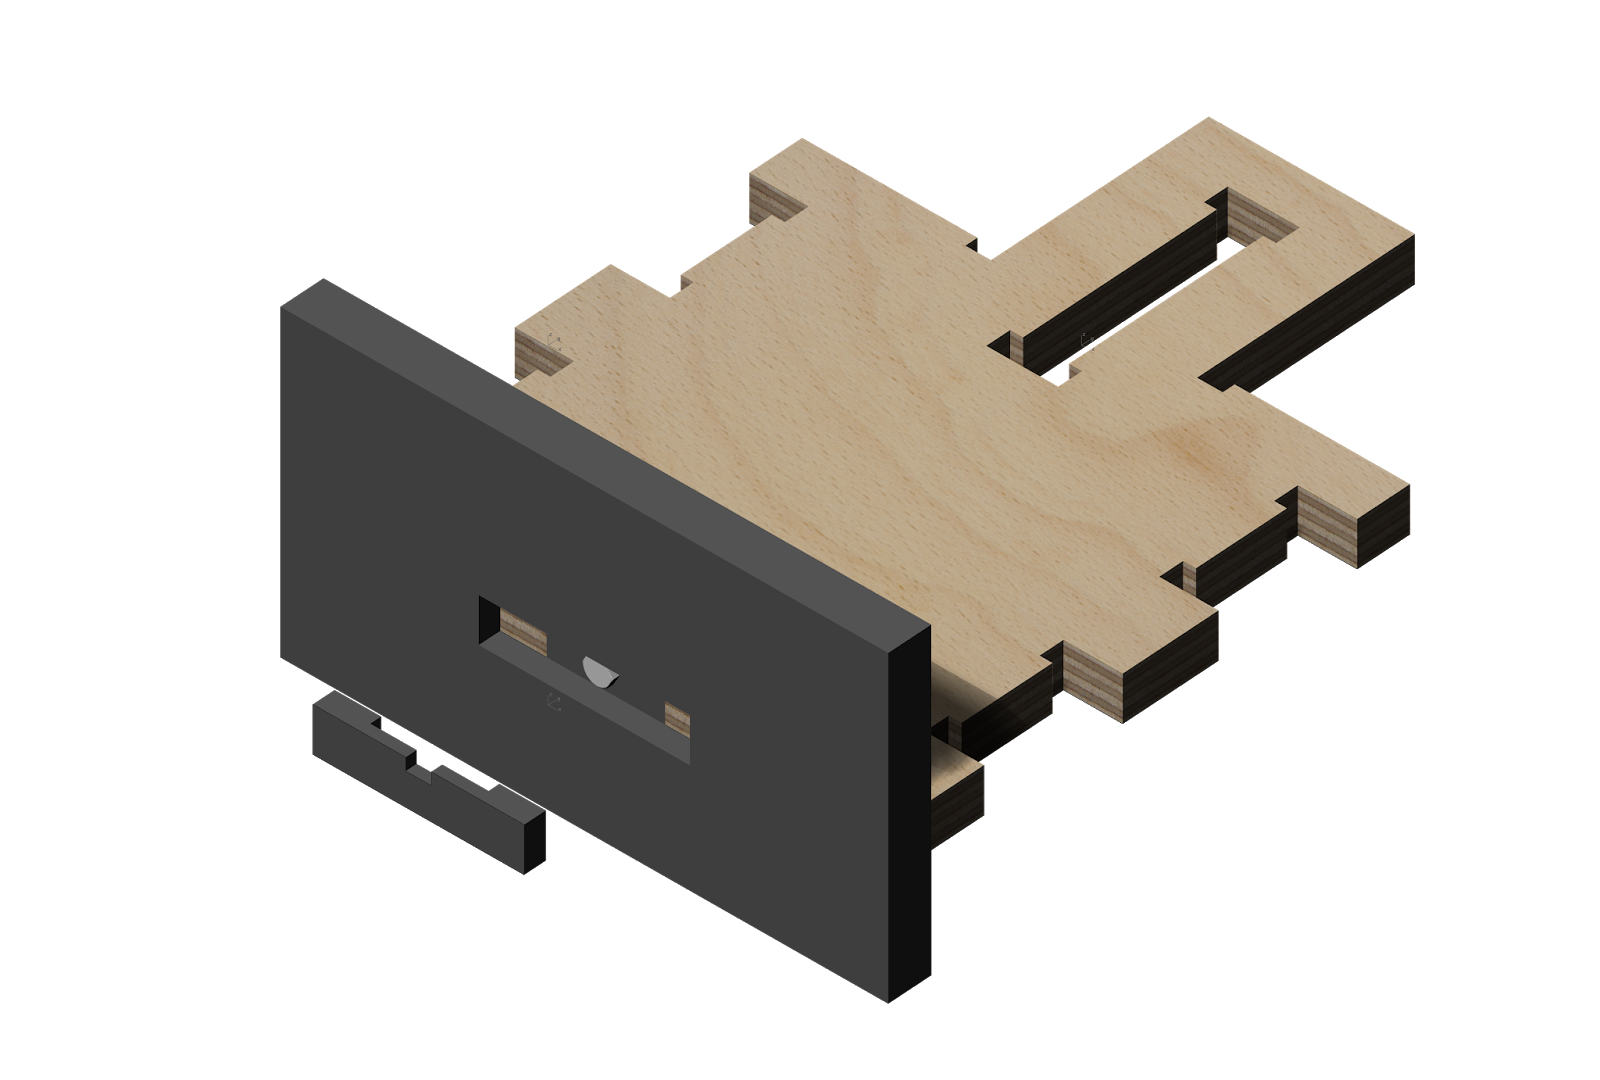
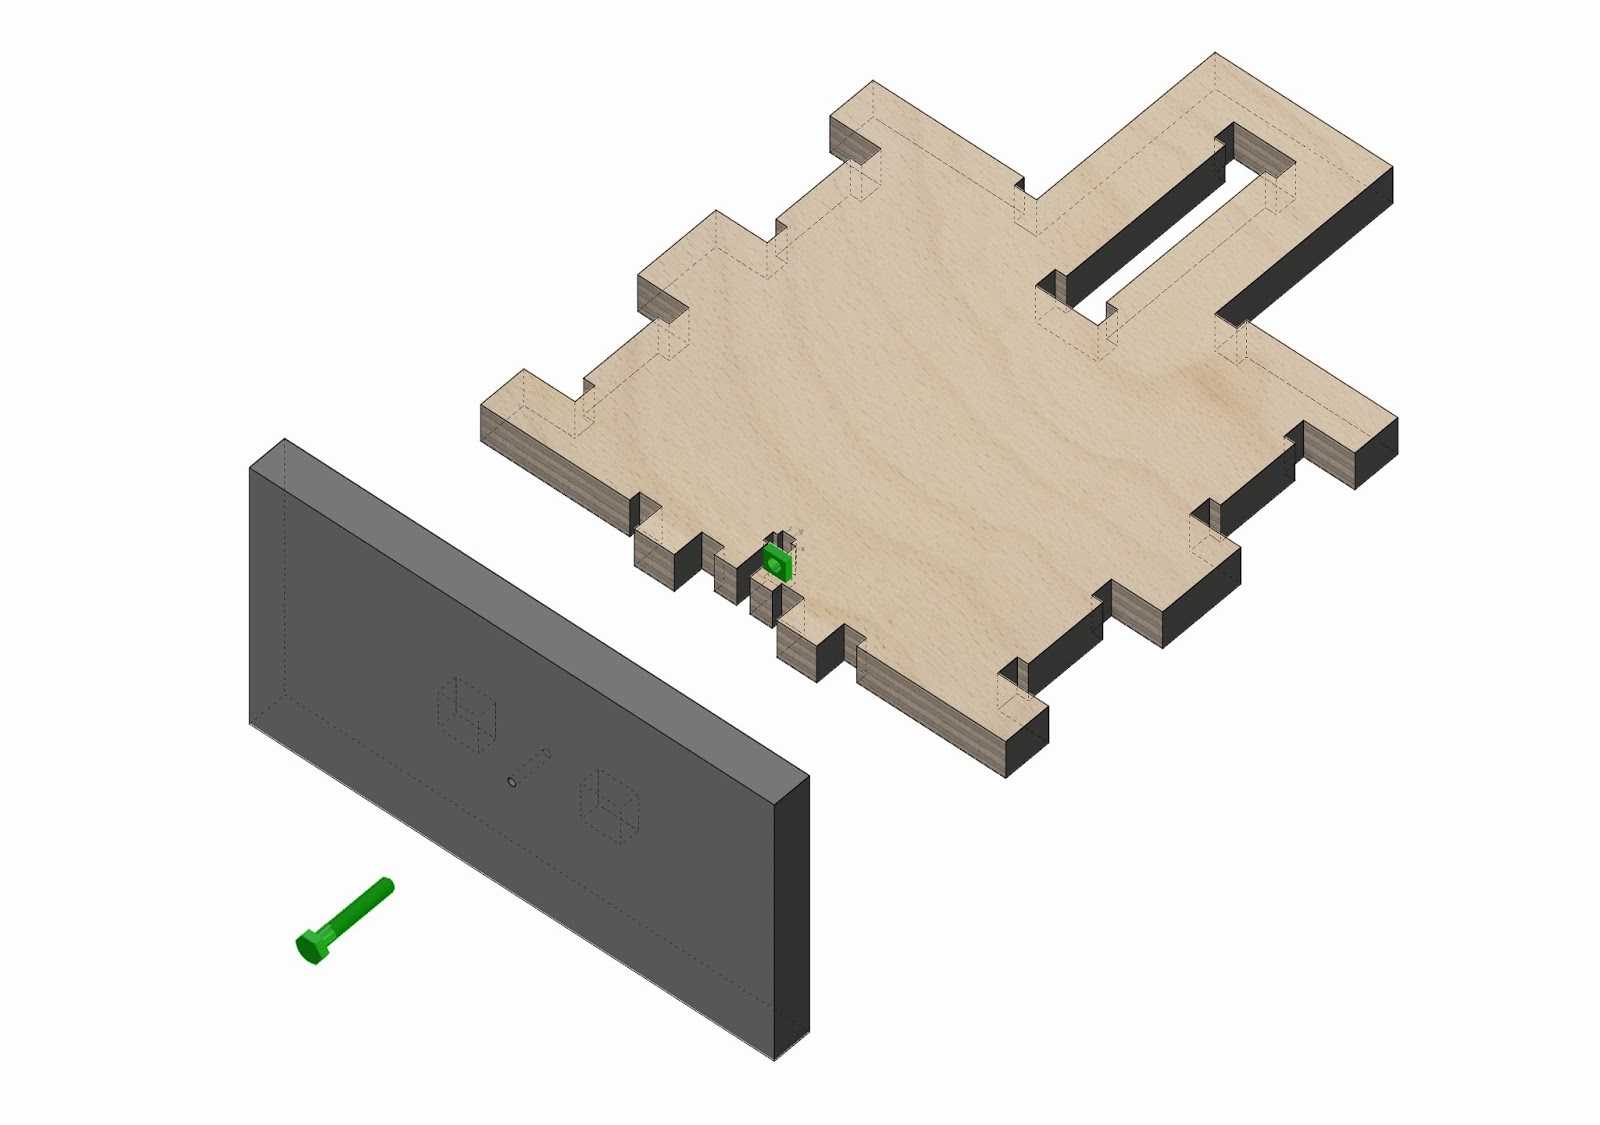
I saw this post at the start but didn't catch up in the last week. Wish I'd seen some of these ideas when I was thinking about ways to create create flush waterproof joints for the outside panels/fins. I created some 3D mock-ups (link to google drive) of my first thoughts inspired by the 50 digital wood joints project which was posted here previously. For speed and accuracy I've been assuming that we can only cut on one face with the CNC. Designing for cheap proprietary systems is something I want to look into.
Very early days. For the WikiHouse Ox project I'm going to use the no-fixing version which I don't have an image of here but is in the link above (I've named it the recogniser). I'm looking to build a WikiHouse to live in with six others next year so I'm trying to gather as many ideas as possible for that.

Eric Hunting
Oct 9, 2013, 12:07:18 PM10/9/13
to wikihouse...@googlegroups.com
These are great renderings. Does an excellent job of showing how that T-notch could work. Looking at these different joints, I think there is definitely an issue with the radius limits of the router with these approaches to attachment. We're probably looking at pretty large nut or fastener sizes so there is enough material to hold them securely.
Reply all
Reply to author
Forward
0 new messages