RBAC adent:id issue
207 views
Skip to first unread message

Gal Akavia
Sep 22, 2021, 2:54:01 PM9/22/21
to Wazuh mailing list
Hi,


Great RBAC!
Im using wazuh version 4.1.5
I will be thankfull for a little help hehe..
Im try to configue in the WUI readonly access for a user to spesific agent (Don't want him to see all the agents security events - only for a spesific one).
I did does steps in Kibana & Wazuh but still that privilegless user keep see all the agents i have on the Wazuh > Modules> security events.
Kibana:
1. I created internal user (in WUI user-Run_as allow & /usr/share/kibana/data/wazuh/config/wazuh.yml)
2. I created new role and assign it the following:
3. Mapped my user to that role.
Wazuh WUI:
1.
2. I created 2 policies and then apply them to a role, first allow the following Allow(G_testt) to spesific\all agents and the disallow permissions to thoes spesific agents;
(tried alot of variations with that policies, with the Allow & Disallow together\seperate, and diffrent order of priority)
G_testt = allow
G_test_DisallowPolicy
above Resources I wanna DENY read\watching access to does praticular agents (006 for example) for that test user but still seeing them in the security events!!
3. Roles (As above i tried many variations like with\without the allow policy(G_test) and i changed the roles & policies assign to it, it is the main one i stay with now)
4. Roles mapping (few variations that i tried at Roles);
*** inside look ***
All thoes steps but still that permissionsless-user keep seeing all the agents at my Wazuh security events
Please help :)
I know thats alot to read and yet, Its the fully steps to made RBAC with Wazuh-Kibaba WUI 4.1.5 after i combined all the guides i saw so.. thats still nice for anybudy who want to create it . . . ;)
Gal Akavia
Sep 22, 2021, 3:06:12 PM9/22/21
to Wazuh mailing list
To be more clear, at Kibana step 3 thats the screen i mapped the internal user (Gal_test)
About step 2 in Wazuh, the priority order i tooked from here, Last-in is the High priority >
step 2 in my main post there is some writing errors so, forgive me =P

carlos...@wazuh.com
Sep 23, 2021, 5:22:56 AM9/23/21
to Wazuh mailing list
Hi,
Let me answer you with a guide of the exact steps you should follow in order to achieve this goal, so it can be useful both for you, who already have most of it done, and for the rest of the community that may want to do it from scratch.
These would be the steps:
STEP 1: CREATE A GROUP FOR YOUR AGENTS
This is a very important step I think you are missing. The idea is to add to this group every Agent you want your user to be able to see.
Create the group by accessing Wazuh > Management > Groups > Add new group


It is important to save the name of the group as we will need it. In this example I'm creating a new group called "community".
STEP 2: CREATE AN INTERNAL USER
Note: If you have already created the user you can skip this step.
Go to Security > Internal users and create a new user.

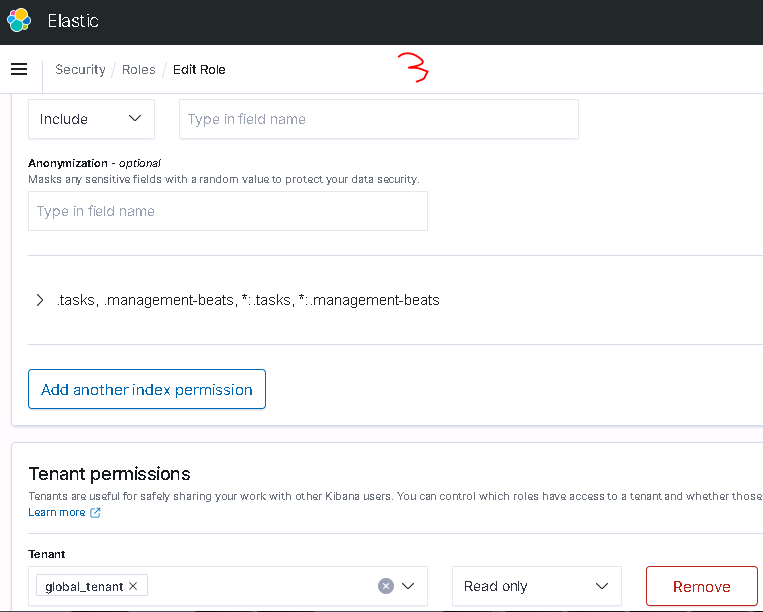
STEP 3: CREATE A KIBANA ROLE
Go to Security > Roles and create a new one with the following permissions:

Then add the following Document level security, replacing the agent.labels value with the name of the group created at step 2 as the label name in the "match_phrase":
{
"bool": {
"must": [],
"filter": [
{
"match_all": {}
},
{
"match_phrase": {
"agent.labels.community": "yes"
}
}
],
"should": [],
"must_not": []
}
}
STEP 4: CREATE A RBAC POLICY
Go to Wazuh > Security > Policies and create a new one.

You should include the desired allowed actions for that particular user. You will need to specify the agent group name as the Resource Identifier. Take a look at the following example:

STEP 5: CREATE A RBAC ROLE
Go to Wazuh > Security > Roles and create a new role assigning to it the new Policy we created

STEP 6: CONFIGURE WAZUH RBAC IN KIBANA
For the next step you will need to use the wazuh-wui user with run_as enabled. To enable this, access your Kibana host and set the run_as parameter to true in the /usr/share/kibana/data/wazuh/config/wazuh.yml configuration file. Save it and restart the Kibana service. Here is an example of how the configuration file should look after applying this change:
hosts:
- default:
url: https://localhost
port: 55000
username: wazuh-wui
password: wazuh-wui
run_as: true
Also make sure you are using RBAC white mode. You can find more information about the white mode and how check if it is enabled here
STEP 7: ADD THE ROLE MAPPING
Finally go to Wazuh > Security > Roles mapping and save a new role mapping using the internal user we created in Step 2 and the role name of the Step 5.

HOW TO TEST THIS
Now it should work as expected. Keep in mind that you probably need to clear your browser cache. Try using incognito mode to see that everything works as you expect.
Here is an example of the results after configuring this to make the agent 002 the only one available for my example user:

I hope this helps. Let me know if you have further questions regarding this topic.
Gal Akavia
Sep 23, 2021, 6:28:49 AM9/23/21
to Wazuh mailing list
Hello Carlos! tnx for replay, according to your instractions i created a group and assign to it the spesific agent,
2 silly quetions,
1. where does configuration are located?
2. RBAC white or black mode (-), i saw that but im using WUI and im not sure how to set is with cURL, is there another option trough the WUI or strate trough my host machine?
Gal Akavia
Sep 23, 2021, 10:05:09 AM9/23/21
to Wazuh mailing list
OK after checked im on RBAC white mode,
I just need to specift that group name as u suggested but where\how am i doing that ? "/
carlos...@wazuh.com
Sep 23, 2021, 10:07:16 AM9/23/21
to Wazuh mailing list
Hi again,


Don't worry about the questions. Ask whatever you need. We are glad to help the community.
The Document level security configuration must be specified when creating the Kibana Role and can be found here:
Just type the configuration I shared with you, replacing "community" with the name of your agent's group and you are good to go.
Regarding the RBAC white or black mode, you can easily check this by using the Wazuh API. The Wazuh UI provides a useful tool called API Console that allow you to run API commands without needing to access your manager by console. You can find the API console here:
With this consule just run the following API endpoint:
You can change the rbac mode by using this other endpoint, if needed. Finally, you can find more information about the different RBAC modes here.
Let me know if you need further assistance.
Gal Akavia
Sep 23, 2021, 12:07:59 PM9/23/21
to Wazuh mailing list
After i added it i got the following errors;


index permissions:
I removed Document level security and its working.
Even if i use the private tenant i got does errors.
Any suggets friend?
Gal Akavia
Sep 23, 2021, 1:33:45 PM9/23/21
to Wazuh mailing list

Gal Akavia
Sep 24, 2021, 6:48:59 AM9/24/21
to Wazuh mailing list
I checked the test user policies, seems i did all by the book cut still it enable to see all agents events,
Dev Toold >
GET /security/users/me
OUTPUT:
{
"data": {
"affected_items": [
{
"id": 2,
"username": "wazuh-wui",
"allow_run_as": true,
"roles": [
{
"id": 100,
"name": "G_test",
"policies": [
{
"id": 100,
"name": "G_testt",
"policy": {
"actions": [
"ciscat:read",
"mitre:read",
"rootcheck:read",
"syscheck:read",
"sca:read",
"syscollector:read",
"agent:read"
],
"resources": [
"agent:group:agents_4-5",
"agent:id:004",
"agent:id:005"
],
"effect": "allow"
}
}
],
"rules": [
{
"id": 100,
"name": "G_test_RoleMap",
"rule": {
"FIND": {
"user_name": "Gal_test"
}
}
}
]
}
]
}
],
"total_affected_items": 1,
"total_failed_items": 0,
"failed_items": []
},
"message": "Current user information was returned",
"error": 0
}
in the other hand that user can see in the Agents dashbord only agents 004 & 005 as config it to see.
is that a bug ?
carlos...@wazuh.com
Sep 27, 2021, 11:28:12 AM9/27/21
to Wazuh mailing list
Hi,
First of all, let me clarify the differences between Wazuh's RBAC and OpenDistro's RBAC, as there seems to be some confusion about it.
- OpenDistro RBAC allows you to restrict a user's access to Kibana alerts and other actions.
- Wazuh API RBAC allows you to restrict user access to different resources and actions that affect the operation of Wazuh itself, such as managing agents, modifying configurations, restarting Wazuh, etc.
It is possible to combine them, to take advantage of the capabilities that both offer.
That said, events are not managed by Wazuh's RBAC, but by OpenDistro's RBAC. That's why if you want a Wazuh policy to limit the display of some element, such as alerts, it has to be using the Document Level Security field. That's why you need to configure the Document Level Security as I specified before.
Regarding the issue of not seeing the alerts, have you made sure you are using a date filter in which there are events available? For example, in my example below I have no alerts for today, so I see this.

However, if I select a wider filter (the last 7 days), I see that it works perfectly with the configuration I have given you:

Please make sure your agent has events available for the time range specified.
Gal Akavia
Sep 28, 2021, 10:56:56 AM9/28/21
to Wazuh mailing list
Hi carlos, tnx for replay.
I will explain my errors and targets.
1. I successfully configured to made that user to see wazuh spesific info for 2 agents and not all.
2. As you explain above, I used document level as you said because i want that user to see only thoes 2 agents alerts,
i just changed the ".community" with my group as you can see:


But,
After i configure it as above i got the following errors, i cannot signin to wazuh web interfaces:
So document level give me those errors, you can see my index-pattern for that user
After i remove document level as mention above the errors is fixed..
What am i missing?
Gal Akavia
Sep 29, 2021, 12:34:58 PM9/29/21
to Wazuh mailing list
Carlos thank for all,
i success to do it even without the document level security.
tnx man
Reply all
Reply to author
Forward
0 new messages