E-mail alert postfix no functions.
735 views
Skip to first unread message

Defence Technology
Sep 9, 2021, 2:36:58 AM9/9/21
to Wazuh mailing list
Good day Wazuh Team,
I have created one ELK Wazuh server for monitor file integrity and security events of
our servers. The ELK Wazuh Manager able to view the hits from agents but when I created alert emails, it unable to send alerts. Installed Postfix as per Wazuh documentation.
I've attached the diagram along with this mail for better understanding.
Thanks.
1) Wazuh able to detect the target agent servers/PC. Able to view the hits.
2) Installed postfix for generate e-mail alerts.
3) When tries to test postfix echo, the log shows error message. No test e-mail received:
2021/09/09 12:09:19 ossec-maild[27085] sendmail.c:417 at OS_Sendmail(): ERROR: (1765): RCPT TO not accepted by server - 'm...@example.com'
2021/09/09 12:09:19 ossec-maild[27085] maild.c:334 at OS_Run(): ERROR: (1223): Error sending mail to 127.0.01 (smtp server)

Hanes Nahuel Sciarrone
Sep 11, 2021, 11:56:02 AM9/11/21
to Wazuh mailing list
Hi Thirupan,
Thank you for use Wazuh, I'll try to help you with the Postfix problem. Recently the documentation was changes because there was something wrong on certificate configuration for Ubuntu. As far as I could see you are using Ubuntu server for Wazuh manager, Am I right?. I would like to suggest review the documentation again to validate the certificate.
Best regard
Hanes.
Defence Technology
Sep 12, 2021, 4:34:18 AM9/12/21
to Wazuh mailing list
Hi hanes,
I have reconfigured
"smtp_tls_CAfile = /etc/ssl/certs/ca-certificates.crt", previously was different. After reload postfix,
tried test "
echo "Test mail from postfix" , still unable to receive the test email.
Hanes Nahuel Sciarrone
Sep 13, 2021, 1:42:10 PM9/13/21
to Wazuh mailing list
Hi Thrirupan,
Best regards
Hanes
Defence Technology
Sep 14, 2021, 10:32:24 PM9/14/21
to Wazuh mailing list
Hi Hanes,
Thank you for your reply. I have checked, there is no folder called "certs" in the ssl folder. (ie:cat /etc/ssl/certs/ca-certificates.crt doesn't exist).
For
Postfix, I followed the exact documentation from the Wazuh. There are 2
email ID's involved. One is mine to receive the alerts and another
email used to be configured is sasl_passd, contains username and the
password for the email.
We are using an SMTP server called
Axigen. The email that I've configured in Postfix sasl_passd, is an
email account used as "no-reply".
Hanes Nahuel Sciarrone
Sep 16, 2021, 12:08:40 AM9/16/21
to Wazuh mailing list
Hi Thirupan,
- What OS are you using to run Wazuh manager and Postfix?
- Could you please validate if you have /etc/ssl/certs/ folder in your system?
- Could you please share with me the file generated with tree /usr/share/ca-certificates/ > folder_tree.txt command? You should check that /usr/share/ca-certificates/ folder exist.
Best regards
Hanes
Defence Technology
Sep 17, 2021, 3:32:13 AM9/17/21
to Wazuh mailing list
Hi Hanes,
1) Wazuh manager/postfix runs on OS Ubuntu 18.04.5 LTS
2) Yes, folder
/etc/ssl/certs/ exist. Contains .pem files inside.
3) After runs command
#tree /usr/share/ca-certificates/ > folder_tree.txt command, there is folder_tree.txt file appears in
/usr/share/ca-certificates/ folder. But when I tried to view as command nano, the txt file were empty, no text found inside
folder
/usr/share/ca-certificates/.
Hanes, please assist what should I do.
Hanes Nahuel Sciarrone
Sep 17, 2021, 2:33:49 PM9/17/21
to Wazuh mailing list
Hi Thirupan,
As far as I see the main problem now is that you are not able to create and configure a certificate for Postfix because the OS does not have certificates. I would like to suggest that you install Ubuntu 18.04.5 in Virtual Box to validate if the installation has the certificates. I installed Ubuntu 18.04.5 on my default system and it does. In case that certificates exist on your virtualized os, we could install Postfix here and do a test. As an example I show you Ubuntu 18.04.5 freshly installed on virtual box.
Best regards
Hanes
Hanes Nahuel Sciarrone
Sep 21, 2021, 9:16:42 AM9/21/21
to Wazuh mailing list
Hi Thirupan,
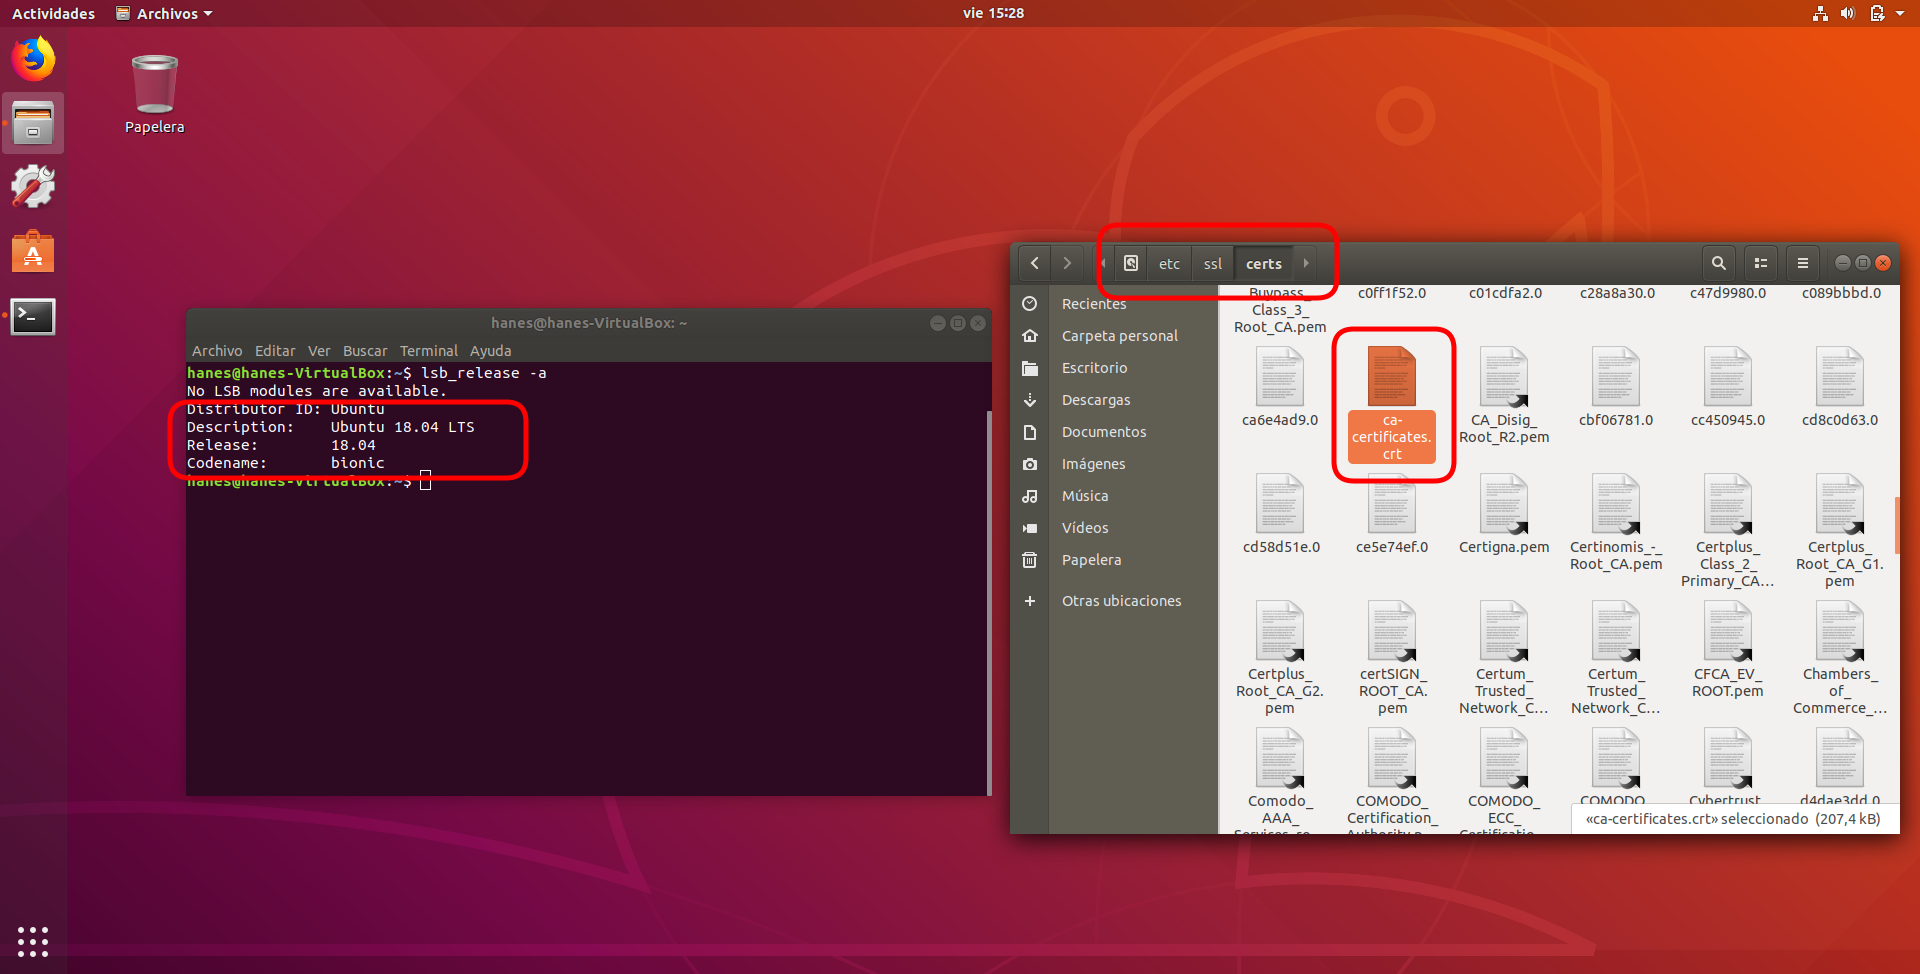
I have seen that you already have the certificate, perfect. The first thing you should know is that this certificate only works on the OS on which it was created so, if you are using the virtual machine with these certificates let's do the Postfix server here. I would like to share with you this guide that I built for this purpose over Ubuntu where we are using the Gmail service.
1. Open the terminal as root.
2. Install the packages apt install postfix mailutils libsasl2-2 ca-certificates libsasl2-modules.
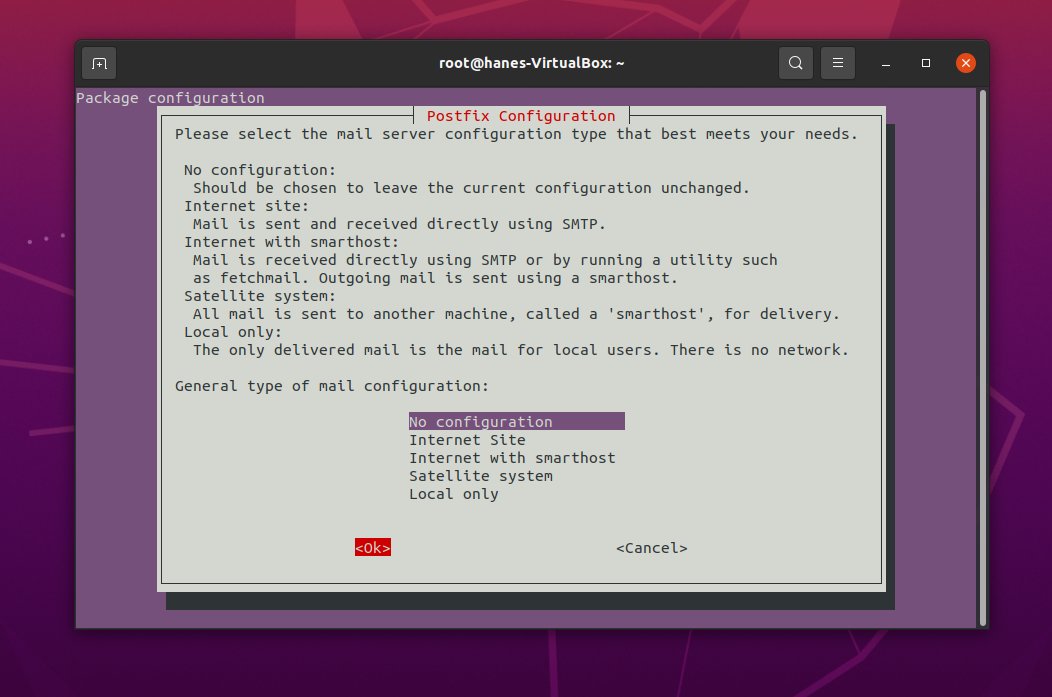
3. Once the command execution has finished, the Postfix installation menu should appear. In this menu, the No configuration option must then be selected. The image shows an example of this.
4. Then we will copy the schematic configuration in specific path with command cp /usr/share/postfix/main.cf.debian /etc/postfix/main.cf. Before, we will validate that main.cf.debian exist.
5. At this point, the configuration file /etc/postfix/main.cf must be edited with the mail server information. The image below shows an example
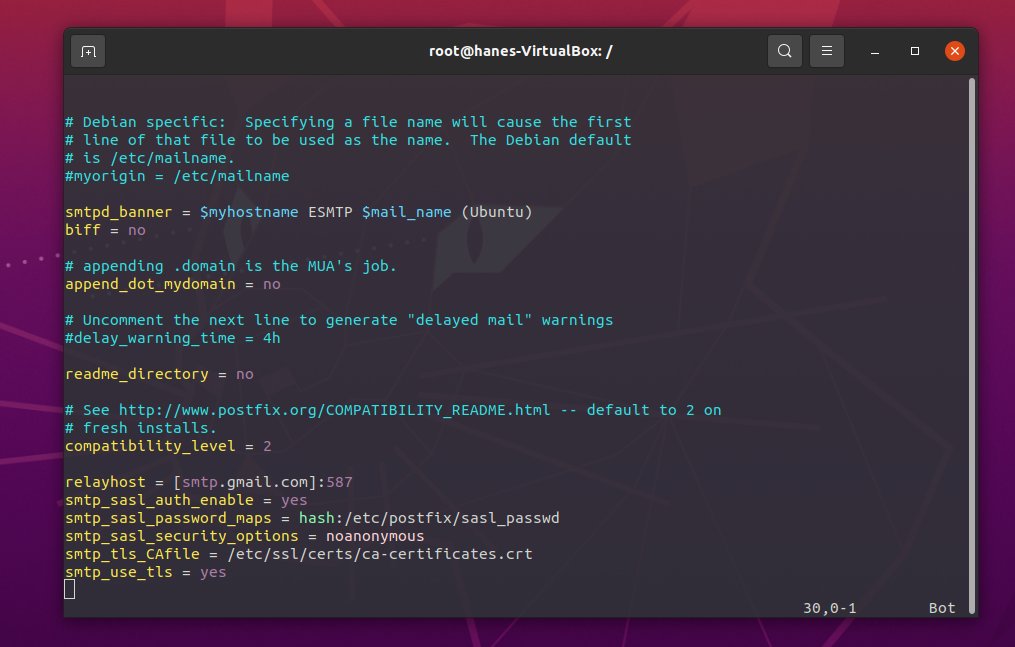
Before saving the configuration, we need to validate that ca-certificates.crt exists on the path. If not exist, an error will occur in Postfix.
6. Next, we should execute these commands as root.:
echo [smtp.gmail.com]:587 USER...@gmail.com:PASSWORD > /etc/postfix/sasl_passwd
postmap /etc/postfix/sasl_passwd
chmod 400 /etc/postfix/sasl_passwd
chown root:root /etc/postfix/sasl_passwd /etc/postfix/sasl_passwd.db
chmod 0600 /etc/postfix/sasl_passwd /etc/postfix/sasl_passwd.db
systemctl restart postfix
Where:
- USER...@gmail.com is a mail that sends the alert.
- PASSWORD is the password mail.
The image shows the execution

7. Is very important to Enable “Less Secure Apps” for Gmail (Link). If you don't do Gmail locks access to Postfix and email never will send.
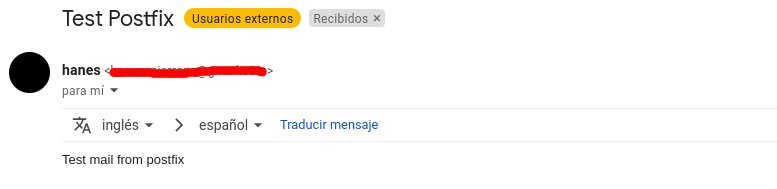
8. Finally we are ready to send the mail with Postfix therefore, we should execute the command:
echo "Test mail from postfix" | mail -s "Test Postfix" -r "y...@example.com" hanes.s...@wazuh.com
I validated that works well. I would like to left you an image with the Postfix test.
I followed this page to do this tutorial.
Best regards
Hanes
Defence Technology
Sep 23, 2021, 11:15:35 PM9/23/21
to Wazuh mailing list
Hi Hanes,
I really appreciate your time on assist.
The alert is working now as expected.
I have followed reconfigure Postfix from the link url you have provided: https://linuxscriptshub.com/configure-smtp-with-gmail-using-postfix/
Thank you again Hanes.
Reply all
Reply to author
Forward
0 new messages