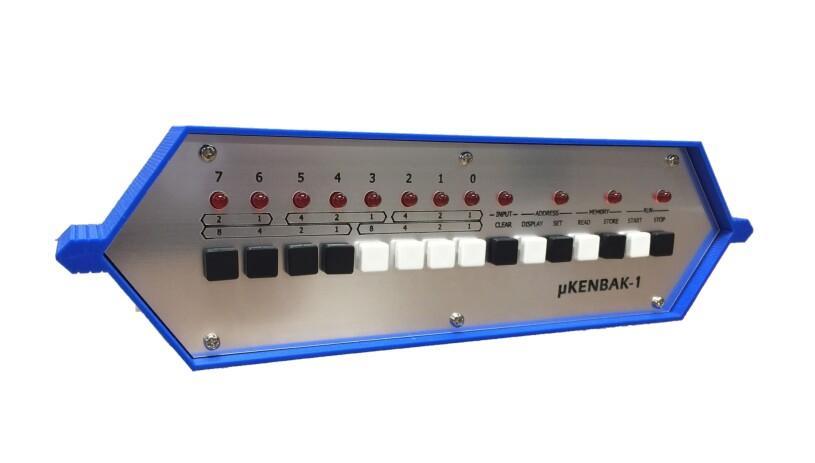
µKenbak-1 Serial port adding machine of yore
瀏覽次數:121 次
跳到第一則未讀訊息

Frank P.
2019年1月4日 中午12:50:032019/1/4
收件者:uken...@googlegroups.com
Here's an interesting question: can this:
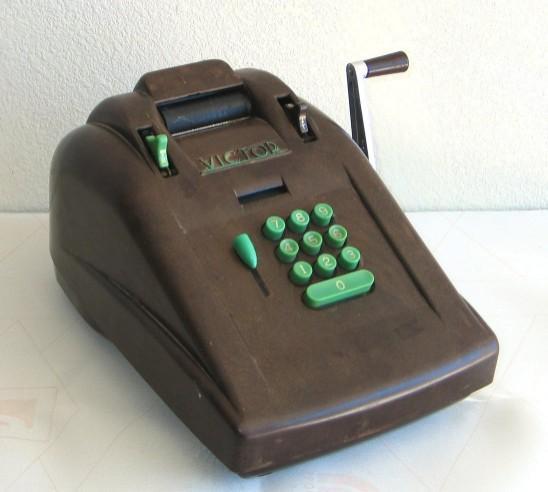
Do what this did in the '50s?
The answer is not quite, at least not yet.
I thought we ought to have a somewhat more interesting program to show off the µKenbak-1 serial port (for those who have added an RS-232 module or FTDI connector). So I wrote what I had hoped would be a 1-banger program, but ran out of memory before I could make it do follow-on additions like the mechanical version. For those of you too young to have played with one of these, you entered a decimal number on the keys, pulled the handle, and that number got printed and added into the sum; pulling the handle would re-cock the spring for entering another number, and you could repeat entering numbers and pulling the handle until you were ready for the sum. Then you would pull down the T lever (upper right) and pull the handle to print the sum and then reset the sum to 0.
My version of the AddingMachine for µKenbak-1 only allows adding two numbers (but up to 20 digits each, which is quite a bit more than the original would handle). Thus you can type into the serial port:
12345678+87654321=
and the µKenbak-1 will print 99999999. But if you type:
12345678+87654321+5=
you will get the wrong answer. I didn't have the energy to try to optimize the code to pick up more free bytes, and include the code to handle the follow-on additions (though the latter would seem fairly simple to do). So I'll leave this as an exercise for the student :)
Note: If you type more than 20 digits for either number, only the last 20 digits will be used in the calculation.
Attached are the source, listing, and octal files for the program. Do not try to assemble this with version 1.2 of ukasm.py because that version has a bug and the program will not work correctly (see https://groups.google.com/forum/#!topic/altair-duino/7fcu-FwyCxk). But the listing and octal file here are correct. Have fun.
Frank P.
2019年1月5日 晚上10:42:052019/1/5
收件者:Altair-Duino
Dave Hunter just posted version 1.3 of the assembler (see https://groups.google.com/forum/#!topic/altair-duino/7fcu-FwyCxk) and that version does correctly assemble AddingMachine.asm.
Frank P.
2019年1月11日 清晨7:38:132019/1/11
收件者:Altair-Duino
It appears nobody took the bait, so feeling a renewed energy to code-crunch yesterday, I paid careful attention to how the Victor actually worked and modeled a new version (V1.1) of this program closely after its inner workings. The result freed up quite a few bytes, allowing not only for multiple consecutive additions to the sum (who knows, the Victor might have even called it the Accumulator), but also for formatting the output into a neatly right-justified column just like an adding machine tape (but don't try this on an ASR-33). It even includes that extra pull on the handle you'd do to separate the previous calculation from the next one or give yourself enough room to tear off the tape. With only 1 byte to spare (well, 4 if you count the three overflow/carry registers that can't be productively used), I had to make a few compromises:
1. It doesn't print the letter "T" next to the total as the old adding machines typically did (perhaps if I hadn't been so obsessed with printing a "*" instead of a ":" to indicate overflow, I would have had room.)
2. I doesn't scroll the entered digits to the left as each new one is entered (I tried but it was just too slow.)
3. If you enter an addend of 0 (sort of a silly thing to do), it will print a blank line instead of 0.
4. It uses the INPUT register to hold the second byte of the very last instruction, so don't press any buttons after loading and starting, or the program is toast. This also causes the V1.3 assembler to say that the program exceeds 256 bytes, when in fact it is exactly 256 bytes long.
5. It can't print a subtotal like the Victor could if you pressed that upper right lever up instead of down.
But I'll submit this to the archive as a candidate for the largest relatively useful µKenbak-1 serial port program (oh where are my paper tax forms now?) and challenge the masses to improve upon it further (or at least get inspired to add a serial port). See attached files.

Charley Jones
2019年1月11日 清晨7:41:492019/1/11
收件者:Frank P.、Altair-Duino
<worships> we are not worthy.
Great work!
Sent from my iPhone 7!
--
You received this message because you are subscribed to the Google Groups "Altair-Duino" group.
To unsubscribe from this group and stop receiving emails from it, send an email to altair-duino...@googlegroups.com.
To view this discussion on the web visit https://groups.google.com/d/msgid/altair-duino/9580565f-58ed-4f8b-879d-df684558e324%40googlegroups.com.
For more options, visit https://groups.google.com/d/optout.
<AddingMachineV11.asm>
<AddingMachineV11.lst>
<AddingMachineV11.oct>
Frank P.
2019年1月11日 上午10:11:352019/1/11
收件者:uken...@googlegroups.com
One small complication of having used the INPUT register to hold code:
If you load this program into the µKenbak-1 over the serial port and then try to save it to a 256-byte EEPROM page, you MUST follow a special procedure to correctly save the program. For example to save it to EEPROM page 0:
. Press and RELEASE button 0, then
. Press and HOLD button 0 while you press STORE
Failure to do the first step will save the program with one incorrect bit in memory location 377, and the program will fail to loop back to MAIN to do a new addition.
This is a consequence of the µKenbak-1 emulator modifying location 377 if buttons are pressed even when in STOP state. This is perhaps wrong of it, but that's how it currently works, and why you need that extra step to save to EEPROM.
UPDATE: I checked the Kenbak-1 Programming Reference Manual and found:
"Location 377 is the input location. Data from the Console Data
Pushbuttons is placed here in both the Run and Halt states of the
computer." on page PR-2. That means the emulator is doing exactly what the Kenbak-1 does, so the double press of a button is indeed necessary to force location 377 back to the value that was loaded there. Also, because the Programming Reference Manual also says:
"The Clear Pushbutton erases the contents of location 377 to 00 000 000" on page PR-20, CLEAR shouldn't be pressed after the program has been downloaded and before the program is run or saved.
Frank P.
2019年6月27日 下午4:23:462019/6/27
收件者:uken...@googlegroups.com
When I wrote the original serial port adding machine, I just squeezed it into 256 bytes with 1 byte to spare (and that was at address 0177). I was unhappy with the output format, unhappy that a zero addend or total printed as blank rather than 0, and unhappy that it couldn't subtotal like the Victor. I needed more program memory and cajoled Mark to add some ability to read an EEPROM slot using a sysx command. He did way more than that, adding (in the June 2019 version on Github) a very flexible ability to transfer EEPROM to and from memory, which more than met my original need.
I decided, for my first foray into overlays, to keep it simple and only overlay the lower 128 bytes (actually 124) of memory:
In the main overlay is the end of the main program and all the functions except PUTVALUE (which is the primary function I needed to expand to improve the program).
In the second overlay is the same end of the main program and the PUTVALUE function.
The first overlay (plus the upper 128 bytes containing data, main program, and minor functions) is hard coded to reside in EEPROM slot 0 (which is always 256 bytes).
The second overlay is hard coded to reside in EEPROM slot 2. That slot must be configured to be at least 128 bytes (it's possible but unlikely you've configured it to less than that).
The main program copies the second overlay into the 124 bytes starting at address 4 before calling PUTVALUE, and copies the first overlay back into those bytes after. That gave me a substantial amount of additional memory to expand/improve PUTCHAR, and just enough memory to modify the main program to support a subtotal and loading the overlays. The overlays contain only code and no persistent data, and are thus never copied back to EEPROM.
In the version posted here, the first overlay has 2 spare bytes at 0176 and 0177; and the second overlay has 15 spare bytes from 0161 to 0177.
So how do you run this, you might ask. Here's the rundown:
Make sure you're running the June 2019 version of the µKenbak-1 firmware.
Make sure your EEPROM map is configured such that slot 2 is at least 128 bytes.
Make sure your µKenbak-1 is connected to a terminal emulator at 38400 baud, and is stopped.
Over the serial port, load the first overlay and save it to EEPROM slot 0:
Press and hold button 7, click the SET button, release button 7. Terminal will prompt [0.
From terminal emulator, paste or send the file "AddingMachineV12o1.out".
Terminal should show "len=0x100 chk=0x3E"
If length or checksum is wrong, you may need to configure the terminal emulator for some per-character delay.
Press button 0, then release button 0 (this step is VERY important).
Press and hold button 0, click the STORE button, release button 0. LED 0 will be lit.
Over the serial port, load the second overlay and save it to EEPROM slot 2:
Press and hold button 7, click the SET button, release button 7. Terminal will prompt [0.
From terminal emulator, paste or send the file "AddingMachineV12o2.out".
Terminal should show "len=0x100 chk=0x68". If it doesn't, see above.
Press button 2, then release button 2.
Press and hold button 2, click the STORE button, release button 2. LED 2 will be lit.
From now on (until you store something else in EEPROM slots 0 or 2), to run the serial port adding machine program, simply load and run the program in slot 0:
Press and hold button 0, click the READ button, release button 0.
Click the START button. All 8 LEDs should extinguish.
VERY important: do not press any button 0-7 before or after clicking START.
Now type digits to enter an addend (up to 20 digits), "+" to add it into the sum, "S" to print a subtotal, and "=" to print the total and clear the sum. (While you're typing, the ASCII code for each character you type will appear in the LEDs because the OUTPUT register is being used to store data) That's all there is to it!
I'll be the first to admit that the function PUTVALUE, while not exactly spaghetti code, is not written in the most comprehensible way, and no doubt it can be improved (exercise for the student). I just wanted to have fun playing with the overlay idea, so I didn't take code quality too seriously.

Mark Wilson
2019年6月27日 下午4:29:232019/6/27
收件者:Altair-Duino
Truly epic, great job!
fcpr...@gmail.com
2021年4月9日 下午3:19:352021/4/9
收件者:uKenbak-1
Recently, to make three 256 byte EEPROM pages available, I decided to use a slightly different EEPROM Page Map: 014 instead of 012. This yields 3 pages (0,1,2) of 256 bytes, 1 page (3) of 128 bytes, and 2 pages (4,5) of 64 bytes, with no pages 6 or 7.
Since AddingMachineV12o2 (the second overlay) only requires a 128-byte slot, I created a new version 1.3 that is identical to version 1.2 EXCEPT it has the 2nd overlay hard-coded to reside in EEPROM page 3 instead of page 2 (which will work fine with either the default 012 page map or my new 014 page map). The instructions for running this version (1.3) are, of course, slightly different (differences highlighted in red):
Make sure you're running either the June 2019 or the new April 2021 version of the µKenbak-1 firmware
(the latter will make your adding machine run faster).
Make sure your EEPROM map is configured such that slot 3 is at least 128 bytes.
Make sure your µKenbak-1 is connected to a terminal emulator at 38400 baud, and is stopped.
Over the serial port, load the first overlay and save it to EEPROM slot 0:
Press and hold button 7, click the SET button, release button 7. Terminal will prompt [0.
From terminal emulator, paste or send the file "AddingMachineV13o1.out".
Terminal should show "len=0x100 chk=0x40"
If length or checksum is wrong, you may need to configure the terminal emulator for some per-character delay.
Press button 0, then release button 0 (this step is VERY important).
Press and hold button 0, click the STORE button, release button 0. LED 0 will be lit.
Over the serial port, load the second overlay and save it to EEPROM slot 2:
Press and hold button 7, click the SET button, release button 7. Terminal will prompt [0.
From terminal emulator, paste or send the file "AddingMachineV13o2.out".
Terminal should show "len=0x100 chk=0x6A". If it doesn't, see above.
Press button 3, then release button 3.
Press and hold button 3, click the STORE button, release button 3. LED 3 will be lit.
From
now on (until you store something else in EEPROM slots 0 or 3), to run
the serial port adding machine program, simply load and run
the program
in slot 0:
Press and hold button 0, click the READ button, release button 0.
Click the START button. All 8 LEDs should extinguish.
VERY important: do not press any button 0-7 before or after clicking START.
Now
type digits to enter an addend (up to 20 digits), "+" to add it into
the sum, "S" to print a subtotal, and "=" to print the total and clear
the sum. (While you're typing, the ASCII code for each character you
type will appear in the LEDs because the OUTPUT register is being used
to store data) That's all there is to it!
Due to excessive Google paranoia, I can no longer attach the 6 new files for version 1.3 to this post, so instead download this file: AddingMachineV13.txt and then rename it to AddingMachineV13.zip and unzip it to get the 6 files, oy!
fcpr...@gmail.com
2021年4月9日 下午3:25:182021/4/9
收件者:uKenbak-1
Curses, missed one 2 that should have been changed to 3 in the previous post (we need to restore that edit capability, Google!):
Over the serial port, load the second overlay and save it to EEPROM slot 2:
fcpr...@gmail.com
2021年4月9日 下午3:27:202021/4/9
收件者:uKenbak-1
Ok, I keep typing 3, but it keeps changing to 2. One more try - if this doesn't work... well, you get the idea:
Over the serial port, load the second overlay and save it to EEPROM slot 3: (three, three, three)
回覆所有人
回覆作者
轉寄
0 則新訊息