Advice on adding serial to this old Target Turner.
247 views
Skip to first unread message

Phillip Stevens
Jul 11, 2021, 12:19:50 AM7/11/21
to retro-comp
I've been asked to put an interesting old system "on-line".
I was thinking the easiest way would be to add a serial port to the system, and then use a serial connected ESP8266 to do web pages and WiFi.
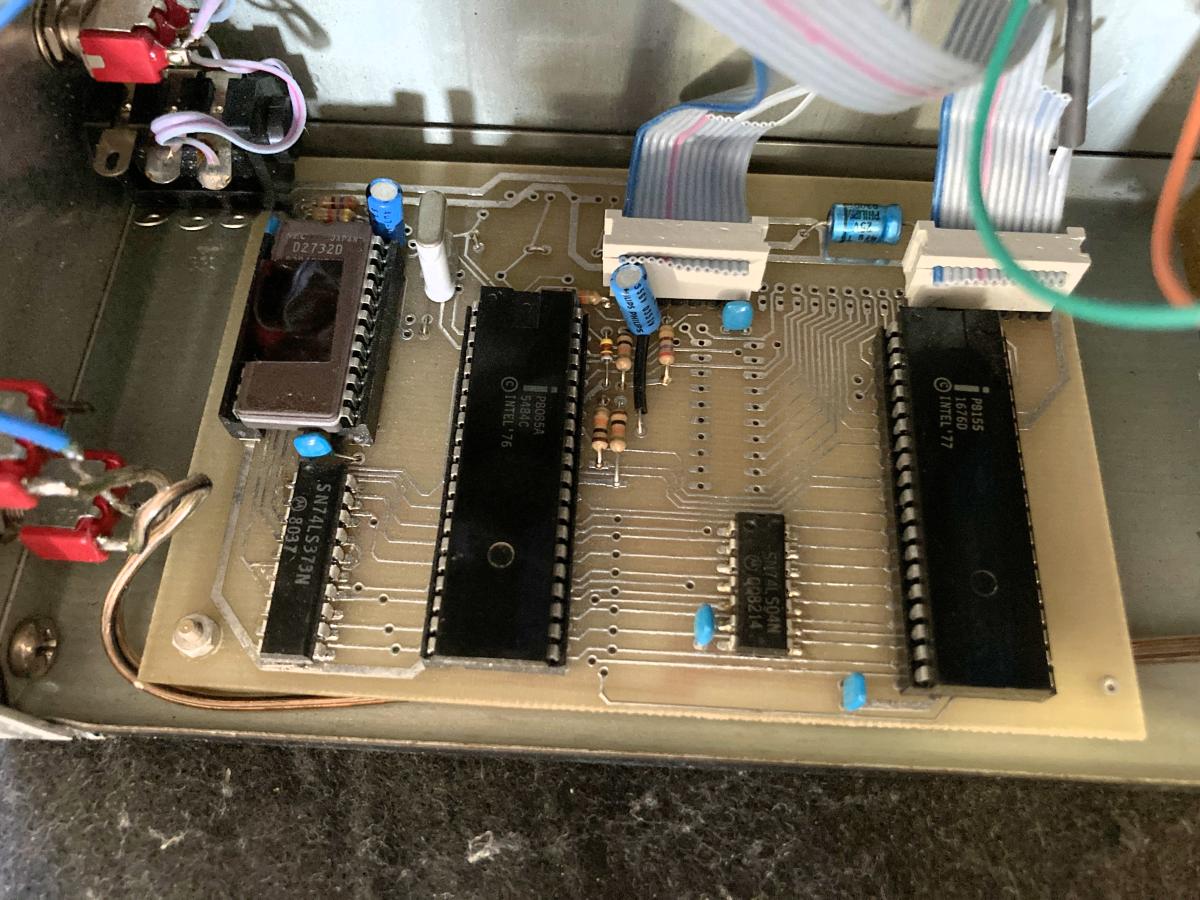
It was a pleasant surprise to open the box and find an 8085 and matching original components. It looks like something straight out of the manual. But, afaik there is no serial uart on this system.
Anyone have a suggestion on how best to do build serial on this 8085 system?
Is there any EEPROM that would substitute for the UV PROM?
Thoughts for adding a bit more RAM easily?
Very excited to play with this new (old) toy.
Phillip

Tadeusz Pycio
Jul 11, 2021, 4:40:31 AM7/11/21
to retro-comp
You can use SOD and SID CPU pins as serial port, but don't expect performance from this solution.
Phillip Stevens
Jul 11, 2021, 5:26:07 AM7/11/21
to retro-comp
Tadeusz Pycio wrote:
You can use SOD and SID CPU pins as serial port, but don't expect performance from this solution.
Thanks. That's a good suggestion.
You know I've been reading over the datasheet now for a while, but had overlooked those two pins.
Just not reading closely enough.
I'll only have to receive a time+start sequence, and send a stop sequence over serial, so performance is not a big deal.
I think I can kludge a 6116 2kB RAM and small EEPROM onto a daughter board to replace the 2732 UV EPROM, and that will probably suffice for what I need.
Not sure that I can program as economically as it is done now.
I need to disassemble the ROM to see what magic they worked.

Greg Holdren
Jul 11, 2021, 6:00:12 PM7/11/21
to retro-comp
I had an Intel SDK85 dev kit. The SOD and SID pins was the serial port for the board. Works and even had SW auto baud rate detection by holding down space bar or enter key or some key after reset. The code should be on the net somewhere.
I don't think performance is is necessary based on memory to load/unload unless I'm missing the idea of the application for this.
Classic minimal chip count using the 8085/8155. CPU, address latch, '04 for chip select inversion for address bit, boot rom, 8155 for RAM and PIO.
Greg
Phillip Stevens
Jul 19, 2021, 1:34:06 AM7/19/21
to retro-comp
Thanks. And code found and implemented.
Just to update on this system, I've created a repository for the Target Turner system, and have traced tracks and annotated the ROM.
It uses an interesting method of HALT and Interrupt to trigger its timed actions, and luckily the code is simple and repetitive so it was easy to understand.
So the next job is to add serial I/O and also to manage interaction with an external (probably ESP8266) device.
I'm thinking to use the R6.5 interrupt to signal that serial input will be incoming, and then either initiate the selected timed sequence or set up a different timed sequence than the front panel indicates.
There's an I/O on an ESP01S which I can use to trigger the interrupt on R6.5, and handle the added functions.
There's an I/O on an ESP01S which I can use to trigger the interrupt on R6.5, and handle the added functions.
Otherwise the rest of the code should be unchanged so the front panel works as expected.
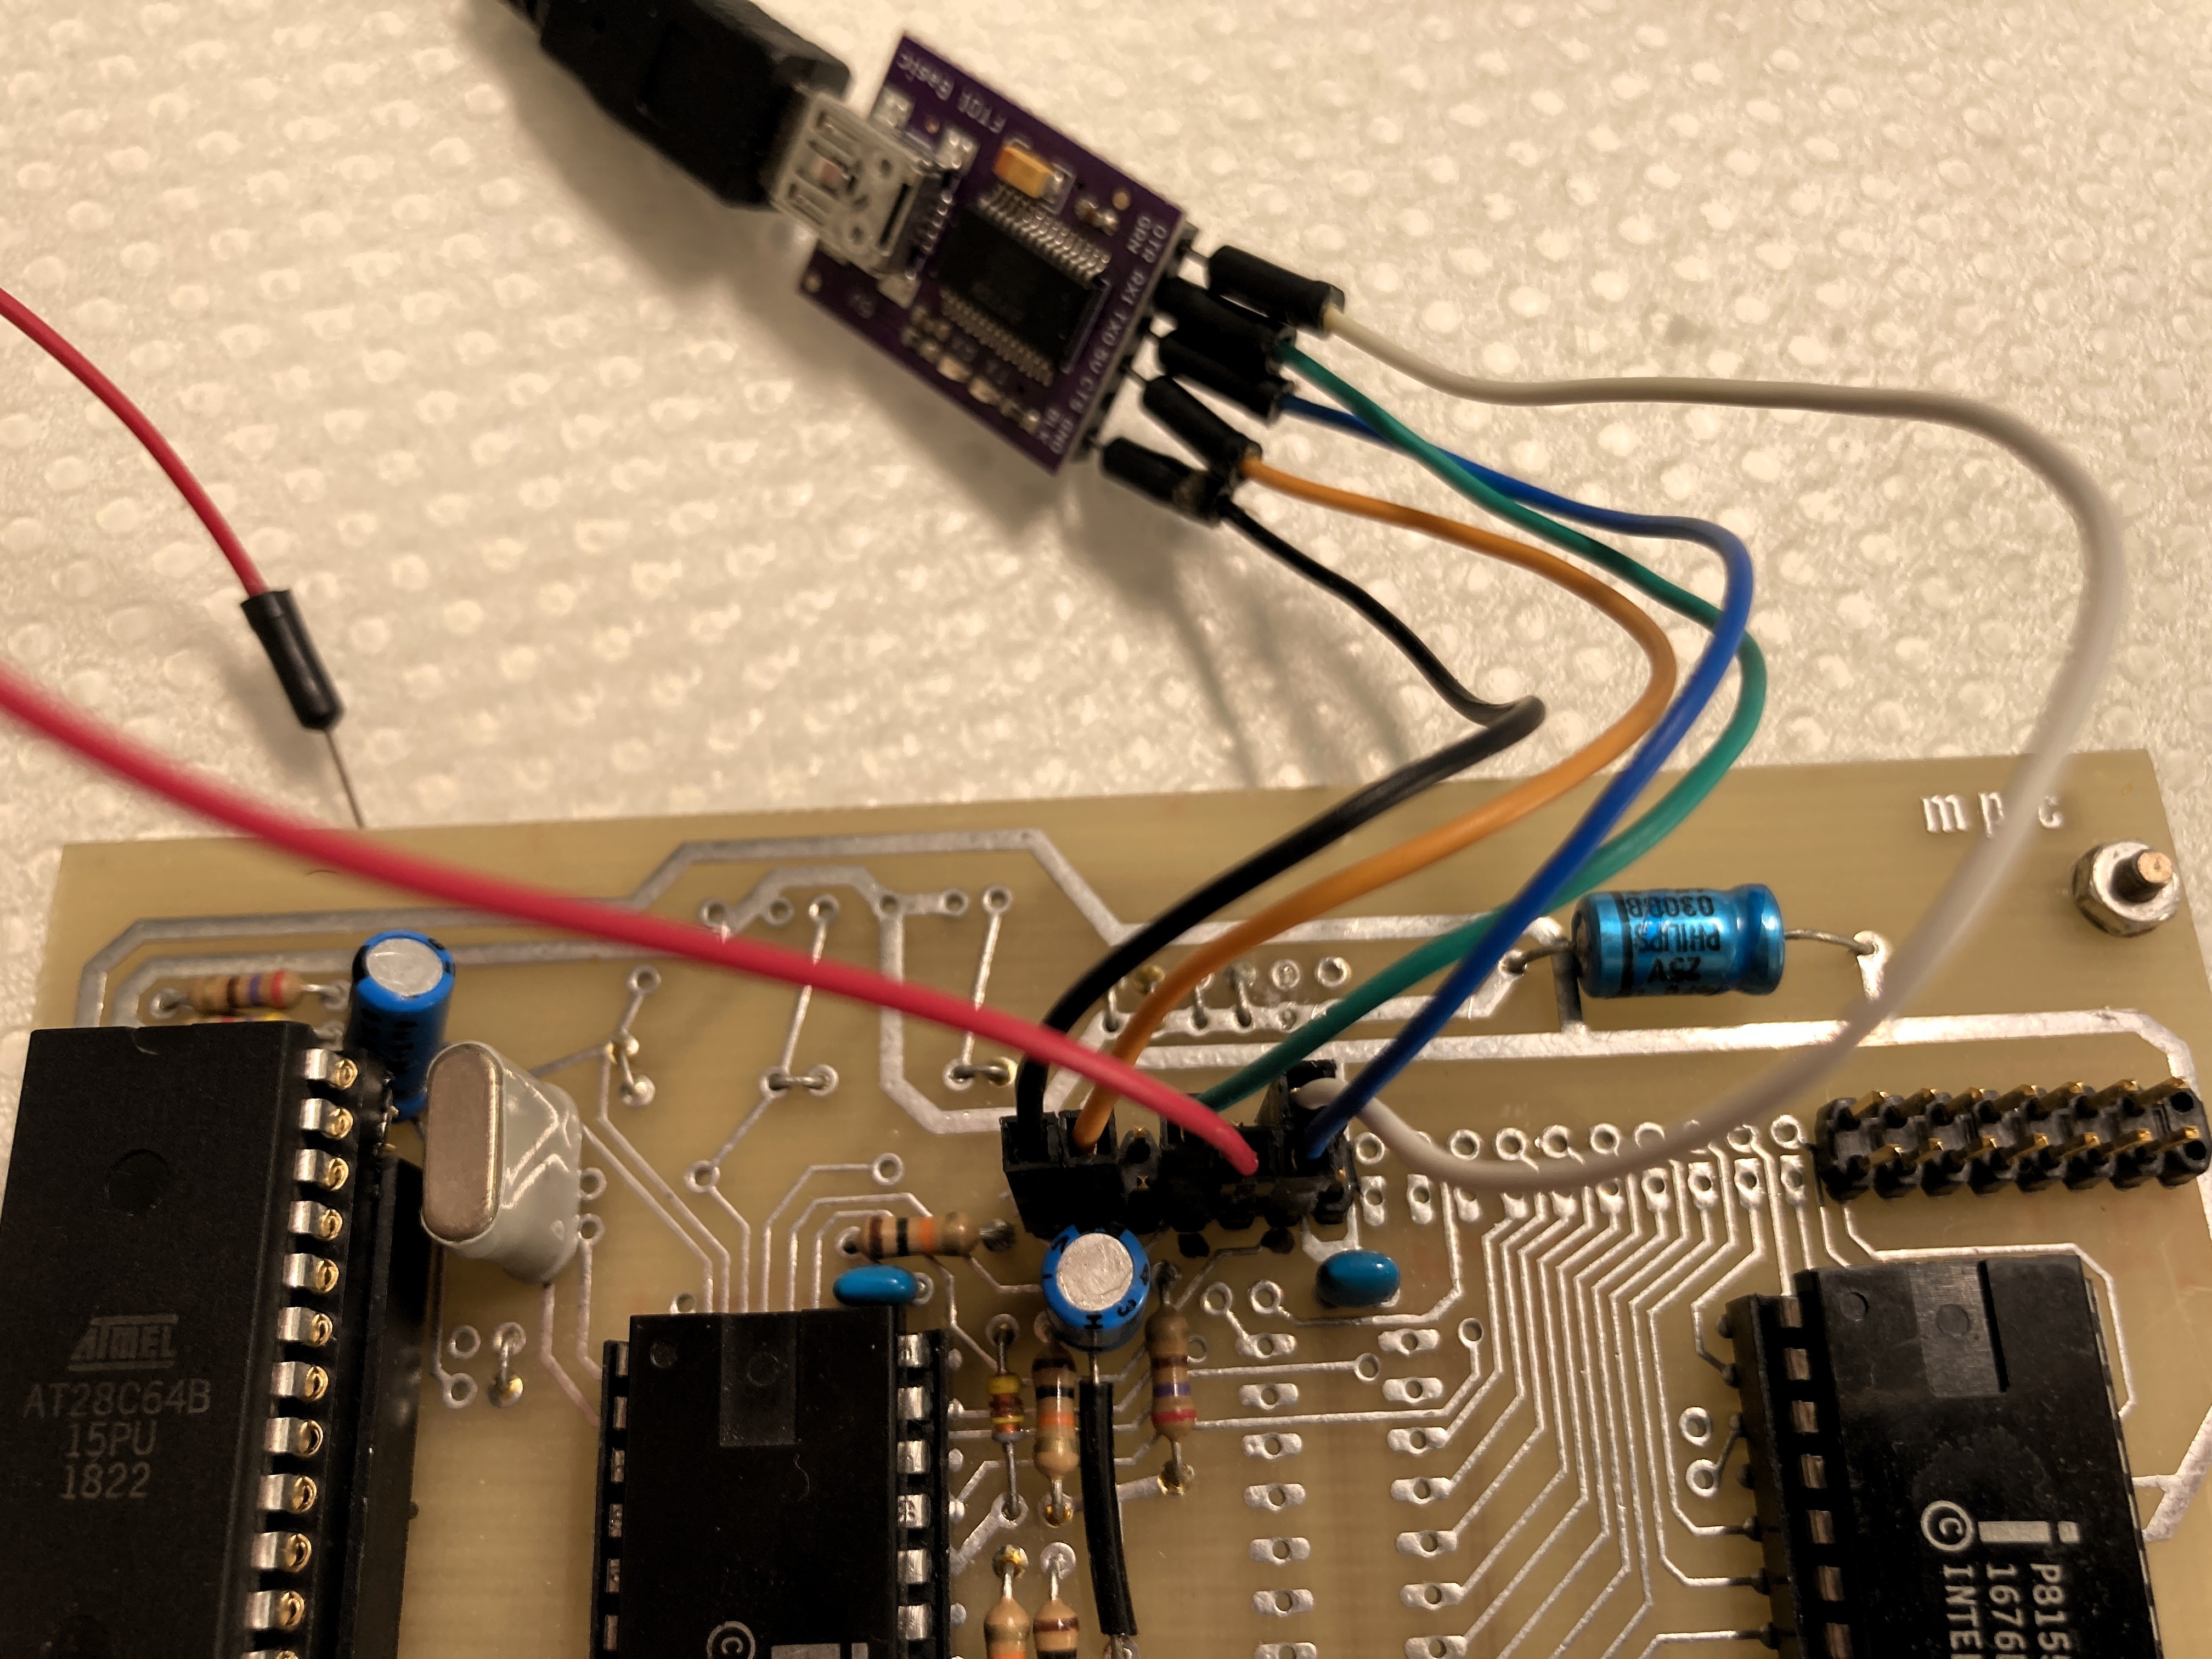
Since the EPROM is UV and there's no option for 2732 in EEPROM, I've bought some AT28C64 devices that I can use with a simple spacer socket to do development on.
For production, I'll put the final build back on the original 2732s, as there should be enough space.
Any thoughts on the plan?
Cheers, Phillip

Alan Cox
Jul 19, 2021, 8:35:09 AM7/19/21
to Phillip Stevens, retro-comp
I'm thinking to use the R6.5 interrupt to signal that serial input will be incoming, and then either initiate the selected timed sequence or set up a different timed sequence than the front panel indicates.
There's an I/O on an ESP01S which I can use to trigger the interrupt on R6.5, and handle the added functions.
The traditional way to do it is just that - the start bit triggers the interrupt, you mask it and you then bitbang the data so it sounds reasonable. Full duplex bit bang is a work of art though 8)
Alan

Joshua Kim
Jul 23, 2021, 8:14:11 AM7/23/21
to retro-comp
Regarding the EPROM, how about using this?
Joshua

Bill Shen
Jul 23, 2021, 4:32:43 PM7/23/21
to retro-comp
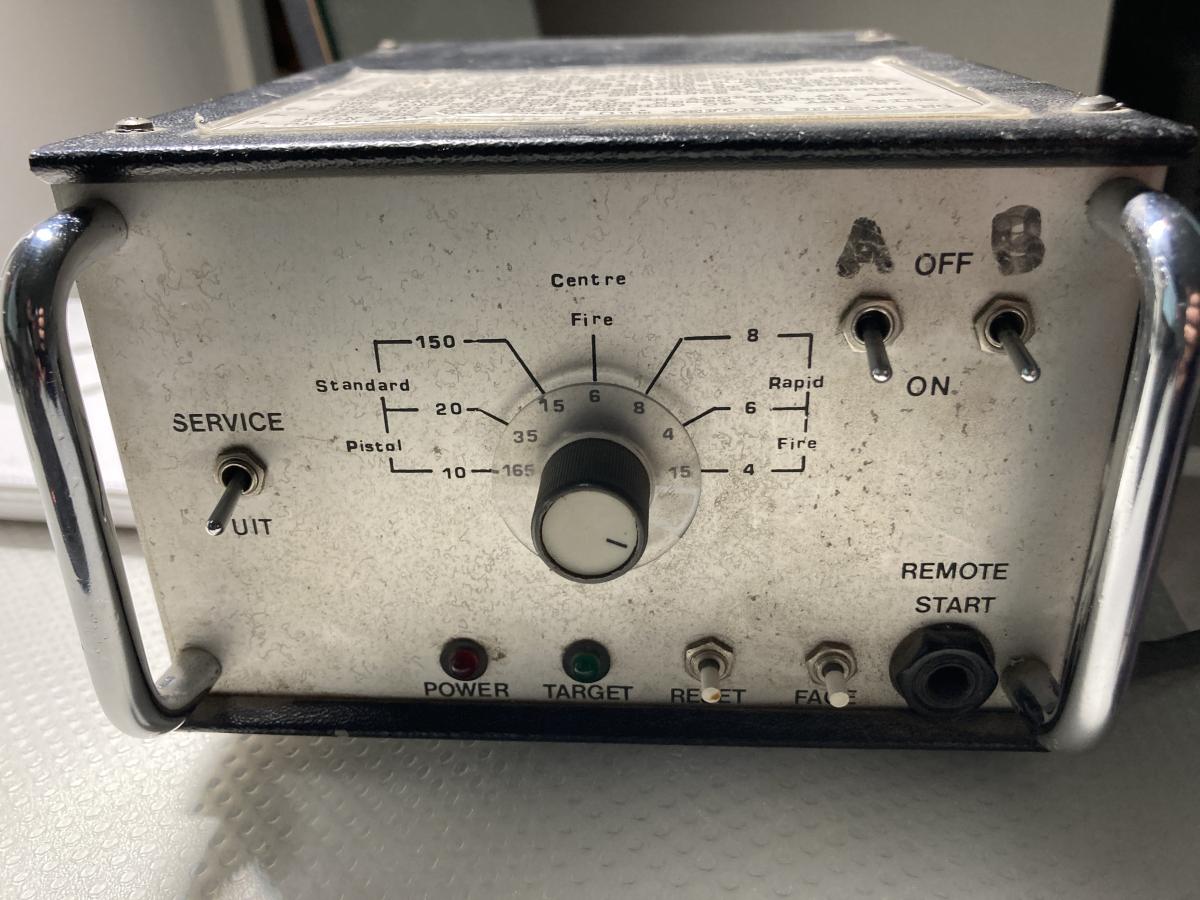
I shoot pistol competitively in my 20's and 30's so I stared at the picture of your target turner for quite a while. I still can't figure out why you have all these dial positions. I was expecting "slow", "timed", "rapid", and "manual" settings. Maybe Australian has a different shooting rules? Do you have a manual for that box?
Bill
Phillip Stevens
Jul 24, 2021, 1:55:53 AM7/24/21
to retro-comp
Bill Shen wrote:
I shoot pistol competitively in my 20's and 30's so I stared at the picture of your target turner for quite a while. I still can't figure out why you have all these dial positions. I was expecting "slow", "timed", "rapid", and "manual" settings. Maybe Australian has a different shooting rules?
There are two sets of times.
The outer ring is for ISSF Events. Left is Standard Pistol. Right is Olympic Rapid Fire.
The center is ISSF rapid fire also called Dueling Event.
The inner rig is for Service Pistol, activated by switch on left.
I think this is also based on USA matches. But not sure.
Do you have a manual for that box?
Reading the code it is easy to see the course of fire. So one of those happy cases where having the manual (long lost) didn’t really matter.
Though interestingly, I think I found an old bug where a jump address was incorrect. It is strange that it has been in the machine for 30+? Years, and yet no complaints. I guess someone had to hit the RESET button each cycle that match was shot.
Phillip Stevens
Jul 27, 2021, 3:12:13 AM7/27/21
to retro-comp
Phillip wrote:
So the next job is to add serial I/O and also to manage interaction with an external (probably ESP8266) device.I'm thinking to use the R6.5 interrupt to signal that serial input will be incoming, and then either initiate the selected timed sequence or set up a different timed sequence than the front panel indicates.
A quick update. I've got the serial port working, based on the example code. Works pretty well at 9,600 baud.
And using the RST6.5 to trigger serial input, toggled here by DTR. Works great, after I found and removed the pull-down link on the PCB.
Since the EPROM is UV and there's no option for 2732 in EEPROM, I've bought some AT28C64 devices that I can use with a simple spacer socket to do development on.For production, I'll put the final build back on the original 2732s, as there should be enough space.
Using a 28 pin socket with pins 2, 26, 27, and 28 tied together and an AT28C64 works very well. Just need to remember to write the ROM into the top page, and it works well.
So now the work has to move on to the ESP8266 side, and building a web interface. For which I've no aptitude.
Hopefully there's someone at our club who can help me out with Web Design... ;-)
p.
Joshua Kim
Jul 27, 2021, 4:49:46 AM7/27/21
to retro-comp
Hello Phillip,
Congratulate on your great success! I respect your talent to make nothing impossible. :)
Regarding the web interface, building a web server on the ESP8266 is a good way, but using MQTT might be more scalable and easy maintenance.
Once you skim the following Rui Santos’s book or content, you probably make it in a day.
Regards,
Joshua
Phillip Stevens
Jul 27, 2021, 5:34:53 AM7/27/21
to retro-comp
Joshua wrote:
Regarding the web interface, building a web server on the ESP8266 is a good way, but using MQTT might be more scalable and easy maintenance.Once you skim the following Rui Santos’s book or content, you probably make it in a day.
Joshua, thanks for the tips. I'll read them soonest.
I've actually found what I think will be the perfect device. It is a HUZZAH32 from Adafruit. I've just ordered one (actually two, because I hate it when I break the one device I have).
This HUZZAH32 breakout PCB has a 5V regulator and has the RX line protected for 5V too. So it should be "plug-n-play" with the 8085 interface port.
Some and some mounting holes so I can place it in a little plastic box stuck on the outside the metal housing.
The plan is to run the web server on the HUZZAH32, and then send simple 1 character serial commands to the 8085 when one of the web page buttons is pressed.
So this is going to be much simpler than MQTT, I hope.
I'll read up on how to build a esp based web server over the next few days, whilst waiting for the new devices to arrive.
Phillip
Reply all
Reply to author
Forward
0 new messages