Velo Orange Zeste Brakes Review
457 views
Skip to first unread message

Jeff Bertolet
Apr 6, 2015, 9:04:24 PM4/6/15
to ran...@googlegroups.com
Full Text with pics here. If anyone has any comments or measurements on other types of cantilever brakes, that would be great.
I've been struggling to find cantilever brakes strong enough to satisfy my needs. The very rainy Severna Park 200k ride demonstrated that a few hours of rain, road oil and grit can turn adequate brakes into non-stoppers very quickly. After way more research than I thought possible on the subject of cantilever brakes, I got the Velo Orange Grand Cru Zeste brakes. I figured the longer arms plus the low profile should give me the most stopping power available from a cantilever brake.
While researching cantilever brakes, I relied mostly on this mechanical analysis from Circle A Cycles. I also read Sheldon Brown's article on cantilever geometry, but I found it oversimplified things and left out a lot of details. I did not completely verify the math in the Circle A Cycles article, but I will trust the resulting equations. Namely, the equation relating mechanical advantage (MA) to yoke height (footnote 8 on page 3, his equation uses degrees, mine uses radians).
For a given bike, PO is fixed at half the distance between the cantilever bosses, and DO is the vertical distance from the cantilever boss to the middle of the rim braking surface. The variables are PA, the distance between the cantilever post (P) and the cable anchor point (A), YO, the vertical distance from the cantilever boss to the yoke, and 'a', the cantilever angle, the angle from vertical of the line PA. This angle is measured differently than in Sheldon's analysis, where it is the included angle between the A, P, and the rim surface.
The equation is far from elegant, but it is easy to see that lengthening the arm of the cantilever brake will increase the mechanical advantage. And it doesn't take much, if DO=24, PO=44 (in mm), and a=.436 rads (25 degrees), then a 10% increase in the arm length (PA) leads to a 30% increase in MA.
For reference here is a list of a few cantilever brakes and their arm length (PA, pivot to cable anchor distance, measured 'as the crow flies'):
Brake Name, Arm Length (PA) in mm, 'a' angle (approx)
Velo Orange Zeste, 76, 15
Paul touring, 68, 20
Shimano Non-series, 67, 20
Paul Neo Retro, 47, 74
Tektro 720, 48, 75
There are threads started every day on how to adjust cantilever brakes, and given that I've used four different sets on my rear brake (Tektro CR720, Shimano non-series low profile, generic low profile, and VO Zeste), here's what you need to know.
lower yoke height=more power (but less modulation)
medium profile brakes are less sensitive to yoke height, up to a point
low profile brakes are sensitive to yoke height throughout the range
I've been struggling to find cantilever brakes strong enough to satisfy my needs. The very rainy Severna Park 200k ride demonstrated that a few hours of rain, road oil and grit can turn adequate brakes into non-stoppers very quickly. After way more research than I thought possible on the subject of cantilever brakes, I got the Velo Orange Grand Cru Zeste brakes. I figured the longer arms plus the low profile should give me the most stopping power available from a cantilever brake.
While researching cantilever brakes, I relied mostly on this mechanical analysis from Circle A Cycles. I also read Sheldon Brown's article on cantilever geometry, but I found it oversimplified things and left out a lot of details. I did not completely verify the math in the Circle A Cycles article, but I will trust the resulting equations. Namely, the equation relating mechanical advantage (MA) to yoke height (footnote 8 on page 3, his equation uses degrees, mine uses radians).

For a given bike, PO is fixed at half the distance between the cantilever bosses, and DO is the vertical distance from the cantilever boss to the middle of the rim braking surface. The variables are PA, the distance between the cantilever post (P) and the cable anchor point (A), YO, the vertical distance from the cantilever boss to the yoke, and 'a', the cantilever angle, the angle from vertical of the line PA. This angle is measured differently than in Sheldon's analysis, where it is the included angle between the A, P, and the rim surface.
The equation is far from elegant, but it is easy to see that lengthening the arm of the cantilever brake will increase the mechanical advantage. And it doesn't take much, if DO=24, PO=44 (in mm), and a=.436 rads (25 degrees), then a 10% increase in the arm length (PA) leads to a 30% increase in MA.
For reference here is a list of a few cantilever brakes and their arm length (PA, pivot to cable anchor distance, measured 'as the crow flies'):
Brake Name, Arm Length (PA) in mm, 'a' angle (approx)
Velo Orange Zeste, 76, 15
Paul touring, 68, 20
Shimano Non-series, 67, 20
Paul Neo Retro, 47, 74
Tektro 720, 48, 75
There are threads started every day on how to adjust cantilever brakes, and given that I've used four different sets on my rear brake (Tektro CR720, Shimano non-series low profile, generic low profile, and VO Zeste), here's what you need to know.
lower yoke height=more power (but less modulation)
medium profile brakes are less sensitive to yoke height, up to a point
low profile brakes are sensitive to yoke height throughout the range
This is relatively common knowledge, the part most people don't realize is there is tipping point for medium profile brakes (like Tektro CR720). Lowering the yoke height doesn't make them much more powerful, until you reach a certain point. Then the mechanical advantage skyrockets with each small lowering of the yoke. Perhaps all the people who are satisfied with the CR720's have sufficiently narrow tires or other frame distances that allow them to have a lower yoke height and thus higher than normal mechanical advantage.
Enough with the engineering, onto the review.
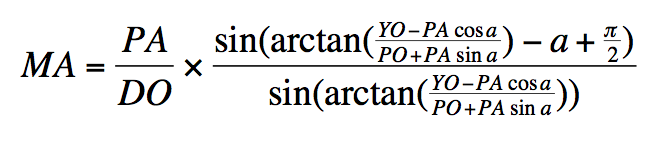
Comes with two brakesets, enough for one bike. All necessary hardware? Yes. Instructions? No, none at all. Tools necessary: 2, 2.5, 3, 4, 5 mm allen keys, 10 and 13mm wrenches, phillips screwdriver.
.JPG)
Enough with the engineering, onto the review.
Comes with two brakesets, enough for one bike. All necessary hardware? Yes. Instructions? No, none at all. Tools necessary: 2, 2.5, 3, 4, 5 mm allen keys, 10 and 13mm wrenches, phillips screwdriver.
.JPG)
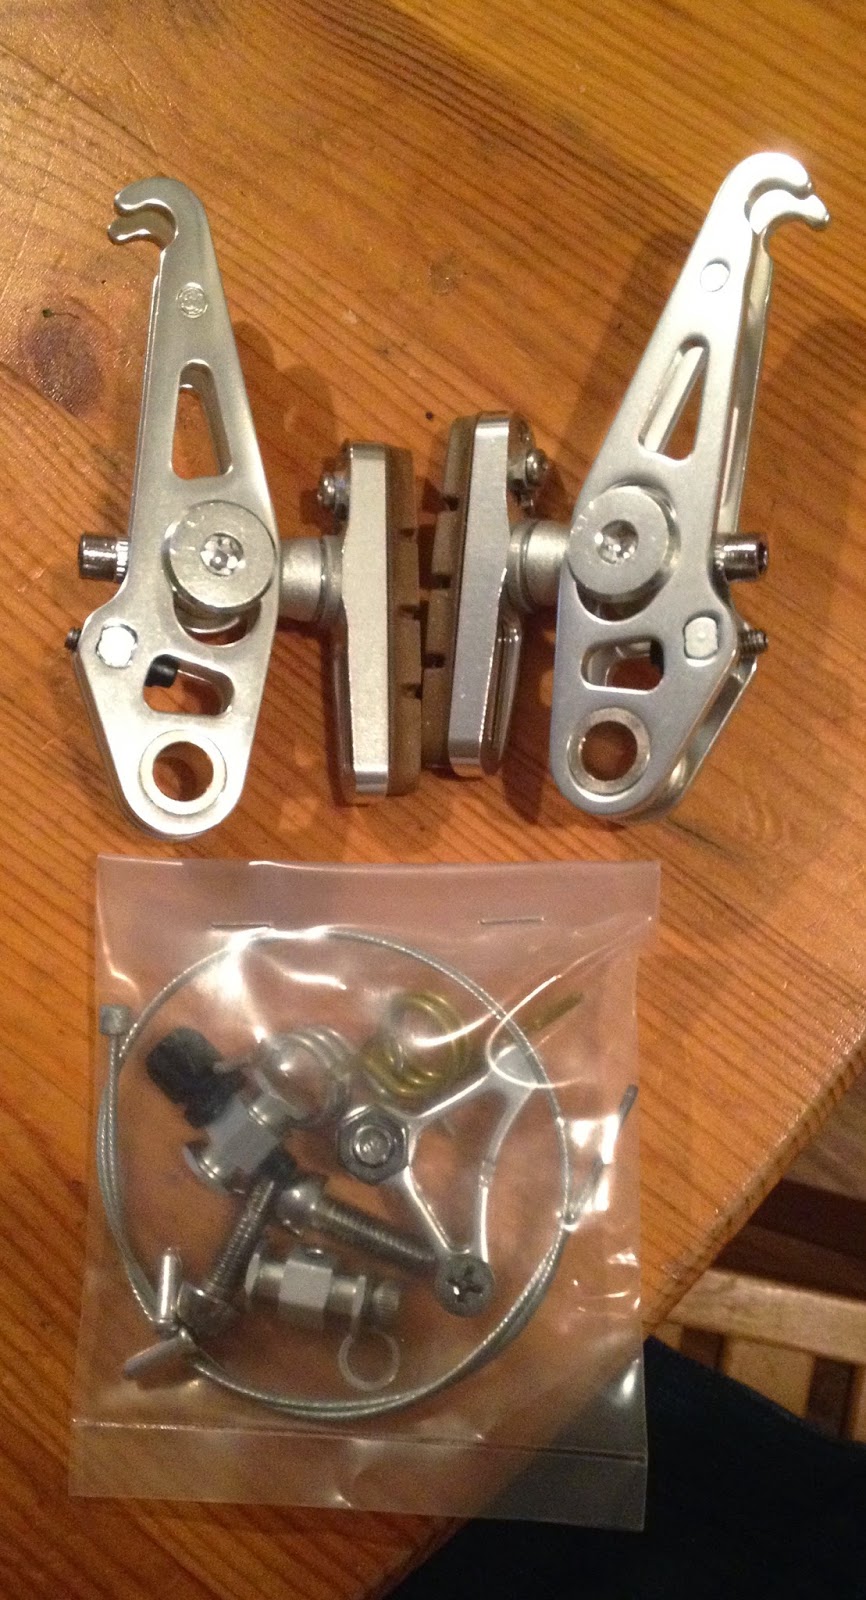
When installing the calipers, the 5mm allen key bolt should be facing out, and the 13mm nut should be behind the caliper. The 13mm nut has to be very tight to keep the brake pad holder from moving. It would be easy enough to label the bags of hardware 'front' and 'rear.' But they weren't.
There are so many adjustments that can be made it can be time consuming to go back and forth between various adjustments until the pads hit the rim squarely, at the same time, and all adjusting bolts (spring tension, pad angle, cable barrel adjuster, etc.) are near the middle of their respective adjustment ranges.
These take more tools to install than are present on any multi tool I have ever used. It is a little bewildering that a brake that may be used for long distance events would require either a 13mm wrench or an adjustable wrench.
I certainly appreciate the long arms that provide more power than almost any other cantilever brakes, but the user interface (to borrow a software term) is not quite refined enough to be truly useable for non-mechanics. These brakes could really use a couple hundred more hours of engineering. I would have considered halting the project once a 13mm wrench was required. It is unfortunate that Velo Orange is such a small company they can't afford to make these more user friendly without making them prohibitively expensive. As a comparison,Compass Bicycles offers boutique centerpull brakes that are as powerful as possible with no performance compromises (they also directly copied a well established design, so they spent a lot of time on manufacturing, not as much on design). But they require specialized bosses that are so sensitive to alignment and spacing, they should only be installed by a framebuilder. They also cost $325 for one bike.
.JPG)
I swapped out the stock pads for Kool Stop Salmons. Once installed the brakes work great. Fantastic power with good modulation. The Compass 650Bx42mm tires have so much grip you are still unlikely to lock up the wheels. I could stop the bike with one or two fingers on the front brake. On a drop bar lever, that is pretty impressive. Pads run pretty close to the rim for cantilevers, about the same as V-brakes.
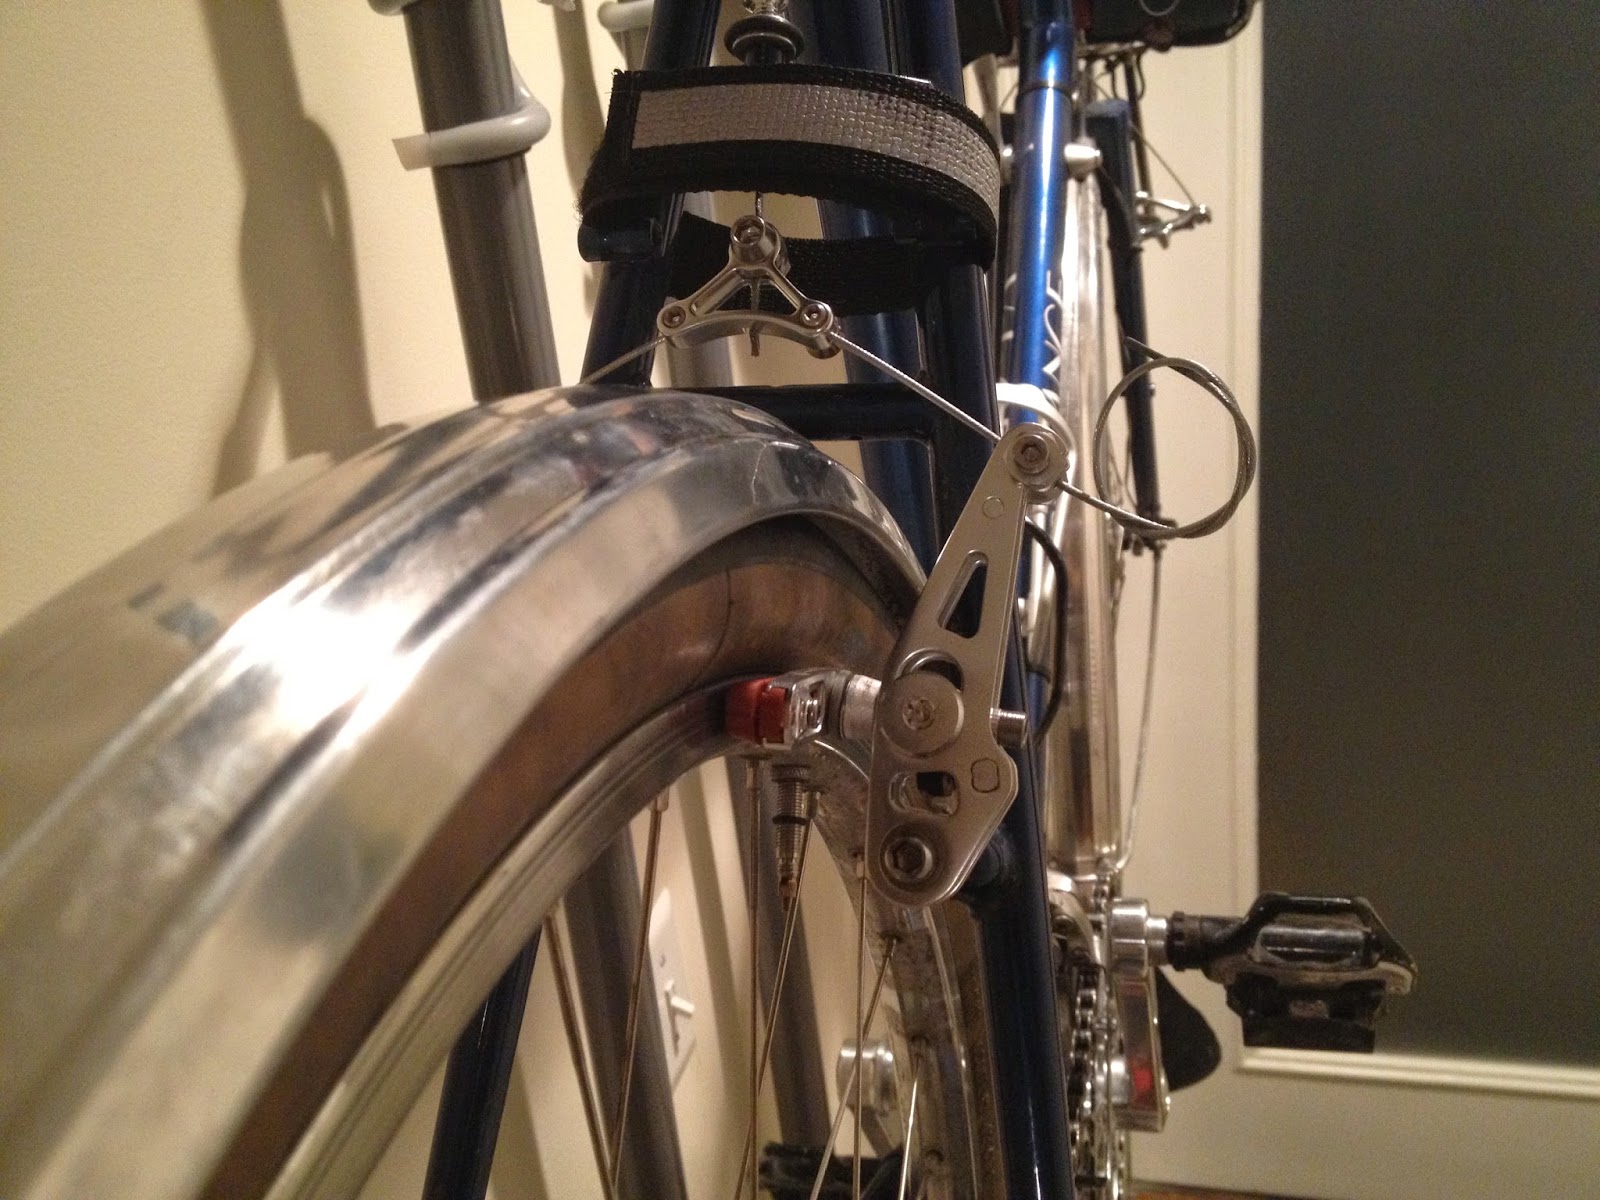
Cable Pinch Bolt (Sturmey-Archer on left, Velo Orange on right)
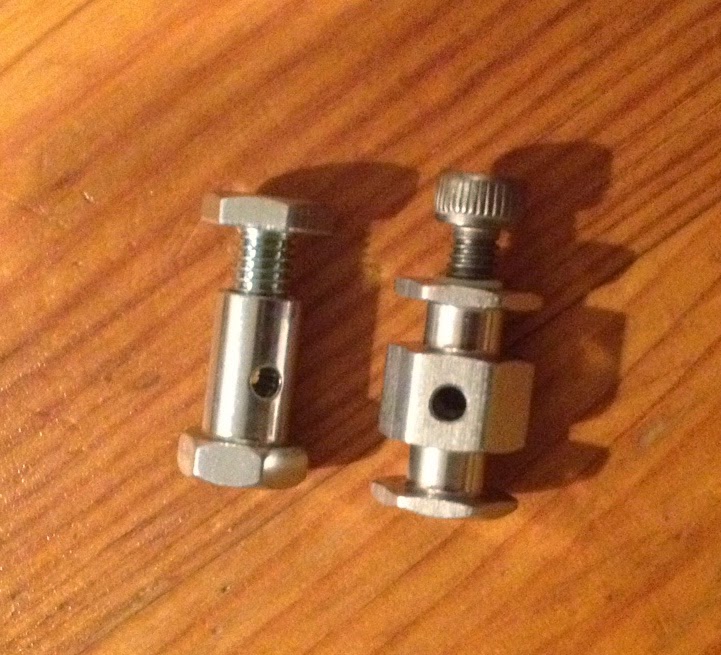
There were only two reviews of these brakes I could find online. One mentioned that the pinch bolt was prone to cutting the straddle cable since the end of the bolt can be sharp. I checked out the bolt and there didn't seemed to be any burring or excessively sharp edges. I have been using the Sturmey-Archer pinch bolt of a similar design for years on my drum brakes without problem. The S-A pinch bolt uses larger diameter threads, but is functionally identical. If you aren't used to these types of anchors, they actually deform the cable instead of the clamping it. You do not need to tighten as much as normal anchor points where the cable is clamped between a washer and the arm. If I had to guess, I would use 5Nm.
If you go the V-O webpage on these brakes, here. You will notice that the brake cable exits the pinch bolt on both sides at a strange angle. Whoever installed it didn't hold the anchor with a 10mm wrench while tightening the M4 bolt. Please do not follow their example.
By the numbers:
Power: 5/5; Ease of installation 3/5; Field Serviceable: 1/5
There are so many adjustments that can be made it can be time consuming to go back and forth between various adjustments until the pads hit the rim squarely, at the same time, and all adjusting bolts (spring tension, pad angle, cable barrel adjuster, etc.) are near the middle of their respective adjustment ranges.
These take more tools to install than are present on any multi tool I have ever used. It is a little bewildering that a brake that may be used for long distance events would require either a 13mm wrench or an adjustable wrench.
I certainly appreciate the long arms that provide more power than almost any other cantilever brakes, but the user interface (to borrow a software term) is not quite refined enough to be truly useable for non-mechanics. These brakes could really use a couple hundred more hours of engineering. I would have considered halting the project once a 13mm wrench was required. It is unfortunate that Velo Orange is such a small company they can't afford to make these more user friendly without making them prohibitively expensive. As a comparison,Compass Bicycles offers boutique centerpull brakes that are as powerful as possible with no performance compromises (they also directly copied a well established design, so they spent a lot of time on manufacturing, not as much on design). But they require specialized bosses that are so sensitive to alignment and spacing, they should only be installed by a framebuilder. They also cost $325 for one bike.
.JPG)

I swapped out the stock pads for Kool Stop Salmons. Once installed the brakes work great. Fantastic power with good modulation. The Compass 650Bx42mm tires have so much grip you are still unlikely to lock up the wheels. I could stop the bike with one or two fingers on the front brake. On a drop bar lever, that is pretty impressive. Pads run pretty close to the rim for cantilevers, about the same as V-brakes.
Cable Pinch Bolt (Sturmey-Archer on left, Velo Orange on right)

There were only two reviews of these brakes I could find online. One mentioned that the pinch bolt was prone to cutting the straddle cable since the end of the bolt can be sharp. I checked out the bolt and there didn't seemed to be any burring or excessively sharp edges. I have been using the Sturmey-Archer pinch bolt of a similar design for years on my drum brakes without problem. The S-A pinch bolt uses larger diameter threads, but is functionally identical. If you aren't used to these types of anchors, they actually deform the cable instead of the clamping it. You do not need to tighten as much as normal anchor points where the cable is clamped between a washer and the arm. If I had to guess, I would use 5Nm.
If you go the V-O webpage on these brakes, here. You will notice that the brake cable exits the pinch bolt on both sides at a strange angle. Whoever installed it didn't hold the anchor with a 10mm wrench while tightening the M4 bolt. Please do not follow their example.

By the numbers:
Power: 5/5; Ease of installation 3/5; Field Serviceable: 1/5

Jamie Johnston
Apr 6, 2015, 10:55:22 PM4/6/15
to Jeff Bertolet, ran...@googlegroups.com
I recommend Tektro CR720 brakes. These brakes came in my Pass Hunter build kit. The bike also has Tektro RL340 levers, H+Son Archetype rims and Clement Strada LGG 700x28 120tpi tires.
The CR720's have great stopping power and modulation without feeling either hard or squishy. I've used these brakes in good and bad weather on big hills without problems.
I've also used Tektro Onyx canti's on my Surly Long Haul Trucker with Velocity Dyad rims (and Alex Adventure rims before that). Also using Tektro RL340 levers with the Onyx canti's. These brakes are really tough to use: little stopping power with high lever force. On long twisty downhills I often get cramped hands with the Onyx brakes.
The Onyx brakes are narrow so they easily clear panniers. I plan to replace the front brakes on the Surly LHT with CR720 but leave the Onyx on the back for pannier clearance.
-jamie
--
You received this message because you are subscribed to the Google Groups "randon" group.
To unsubscribe from this group and stop receiving emails from it, send an email to randon+un...@googlegroups.com.
To post to this group, send email to ran...@googlegroups.com.
Visit this group at http://groups.google.com/group/randon.
For more options, visit https://groups.google.com/d/optout.
Jeff Bertolet
Apr 7, 2015, 9:30:12 AM4/7/15
to ran...@googlegroups.com, jbf...@gmail.com
I understand that the 720's work for fine for some people, they also are inadequate for some people. I'm interested in why some people find them ok, and others don't. I'm also interested in whether the rudimentary chart listing the brakes in order of decreasing theoretical power is realistic for people that have tried multiple brakes on the list. One thing medium profile brakes (such as the 720's) have going for them is the triangle shape of the caliper means the arms don't flex very much under hard braking, which is not the case for low profile brakes.
Possible reasons for differing experiences with 720's:
- Different yoke heights. If your yoke is low enough it passes the tipping point on the MA graph (which yours might do if you are running it with 28mm tires and a low yoke).
- Different levers. There is some variation among short pull levers, as demonstrated by TRP offering two models of their mini v's (a 90mm version, and a 84mm version) to be compatible with levers of different mechanical advantage.
- Different pad placements. Having the pads at the bottom of the adjustment slot on your caliper could increase the MA by at least 15%.

Lounging Longhorn
Apr 7, 2015, 10:02:28 AM4/7/15
to Jeff Bertolet, randon
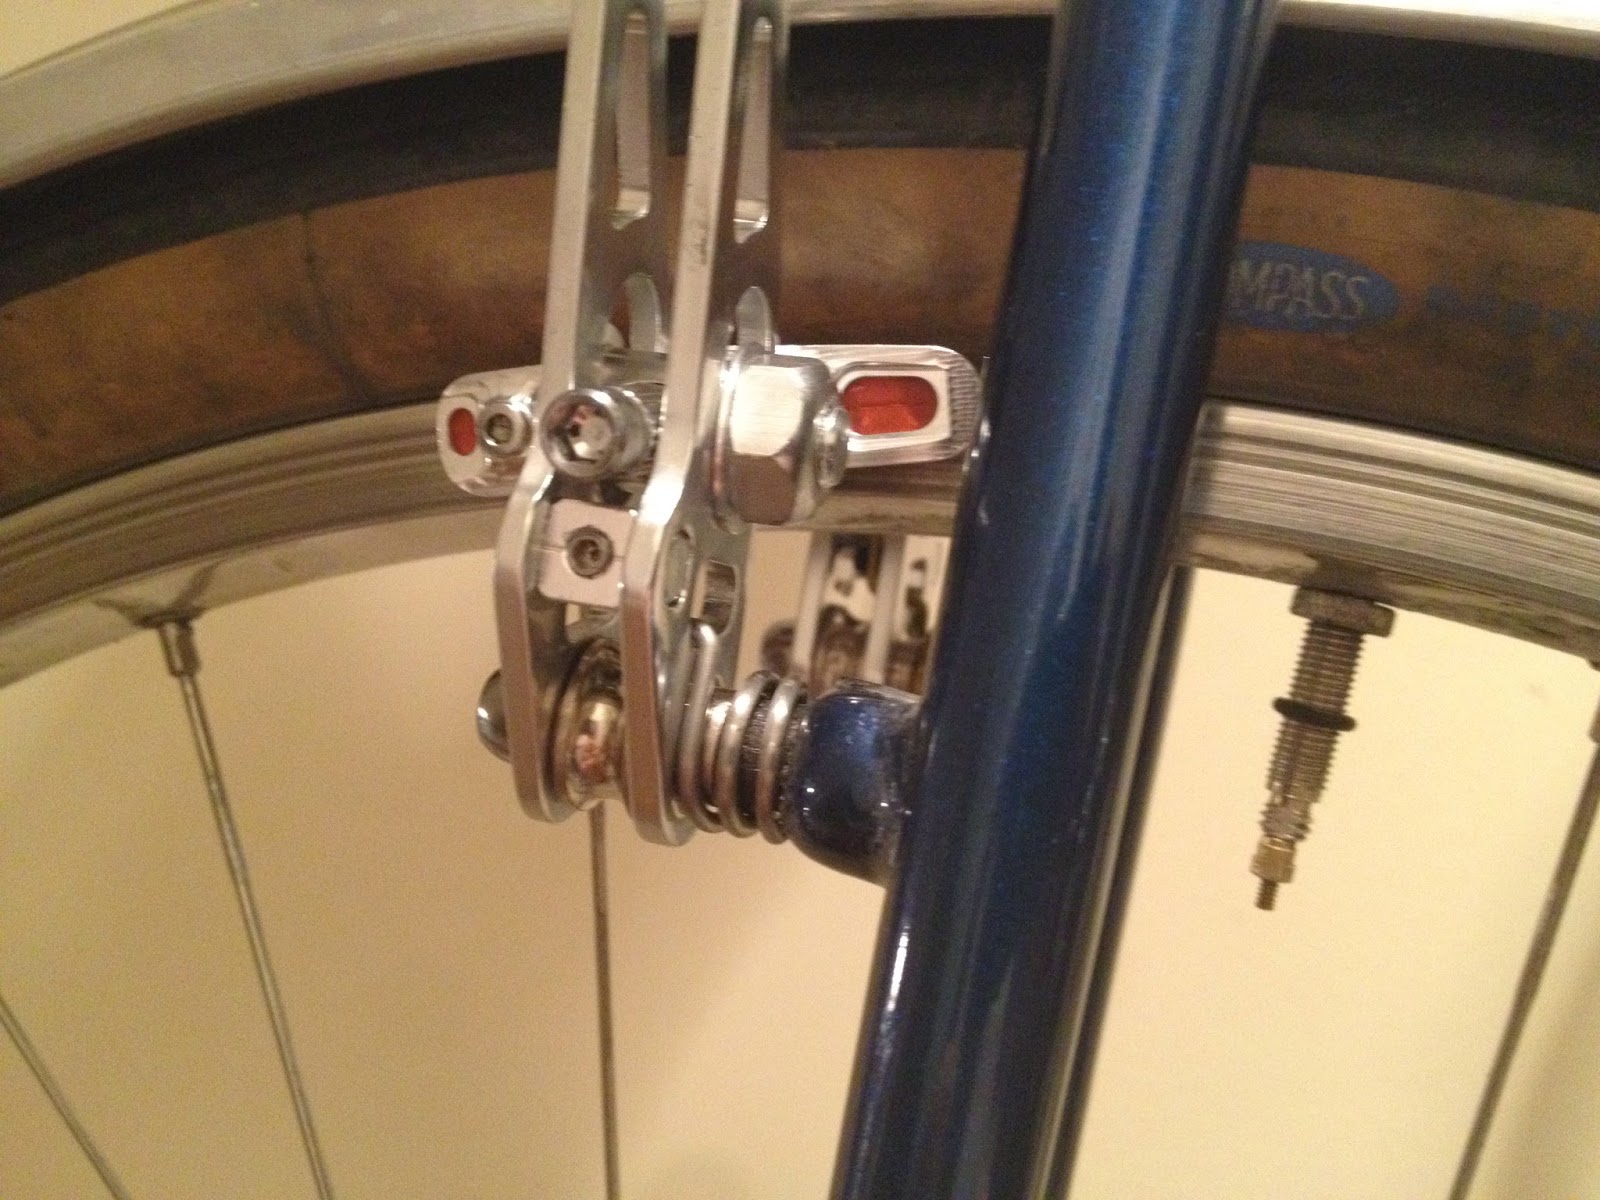
In the third picture down, the rim looks severely scored. But the scoring is fairly uniform, which makes me wonder, is that part of the design of those rims such that they have a "wear indicator"? If it's not designed that way and the scoring is from usage, I would replace the rim immediately. If it's designed that way then disregard this post.
-Jim
--

NickBull
Apr 7, 2015, 10:30:03 AM4/7/15
to ran...@googlegroups.com, jbf...@gmail.com
I find the 720's just fine. When I get home, I can measure the straddle height. For purpose of expeditiousness, what do you want the height measured relative to? FWIW I'm on 650Bx42's with fenders.
Nick
Nick
Jeff Bertolet
Apr 7, 2015, 12:36:56 PM4/7/15
to ran...@googlegroups.com
Thats just poor lighting plus poor brakes. On my previous brakes the pads werent hitting the rim squarely leaving the narrow band of brake stuff.
Jeff Bertolet
Apr 7, 2015, 12:40:14 PM4/7/15
to ran...@googlegroups.com
Yoke height should be the vertical distance from the canti post to the apex of the straddle cable. Im also using 42mm tire and fenders. Yoke height is about 110mm, lowest practical height would be 105.
What levers are you using?
What levers are you using?
Reply all
Reply to author
Forward
0 new messages