Export Annotations / transfer it to the next image. Is there a way to do that?
5,139 views
Skip to first unread message

David Haumann
Oct 19, 2017, 8:06:54 AM10/19/17
to QuPath users
Hello all,
it would make training of classifiers with different statistics and differend cell detection parameters much faster and easier, if QuPath allows to save and export the drawn annotations for the teaching of classifiers and import or transfer them to the same image, opened in a second QuPath window.
Or another thing it would help for:
Do fully automatic Celldetection and Classification and then put the Annotation above it to manually evaluate the quota of right classified cells.
Is there a way to copy the annotations from one picture to another? Even there are already detected cells?
Best
David

Pete
Oct 19, 2017, 1:26:49 PM10/19/17
to QuPath users
Hi David,
If you have multiple images open, it is possible to transfer annotations one at a time using Objects -> Transfer last annotation (Shift + E). It's purely a manual process, and works much like ImageJ's Edit -> Selection -> Restore Selection command (which has the same shortcut).
I agree that the ability to export annotations only would be useful. The question is in what format... this would take a bit of thought. It would be nice to use an existing format for compatibility with other software, rather than invent a new, QuPath-specific way of doing things. Although it's not clear to me what format this should be. It might be worth having a poll to decide...
However, perhaps rather fortunately, you ask this question around the time I happened to notice an intriguing Groovy trick to create an ObjectOutputStream - and I suspect that could help. Putting this into practice, as a temporary measure you can very quickly save the annotations on an image with the following script
def path = buildFilePath(PROJECT_BASE_DIR, 'annotations')
def annotations = getAnnotationObjects()
new File(path).withObjectOutputStream {
it.writeObject(annotations)
}
print 'Done!'
Then you can load them onto a new image with this:
def path = buildFilePath(PROJECT_BASE_DIR, 'annotations')
def annotations = null
new File(path).withObjectInputStream {
annotations = it.readObject()
}
addObjects(annotations)
print 'Added ' + annotations
In practice, I suspect this wouldn't behave well if you also have detections... things may go a bit strange in that case. I haven't tested it, but my expectation is that you'd end up also saving child objects and weird things might happen.
With that in mind, you should probably switch the first script for this one:
def path = buildFilePath(PROJECT_BASE_DIR, 'annotations')
def annotations = getAnnotationObjects().collect {new qupath.lib.objects.PathAnnotationObject(it.getROI(), it.getPathClass())}
new File(path).withObjectOutputStream {
it.writeObject(annotations)
}
print 'Done!'
Basically, this doesn't save your annotations directly. It saves a new list of annotations, but which have the same ROIs and classifications as the originals - but no other shared properties (including child detections). I think it should behave better.
Pete

micros...@gmail.com
Oct 19, 2017, 4:39:35 PM10/19/17
to QuPath users
Oooh, this might be fun!
David Haumann
Oct 21, 2017, 5:59:57 AM10/21/17
to QuPath users
Hi Pete,
that looks very nice! I am going to try that. If I encounter troubles because no childobjects are transfered I dont know yet. But for shure it will save me a lot of time if I can transfer the Annotations onto an image hat has already detected cells.
If that is not possible - I will select the annotations and to cell detections inside them with the same script for celldetection that was used before. For now, I am optimistic to achive the goals via scripting.
Thanks a lot for your help.
Best
David
David Haumann
Oct 23, 2017, 11:45:52 AM10/23/17
to QuPath users
Hi Pete,
I tried all three scripts. They work. Yes, the first writes also the cells - and does not help in this case. But the third writes only the annotations and I can load them with the script in the middle. Thanks a lot for that.
In this way I can test different machine learning statistics to train a classifier for a whole study within one day - before i needed 2-3 days for one try because each training annotation need to be manually drawn again and again.
For this approach now I need to create a project for each image.
Is there a possibility to consider the name of each image and export and import the annotations for all images in a project?
This would again save a lot of time.
Best
David
Pete
Oct 23, 2017, 12:47:52 PM10/23/17
to QuPath users
If I understand correct, you should just need to make sure the file name for export is somehow connected to the image name.
So replacing the original line in the scripts with something like this should work:
def path = buildFilePath(PROJECT_BASE_DIR, 'annotations-' + getProjectEntry().getImageName() + '.txt')

Ben Pearson
Oct 24, 2017, 4:29:24 PM10/24/17
to QuPath users
Hi Pete,
Many thanks and best wishes
Ben
Firstly, I think you have done a wonderful job with QuPath and its detailed/informative documentation and forums.
I have a limited understanding of programming, so I am sorry if this question is either overly simple or difficult to understand.
The script that you posted above to copy multiple annotations works really well for me. However on my subsequent images the x, y coordinates refer to different areas of the tissue, so my copied/loaded annotations are the right shape, size and correctly distributed, but all their positions need to be translated. Is there a simple solution that would enable me to load the annotations, but with altered coordinates (i.e. giving QuPath just 2 floats for an overall x, y correction). Alternatively is there a script that would move either all my annotations, or alter the x, y coordinates relative to my image? I notice you can select multiple annotations by holding down the control button, but when dragged with the move tool, only one annotation moves with the mouse. Is there a way to drag multiple annotations in one go?
Many thanks and best wishes
Ben
Pete
Oct 24, 2017, 6:00:30 PM10/24/17
to QuPath users
Hi Ben,
Thanks for your encouraging feedback, and for your entirely reasonable and understandable question :)
There isn't an obvious, 'proper' way to do what you describe (i.e. you can't drag multiple annotations at one time), but I think this script should do the trick:
double dx = -50
double dy = 100
for (pathObject in getAllObjects()) {
    if (pathObject.hasROI())
        pathObject.setROI(pathObject.getROI().translate(dx, dy))
}
fireHierarchyUpdate()
ROIs aren't meant to be modifiable, so you need to create a new ROI and then set it for the existing object. Such direct modifications aren't really advisable in general, since they will circumvent any of QuPath's built-in checks that try to keep the object hierarchy in some sensible state. But I can't think of any problem if you are translating all the objects by the same amount... since in this case the relationships between the objects should remain the same. So I think the script is worth a try.
Pete
PS. I hope that translations can be enough. Rotations would be several orders of magnitude more awkward...
Ben Pearson
Oct 27, 2017, 8:44:41 AM10/27/17
to QuPath users
Thanks Pete,
Best wishes
You replied so quickly and your solution really helps me with my analysis. I am going to continue reading through your forums and documentation and if I come up with a solution for rotations i'll post it here :-)
Best wishes
Ben
Ben Pearson
Nov 15, 2017, 11:11:46 AM11/15/17
to QuPath users
Hello Pete and other qupath users,
I am not sure if this is needed or will help anyone. Here is my attempt at a script that will rotate all polygon objects on the screen. Essentially it loops through the number of annotations, converts each one into 2 arrays of integers (x and y values). It centres each polygon around the (0, 0) coordinate and rotates before moving them back and redrawing the area.
I am not sure if this is needed or will help anyone. Here is my attempt at a script that will rotate all polygon objects on the screen. Essentially it loops through the number of annotations, converts each one into 2 arrays of integers (x and y values). It centres each polygon around the (0, 0) coordinate and rotates before moving them back and redrawing the area.
It is probably very messy - as I'm not familiar with computer code and have not used groovy before.
I have been trying to improve the code in the following ways -
1) delete the previous polygon - this copies and pastes a new polygon. If I could select the polygon from the annotations i.e. annotation[j] I could use the clearselectedobject method at the end of the loop.
2) move tiles within a polygon - i.e. by just updating all the centroid values of each tile (based on the rotation calculation)
If anyone has any quick hints - i.e. how to reference/select the object or tiles, perhaps let me know. Otherwise I will enjoy finding out the answers by myself.
Best wishes
Ben
import qupath.lib.objects.*
import qupath.lib.roi.*
def annotations = getAnnotationObjects()
for (j = 0; j < annotations.size; j++)
{
    def roi = annotations[j].getROI()
    def roiPoints = annotations[j].getROI().getPolygonPoints()
def roiPointsArx = roiPoints.x.toArray() //convert each point to an array
def roiPointsAry = roiPoints.y.toArray() //for x and y coordinates
//the centroid of the roi - which will be used to center the shape around (0,0)
double centroidX = roi.getCentroidX()
double centroidY = roi.getCentroidY()

double deg = -4
double degrees = Math.toRadians(deg)       // sets the number of degrees to rotate

for (i= 0; i<  roiPointsAry.length; i++)
{
     // correct the center to 0
      roiPointsArx[i] = roiPointsArx[i] - centroidX
      roiPointsAry[i] = roiPointsAry[i] -  centroidY

      //Makes prime placeholders, which allows the calculations x'=xcos(theta)-ysin(theta), y'=ycos(theta)+xsin(theta) to be performed
      double newPointX  = roiPointsArx[i]
      double newPointY = roiPointsAry[i]

      // then rotate

      roiPointsArx[i] = (newPointX * Math.cos(degrees)) - (newPointY * Math.sin(degrees))

      roiPointsAry[i] = (newPointY * Math.cos(degrees)) + (newPointX * Math.sin(degrees))

      // then move it back
      roiPointsArx[i] = roiPointsArx[i] + centroidX
      roiPointsAry[i] = roiPointsAry[i] +  centroidY

}

// then to convert it back into an objectdef xFloat =  roiPointsArx as float[]
def yFloat =  roiPointsAry as float[]

def roiNew = new PolygonROI(xFloat, yFloat, -1, 0, 0)
def pathObjectNew = new PathAnnotationObject(roiNew)
addObject(pathObjectNew)

}
micros...@gmail.com
Nov 15, 2017, 1:21:12 PM11/15/17
to QuPath users
There are two ways I tend to go back and find objects, and it really depends on the project which is best for you. In most cases I know what is going on, and I am most used to using classes, so I will simply set the class of the objects I am working with at the start, then go back and modify or delete all objects of that original class.
This isn't the best way, but if your script set all annotations to the "ToBeDeleted" class at the beginning of the script, you could select them by:
This isn't the best way, but if your script set all annotations to the "ToBeDeleted" class at the beginning of the script, you could select them by:
selectObjects { p -> p.getPathClass() == getPathClass("ToBeDeleted") && p.isAnnotation() };

An example of assigning classes at: https://groups.google.com/forum/#!searchin/qupath-users/PathClassFactory%7Csort:date/qupath-users/DIJHmk-ntB0/5eyiVG41BwAJ
Putting the measurements into each annotation could be done similar to https://groups.google.com/forum/#!searchin/qupath-users/getMeasurementList%7Csort:date/qupath-users/NJPNrNuxwHE/uw3lhUgTAAAJexcept with the detections swapped to annotations.  This would be better if you already have classes assigned and do not want to mess with them.  Just make the new measurement "Delete" and then 1 or 0.
Pete
Nov 15, 2017, 2:29:48 PM11/15/17
to QuPath users
Really nice solution, thanks for posting it!
I actually had no idea that
def roiPointsArx = roiPoints.x.toArray() //convert each point to an array
def roiPointsAry = roiPoints.y.toArray() //for x and y coordinates
would work, that's a new bit of Groovy for me, but looks handy.
For deleting previous polygons, you can add this at the end
removeObjects(annotations, true)
Guray Akturk
Mar 18, 2019, 10:48:52 AM3/18/19
to QuPath users
This is a very interesting topic that I can apply to my routine work.
Pete had a tremendous work in QuPath 0.2.0 version and there is a very useful experimental feature named "interactive overlay alignment".
I would like to thank Pete for his work on the new version.
When a whole slide image is aligned over another one by using interactive overlay alignment, it gives a transform data like
Transform: [
1.000, 0.000, 2790.256
0.000, 1.000, 4096.115
]
We do multiple stainings on one slide by staining, scanning and destaining cycles and ultimately yield multiple images of different IHC markers applied on the same slide. My purpose is to make annotations on one image and transfer to other images which are stained with different markers on the same slide.
Is it possible to integrate this transform factor into this script to move an annotation from one whole slide image to another with proper coordinates and ultimately have the same annotation on all images?
micros...@gmail.com
Mar 18, 2019, 11:04:52 AM3/18/19
to QuPath users
I believe that is the ultimate plan, but Pete is working on Milestone releases so many such options are a work in progress. I don't think full functionality is in yet, though I would recommend keeping an eye on this thread in case of further updates. Feedback on how useful this will be to you is good!
Guray Akturk
Mar 18, 2019, 12:54:38 PM3/18/19
to QuPath users
That thread helped me a lot. Thanks!
The script Pete shared works perfectly. Many thanks to Pete!
One question: Is affine transform something similar to the one used in SIFT registration? I mean, does it fix the minimal changes in the tissue during the transfer of annotations and objects for the same slide stained with different markers? I am asking because it makes the transfer of annotations and tens of thousands of cell objects perfectly!
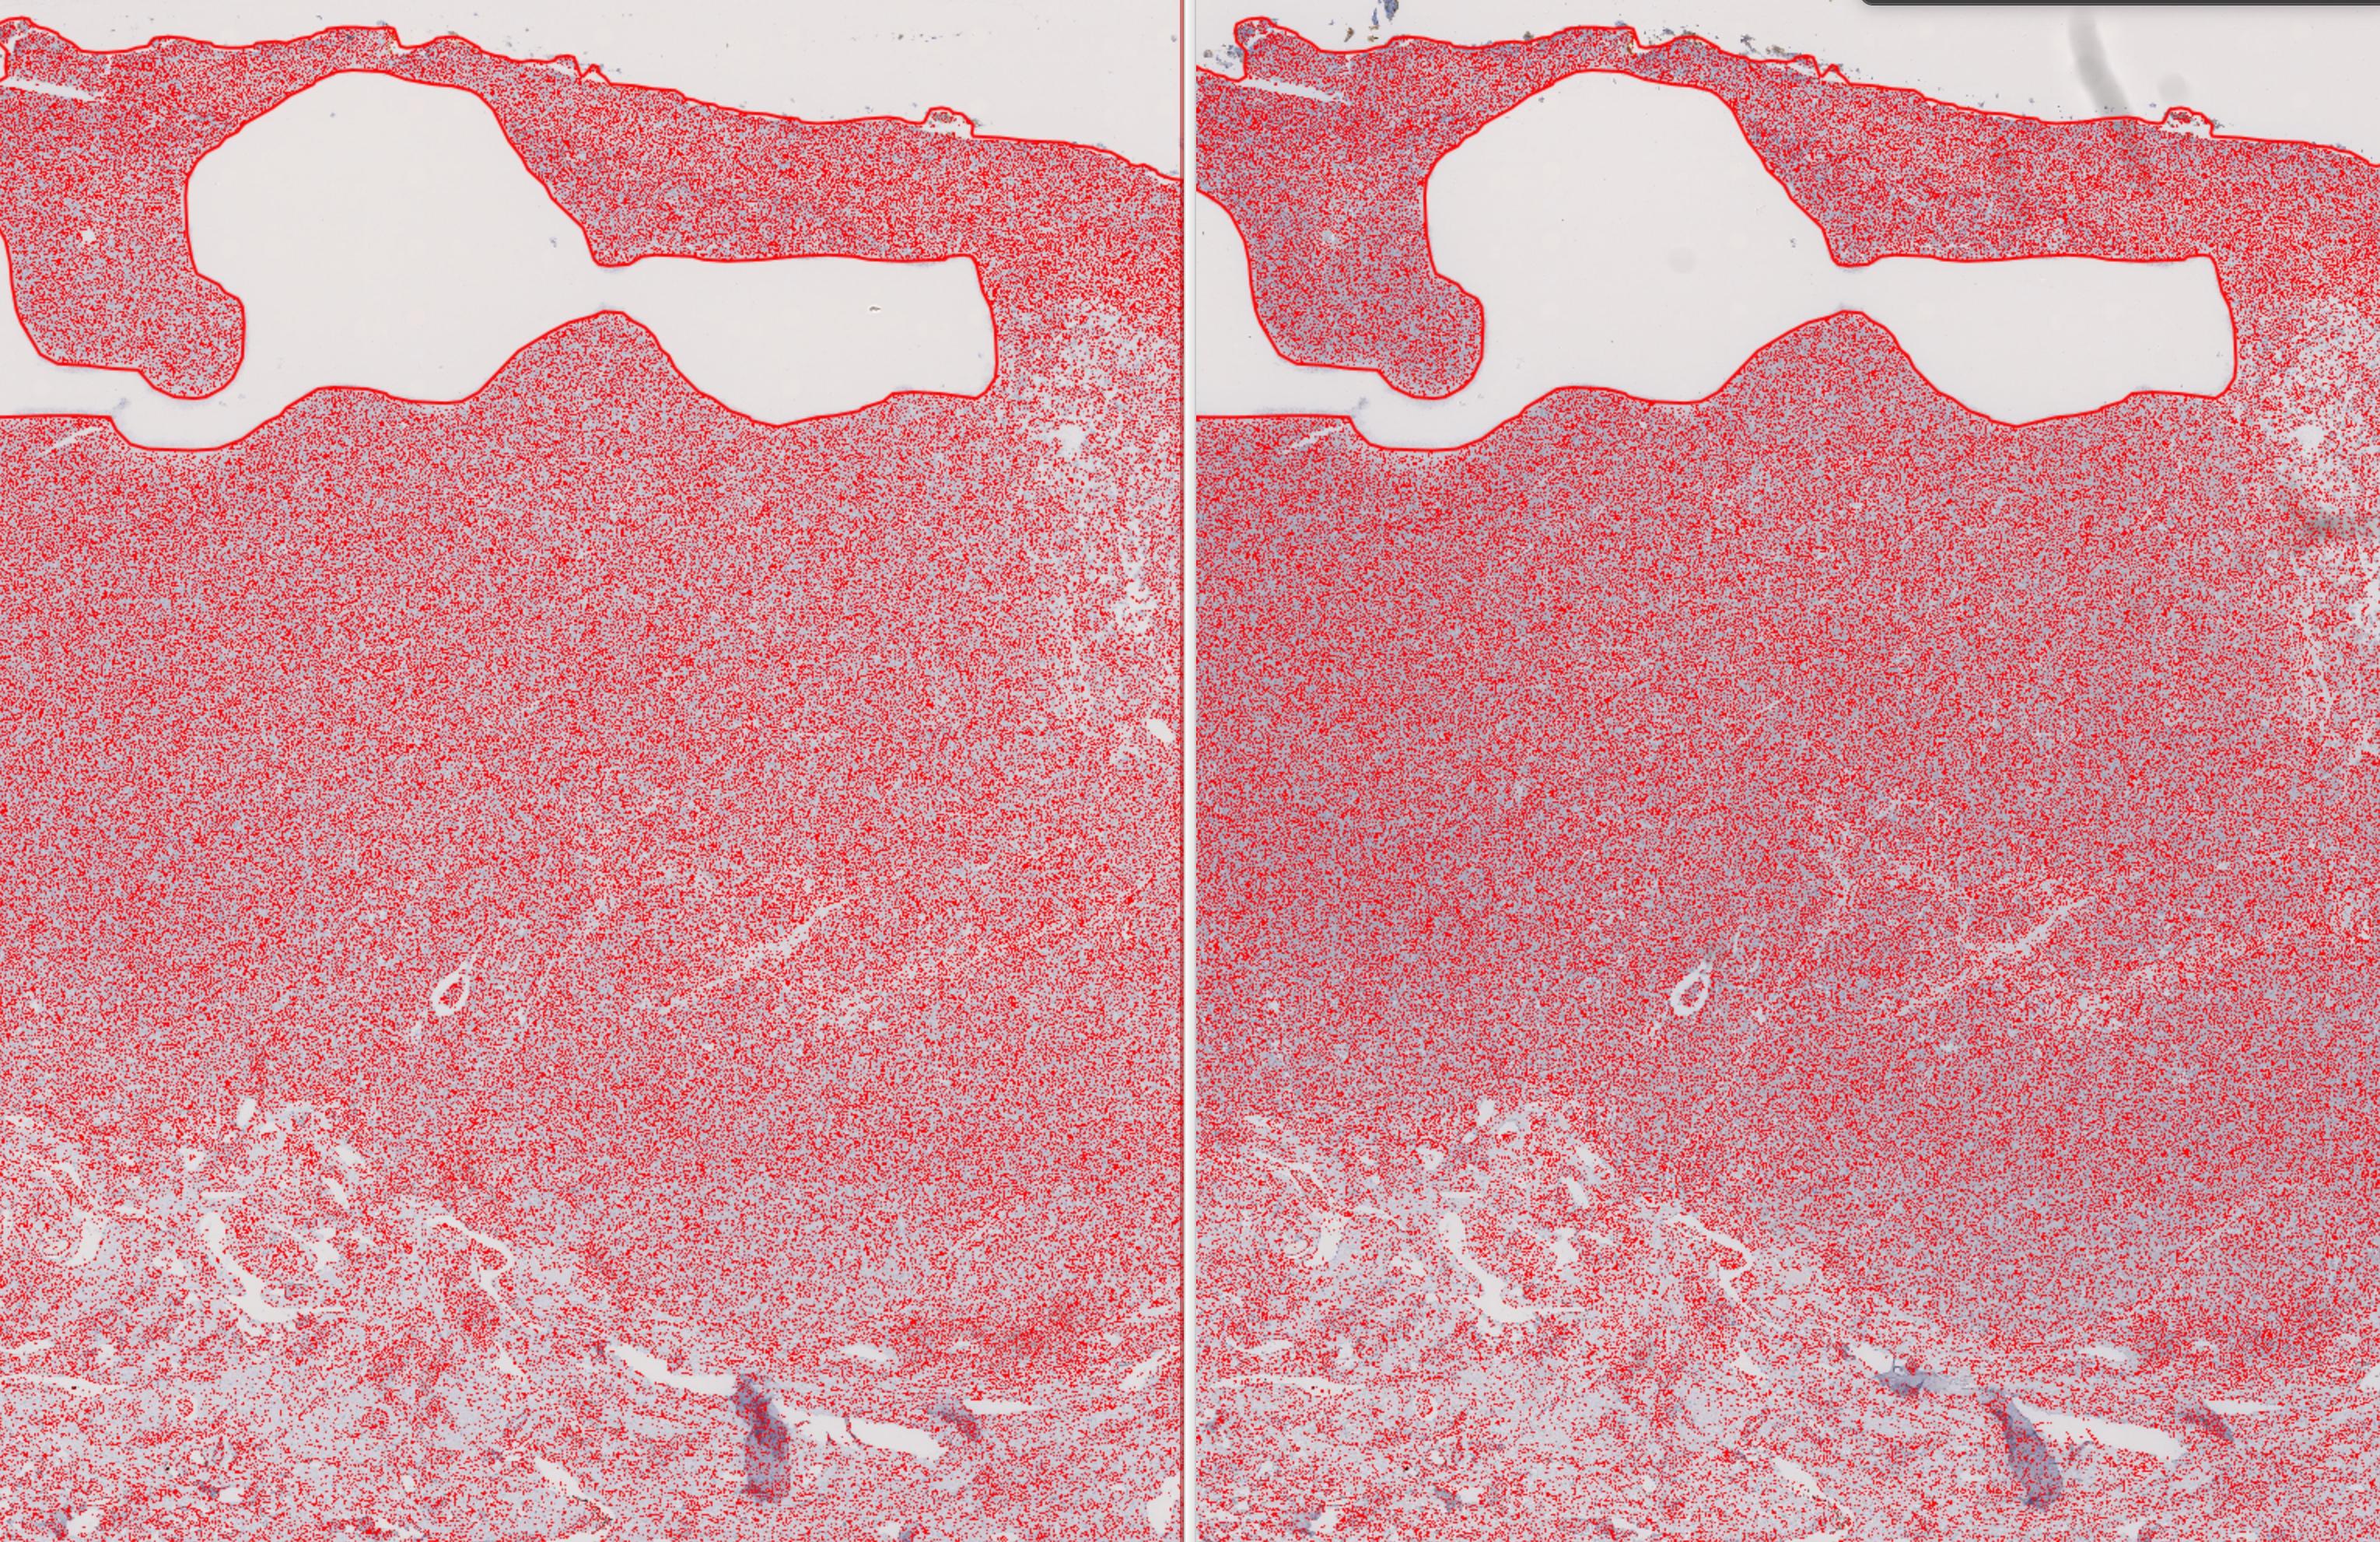
Here is an example of transfer of whole tissue annotation and 750293 objects from CD3 to FOXP3 stained same slide! (I did not perfect the segmentation, it's the basic setting of QuPath just to demonstrate the result in a fast way.)
Left image is CD3; right image is FOXP3 (same slide: staining with CD3- scanning CD3 - destaining of CD3 - staining FOXP3 - scanning FOXP3)

micros...@gmail.com
Mar 18, 2019, 3:05:19 PM3/18/19
to QuPath users
I probably won't have the best answer to this, but I think the affine is a relatively simple transform of rotation, translation and such. SIFT would be a method for acquiring something like an affine transform matrix, by detecting what the rotation and translation should be.
Or, the affine transform matrix is the output of a SIFT algorithm's attempt to perform registration.
I think. I could be wrong. I also don't know what method Pete actually uses for the automatic registration.
Pete
Mar 18, 2019, 9:12:31 PM3/18/19
to QuPath users
No SIFT involved, it's just a global transform consisting of rotation and translation.
The auto option attempts to use findTransformECC from OpenCV: https://docs.opencv.org/4.0.0/dc/d6b/group__video__track.html#ga7ded46f9a55c0364c92ccd2019d43e3a
If it works well, it's a testimony to the preservation of all the structure throughout the restaining and imaging process :)
Guray Akturk
Mar 19, 2019, 12:05:41 PM3/19/19
to QuPath users
I have tested it in several other cases later yesterday and it does not always work 100% perfect but it worked perfectly for that particular example in my previous post :)
Is it possible to calculate SIFT registration data between two images (same slide, different markers) and apply it to transform annotations and detections during the transfer from the source image to the other? I mean incorporating SIFT feature into your script involving interactive image alignment feature. It would be a game changer in multiplex chromogenic IHC studies.
Pete
Mar 19, 2019, 12:19:34 PM3/19/19
to QuPath users
Anything beyond what the command currently has would need to be scripted - most likely using OpenCV. If (even slightly) different transforms need to be calculated locally then the job is considerably harder than using one global transform.
For QuPath itself I ask for patience, I have very many plans but exceedingly little time to work on all the interrelated parts...

rldi...@gmail.com
Apr 19, 2019, 12:50:55 PM4/19/19
to QuPath users
Hi, the Groovy above works for me to export all the annotations and cells classified, but is it possible to export only a specific class (such as "Tumor")?
Gracias,
Robbie
micros...@gmail.com
Apr 19, 2019, 1:03:59 PM4/19/19
to QuPath users
Here is an example of selecting annotation objects by their class.
In general it would be better to start a topic on the real forum and reference this topic by link if necessary.
Reply all
Reply to author
Forward
0 new messages