Midi Visualizer
366 views
Skip to first unread message

Eelke Johnson
Feb 4, 2018, 12:53:27 PM2/4/18
to pyglet-users
Hi community!
I'm a newbie and a muscician and I want to programm a live python midi interface to visualize my favourite song when I play it on my keyboard.
I've started learning python, installed Ubuntu, configured my environnement and searched for online libraries.
I found here those libraries:
-pygame
-pyglet
-pyopengl
My purpose was to use pygame's midi librairies to listen to my keyboard and use pyopengl for the graphics.
The problem was that I didn't found anywhere sufficient documentation for learning pyopengl and I gave up until I discovered Piglet!
I'm not sure if I can implement the pygame's midi library and integrate it with piglet. Is this possible? or should I use pygame with pyopengl instead?
My question is : Can I use piglet to programme my app with pygame's midi library?
What I want to do:
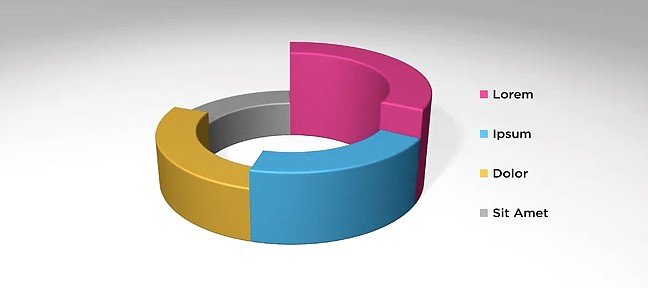
Here is an animation more or less simillar than my idea ( I only want 12 sectors and of course map it with my midi keyboard)
https://www.youtube.com/watch?v=4kkNbtbWbm8
First step,
I want to draw a circle with sector like this (in 2d or 3d)
But first thing first,
I started with hello world and then writed a simple app who draw a circle (https://www.youtube.com/watch?v=dEZDPjVegT4)
But then,
I want to do this shape with 12 sectors and I don't know how to proceed. I looked for the GL_POLYGON method but I don't know how to implement it.
Can someone help me with a basic example or procedure to follow?
(for instance :
I'm motivated to learn piglet, opengl and python but I seek for ressources, example and support
Sorry for my bad english I'm not native.
Eelke Johnson
I'm a newbie and a muscician and I want to programm a live python midi interface to visualize my favourite song when I play it on my keyboard.
I've started learning python, installed Ubuntu, configured my environnement and searched for online libraries.
I found here those libraries:
-pygame
-pyglet
-pyopengl
My purpose was to use pygame's midi librairies to listen to my keyboard and use pyopengl for the graphics.
The problem was that I didn't found anywhere sufficient documentation for learning pyopengl and I gave up until I discovered Piglet!
I'm not sure if I can implement the pygame's midi library and integrate it with piglet. Is this possible? or should I use pygame with pyopengl instead?
My question is : Can I use piglet to programme my app with pygame's midi library?
What I want to do:
Here is an animation more or less simillar than my idea ( I only want 12 sectors and of course map it with my midi keyboard)
https://www.youtube.com/watch?v=4kkNbtbWbm8
First step,
I want to draw a circle with sector like this (in 2d or 3d)
But first thing first,
I started with hello world and then writed a simple app who draw a circle (https://www.youtube.com/watch?v=dEZDPjVegT4)
But then,
I want to do this shape with 12 sectors and I don't know how to proceed. I looked for the GL_POLYGON method but I don't know how to implement it.
Can someone help me with a basic example or procedure to follow?
(for instance :
- make an array with all vertices
- draw a polygon shape with GL
- fill it
- change the camera projection
- etc...
I'm motivated to learn piglet, opengl and python but I seek for ressources, example and support
Sorry for my bad english I'm not native.
Eelke Johnson

Benjamin Moran
Feb 4, 2018, 10:32:39 PM2/4/18
to pyglet-users
Hi Eelke,
You can certainly use pyglet for this kind of project. I would recommend getting a prototype going first, using PC keyboard input. Most of the work will be graphical, so you can add a library for reading Midi commands after you get something going. To start, you will need to understand some OpenGL, but the pyglet.graphics module will take most of the pain out of working with the actual OpenGL primitives. Give this a read over, and post back if you have any questions. We're always interested in improving the documentation : https://pyglet.readthedocs.io/en/latest/programming_guide/graphics.html
You can also check out this example in the repo as well: https://bitbucket.org/pyglet/pyglet/src/89bc2c4825e13a73ed156d3232159cb481aabc9d/examples/graphics.py?at=default&fileviewer=file-view-default
You might want to make some template classes for the various shapes, similar to the Torus. For a project of this scale, keep it simple and just use GL_LINES and GL_TRIANGLES for everything.
This is an interesting sounding project. If you plan to make this open source, you should post a link to your repository.
-Ben
Eelke Johnson
Feb 18, 2018, 2:21:49 PM2/18/18
to pyglet-users

I began to use openGL and pyglet. Now I'm trying to get a function who return a sector. I want to use GL_POLYGON draw method but I've got weird result... Can you help me? I use cos(pi/2) for my x coordinate and sin(pi/2) for my y coordinate. I used red for the outter ring and green for the inner ring. I only want to fill my array of points^^ I dont know much about openGL but it's a start! I already prepared the midi interface. Im only stuck with the graphic parts...
here is my code
from math import *
class secteur(object):
def __init__(self, radius, inner_radius, angle, points):
self.radius = radius
self.inner_radius = inner_radius
self.angle = angle
self.points = points
self.vertex = []
self.color = []
for i in range(points):
angle=self.angle/points*i
x=cos(angle)*radius
y=sin(angle)*radius
z=0
self.vertex.extend([x,y,z])
self.color.extend([255,0,0])
for i in range(points):
angle=self.angle-self.angle/points*i
x=cos(angle)*inner_radius
y=sin(angle)*inner_radius
z=0
self.vertex.extend([x,y,z])
self.color.extend([0,255,0])
self.vertices = pyglet.graphics.vertex_list(2*points,('v3f', self.vertex),('c3B',self.color))
class myWindow(pyglet.window.Window):
def __init__(self,*args,**kwargs):
super().__init__(*args,**kwargs)
self.set_minimum_size(300,300)
glClearColor(0.2,0.2,0.21,1)
self.secteur = secteur(0.5,0.3,pi/2,11)
def on_draw(self):
self.clear()
self.secteur.vertices.draw(GL_POLYGON)
def on_resize(self,width,height):
glViewport(0,0,width,height)
if __name__ == "__main__":
windows = myWindow(800,800,"midi_visualizer",resizable=True)
pyglet.app.run()
Benjamin Moran
Feb 18, 2018, 10:31:19 PM2/18/18
to pyglet-users
GL_POLYGONS are only for convex shapes, I believe. That might be why there is the part at the bottom that's connecting together.
Since you're just starting out, I would strongly suggest that you use GL_TRIANGLES.
Since you're just starting out, I would strongly suggest that you use GL_TRIANGLES.
Benjamin Moran
Feb 25, 2018, 10:28:31 PM2/25/18
to pyglet-users
Hi Eelke,
You only replied to my email last time, so I'm copying the conversation here so that others can see it in the future as well.
I made some quick hacks to your code, to give you some additional examples. Lots of OpenGL primitives should be drawn with batches and groups, but for your use case it's probably OK to just draw everything seperately like you are doing. This is not the "best" way, but for now it will work fine and won't use much CPU.
For outlines, an easy way to do it is to make an additional vertex list with GL_LINES. You can also use `glLineWidth` to make this thicker if you want.
Each Sector would contain two vertex lists.
In the example, it uses the key press/release Window events to set a draw list. This could be connected to the midi events instead. You will probably want to use a dictionary to map the midi events to the visual effect you want.
from math import *

from pyglet.gl import *


class Segment:
    def __init__(self, vlist):
        self.vlist = vlist
    #     self.outline = outline_vlist

    # def draw(self):           # for example
    #     self.vlist.draw(GL_TRIANGLES)
    #     self.outline.draw(GL_LINES)


def create_segment(radius, inner_radius, angle_out, angle_in, points=360):
        vertex = []
        color = []
        indices = []
        for i in range(points):
            angle = angle_out * (i / (points - 1)) + angle_in
            x = cos(angle) * radius
            y = sin(angle) * radius
            z = 0
            vertex.extend([x, y, z])
            color.extend([255, 0, 0])
        for i in range(points):
            angle = angle_out - angle_out * (i / (points - 1)) + angle_in
            x = cos(angle) * inner_radius
            y = sin(angle) * inner_radius
            z = 0
            vertex.extend([x, y, z])
            color.extend([0, 255, 0])
        for i in range(points - 1):
            n = 2 * points - 1
            indices.extend([i, i + 1, n - i])
            indices.extend([n - i, n - 1 - i, i + 1])

        return Segment(vlist=pyglet.graphics.vertex_list_indexed(2 * points, indices,
                                                                 ('v3f', vertex),
                                                                 ('c3B', color)))


class MyWindow(pyglet.window.Window):
    def __init__(self, *args, **kwargs):
        super().__init__(*args, **kwargs)
        self.set_minimum_size(300, 300)
        glClearColor(0.2, 0.2, 0.21, 1)

        self.sectors = [create_segment(0.5, 0.3, pi / 8, n * pi / 6) for n in range(12)]
        self.draw_list = []

    def on_draw(self):
        self.clear()
        for sector in self.draw_list:
            sector.vlist.draw(GL_TRIANGLES)

    def on_resize(self, width, height):
        glViewport(0, 0, width, height)

    def on_key_press(self, key, modifier):
        # replicate default behavior:
        if key == pyglet.window.key.ESCAPE:
            pyglet.app.exit()

        # Some examples of mapping key presses
        if key == pyglet.window.key._1:
            self.draw_list.append(self.sectors[0])
        elif key == pyglet.window.key._3:
            self.draw_list.extend(self.sectors[0:3])
        elif key == pyglet.window.key._4:
            self.draw_list.extend(self.sectors[0:4])
        elif key == pyglet.window.key.SPACE:
            self.draw_list.extend(self.sectors[0:12])

    def on_key_release(self, key, modifier):
        self.draw_list.clear()


if __name__ == "__main__":
    windows = MyWindow(800, 800, "midi_visualizer", resizable=True)

    pyglet.app.run()
On Mon, Feb 26, 2018 at 5:03 AM, Eelke Johnson wrote:

Hi,
I dealt with GL_TRIANGLE and now it work :D I implemented a function which draw some sectors.
Now I want three things:
1) How can I draw some dick borders lines? to my array of points?
2) I want to place 12 sectors in one ring. How do you suggest me to implement this? a new class named ring with an array who contain all my sectors?
3) Finally, I want to make a sector glow or light up when I press a specific Key. Which OpenGL function should I use?
I need to build my programm in a way that I can make live performance :p
Thank you for your support !
here is my code:
from pyglet.gl import *
from math import *

class secteur(object):
def __init__(self, radius, inner_radius, angle, angle_in,points):
        self.radius = radius
        self.inner_radius = inner_radius
        self.angle =
angle
self.angle_in = angle_in
self.points = points
self.vertex = []
self.color = []
self.indices = []
for i in range(points):
angle=self.angle*(i/(points-1))+angle_in
x=cos(angle)*radius
y=sin(angle)*radius
z=0
            self.vertex.extend([x,y,z])
            self.color.extend([255,0,0])
        for i in range(points):
            angle=self.angle-self.angle*(i/(points-1))+angle_in
            x=cos(angle)*inner_radius
            y=sin(angle)*inner_radius
            z=0
            self.vertex.extend([x,y,z])
            self.color.extend([0,255,0])
        for i in range(points-1):
            n = 2*points-1
            self.indices.extend([i,i+1,n-i])
            self.indices.extend([n-i,n-1-i,i+1])
        self.vertices = pyglet.graphics.vertex_list_indexed(2*points,self.indices,('v3f', self.vertex),('c3B',self.color))
class myWindow(pyglet.window.Window):
    def __init__(self,*args,**kwargs):
        super().__init__(*args,**kwargs)
        self.set_minimum_size(300,300)
        glClearColor(0.2,0.2,0.21,1)
        self.secteur = secteur(0.5,0.3,pi/12,2*pi/12,360)
        self.secteur2 = secteur(0.5,0.3,pi/12,4*pi/12,360)

    def  on_draw(self):
        self.clear()
        self.secteur.vertices.draw(GL_TRIANGLES)
self.secteur2.vertices.draw(GL_TRIANGLES)Message has been deleted
Message has been deleted
Eelke Johnson
Feb 26, 2018, 5:38:29 AM2/26/18
to pyglet-users

Merci beaucoup for the fast answer!
Thank you for idea of the drawing list it will help me a lot!
Before I got your message, I already started a new class called ring with a dictionnary for the midi keys mapping and I writed two render functions. One for iddle state and the second when an event occurs.
What I want to implement:
I want to keep the ring printed on screen and when an event occur, the sector concerned would glown shine or I dont know what kind of fancy effect (here I drawn a blue sector).
I don't know much about pyglet structure, batch or vlist. and I don't know how to implement it properly. Should I integrate the draw_list into my ring class? Can I write a function in the sector class who tweak the sector and I call this function directly on the dictionnary? There is a lot of points I don't master and I want to write it like KISS. (Keep It Simple and Stupid)
Thank you for your support! I appreciate that :D I sought an active community to ask questions and learn. here I am
Eelke
Here is my code:
from pyglet.gl import *
from math import *
from pyglet.window import key

class sector(object):
    def __init__(self, radius, inner_radius, angle, angle_in,points):
        self.radius = radius
        self.inner_radius = inner_radius
        self.angle = angle
        self.angle_in = angle_in
        self.points = points
        self.vertex = []
        self.color = []
        self.indices = []
        for i in range(points):
            angle=self.angle*(i/(points-1))+angle_in
            x=cos(angle)*radius
            y=sin(angle)*radius
            z=0
            self.vertex.extend([x,y,z])
self.color.extend([255,800,45])
        for i in range(points):
            angle=self.angle-self.angle*(i/(points-1))+angle_in
            x=cos(angle)*inner_radius
            y=sin(angle)*inner_radius
            z=0
            self.vertex.extend([x,y,z])
self.color.extend([255,120,12])
        for i in range(points-1):
            n = 2*points-1
            self.indices.extend([i,i+1,n-i])
            self.indices.extend([n-i,n-1-i,i+1])
    def render(self):
        self.vertices = pyglet.graphics.draw_indexed(2*self.points,GL_TRIANGLES,self.indices,('v3f', self.vertex),('c3B',self.color))
    def played(self):
        self.color = []
        for i in range(2*self.points):
            self.color.extend([0,0,255])
        self.vertices = pyglet.graphics.draw_indexed(2*self.points,GL_TRIANGLES,self.indices,('v3f', self.vertex),('c3B',self.color))

class ring(object):
    def __init__(self):
        self.notes = {
        'c' : None,
        'c#': None,
        'd' : None,
        'd#': None,
        'e' : None,
        'f' : None,
        'f#': None,
        'g' : None,
        'g#': None,
        'a' : None,
        'a#': None,
        'b' : None
        }
        i=0
        for note in self.notes:
            self.notes[note] = sector(0.7,0.6,pi/6.4,2*i*pi/12,360)
            i+=1
    def render(self):
        for note in self.notes:
            self.notes[note].render()
Message has been deleted
Eelke Johnson
Feb 26, 2018, 6:18:38 AM2/26/18
to pyglet-users
Hi Benjamin,
I started a Githubrepo because google group's post are too small to contain the code
here is my repo :
https://github.com/way2key/Midi_Visualizer
I merged partially your code with mine and new functions
my answer is in the last post
++ Eelke
I started a Githubrepo because google group's post are too small to contain the code
here is my repo :
https://github.com/way2key/Midi_Visualizer
I merged partially your code with mine and new functions
my answer is in the last post
++ Eelke
Benjamin Moran
Feb 27, 2018, 12:19:11 AM2/27/18
to pyglet-users
That's a good move. I would suggest that you add a LICENSE file to your repository, if you want to attract contributions.
Please note that rendering each vertex list seperately with pyglet.graphics.draw is not the most efficient way, but it will be fine if the number of objects not too great.
Is that anything that you are stuck on now?
Please note that rendering each vertex list seperately with pyglet.graphics.draw is not the most efficient way, but it will be fine if the number of objects not too great.
Is that anything that you are stuck on now?
Eelke Johnson
Feb 27, 2018, 9:58:33 AM2/27/18
to pyglet-users
Yes of course.
I'm stuck on the order of execution and eventually mix it with a midi library.
I don't exactly understand how pyglet.app.run() work and when it call the on_draw() event.Furthermore, I already writed a small program who handle midi with pygame but I don't know how to implement it with pyglet.
I'm stuck on the order of execution and eventually mix it with a midi library.
I don't exactly understand how pyglet.app.run() work and when it call the on_draw() event.Furthermore, I already writed a small program who handle midi with pygame but I don't know how to implement it with pyglet.
The second thing I'm stuck on is the glowing effect. Here, I writed a function named played in the sector's class who draw from scratch a blue sector over the other. What I want, is a function who use the ancient sector and tweak it with openGl and make something nicer.
Thank you one more time. I hope you can share the knowledge you own.
Eelke
Eelke Johnson
Mar 5, 2018, 12:42:48 AM3/5/18
to pyglet-users
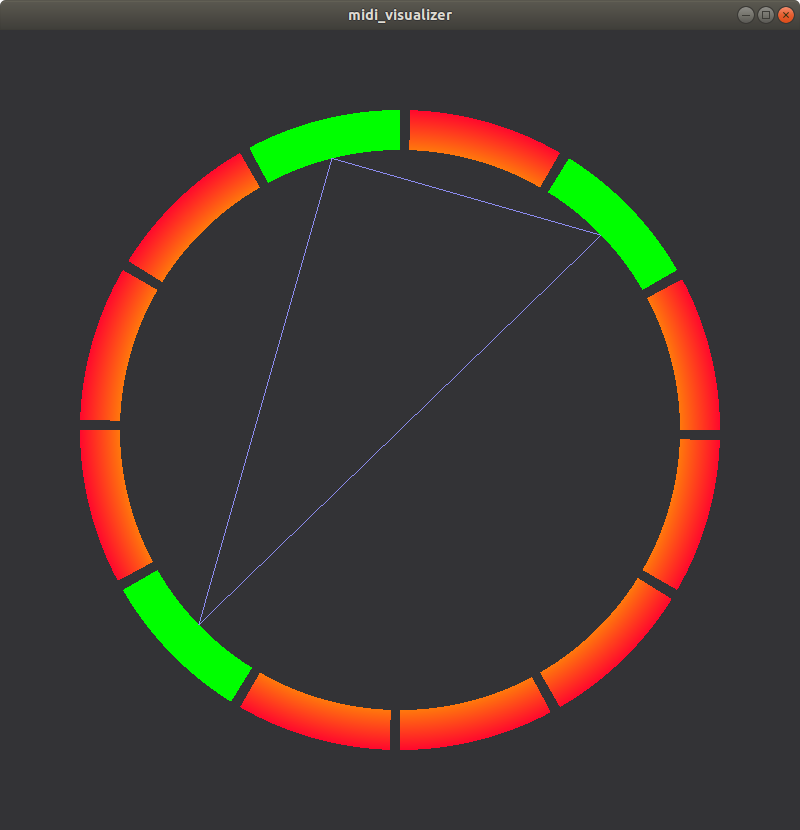
I updated my small project. I reviewed how my code works and I implemented chord lines between notes.
Now, I need your suggestions :)
I want to improve the visual part with a glow effect when a note is played like in the software synthétisa. have you any idea how to implement it? I listen to your commentaries and if you have another good idea I take it!
My second challenge is to implement it with my midi keyboard. There isn't many documentation available online. Do you have any ressources for a pyglet program who use midi input?
Thank you for your support :D I'm proud of the result and I hope I can keep it moving straight forward !
Eelke (way2key)
Benjamin Moran
Mar 7, 2018, 12:34:34 AM3/7/18
to pyglet-users
Hi Eelke,
Sorry, I've been very busy the last week. It seems like you're making good progress! Not bad for your first project.
In answer to your previous questions:
In simple terms, the on_draw method is called whenever you press a key or resize the window. This is an "event driven" programming style, and it works well for GUI applications. After all, the screen does not need to be updated if nothing changes.
For more graphical applications, such as games, you want a steady update (such as 60fps). To do that, just use the `pyglet.clock.schedule_interval` function. This will cause the window to be redrawn as necessary.
For graphical effects, you could do it with Sprites. You could also do it with OpenGL shaders, but it will require some knowledge of shader programming. I would recommend you skip this step for now, and come back to it after the functionality is more complete.
For reading your physical Midi device, it seems that `mido` is popular these days. Mido uses the rtmidi or portmidi backends. It will require you to install that library as well.
As a first step, I would try to create a small program that will read your keyboard, and print your key presses out to the console. After you have that working, it should be pretty easy to implement it into your pyglet project.
I think I have an old Midi keyboard laying around. I might give it a try as well.
Benjamin Moran
Mar 7, 2018, 4:48:36 AM3/7/18
to pyglet-users
As a quick followup, I found my Midi keyboard, and tried some things.
I had good luck with the `rtmidi` module: https://pypi.python.org/pypi/python-rtmidi
It's pretty easy to open up a midi device, and create a callback for key presses. Instead of using the "on_key_press" events in pyglet, you can use the rtmidi callback to set the characters. You will need to determine what the midi data actually means, and create some kind of mapping. A dictionary will work well for that.
import time
import rtmidi


midi_in = rtmidi.MidiIn()

available_ports = midi_in.get_ports()
print(available_ports)

# I have a USB midi keyboard, and device #2 is the input:
port = midi_in.open_port(2)


def printer(message, data):
    # Actually update something here
    print(message, data)


port.set_callback(printer, data=None)

while True:
    # Dumb event loop
    time.sleep(1)
Eelke Johnson
Apr 21, 2018, 3:57:24 AM4/21/18
to pyglet-users
Hi,
It's been a while since I didn't posted anything but I'm back!
I've got some problem with the python rt-midi package. I didn't find any useful and complete documentation. I built the sphinx documentation but except the installation, I didn't found something useful and I'm stuck!
What I want to do basically is this:
key_map = { 0:  "c",
            1:  "c#",
            2:  "d#",
            3:  "d#",
            4:  "e",
            5:  "f",
            6:  "f#",
            7:  "g",
            8:  "g#",
            9:  "a",
            10: "a#",
            11: "b"
                    }

# Midi configuration
midi_in = rtmidi.MidiIn()
available_ports = midi_in.get_ports()
port = midi_in.open_port(1)

def hit_a_key(message, data):
    m = message[0][1]%12
    self.ring.notes[key_map[m]].played()

def release_a_key(message, data):
    m = message[0][1]%12
    self.ring.notes[key_map[m]].idle()

port.set_callback(hit_a_key, data=self)
port.set_callback(release_a_key, data=self)
The two problems I faced are:
- I cannot pass the self object who contain my ring into the midi function
- I didn't found how to implement an event hit/release. The callback is called each time you press/release a key and I don't want that^^
My code is on github https://github.com/way2key/Midi_Visualizer HERE
I'm close to the end of this small program!
Merci Eelke
Benjamin Moran
Apr 23, 2018, 9:39:08 PM4/23/18
to pyglet-users
Hi Eelke,
Rtmidi has it's own internal event loop. You shouldn't have to worry about the pyglet event loop - just use `port.set_callback` to update the methods on your classes.
1. Why are you trying to pass `self` into the callback? I'm not sure what you are trying to do.
2. Do you mean PC Keyboard key, or musical keyboard key?
Eelke Johnson
Apr 29, 2018, 2:24:15 PM4/29/18
to pyglet-users
Hi,
1) I want to pass the self into the callback because self mean the ring. There are all sector in this ring and when I want to toggle a sector, I have to update it with a method contained into the self object.
self -> ring -> sectors -> method on//off
2) The keyboard key. The rt-midi port.setcallback() method is called two times: when you hit the piano keyboard and when you release it.
Basically, I want to play a note on the piano keyboard and then toggle it with my ring.
Eelke Johnson
Apr 29, 2018, 4:11:03 PM4/29/18
to pyglet-users
I solved the self problem. When I call the instance of the window it work ! (obviously) #window.ring.notes[key_map[m]].played()
and for now
IT'S WORKING :D
merci for your help :D
any suggestions or improvements?
I uploaded the code on my github repo ;)
https://github.com/way2key/Midi_Visualizer/
and for now
IT'S WORKING :D
merci for your help :D
any suggestions or improvements?
I uploaded the code on my github repo ;)
https://github.com/way2key/Midi_Visualizer/
Eelke Johnson
Apr 29, 2018, 5:18:24 PM4/29/18
to pyglet-users
I solved the problem of the two call of the printer function with a toggle function but now when I play an octave I got the same problem...
Have you any idea to separate the hit/release piano key event on the port.set_callback ?
Have you any idea to separate the hit/release piano key event on the port.set_callback ?
Benjamin Moran
Apr 30, 2018, 9:42:05 AM4/30/18
to pyglet-users
Hi Eelke,
I just tried it out. Good job!
I am not very familar with MIDI, but I think I can offer some suggestions. The rtmidi callback will always be called for any key action (up, or down). However, you can see if the key is pressed or relesed by looking at the message[0][0] data. For example, look at this message data:
([144, 36, 100], 0.0)
([128, 36, 0], 0.551361)
The "144" is always a key press, and "128" is always a key release. You can check this inside your callback, and decide what to do.
For improvement suggestions, maybe you can ask the user which midi device to open.
1. Print out all midi devices.
2. Ask the user to press a key.
Another suggestion:
1. Use the key press strength value to affect the animation. Harder key presses could be a different color.
Reply all
Reply to author
Forward
0 new messages