Aligning images
536 views
Skip to first unread message

Velson Horie
Jul 22, 2023, 11:30:15 AM7/22/23
to PTGui Support
I have probably overlooked a method statement.
I have 8 tiles each of ca 3 GB, arranged in life as
5 6 7 8
4 3 2 1
When they are loaded, the alignment process takes a very long time, so I want to give it a helping hand, by putting them roughly in the correct position, by choosing the button to move the tiles separately, then moving them on the panorama editor window.
If I click on a number to move its tile, usually a diferent tile is moved, and the program then tries to update all the positions in the wrong place. The attached image, ..508, shows the stage at which I gave up. Is there any way to deactivate the internal alignment process until the external manual input is finished?
There is a very useful alignment tool in MS ICE that makes this stage very easy.
The next image, ..223, is 1/2 hour after PTGui had been given its head (I don't know what has happened to 6) and it is still looking.

John Houghton
Jul 22, 2023, 1:24:23 PM7/22/23
to PTGui Support
On Saturday, July 22, 2023 at 4:30:15 PM UTC+1 Velson Horie wrote:
If I click on a number to move its tile, usually a diferent tile is moved, and the program then tries to update all the positions in the wrong place. The attached image, ..508, shows the stage at which I gave up. Is there any way to deactivate the internal alignment process until the external manual input is finished?
Velson, Do you click on the "Select image under the mouse pointer" or do you just click the "Edit individual images" icon and then select an image that you wish to move? Doing the latter, I have never found it to move a different image. Having moved the image to its new position, it should stay put. There is no internal alignment process invoked by simply dragging an image to a different position, so there's nothing to deactivate.
If you can estimate the horizontal and vertical angular increments (e.g. from previous projects), you might position the the images manually via the Image Parameters tab using Fill Yaw for rows and editing pitch for selected columns, or you could use Align to grid, of course. And for similar projects, make use of a template.
John
Velson Horie
Jul 23, 2023, 3:12:34 AM7/23/23
to PTGui Support
John,
Thank you - you should take the weekend off.
Yes, I was using the
Edit individual images" icon. and didn't think of looking for
"Select image under the mouse pointer". When I found it under Mode, the selection was already ticked. Do I have to press ctrl-shift-L at the same time as I click the mouse button to select the image?
I loaded the 8 images, then the normal template (for 6 images), then changed the 2 new images to Optimise.
I then used cntrl-shift-L and moved one of the images into place successfully. Then tried the next one, but my control of the mouse stopped as the hard disk light was constantly on. The mouse was then unable to control which image is picked up when I clicked on a label. Currently RAM60% CPU35%.
Below is the result of applying Align to grid. At this point, I did manage to move the tiles into place, but the labels on the tiles on that graph paper kept changing as I chose and moved them around.
All the objects I am scanning are all somewhat different sizes. Depending on how they fit on the scanner platen, the amount of overlap between tiles can vary, between and within objects.

PTGui Support
Jul 23, 2023, 4:22:54 AM7/23/23
to pt...@googlegroups.com
Hi Velson,
I think applying the grid may not wwork because your template has
Viewpoint Correction enabled. The viewpoint settings will (kind of)
override the grid layout.
But I wouldn't bother trying to layout the images manually. You'll be
going to add control points later on, and aligning by control points
will completely override the pre-alignment. You gain nothing by doing this.
For performance, you may try disabling 'Find Optimum Seams' until the
panorama is nearly finished. Calculating the optimum seams requires
quite a bit of memory, especially for these large panoramas. It sounds
like your computer is underspecced for this. The 60% RAM is probably the
default limit configured in Options - Advanced, so PTGui is maxing out
its budget. You may try increasing this limit to, say 80%, but then
don't attempt to run any applications concurrently.
Speaking of the hard disk light: you really want to have SSDs for these
kind of projects. If you can hear the crackling noise of HDDs then
things are going to be very slow.
Kind regards,
Joost Nieuwenhuijse
www.ptgui.com
> --
> You received this message because you are subscribed to the Google
> Groups "PTGui Support" group.
> To unsubscribe from this group and stop receiving emails from it, send
> an email to ptgui+un...@googlegroups.com
> <mailto:ptgui+un...@googlegroups.com>.
> To view this discussion on the web visit
> https://groups.google.com/d/msgid/ptgui/6a6e72cc-3e1c-4fe1-b746-8124fc6e46a6n%40googlegroups.com <https://groups.google.com/d/msgid/ptgui/6a6e72cc-3e1c-4fe1-b746-8124fc6e46a6n%40googlegroups.com?utm_medium=email&utm_source=footer>.
I think applying the grid may not wwork because your template has
Viewpoint Correction enabled. The viewpoint settings will (kind of)
override the grid layout.
But I wouldn't bother trying to layout the images manually. You'll be
going to add control points later on, and aligning by control points
will completely override the pre-alignment. You gain nothing by doing this.
For performance, you may try disabling 'Find Optimum Seams' until the
panorama is nearly finished. Calculating the optimum seams requires
quite a bit of memory, especially for these large panoramas. It sounds
like your computer is underspecced for this. The 60% RAM is probably the
default limit configured in Options - Advanced, so PTGui is maxing out
its budget. You may try increasing this limit to, say 80%, but then
don't attempt to run any applications concurrently.
Speaking of the hard disk light: you really want to have SSDs for these
kind of projects. If you can hear the crackling noise of HDDs then
things are going to be very slow.
Kind regards,
Joost Nieuwenhuijse
www.ptgui.com
> You received this message because you are subscribed to the Google
> Groups "PTGui Support" group.
> To unsubscribe from this group and stop receiving emails from it, send
> an email to ptgui+un...@googlegroups.com
> <mailto:ptgui+un...@googlegroups.com>.
> To view this discussion on the web visit
> https://groups.google.com/d/msgid/ptgui/6a6e72cc-3e1c-4fe1-b746-8124fc6e46a6n%40googlegroups.com <https://groups.google.com/d/msgid/ptgui/6a6e72cc-3e1c-4fe1-b746-8124fc6e46a6n%40googlegroups.com?utm_medium=email&utm_source=footer>.
Velson Horie
Jul 23, 2023, 4:57:24 AM7/23/23
to PTGui Support
Joost
Thank you for the hints on how the various settings interact under the hood.
My system is
Intel(R) Core(TM) i7-7700K CPU @ 4.20GHz 4.20 GHz
RAM 32.0 GB and I have set PTGui memory usage to 30 GB
C:\temp is an SSD with 109 GB free space
And the other temp folder is an HDD G: with 5 TB free.
I don't think the motherboard speed is fast enough, but I have souped it up as much as it is worth.
So, yes the computer is underpowered for these images, but its replacement will have to wait a year or two.
Velson Horie
Jul 23, 2023, 6:06:32 AM7/23/23
to PTGui Support
Joost
PTGui has just stopped with an out of memory error.
C: has 68 GB free, and C:\temp has 32 GB of PTGui temp files (all this morning).
G: has 4.88 TB free, and G:\temp has no
PTGui temp files.
These are the two declared temporary file folders.
Over the past 2 days I have been successively stitching these large files. Each time, I have exited PTGui and restarted it, but without rebooting the computer. In the past, similar problems were solved by rebooting the computer. Does PTGui leave any remains behind in memory when it exits?
PTGui Support
Jul 23, 2023, 6:16:26 AM7/23/23
to pt...@googlegroups.com
You don't need a new computer, but adding an SSD (so that PTGui will not
use the HDD for temporary storage) would make a huge difference. Also
increasing RAM would help.
> www.ptgui.com <http://www.ptgui.com>
> https://groups.google.com/d/msgid/ptgui/6a6e72cc-3e1c-4fe1-b746-8124fc6e46a6n%40googlegroups.com <https://groups.google.com/d/msgid/ptgui/6a6e72cc-3e1c-4fe1-b746-8124fc6e46a6n%40googlegroups.com> <https://groups.google.com/d/msgid/ptgui/6a6e72cc-3e1c-4fe1-b746-8124fc6e46a6n%40googlegroups.com?utm_medium=email&utm_source=footer <https://groups.google.com/d/msgid/ptgui/6a6e72cc-3e1c-4fe1-b746-8124fc6e46a6n%40googlegroups.com?utm_medium=email&utm_source=footer>>.
use the HDD for temporary storage) would make a huge difference. Also
increasing RAM would help.
>
> --
> You received this message because you are subscribed to the Google
> Groups "PTGui Support" group.
> To unsubscribe from this group and stop receiving emails from it, send
> an email to ptgui+un...@googlegroups.com
> <mailto:ptgui+un...@googlegroups.com>.
> To view this discussion on the web visit
> https://groups.google.com/d/msgid/ptgui/461e0987-c647-4226-8772-1f9e9f6aaf17n%40googlegroups.com <https://groups.google.com/d/msgid/ptgui/461e0987-c647-4226-8772-1f9e9f6aaf17n%40googlegroups.com?utm_medium=email&utm_source=footer>.
> --
> You received this message because you are subscribed to the Google
> Groups "PTGui Support" group.
> To unsubscribe from this group and stop receiving emails from it, send
> an email to ptgui+un...@googlegroups.com
> <mailto:ptgui+un...@googlegroups.com>.
> To view this discussion on the web visit
PTGui Support
Jul 23, 2023, 6:23:00 AM7/23/23
to pt...@googlegroups.com
If there's a hard crash PTGui might leave temporary files around. You
can remove those. Rebooting won't hurt.
Your C drive is not only used by PTGui but also by Windows' own swap.
You should avoid having this run full as it causes all kind of problems.
Ideally you should leave the C drive to Windows and have another SSD for
PTGui temporary storage. Consider getting an external SSD (like the
Samsung T7 or similar) if you cannot install one in the computer. It
will really make the difference.
Also keep in mind that, once PTGui reports out of memory, most temporary
files have already been cleaned up, so your C drive may not actually
have had 68 GB free when the error occurred.
> www.ptgui.com <http://www.ptgui.com>
can remove those. Rebooting won't hurt.
Your C drive is not only used by PTGui but also by Windows' own swap.
You should avoid having this run full as it causes all kind of problems.
Ideally you should leave the C drive to Windows and have another SSD for
PTGui temporary storage. Consider getting an external SSD (like the
Samsung T7 or similar) if you cannot install one in the computer. It
will really make the difference.
Also keep in mind that, once PTGui reports out of memory, most temporary
files have already been cleaned up, so your C drive may not actually
have had 68 GB free when the error occurred.
> https://groups.google.com/d/msgid/ptgui/6a6e72cc-3e1c-4fe1-b746-8124fc6e46a6n%40googlegroups.com <https://groups.google.com/d/msgid/ptgui/6a6e72cc-3e1c-4fe1-b746-8124fc6e46a6n%40googlegroups.com> <https://groups.google.com/d/msgid/ptgui/6a6e72cc-3e1c-4fe1-b746-8124fc6e46a6n%40googlegroups.com?utm_medium=email&utm_source=footer <https://groups.google.com/d/msgid/ptgui/6a6e72cc-3e1c-4fe1-b746-8124fc6e46a6n%40googlegroups.com?utm_medium=email&utm_source=footer>>.
>
>
> --
> You received this message because you are subscribed to the Google
> Groups "PTGui Support" group.
> To unsubscribe from this group and stop receiving emails from it, send
> an email to ptgui+un...@googlegroups.com
> <mailto:ptgui+un...@googlegroups.com>.
> To view this discussion on the web visit
> https://groups.google.com/d/msgid/ptgui/003d8fd1-631f-4a7c-8d4e-214736f08948n%40googlegroups.com <https://groups.google.com/d/msgid/ptgui/003d8fd1-631f-4a7c-8d4e-214736f08948n%40googlegroups.com?utm_medium=email&utm_source=footer>.
> You received this message because you are subscribed to the Google
> Groups "PTGui Support" group.
> To unsubscribe from this group and stop receiving emails from it, send
> an email to ptgui+un...@googlegroups.com
> <mailto:ptgui+un...@googlegroups.com>.
> To view this discussion on the web visit
John Houghton
Jul 23, 2023, 8:06:08 AM7/23/23
to PTGui Support
On Sunday, July 23, 2023 at 8:12:34 AM UTC+1 Velson Horie wrote:
John,Thank you - you should take the weekend off.
When you are my age (84), weekends are little different to weekdays, but I have just got back from a 30 mile ride on my bicycle, so I am not doing too badly.
Yes, I was using the Edit individual images" icon. and didn't think of looking for "Select image under the mouse pointer". When I found it under Mode, the selection was already ticked. Do I have to press ctrl-shift-L at the same time as I click the mouse button to select the image?
You can just use the two icons under the Mode option:
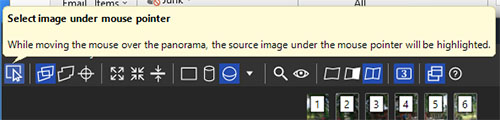
Note that the "Select Image under mouse pointer" icon is only active when the icon to the right ("Edit individual images") has been selected. Just click it to turn it off/on.
Given that the images are of different sizes, I trust that you are assigning individual lens parameters to them as they cannot share the same hfov parameter. (I guess we covered that previously).
John
Velson Horie
Jul 23, 2023, 8:59:33 AM7/23/23
to PTGui Support
Yes, I am just about to order my ring fenced PTGui internal SSD.
When PTGui says it is running out of memory, which memory is that - RAM or disc space? It did not start to use the G:\temp space (4 TB of empty prairies). I.e. would an additional SSD make the difference?
Additional RAM would mean throwing out the existing 32 GB (and I am not sure that the motherboard accepts 64 GB of memory).
John - you outdo me of course. But Morris dancing keeps me youngish.
I have learned (from you) to ensure that the sizes are the same within a set of images. But as the objects vary in size, the tiles for a set are varied to get the maximum resolution within the overal 4 GB TIFF limit of the scanner.
Thank you both.
PTGui Support
Jul 23, 2023, 9:18:38 AM7/23/23
to pt...@googlegroups.com
Normally PTGui would never complain about being out of memory. It would
use its allocated chunk of memory, and then start using the temporary
folders. In the end it would complain about a lack of disk space, not
memory.
I guess what happened here is that PTGui was using the C drive in the
assumption that it had enough space there, but through some (external?)
reason the c drive ran full faster than expected. Now Windows is out of
swap space and this caused a physical lack of memory.
You could verify this by removing the C drive from the temporary folders
in PTGui and only use G. It might be slow but it should not run out of
memory.
With your new SSD, be sure remove the C drive from the temporary folder
list in PTGui.
> siump.jpg
>
> Note that the "Select Image under mouse pointer" icon is only active
> when the icon to the right ("Edit individual images") has been
> selected. Just click it to turn it off/on.
>
> Given that the images are of different sizes, I trust that you are
> assigning individual lens parameters to them as they cannot share
> the same hfov parameter. (I guess we covered that previously).
>
> John
>
>
>
> Note that the "Select Image under mouse pointer" icon is only active
> when the icon to the right ("Edit individual images") has been
> selected. Just click it to turn it off/on.
>
> Given that the images are of different sizes, I trust that you are
> assigning individual lens parameters to them as they cannot share
> the same hfov parameter. (I guess we covered that previously).
>
> John
>
>
> --
> You received this message because you are subscribed to the Google
> Groups "PTGui Support" group.
> To unsubscribe from this group and stop receiving emails from it, send
> an email to ptgui+un...@googlegroups.com
> <mailto:ptgui+un...@googlegroups.com>.
> To view this discussion on the web visit
> https://groups.google.com/d/msgid/ptgui/c4c68c16-bc08-4f56-bdaf-7c994da839b2n%40googlegroups.com <https://groups.google.com/d/msgid/ptgui/c4c68c16-bc08-4f56-bdaf-7c994da839b2n%40googlegroups.com?utm_medium=email&utm_source=footer>.
> You received this message because you are subscribed to the Google
> Groups "PTGui Support" group.
> To unsubscribe from this group and stop receiving emails from it, send
> an email to ptgui+un...@googlegroups.com
> <mailto:ptgui+un...@googlegroups.com>.
> To view this discussion on the web visit
Velson Horie
Jul 29, 2023, 5:23:47 AM7/29/23
to PTGui Support
As previously discussed, I am setting Optimise>advanced>tile 1 to Reset, the remainder (2-7) to Optimise
In order to ensure that the panorama is horizontal, I am taking especial care to ensure that tile 1 is true both in the intial imaging then checked (and corrected if necessary) in Photoshop. So all subsequent orientations should be fixed to that of tile 1. This is fiddly and timeconsuming, so I take slightly less care about the remainder. However, sometimes the panorama is less than horizontal by a couple of degrees.
Does PTGui ever change the orientation of the Reset tile 1?
PS. I fitted the new 1 TB SSD and saw 90 GB of temp files created for a 13 GB panorama.
Thank you for the advice
John Houghton
Jul 29, 2023, 4:22:41 PM7/29/23
to PTGui Support
On Saturday, July 29, 2023 at 10:23:47 AM UTC+1 Velson Horie wrote:
In order to ensure that the panorama is horizontal, I am taking especial care to ensure that tile 1 is true both in the intial imaging then checked (and corrected if necessary) in Photoshop. So all subsequent orientations should be fixed to that of tile 1. This is fiddly and timeconsuming, so I take slightly less care about the remainder. However, sometimes the panorama is less than horizontal by a couple of degrees.Does PTGui ever change the orientation of the Reset tile 1?
Velson, The orientation of the anchor image (Tile 1) can change if you are using the default optimization settings, for which hor/vert control points are only taken into account in a second (levelling) pass of the optimizer after the images have been aligned with each other in the first pass. Levelling is achieved by shifting the complete composite panorama about on the spherical stitching surface.
Alternatively, you can select the option to include hor/vert points in a single pass, in which case the anchor image will not change position if y,p,r are all unchecked. You would normally check pitch and roll to allow the anchor image to change position in order to facilitate the levelling process. Also, evaluation of lens parameters would usually be affected by the hor/vert points, which would not happen when the points are only used in a second pass.
John
Velson Horie
Aug 16, 2023, 11:57:26 AM8/16/23
to PTGui Support
John
Thank you
I haven't set hor/vert points in any of my panoramas of scanned prints. My horizontal line is set by ensuring that tile 1 is scanned as true as possible, defined by the edge of printed image. So I thought that any optimising of hor/vert points would be ignored. Each tile is ca 3.8 GB.
Using my "normal" settings, -806 is the result after optimising. As you can see, the panorama (under the optimise window) is slightly skewed.
I then changed the hor/vert .. points: to "include in single pass", with the result shown in ..631
I then tried ignore, with the result shown in ..459.
All these settings show the same amount of resulting slope.
..127 is the bottom edge of tile 1(using Photoshop) showing that this tile is true.
Is there another setting that can be used to fix the orientation of tile 1?
John Houghton
Aug 16, 2023, 1:18:01 PM8/16/23
to PTGui Support
Velson, So what happens to the values of y,p,r as displayed on the Image Parameters tab? Do they change from their initial values?
John
John Houghton
Aug 16, 2023, 1:55:20 PM8/16/23
to PTGui Support
On Wednesday, August 16, 2023 at 6:18:01 PM UTC+1 John Houghton wrote:
Velson, So what happens to the values of y,p,r as displayed on the Image Parameters tab? Do they change from their initial values?
I should have reminded you to click twice on the displayed values to see the full decimal places
John
Velson Horie
Aug 21, 2023, 12:50:11 PM8/21/23
to PTGui Support
John
For the moment, I shall leave investigating the levelling problem, as another has appeared.
I am stitching 12 x 3.8 GB scans, see attached.
As before on Optimise, tile 1 is set as Reset, the rest as Optimise. The resultant optimised image and panorama has a mist coming over the sea but only on tile 1. I thought this might be a problem with stray lighting (I started the scanning on a bright morning) so repeated on an overcast day. And got the same result.
It looks as though Reset does more than just adjust the position. Comparison with the actual object and the scanned images suggests that the Optimise tiles are more nearly correct and the Reset one has been altered.
Any idea what is happening, and how to prevent it?
John Houghton
Aug 21, 2023, 1:27:41 PM8/21/23
to PTGui Support
Velson, Reset is the normal default setting and will not have any effect on the brightness of the image. Could you supply a copy of your project file in its final state please.
John
John Houghton
Aug 22, 2023, 3:46:32 AM8/22/23
to PTGui Support
On Monday, August 21, 2023 at 5:50:11 PM UTC+1 Velson Horie wrote:
As before on Optimise, tile 1 is set as Reset, the rest as Optimise.
Velson, For correct perspectives, I would therefore expect image 1 to be positioned at the centre of the Panorama Editor window. The other images would be aligned with that image and you would need to drag in the yellow crop bars to select just the picture for generating the output panorama. Your screen shot suggests you have centred the whole panorama image which would result in some perspective distortion, depending on the value you have set for the focal length. Maybe not too significant if specifying a very large focal length.
John
Velson Horie
Sep 4, 2023, 3:48:37 AM9/4/23
to PTGui Support
John
Thank you. I have just come back to my computer.
1. I have re-run the panorama. Attached is an image showing the joins in PE, an image of the resultant panorama on Photoshop (38 GB), and the PTS file. The mist has not been dispersed by the warm weather, must be autumn.
2. I have set up a template (attached) to be applied to all my scanner projects, following your advice. These may involve 2-14 tiles, with tile 1 being on the bottom left. It is good that PTGui is flexible enough to adjust to any of these numbers in a presented project. It would be difficult to start scanning tile 1 in the centre of the image, which needs a rectilinear pattern of tiles to ensure complete, efficient, coverage. The focal length is 1750 mm. I both centre and fit panorama then use the yellow framing lines to get clean margins.
John Houghton
Sep 4, 2023, 6:38:46 AM9/4/23
to PTGui Support
Velson, For your template project, you should visit the Project Settings tab and choose appropriate settings for Align Images. The "Roughly arrange images" setting will destroy the initial alignment, which you probably don't want. Choose "The images are already roughly positioned". You also have the "Perform automatic exposure and colour adjustment" option checked, which is probably why image 1 is somewhat lighter than the others. All the images should be the same brightness, so this adjustment should not be necessary, though it shouldn't actually do any harm, but try turning this option off.
More generally, there are relatively few control points and the optimization figures are rather poor. Image one has only one control point between it and its horizontal and vertical neighbours. The images provided are much to small to say whether more points might be readily found with careful manual assignment. (The "Generate control points here" function would probably find many more points). Straight line control points could be used to help get clean edges to the picture. Perhaps you could supply a 100% crop of a small portion of an image so we could see what the image content actually is like.
John
Velson Horie
Sep 5, 2023, 9:00:17 AM9/5/23
to PTGui Support
John
Thank you.
Attached is a crop at the junction between the mist and normal, at 100% and a locating crop with the cross roughly in the centre of the 100% crop. It looks as though the mist (left) portion of the panorama image is considerably better resolved (aligned?) than the darker portion. Mezzotint has a deliberately random base structure.
I thought (and may have misunderstood) that the control points were used for a second pass of alignment, which was then replaced in the optimisation pass, and that replaced in the panorama generation pass.
I have reloaded S141_xii_cvh_cvh1523_1_PTGui_testmist.pts. There indeed only one control point between tiles 1 and 2 (to the right), and choosing to generate control points between 1 and 2 generated no more. But there were (and are) 4 points between 1 and 7(above). I have added a couple of points between 1/2. The rest of the overlaps seem to have 3-4 CPs each.
Having done that, I adjusted the Project Settings as you suggest>set tile 1 to Reset
> Optimize>Ave control distance =4>PE>Recentred panorama>the mist has moved but still there (see image)>create panorama>PS.
Attached are images of the originalTile1 and tile 2 and the PS file of the resulting panorama of tile1/2
I closed PTGui, saving the relevant pts file, S141_xii_cvh_cvh1523_1_PTGui_testmist_c
John Houghton
Sep 5, 2023, 10:13:56 AM9/5/23
to PTGui Support
Velson, Thank you for the images. I can see how the control point generator might be having a tough time. Nevertheless, it is possible to get a good alignment between tiles 1 & 2 and eliminate the brightness difference between the two images. The latter is due to entries in the Exposure Offset column of the Image Parameters tab for your project file:
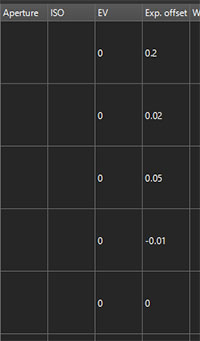
Those four entries should be set to 0, as for all the other images. I can't tell you how they came to have non-zero values. Usually it is the result of running the "Automatic exposure and colour adjustment" option. But just alter them to 0 and your problem is solved. My output is attached. If you would like me to try a complete stitch using half or quarter size jpegs (with a centre watermark if you prefer), by all means zip them together and upload to wetransfer.com, or Dropbox or similar service..
John
Velson Horie
Sep 6, 2023, 3:42:18 AM9/6/23
to PTGui Support
John
Thank you for teasing out the problem, and providing a solution.
I run these as overnight jobs. This one appears to have taken 1:20 hours.
Is there a way to attach a timer to each process so I can tweak the conditions to speed it up?
John Houghton
Sep 7, 2023, 11:01:22 AM9/7/23
to PTGui Support
Velson, AFAIK, there's no way to obtain automatically a log of timings for the various processes involved in a stitch.
BTW, from what I have seen of your project files, I think you may not fully understand how viewpoint correction can be safely used in mosaic stitches. To show how it can be done, I have created a sample project using perfect "scanned" images similar to those you are using (actually Photoshop crops of a panorama image). If interested, download from https://we.tl/t-mD2gvh0zEg (7MB). It will be there for 7 days before automatic deletion.
Note the following:
1. The artificial lens focal length specified does not have to be a huge number, as would be the case when not using viewpoint correction. I used 100mm.
2. All y,p,r parameters are set to be optimized, so that the panorama image is totally free to take up its optimum position.
3. I have created horizontal and vertical line control points on each side of the artwork to level it.
4. One source image must have the optimization setting "Reset". All the rest should be set to "Optimize".
5. The "Reset" image should find itself at the centre of the Panorama Editor window after the optimization process. You should not use the "Centre panorama" option, as that will normally introduce perspective distortion (i.e. make the panorama unlevel). Try dragging the panorama image off-centre and see what happens.
6. Adjust the window to accommodate the full panorama image and drag in yellow crop bars from the frame sides to get rid of unwanted blank space.
I hope that helps.
John
Velson Horie
Sep 8, 2023, 6:19:49 AM9/8/23
to PTGui Support
John
Thank you for identifying my many weaknesses.
The standard template I constructed was based on your and Joost's earlier comments.
I loaded the PS-scan.pts then the tiles.
1. the focal length value in my template of ca 1750 mm, was chosen during one Optimiser run, so I left it in the saved template.
2 and 4. You have set all y,p,r to optimise, but the previous recommendation was not to optimise the reset image.
5. I clicked Run Optimiser, and got JohnsProject01. Although 6 is centralised, not all the image is showing. So, I moved it to get as much visible as possible but I still had to increase the window size in order to include all the image, JohnsProject02. This made the image wedge shaped. Alternatively if I clicked fit panorama, it created JohnsProject03. The image did stay square and horizontal though the window still cropped a sliver off the right side and top. As you warn, clicking centre panorama does indeed distort the viewpoint to wedgy.
I then unset
y,p,r for tile 6 and ran optimiser. The resultant image was nearly complete and over filled the window. It stayed square and horizontal. If I move it to fill the black edges, it goes a little bit wedgy horizontally, but still does not show the whole image, JohnsProject04. Alternatively if I click fit panorama. it goes wedgy on the right side, but the defined horizontal and vertical lines are retained.
I added optimum seams 1/2. It is really much quicker with 1 MB tiles than 3 GB ones.
John Houghton
Sep 8, 2023, 8:42:47 AM9/8/23
to PTGui Support
On Friday, September 8, 2023 at 11:19:49 AM UTC+1 Velson Horie wrote:
The standard template I constructed was based on your and Joost's earlier comments.I loaded the PS-scan.pts then the tiles.
2 and 4. You have set all y,p,r to optimise, but the previous recommendation was not to optimise the reset image.
Velson, Sorry, I realised this just seconds after posting my response. It doesn't actually matter which you do. Levelling the panorama to get the horizontals horizontal and the verticals vertical involves shifting/rotating the composite panorama image on PTGui's spherical stitching surface. You therefore need to allow the optimizer to move the anchor image to accomplish this. Long ago in the mists of time, the optimizer ran just one pass of the processing and you did indeed have to check y,p,r for the anchor image to enable levelling to take place. However, in PTGui V9.1.4, Joost introduced a second pass in the optimizer to execute the levelling as a separate process, which does not require the user to check y,p,r of the anchor image and it will usually change its position. It's possible still to include the levelling all in one pass (select on the advanced tab of the Optimizer), in which case you do have to check y,p,r of the anchor image.
5. I clicked Run Optimiser, and got JohnsProject01. Although 6 is centralised, not all the image is showing. So, I moved it to get as much visible as possible but I still had to increase the window size in order to include all the image,
Just adjust the window size to include all that you require. Do not shift the image, as that will introduce perspective distortion (as you noticed). As I already said, you should drag in yellow crop bars from the frame edges to reduce the area being output as necessary.
I then unset y,p,r for tile 6 and ran optimiser. The resultant image was nearly complete and over filled the window. It stayed square and horizontal. If I move it to fill the black edges, it goes a little bit wedgy horizontally, but still does not show the whole image, JohnsProject04.
Again, do not move the image manually. Expand or contract the view as necessary.
Alternatively if I click fit panorama. it goes wedgy on the right side, but the defined horizontal and vertical lines are retained.
Fit Panorama should just adjust the frame to include the whole panorama. There should be no effect on the shape of the panorama.
If you use a very big fake focal length setting, additionally using viewpoint correction many not make much difference and you are free to shift the image to centre and frame it. In my project, I used a (fixed) setting of 100mm, for which viewpoint correction is essential, but the result may be more accurate.
Given the size of the images and the extended processing times, you might consider doing a preliminary stitch using downsized images and then substitute the full size images in the project. Additional points could be created before running the optimizer to finalise the alignment.
John
John Houghton
Sep 8, 2023, 2:35:36 PM9/8/23
to PTGui Support
Velson, In case you aren't too familiar with the yellow crop bars, click and drag them from the edges of the panorama image frame. This screenshot shows how this works for my project:
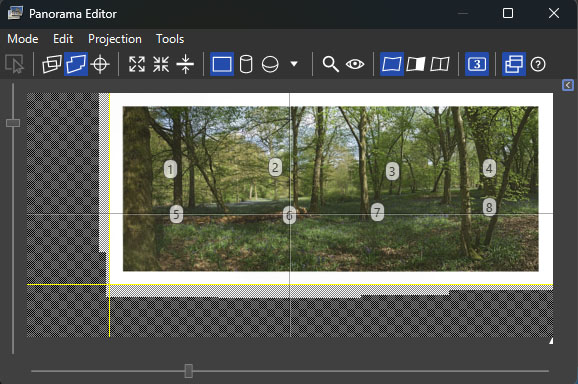
John
Velson Horie
Sep 10, 2023, 12:40:44 PM9/10/23
to PTGui Support
John
Thank you for your help above. I had got it into my head that moving a slider would change the scale in that dimension, which would distort the original shape. But it doesn't, so I am now happy to increase the size of that window.
This isn't your problem, but I should welcome any advice.
For some reason, one of the tiles _7 is not being viewed like any of the others, see screen grab. When I tried to reduce the file sizes to try your faster workround, FastStone refused to reduce this file and to convert it to JPEG. About 5 minutes after loading in PTGui, the _7 TIFF file was rendered properly.
As far as I know I created it the same as the others, so cannot work out why it should be different/corrupted. This is not the first time these symptoms have occurred, but the first time that they stopped my using it. It opens in Photoshop, but because of its size, could not be resaved as a TIFF - only PSB. In the Windows folder, its thumbnail is also not rendered.
It also has a slightly smaller file size,
its size is 4,151,254 instead of 4,160,340 for the other 11 TIFFs.
Can you suggest a de-corrupting program?
John Houghton
Sep 10, 2023, 1:27:02 PM9/10/23
to PTGui Support
Velson, I haven't come across FastStone before, so cannot comment on its behaviour. Irfanview is a long established image processor and free, so possibly it might be of some use if it can do what you are attempting with FastStone.
John
Velson Horie
Sep 15, 2023, 2:07:05 AM9/15/23
to PTGui Support
John
Irfanview was my preferred program for many years, but it does not support files > 4 GB, so automatically downsizes them on loading then saving after manipulation. (In the past few days, I have tried out
Advanced TIFF Editor, Diskinternals and Stellar Repair, but none can do the job of repairing the large files. The best suggestion was to rescan that tile. However, this is about the 3rd time a file has shown this behaviour, so I am looking for a more general solution.)
Faststone is slightly less easy to use, can load and save the large files, but is not able to cope with TIFFs that have a corrupted set of tags, which PTGui and PS seem happy to do.
As can be seen in the image above, -Project05, PTGui can import the file -7 with a corrupted tag set, then after a couple of minutes loads the image data while ignoring the corruption. Does PTGui rewrite the tag set to make it compatible, or does it just ignore the tags? If the former, is it possible to export the rewritten -7 in a TIFF compliant state?
VelsonPTGui Support
Sep 15, 2023, 3:08:36 AM9/15/23
to pt...@googlegroups.com
Hi Velson,
If PTGui can load the image, then it will write a completely new file on
output.
Perhaps this would work:
- new project
- load your image
- go to the Panorama Editor and press Fit Panorama
- In the Create Panorama, make sure the size is set to 100% (verify if
the pixel dimensions indeed equal the input dimensions)
- Set the interpolator to Nearest Neighbor. This ensures that no further
processing is applied. This only works if there is a 1-to-1 pixel
mapping from source to output (no scaling, no rotation, no warping)
- Use TIFF output format. Press Settings and select 'Alpha channel: no
alpha'. And enable LZW compression, this will result in a smaller file,
so you stay clear of the 4GB limit in regular TIFF.
> cropped-panorama.jpg
If PTGui can load the image, then it will write a completely new file on
output.
Perhaps this would work:
- new project
- load your image
- go to the Panorama Editor and press Fit Panorama
- In the Create Panorama, make sure the size is set to 100% (verify if
the pixel dimensions indeed equal the input dimensions)
- Set the interpolator to Nearest Neighbor. This ensures that no further
processing is applied. This only works if there is a 1-to-1 pixel
mapping from source to output (no scaling, no rotation, no warping)
- Use TIFF output format. Press Settings and select 'Alpha channel: no
alpha'. And enable LZW compression, this will result in a smaller file,
so you stay clear of the 4GB limit in regular TIFF.
>
> John
>
> --
> You received this message because you are subscribed to the Google
> Groups "PTGui Support" group.
> To unsubscribe from this group and stop receiving emails from it, send
> an email to ptgui+un...@googlegroups.com
> <mailto:ptgui+un...@googlegroups.com>.
> To view this discussion on the web visit
> https://groups.google.com/d/msgid/ptgui/daa4fcbd-0374-492e-988c-e7cd705ed5a1n%40googlegroups.com <https://groups.google.com/d/msgid/ptgui/daa4fcbd-0374-492e-988c-e7cd705ed5a1n%40googlegroups.com?utm_medium=email&utm_source=footer>.
> John
>
> --
> You received this message because you are subscribed to the Google
> Groups "PTGui Support" group.
> To unsubscribe from this group and stop receiving emails from it, send
> an email to ptgui+un...@googlegroups.com
> <mailto:ptgui+un...@googlegroups.com>.
> To view this discussion on the web visit
Velson Horie
Sep 16, 2023, 6:04:09 AM9/16/23
to PTGui Support
Joost
Thank you for the ideas, but unfortunately it did not repair the tag set. The file size was expanded from
4,151,254 to 4,586,013 (because I didn't get the yellow framing lines exactly on the image edges) and the resolution reset to 1417 from 2400 . But the image data was retained and usable in PTGui and PS after the process, but not in Faststone Viewer.
I used AsTiffTagViewer to inspect the tags, see attachments. It looks as though PTGui did something to the tag structure. The new S141_xii_cvh_cvh1523_7_PTGui_reTIFF.txt is shown as having 7 pages of tags but when I tried to scroll down from p.1 as shown in the .txt , it produced errors.
It is probably not worth exploring much further as the original file is usable for its purpose, as a tile stitched into a mosaic. I shall explore why one out of 12 apparently identical scans appears to have been corrupted in getting the file to my disc.
VelsonVelson Horie
Sep 18, 2023, 9:04:03 AM9/18/23
to PTGui Support
John
In trying to create a standard workflow, I looked back at Support 6.5. There it is recommended that Centre Panorama, then Fit Panorama are chosen in the PE. As shown even at very large nominal focal lengths, centering the mosaic distorts a rectilinear image. What are the effects of Fit Panorama on the shape of the image?
Currently, I have been unable fit my oversized panorama in the PE editor window by moving the sliders. I have to use
Fit Panorama to force the window to encompass the whole image. Then I use the yellow barriers to constrain the image file.
I have been doing this framing after the Optimise step (which takes a couple of hours), i.e. before the Create Panorama step
(which also takes an hour). Would doing this framing before starting Optimising be appropriate?
John Houghton
Sep 18, 2023, 9:20:17 AM9/18/23
to PTGui Support
On Monday, September 18, 2023 at 2:04:03 PM UTC+1 Velson Horie wrote:
In trying to create a standard workflow, I looked back at Support 6.5. There it is recommended that Centre Panorama, then Fit Panorama are chosen in the PE. As shown even at very large nominal focal lengths, centering the mosaic distorts a rectilinear image. What are the effects of Fit Panorama on the shape of the image?
Fit has no effect on the shape of the panorama image. Centre Panorama does affect it, particularly if you are using viewpoint correction.
Currently, I have been unable fit my oversized panorama in the PE editor window by moving the sliders. I have to use Fit Panorama to force the window to encompass the whole image. Then I use the yellow barriers to constrain the image file.I have been doing this framing after the Optimise step (which takes a couple of hours), i.e. before the Create Panorama step (which also takes an hour). Would doing this framing before starting Optimising be appropriate?
I don't think it would make any difference, though you might have to fine tune any framing done before optimizing.
John
Reply all
Reply to author
Forward
0 new messages