Zeroing the tool

678 views
Skip to first unread message

Eric

unread,
Oct 5, 2016, 11:52:33 AM10/5/16
to Pocket NC
Hey all, so I'm familiar with the tool length offset, basically measure the distance the tool sticks out from the spindle and subtract that value from 3.6 (I have the old spindle)

My question is around maintaining a consistent distance from the collet to the end of the tool. Right now I've been using a pair of digital calipers to slide the collar on each bit that I use to make sure it's an exact distance from the base. This works OK but there's a chance for human error here.

Is there a better way to physically make sure that the tool is exactly the correct depth into the spindle? Especially during mid job tool changes?

Maybe there's a way to insert the tool and then have the Z axis flip the B plate up so it's facing the spindle and use the plate as a "stop" so that you could physically make sure that the bit is where it needs to be...

On my 3 axis ShopBot tools I have a touch off plate that accomplishes this... Maybe there's a way to do that with the pocket NC?

Tokyo Pav

unread,
Oct 5, 2016, 12:09:54 PM10/5/16
to Pocket NC
You could machine a setting gauge?

Pocket NC

unread,
Oct 5, 2016, 1:19:50 PM10/5/16
to Pocket NC
Hi Eric,

You should set up each tool in the tool offsets page under a different tool number.  This way each tool is compensated for its difference in height no matter how small.  

To refine each tool offset, take a cut in some material using the face of the tool. Use the Gcode (g43 H1) to engage the tool length offset for tool #1 or H2 for tool #2 and so on.  Then rotate the material 180 degrees using the B axis and take a second cut.  You can measure the thickness of the cuts against the Z number on the readout.  

For example, if you made a cut at a height of Z .375 on two opposite sides of a block, the remaining thickness should be .75".  If it were .752" you would need to adjust your tool offset by .001"  

I hope this helps!

-Matt

Eric

unread,
Oct 5, 2016, 5:07:18 PM10/5/16
to Pocket NC
Hey Matt, that totally makes sense. What I'm wondering though if there's an easier way to "set" all of my tools. If I had to mill material for each tool that would take a bit of time...

I am wondering if I can set those collars on my bits using a physical part of the tool... Maybe some sort of calibrated block that I put on the B axis plate and push the bit into with the collet unlocked. Once it bottoms out I could lock the tool down and then slide the collar on. That way the collar is set in position by the tool itself, and when I remove the tool and replace it, it's right back where it needs to be.... Does that make sense?

Pocket NC

unread,
Oct 6, 2016, 10:43:21 AM10/6/16
to Pocket NC
We don't have a tool for what you are doing but let me know if you come up with something unique!  It can take some time to set up tooling but once its setup, it should be good for the life of the tool!

-Matt

Eric

unread,
Oct 7, 2016, 1:50:52 PM10/7/16
to Pocket NC

So here's the reason I think I need a better method of zeroing things out:

I took a pair of calipers and set my collar so that when I put the tool into the collet it's it's 1" out from the collet just like on the tutorial. I set my tool offset to -2.6 (3.6-1)

I cut out this sphere using a 3+2 method in Fusion and this is the result:


So it looks like my tool length might be off just a little?


Randy Kopf

unread,
Oct 7, 2016, 5:00:06 PM10/7/16
to Pocket NC
Eric:
I'm not sure what I'm seeing is a tool length offset problem. If that part was machined with Deskproto and you did continuous rotary motion there would be no mismatch. The reason is Deskproto on the Pocket NC would keep the always keeps X Axis fixed on 0 position that is it's centerline. Next it would use the Y Axis and B axis to machine about the part. Most typical tool motion would be B Axis rotating continuous as you slowly move Y along the shape either from top to bottom. Deskproto always keeps the spindle pointed through the rotary axis at all times. To reiterate that means the X Axis is fixed.

What I thing I am seeing looking at your part is appears more like an angular error. And that error is amplified with 3+2 machining. As the X axis is moving across the part it looks to be slightly deeper on one side than the other. So this could be more like what would be called a COAXIAL alignment of the rotory tables.
I'd need to look a little closer to see whats going on.
Randy

Pocket NC

unread,
Oct 7, 2016, 5:08:23 PM10/7/16
to Pocket NC

Hi Eric,

Randy might be right... 

From the looks of it, I would say your tool is cutting deeper than it
should.  I will talk with Michael and see if we cannot pump out a better
tutorial on setting tools with the old spindle.  I am sure that you will
have to measure each tool and set up an offset in the offset table but
maybe we can come up with a better way measuring.  With our new spindle, we
have users measuring off a 125 block. That seems to provide good results.

When I am working with tighter numbers surfaces that need to blend, I use
the method of making a test cut on two sides of a block. You might find
that this helps a good deal.


-Matt

Eric

unread,
Oct 7, 2016, 5:50:37 PM10/7/16
to Pocket NC
What Randy is saying makes total sense. The reason for making a sphere isn't to make a sphere per se.. But more to test out if I've actually set the tool up properly.

I ended up trying a different approach:

I bolted up the soft jaw and put a bit into the spindle loosely. I jogged the tool so that the bit was facing the face of the soft jaw. I then jogged the Z to exactly -2.985.

This distance is 3.6 minus the distance of the centerpoint of XYZAB in Fusion above that soft jaw (minus 1).  Then I put the bit against the soft jaw and locked it down. This in theory (if I'm right) allow me to use the tool itself as a physical stop to set the bit exactly 1" out of the spindle.

I did another sphere. It was much better, but not perfect.

I'm going to try the cube thing and see what I come up with next.

Eric

unread,
Oct 12, 2016, 1:43:25 PM10/12/16
to Pocket NC
Ok, some updates:

I modeled a .75" square cube in Fusion 360 and setup the toolpaths. I milled it out and this is what I got:


I'm about .08 off. I had my tool sticking out of the spindle 1" (that's from the base of the collet to the tip of the tool)


I had my tool length offset at -2.6 (3.6-1)


Does anyone have any idea what I'm doing wrong here?


Randy Kopf

unread,
Oct 12, 2016, 3:18:31 PM10/12/16
to Pocket NC
Eric:
Your method appears correct for the old spindle per http://www.pocketnc.com/tool-length-offsets-old-spindle

Yet according to the math you show there is a variance of 0.076".

So the Pocket NC is considers that tool to be 0.038" longer than it actually is. And cuts the part larger. 

Can you verify that the tool number and the H number being written in the code match the tool number you setup?

If that is the case then and your sure the tool sticks out 1.000" then maybe the 3.6" that Pocket NC says to use is off on your machine. It's entirely possible.

I would say on your machine that number should be -(3.638-1.000) = -2.638" Tool length value to be input in the control.

Randy

Eric

unread,
Oct 12, 2016, 3:34:34 PM10/12/16
to Pocket NC
You and I had the same thought. Glad I'm on the right track.

Here's my G Code:


T1 means "tool 1" right? I did the check too in the tutorial to make sure my offset took and it did.


So I wonder what's going on here... Could I have a bad prox switch? Could my software be out of calibration in some way? (I triple checked that I had the tool length correct in Fusion.)


I'm a little leary of using a block of wood as my calibration guide.. Seems like not a 100% accurate way to calibrate everything... I'd rather an electronic touch off or a physical block I could use to set the tools...


Here's the file I used to mill:


http://a360.co/2egCxLd


Randy Kopf

unread,
Oct 12, 2016, 3:54:12 PM10/12/16
to Pocket NC

Eric:

So yes if you input that 2.6" number in Pocket NC tool length column for tool 1 that is correct.

Notice the additional line N85 that I highlighted. That is the code that applies tool length compensation and the H1 address tells the control to use the value from the tool comp table you had input for tool 1.

I agree using a block of wood to calibrate your machine does not make sense. I also suspect your specific Pocket NC needs to use a constant that is more like 3.638" as the starting point to subtract your tool length offset from. You should ask Pocket NC if they recorded a different constant for your machine. It's the only thing that makes sense.

Randy


Eric

unread,
Oct 12, 2016, 7:26:10 PM10/12/16
to Pocket NC
Ok, I milled a few more cubes and I got it dialed in as close as one would expect on a piece of wood...

For a tool that's exactly 1" out of the base of the spindle I need a tool offset of -2.6365

So what's going on here? Is my tool out of calibration, or my CAM software, or Linux CNC?

Gary Swank

unread,
Oct 13, 2016, 8:06:25 PM10/13/16
to Pocket NC
Hello Eric
Here is a fixture we have been using to set depth consistently on our tools.
Purchased originally from a company called Model Master. Long out of business.
Hope this helps
All the best
Gary

Gary 

Eric

unread,
Oct 17, 2016, 8:34:42 AM10/17/16
to Pocket NC
Thanks Gary, I'm sure I can make/find something like that. I do like using the PocketNC itself to set the tools. Speaking of that, an update on my test:

After milling a bunch of cubes I was able to determine that my Z offset from home is off. So if I have a tool exactly 1" out of the spindle my tool length offset SHOULD be -2.6. That doesn't work, my blocks come out too large. If I change my tool length offset to -2.6365 my wooden blocks come out perfectly sized. I even took this a step further and milled a sphere and it came out nice and smooth:


So right now this seems like good workaround but I think it needs to be fixed so that my Tool Length Offset is actually correct.


So Randy has been helping me with this a bit too. With his help I found the PocketNC.ini that has the home offsets in it. I think the next step is going to be changing those so that I don't have to have a wacky tool length offset number....


I'm going to wait until I can get my hands on some really accurate measuring tools so I can make sure I get it exactly right. Wood blocks are only so accurate :)


Randy Kopf

unread,
Oct 18, 2016, 10:23:02 PM10/18/16
to Pocket NC
Eric:
That sphere is looking better all the time....
I am planning on making the tool set fixture that Gary Swank showed us. I'll make one for you gratis, all I need is feedback to let me know how well it works.
Randy

Gary Swank

unread,
Oct 18, 2016, 11:49:27 PM10/18/16
to Pocket NC

Hi Eric
Sphere is looking good!
Using the setting gauge to set the tool length all our bits have the same offset.
Basically we use the method Matt shared in an earlier post.
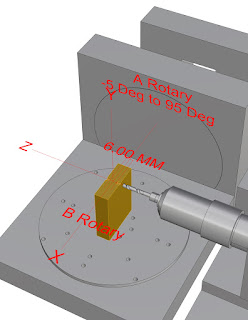
Attach wax bar to B Axis and jog Y till you get 1/8 inch bit cutting in wax and the cut is exposed.
See Image
Please Check code BEFORE running to be sure mill does not crash! Finger on emergency stop!
G code to cut one side to a depth of 3mm then rotate 180 to cut the other side to a depth of 3mm
%
G00 B0.000
G01 Z20.000 F300
G01 Z3.000 F50
G01 Z20.000 F300
G00 B180.000
G01 Z3.000 F50
G01 Z30.000 F300
Measure space that is supposed to be 6mm to get offset
G code to cut one side to a depth of 0mm then rotate to cut the other side to a depth of 0mm to check X offset
See Image
%
G00 B0.000
G01 Z20.000 F300
G01 Z0.000 F50
G01 Z20.000 F300
G00 B180.000
G01 Z0.000 F50
G01 Z30.000 F300
Check X alignment, offset as needed.
See Image
Then we remove wax cut the test area off to expose clean wax, fixture wax, jog Y to cut as pictured above and run second test to see if Z Axis and X Axis are aligned.
All the best
Gary

Randy Kopf

unread,
Oct 19, 2016, 11:01:45 AM10/19/16
to Pocket NC

Gary the concept you proposed is excellent. 


I attempted to do this in Fusion and found a couple of constraints that inhibits this from working as exactly as proposed.


Please afford me a little time to work this out further. But here is what I ran in to:

1) The ability to place the stock on perfect C/L is not always possible on the Pocket NC with supplied tooling.

2) The Pocket NC requires rotation to occur always about intersection of AB Center-lines. And this also dictates math output.

3) The stock size proposed in the test can't be setup and satisfy the 2 prior notes I made. I can't rotate it so satisfy the cuts being balanced off center without rotating the stock 90 degrees in vise. And if I do the set screws can't grip it. So I need to alter the model size to accommodate Pocket NC's limits on model placement.


I will circle back with everyone here.


:-)


Randy Kopf

http://desktopartisan.blogspot.com/


Thanks Gary:


That looks to be a very simple but effective test.

Here is what I like about it: 
1) It helps you accurately establish a correction factor for input of TLO aka Tool Length Offset.
2) With simple measurements you can check Z Axis and X Axis are aligned. Typically this is called COAXIAL Alignment. That is how close do 2 holes line up that cut from opposites sides of a part.
3) The test also is easily repeatable by just dropping the Y Axis down to clean up you can repeated a few times the the  same material till it's out of range.
4) Wax is superior material for test cuts and measurements.

I built this in to Fusion 360. And I added the machine kinematics to illustrate the typical vise placement setup that users are accustomed. That influenced how I did the CAM Setup. See my graphic shown below.

So there are a couple things to note:
1) The Pocket NC Vise can only mount on 8 fixed positions or every 45 degrees.
2) I've mounted your part using the typical vise setup that users are accustomed to using prior tutor examples.
3) This is a rotation in B that is 90 degrees to what you show with your part. I did not want to confuse people see note 2)
4) I believe facing the top and doing a precise cut on the outside of the stock will fully facilitate your test Just to allow for accurate measurements of the Z vs X offset aka COAXIAL Alignment.
5) Checking X vs Z position COAXIAL ALIGNMENT is kind of advanced topic here, but I doctored your graphic to illustrate that we assume when the spindle when commanded to X0 is on center with the B Axis. And more importantly when B is rotated 180 degrees we are on the same axis location as the we just were. But if X is not perfectly calibrated these two holes will not be perfectly in line with each other.

FYI for those here that don't know Gary Swank he is long time veteran with desktop CAD/CAM and CNC. Gary use Rhino 3D for CAD and imports the data into Desk Proto. He is able to be machining his wax models in minutes using proven methods. He has been doing this for 10+ years with his Multi Axis CNC Mill. He makes his wax models for his well established Portland Oregon jewelry store. www.garyswank.com Gary has been creating stuff since 1973 and that makes him a legend folks.

Randy Kopf


Reply all
Reply to author
Forward
0 new messages