About PMEM emulation on numa
345 views
Skip to first unread message

Dongha Yoon
Mar 28, 2022, 5:17:28 AM3/28/22
to pmem
Hi,
I have a problem about pmem emulation on my numa computer.
I referred (https://pmem.io/blog/2016/02/how-to-emulate-persistent-memory/).
My memory resources are
DRAM: 256G ((32G * 4) * 2 node)
PMEM: 1TB (256*2) * 2 node)
There are no problems if I mapped dram space in 0~128G range, where are node0's dram),
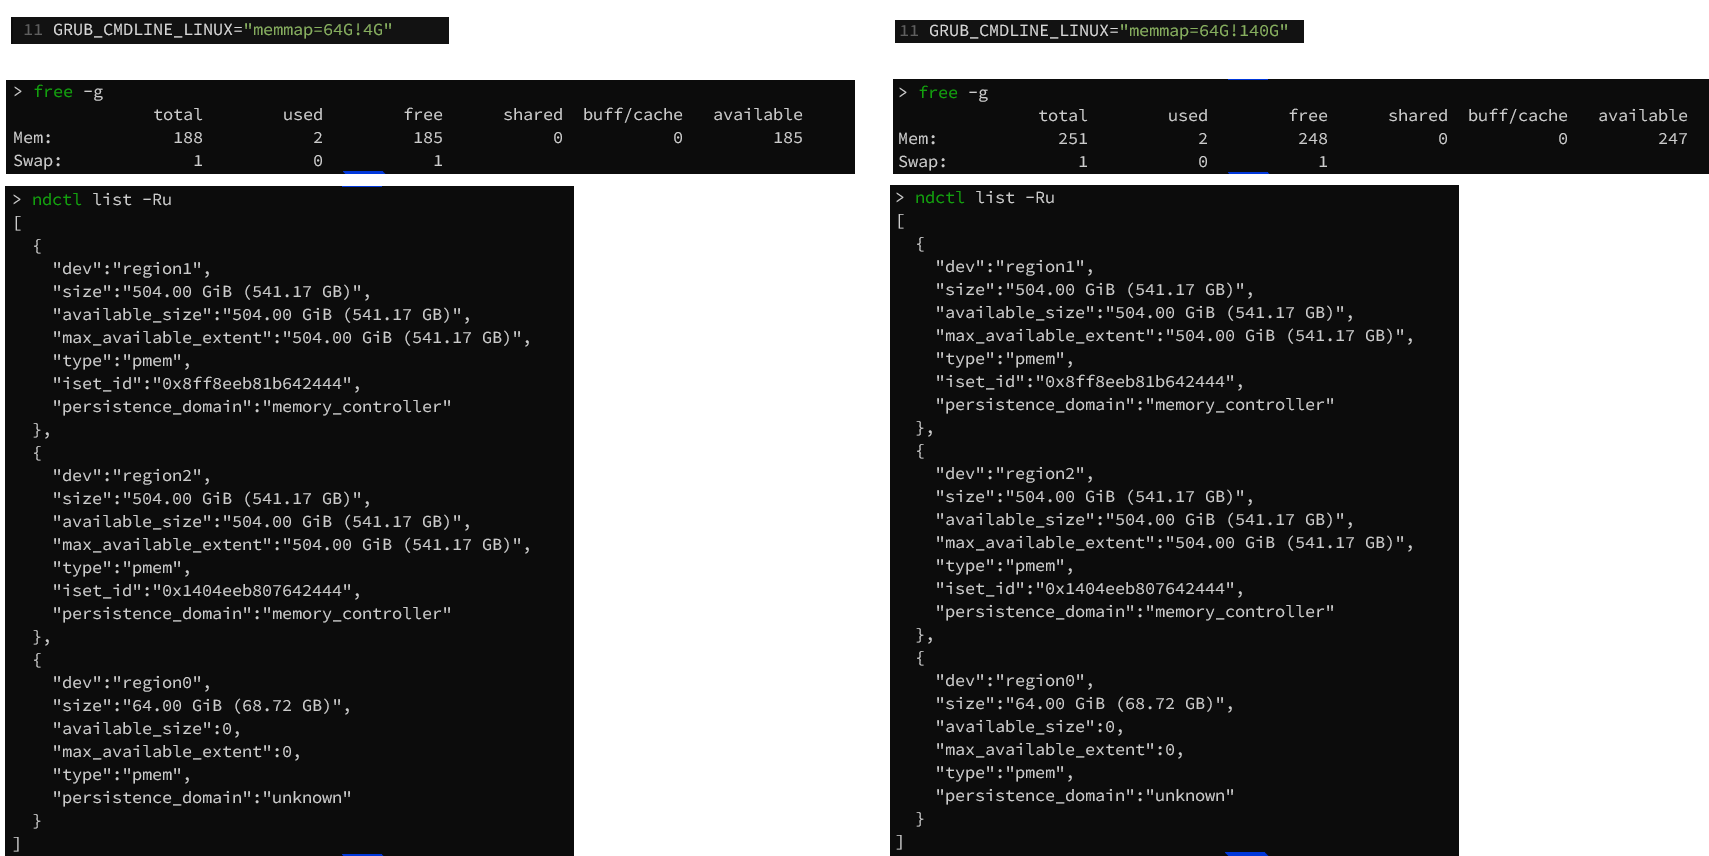
If the space belongs to node1 (128G~256G), The virtual pmem device was mapped successfully. But the system memory space is not decreased.
I have a problem about pmem emulation on my numa computer.
I referred (https://pmem.io/blog/2016/02/how-to-emulate-persistent-memory/).
My memory resources are
DRAM: 256G ((32G * 4) * 2 node)
PMEM: 1TB (256*2) * 2 node)
There are no problems if I mapped dram space in 0~128G range, where are node0's dram),
If the space belongs to node1 (128G~256G), The virtual pmem device was mapped successfully. But the system memory space is not decreased.
Is there another way to emulate dram as pmem with multiple numa nodes?

steve.s...@gmail.com
Mar 28, 2022, 12:33:20 PM3/28/22
to pmem
Q) What Linux distro and version are you using? (cat /etc/-os-release)
Q) What Kernel is installed? (name -r)
Q) Can you provide the 'e820' and 'user' table output please. (dmesg | grep -E "e820|user:") You can see examples in How To Choose the Correct memmap Option for Your System
Q) Having created the namespace, can you create either an xfs or ext4 filesystem on the /dev/pmemN device? If that works, then as far as the PMem emulation code goes, it's working as expected, so I suspect a different Kernel memory tracking issue is causing your observation - See Note[2] below.
TL;DR I believe the issue is because you need to calculate the correct physical start-end values for Socket 1, not virtual. Read How To Choose the Correct memmap Option for Your System and/or continue reading below.
Note [1]: If more than one persistent memory namespace is required, specify a memmap entry for each namespace. For example, "memmap=2G!12G memmap=2G!14G" will create two 2GB namespaces, one in the 12GB-14GB memory address offsets, the other at 14GB-16GB.
Note [2]: The assumption that memory is contiguously assigned may not be true depending on the hardware and OS implementations. ie: Socket 0 == 0-128GB and Socket 1 == 128GB-256GB is likely to be an invalid assumption
To validate the assumption in Note[2], and to ensure you chose the correct values for Socket1, take a look at `numactl -H` which will tell you if the CPUs are contiguously assigned (as they are on Dell), or smaller groups based on the Hyperthread layout (as they are on most platforms). Here's an example of HT grouping:
```
# numactl -H
available: 2 nodes (0-1)
node 0 cpus: 0 1 2 3 4 5 6 7 8 9 10 11 12 13 14 15 16 17 18 19 20 21 22 23 48 49 50 51 52 53 54 55 56 57 58 59 60 61 62 63 64 65 66 67 68 69 70 71
node 0 size: 192111 MB
node 0 free: 127797 MB
node 1 cpus: 24 25 26 27 28 29 30 31 32 33 34 35 36 37 38 39 40 41 42 43 44 45 46 47 72 73 74 75 76 77 78 79 80 81 82 83 84 85 86 87 88 89 90 91 92 93 94 95
node 1 size: 193510 MB
node 1 free: 165117 MB
node distances:
node 0 1
0: 10 21
1: 21 10
```
The detailed memory layout is shown by `lsmem -a`, eg:
```
# lsmem -a
RANGE SIZE STATE REMOVABLE BLOCK
0x0000000000000000-0x000000007fffffff 2G online yes 0
0x0000000100000000-0x000000017fffffff 2G online yes 2
0x0000000180000000-0x00000001ffffffff 2G online yes 3
0x0000000200000000-0x000000027fffffff 2G online yes 4
0x0000000280000000-0x00000002ffffffff 2G online yes 5
0x0000000300000000-0x000000037fffffff 2G online yes 6
0x0000000380000000-0x00000003ffffffff 2G online yes 7
0x0000000400000000-0x000000047fffffff 2G online yes 8
[...snip...]
```
Or to group by NUMA node, use:
```
# lsmem --split node
RANGE SIZE STATE REMOVABLE BLOCK
0x0000000000000000-0x000000007fffffff 2G online yes 0
0x0000000100000000-0x000000307fffffff 190G online yes 2-96
0x000001aa00000000-0x000001da7fffffff 194G online yes 852-948
[...snip...]
RANGE SIZE STATE REMOVABLE BLOCK
0x0000000000000000-0x000000007fffffff 2G online yes 0
0x0000000100000000-0x000000307fffffff 190G online yes 2-96
0x000001aa00000000-0x000001da7fffffff 194G online yes 852-948
[...snip...]
```
You can see both the start-end range for the block(s). You can obtain the CPU to Block mapping from `/sys/devices/system/node/node[0-9]`, eg:
(Note, the following is in hex, the lsmem output is in decimal)
```
# pwd
/sys/devices/system/node/node0
/sys/devices/system/node/node0
# cat memory*/phys_index
00000000
0000000a
0000000b
0000000c
0000000d
0000000e
0000000f
00000010
00000000
0000000a
0000000b
0000000c
0000000d
0000000e
0000000f
00000010
[...snip...]
# pwd
/sys/devices/system/node/node1
/sys/devices/system/node/node1
# cat memory*/phys_index | head
00000354 <-- 852 decimal
00000355
00000356
00000357
00000358
00000359
0000035a
0000035b
0000035c
0000035d
00000354 <-- 852 decimal
00000355
00000356
00000357
00000358
00000359
0000035a
0000035b
0000035c
0000035d
```
The phsy_index == block, so now we can see which memory ranges belong to which CPU core and thus map it to a NUMA node.
Using my Intel S2600WF server with 2 x 8260L CPUs, 192GiB DRAM and 1.5TiB PMem on each socket, we can calculate the correct values to emulate PMem on Socket 0 and Socket 1.
If I look at my e820 table, I can see there is 'usable' memory within the NUMA node regions
# dmesg | grep e820 | grep usable
[...snip...]
[ 0.000000] BIOS-e820: [mem 0x0000000100000000-0x000000303fffffff] usable <-- Socket 0
[ 0.000000] BIOS-e820: [mem 0x000001aa60000000-0x000001da5fffffff] usable <-- Socket 1
[...snip...]
[ 0.000000] BIOS-e820: [mem 0x0000000100000000-0x000000303fffffff] usable <-- Socket 0
[ 0.000000] BIOS-e820: [mem 0x000001aa60000000-0x000001da5fffffff] usable <-- Socket 1
Refer to the previous `lsmem --split node` output to see how we map the ranges to sockets.
In my case, it would be safe for me to choose to use some capacity within the 4GiB - 192GiB (Socket 0) and 1706GiB - 1897GiB (Socket 1). Notice this isn't contiguous memory addresses for Socket0 and Socket 1!!
Here's the free(1) output before I make any changes (376GiB is the magic number we'll use later)
```
# free -h
total used free shared buff/cache available
Mem: 376Gi 7.3Gi 286Gi 1.6Gi 83Gi 365Gi
Swap: 8.3Gi 0B 8.3Gi
total used free shared buff/cache available
Mem: 376Gi 7.3Gi 286Gi 1.6Gi 83Gi 365Gi
Swap: 8.3Gi 0B 8.3Gi
```
After adding two memmap entries, my boot command line looks like this:
```
# cat /proc/cmdline
BOOT_IMAGE=(hd1,gpt2)/vmlinuz-5.16.14-200.fc35.x86_64 root=/dev/mapper/fedora_pmemdev1-root ro resume=/dev/mapper/fedora_pmemdev1-swap rd.lvm.lv=fedora_pmemdev1/root rd.lvm.lv=fedora_pmemdev1/swap systemd.unified_cgroup_hierarchy=0 memmap=64G!12G memmap=64G!1760G
BOOT_IMAGE=(hd1,gpt2)/vmlinuz-5.16.14-200.fc35.x86_64 root=/dev/mapper/fedora_pmemdev1-root ro resume=/dev/mapper/fedora_pmemdev1-swap rd.lvm.lv=fedora_pmemdev1/root rd.lvm.lv=fedora_pmemdev1/swap systemd.unified_cgroup_hierarchy=0 memmap=64G!12G memmap=64G!1760G
```
After a reboot, my memory now looks like this:
```
# dmesg | grep mem
[ 0.000000] reserve setup_data: [mem 0x0000000100000000-0x00000002ffffffff] usable
[ 0.000000] reserve setup_data: [mem 0x0000000300000000-0x00000012ffffffff] persistent (type 12) <-- Emulated PMem
[ 0.000000] reserve setup_data: [mem 0x0000001300000000-0x000000303fffffff] usable
[ 0.000000] reserve setup_data: [mem 0x0000003040000000-0x000000305fffffff] reserved
[ 0.000000] reserve setup_data: [mem 0x0000003060000000-0x000001aa5fffffff] persistent (type 7) <- Physical PMem
[ 0.000000] reserve setup_data: [mem 0x000001aa60000000-0x000001b7ffffffff] usable
[ 0.000000] reserve setup_data: [mem 0x000001b800000000-0x000001c7ffffffff] persistent (type 12) <-- Emulated PMem
[ 0.000000] reserve setup_data: [mem 0x000001c800000000-0x000001da5fffffff] usable
[ 0.000000] reserve setup_data: [mem 0x000001da60000000-0x000003545fffffff] persistent (type 7) <- Physical PMem
```
Here's the free(1) output which lines up with my expectations (375GiB - 128GiB ~= 248GiB)
```
# free -h
total used free shared buff/cache available
Mem: 250Gi 6.7Gi 243Gi 2.0Mi 722Mi 242Gi
Swap: 8.3Gi 0B 8.3Gi
total used free shared buff/cache available
Mem: 250Gi 6.7Gi 243Gi 2.0Mi 722Mi 242Gi
Swap: 8.3Gi 0B 8.3Gi
```
Hope this helps.
Is there another way to emulate dram as pmem with multiple numa nodes?
I'm curious as to why you want to emulate PMem when you already have physical PMem installed?
Dongha Yoon
Mar 29, 2022, 2:17:13 AM3/29/22
to pmem
Thank you for the detailed explanation.
I'll check if the system is set correctly.
If there are other problems, I'll ask again.
About your last question,
I'm studying about memory migration with Hemem(https://dl.acm.org/doi/10.1145/3477132.3483550).
In Hemem implementation, it manages memory space with emulated dram and PMem.
I posted this question because I want to check if the performance gap between native DRAM and emulated DRAM is acceptable and study how to expand Hemem on numa system.
Thank you
Dongha
2022년 3월 29일 화요일 오전 1시 33분 20초 UTC+9에 steve.s...@gmail.com님이 작성:
steve.s...@gmail.com
Mar 29, 2022, 10:30:02 AM3/29/22
to pmem
>
I posted this question because I want to check if the performance gap between native DRAM and emulated DRAM is acceptable and study how to expand Hemem on numa system.
There is no performance difference between DRAM and emulated PMem in this scenario because you're using DRAM to emulate PMem, so you're testing DRAM vs DRAM. The same is true if you were to use the KVM and QEMU approach with a guest VM. You're either using DRAM or a Disk as the backing store for the virtual NVDIMMs/PMem inside the guest, so performance will be determined by the device you used in the host. Unfortunately, there's no emulation method that emulates the performance characteristics of PMem. We don't recommend these approaches for benchmarks.
On the topic of transparent memory tiering that HeMem presents, this has taken a big step forward to the point where we have many solutions available now and in the near future. Here are the ones I'm aware of. If anyone knows of any more, please contribute to the list
- MemVerge Memory Engine - https://memverge.com/
- The 'Standard Edition' is a user-space memory tiering solution
- The 'Advanced Edition' adds snapshots, clones, replication, and a lot more
- Linux Kernel Tiered Memory - Available in Kernel 5.15 onwards.
- The demotion feature (copying DRAM to PMem) is in v5.15
- The promotion feature (copying PMem to DRAM) is tentatively scheduled for v5.18 (It's in the -next branch and just needs to be pulled).
- If you want all the features today, build your own Kernel from https://git.kernel.org/pub/scm/linux/kernel/git/vishal/tiering.git/log/?h=tiering-0.8
- Memkind Transparent Tiering (formally MemTier) is a user-space library that tiers memory between different types of memory
- Man page - http://memkind.github.io/memkind/man_pages/memtier.html
- This is an active project with new algorithms/policies being looked at. Anyone is free to contribute.
- Man page - http://memkind.github.io/memkind/man_pages/memtier.html
- Linux DAMON (Data Access MONitor)
- Upstreamed by Amazon into Linux Kernel 5.16
- Project HomePage - https://sjp38.github.io/post/damon/
- Docs - https://www.kernel.org/doc/html/latest/vm/damon/index.html
- DAMO is the command line interface - https://github.com/awslabs/damo
- The roadmap is particularly exciting and already has patches submitted for memory tiering.
- VMWare Project Capitola
- Announced at VMWare World 2021, Project Capitola will bring memory tiering to the ESXi Hypervisor
This is the future of heterogeneous memory systems.
Reply all
Reply to author
Forward
0 new messages