This post shows how to quickly and easily create a small QGIS plugin for counting the number of features within a vector layer.
To get started, you will need QGIS and Qt Designer (to design the user interface) installed. If you are on Windows, I suggest WinPython which provides Qt Designer and Spyder (a Python IDE).
The great thing about creating plugins for QGIS: There is a plugin for that! It's called Plugin Builder. And while you are at it, also install Plugin Reloader. Reloader is very useful for plugin developers because it lets you quickly reload your plugin without having to restart QGIS every time you make changes to the code.

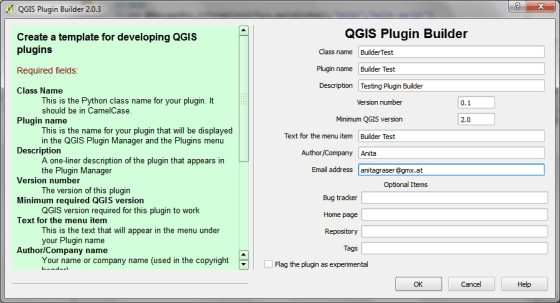
Plugin Builder will create all the files we need for our plugin. Just start it and select a name for your plugin class (one word in CamelCase), as well as a name for the plugin itself and the plugin menu entry (can be multiple words). Once you press Ok, you're asked to select a folder to store the plugin. You can save directly to the QGIS plugin folder ~\.qgis2\python\plugins.
Next, open the newly created folder (in my case ~\.qgis2\python\plugins\BuilderTest). Amongst other files, it contains the user interface file ui_buildertest.ui. Our plugin will count the number of features in a vector layer. Therefore, it needs a combobox which allows the user to select a layer. Open the .ui file in Qt Designer and add a combobox to the dialog. Change the object name of the combobox to layerCombo. We'll later use this name in the plugin code to add items to the combobox. Save the dialog and close Qt Designer.

Now, we need to compile the .ui and the resources.qrc file to turn the dialog and the icon into usable Python code. This is done on the command line. On Windows, I suggest using the OSGeo4W Shell. Navigate to the plugin folder and run:
pyuic4 -o ui_buildertest.py ui_buildertest.ui

pyrcc4 -o resources.py resources.qrc
If you enable and run the plugin now, you will already see the dialog but the combobox will be empty. To populate the combobox, we need to write a few lines of code in buildertest.py. First, we'll fetch all loaded layers and add all vector layers to the combobox. Then, we'll add code to compute and display the number of features in the selected layer. To achieve this, we expand the run() method:
def run(self):
    # show the dialog
    self.dlg.show()

    layers = QgsMapLayerRegistry.instance().mapLayers().values()
    for layer in layers:
        if layer.type() == QgsMapLayer.VectorLayer:
            self.dlg.layerCombo.addItem( layer.name(), layer )

    # Run the dialog event loop
    result = self.dlg.exec_()
    # See if OK was pressed
    if result == 1:
        # do something useful
        index = self.dlg.layerCombo.currentIndex()
        layer = self.dlg.layerCombo.itemData(index)
        QMessageBox.information(self.iface.mainWindow(),"hello world","%s has %d features." %(layer.name(),layer.featureCount()))
When you are done with the code, you can use Plugin Reloader to load the new version. When you start the plugin now, the combobox will be populated with the names of the vector layers in your current project. And on pressing Ok, the plugin will compute and display the number of features.


For more information on PyQGIS and more code samples I warmly recommend the PyQGIS Cookbook. Have fun!


