Rail/Slide Based PNP Machine

Anthony Webb


Chinese rails are up first, and as for as much as I had written them off initially after getting them all locked in I must say that they seems to move great. No slop at all. The passive rail I was worried about? Well for now I am not seeing a problem, but the proof will certainly be in the result.
Thats where I left off today. Mechanical is complete, electrical is next. I have a tinyg laying around that I have tasked with driving the motors I installed. These are off an old 3D printer, nema17 400 step (.9) per rev. I am using 32 tooth 2mm GT2 belt, not sure what kind of speed I will drive with that, but excited to give it a whirl. I am a little nervous about the steppers, I have had such great luck with my clearpath closed loop servos I almost hate to even try anything else, but if I can make steppers work I could save a bundle of money along the way so I am starting with them.
I'l be sure to post my findings as I go, the good/bad/ugly. As always if there are any questions or feedback please feel free to call me crazy, offer insight, etc. I'm very new to all of this and know many of you have been through, at the end of the day I hope to be picking and placing with the rest of you!
A short video of the rolling chassis.

Michael Anton

Jason von Nieda
I'll look forward to seeing your results!!!Mike
--
You received this message because you are subscribed to the Google Groups "OpenPnP" group.
To unsubscribe from this group and stop receiving emails from it, send an email to openpnp+u...@googlegroups.com.
To post to this group, send email to ope...@googlegroups.com.
To view this discussion on the web visit https://groups.google.com/d/msgid/openpnp/e4df3a36-2a33-4664-a9ca-7b5febb787ab%40googlegroups.com.
For more options, visit https://groups.google.com/d/optout.

Graeme Bridge

Robert Walter
Anthony,
I am currently converting a Chinese machine to openPNP but will be following your progress quite closely, as I will likely start a ground up machine design in the spring. I too am considering ball rails and belts, but I may go the lead screw route on the Y-axis to eliminate the inherent stretch and syncing requirements of having two belts. This axis would have the highest load and largest span, so it only makes sense to consider a ball screw. The cost of belts, bearings, pulleys and shafts to link everything together starts pushing the price up towards a lower end ball screw, so it is a plausible solution.
With regards to rails, given the placement accuracy requirements of a typical pnp, you will likely have satisfactory results with just about any ball / rail guide type system. Pay close attention to build quality, flatness, etc of your frame / table and if you find a little slop here or there, some preload on a axis rail can work wonders. You aren't likely to be exerting any forces that are even close to the limits of a ball rail (smallest rails aside), so pay closer attention to the axial play. That is the amount of play in the bearing in each axis. Using multiple block on each rail helps, and some blocks have preload adjustment built in, otherwise, pre-loading between one static rail, and one rail that you can adjust a few thou will suffice.
Also, if you hare planning on just building a one-off machine, ebay is a great way to pick up surplus / overstock high quality rails at really cheap prices. Still likely a little more money than cheap offshore stuff, but a ground THK rail and bearing block set is a work of art that will run well for years. But of course, the higher quality your rails, the better your build quality needs to be, as the tolerances have to be spot on in order for the rails not to bind. Essentially, you build tolerance has to match or be less than the axial play of your rail, otherwise it will bind. That is why most low cost machines use shafts, as they typically deflect enough to reduce binding, at least in one direction.
I find that getting rail bearing blocks with grease nipples / zerks is best if you can get them. It makes the whole lubing procedure much simpler as the lubricant mostly stays with the block internally and kept in place by the wipers. If you are going to lube the rails, lithium grease works well, but is a pain if you are in a somewhat dusty environment. Picking small smd components out of the grease is not fun either!
I tend to go the grease nipple route, and wipe the rails with light machine oil / sewing machine oil when necessary to keep clean and lightly lubricate / add corrosion protection.
Good luck with your build.

Arthur Wolf
Anthony,
I am currently converting a Chinese machine to openPNP but will be following your progress quite closely,
--
You received this message because you are subscribed to the Google Groups "OpenPnP" group.
To unsubscribe from this group and stop receiving emails from it, send an email to openpnp+u...@googlegroups.com.
To post to this group, send email to ope...@googlegroups.com.
To view this discussion on the web visit https://groups.google.com/d/msgid/openpnp/b9c803d4-c7a2-45a8-b3f7-669061594a94%40googlegroups.com.
--
Robert Walter
Rob.
On Friday, December 18, 2015 at 9:09:18 PM UTC-8, Anthony Webb wrote:
Robert Walter
Thanks for the offer. I will definitely keep notes on everything. I already designed up a buffer board that will plug into the smoothie step / direction ports in order to work with my external stepper drives. They need about 15mA drive capability. Those boards should be here late in the week (hopefully before x-mas). Pretty simple board, but a necessity.
Rob.
Anthony Webb

Anthony Webb
Anthony Webb
Anthony Webb


Jason von Nieda
--
You received this message because you are subscribed to the Google Groups "OpenPnP" group.
To unsubscribe from this group and stop receiving emails from it, send an email to openpnp+u...@googlegroups.com.
To post to this group, send email to ope...@googlegroups.com.
To view this discussion on the web visit https://groups.google.com/d/msgid/openpnp/d549996c-d476-4fd7-a741-c62bbdc97724%40googlegroups.com.
Anthony Webb


Jason von Nieda
--
You received this message because you are subscribed to the Google Groups "OpenPnP" group.
To unsubscribe from this group and stop receiving emails from it, send an email to openpnp+u...@googlegroups.com.
To post to this group, send email to ope...@googlegroups.com.
To view this discussion on the web visit https://groups.google.com/d/msgid/openpnp/974dcd3f-233c-42ce-a720-2e0b4df2ac99%40googlegroups.com.

Rich Obermeyer
To view this discussion on the web visit https://groups.google.com/d/msgid/openpnp/CA%2BQw0jxqTZqkBV_TMY%3D2ZCPFrrOSNmJpnuOUMn%2Bt-P2rw4b84w%40mail.gmail.com.
Anthony Webb
Jason von Nieda
--
You received this message because you are subscribed to the Google Groups "OpenPnP" group.
To unsubscribe from this group and stop receiving emails from it, send an email to openpnp+u...@googlegroups.com.
To post to this group, send email to ope...@googlegroups.com.
To view this discussion on the web visit https://groups.google.com/d/msgid/openpnp/855cb263-baa0-44f9-90ee-d07c3cbd1ac0%40googlegroups.com.
Anthony Webb

reade...@gmail.com
Anthony Webb
reade...@gmail.com
Anthony Webb
Anthony Webb

Jason von Nieda
Got the final bed installed. size is about 22 inches square. It is 3/4 inch mdf with a layer of 12 gauge (~1/8 in) galvanized steel laminated to it. It is probably a bit overkill but gives us a nice heavy base to stick magnetic holders and boards to.
--
You received this message because you are subscribed to the Google Groups "OpenPnP" group.
To unsubscribe from this group and stop receiving emails from it, send an email to openpnp+u...@googlegroups.com.
To post to this group, send email to ope...@googlegroups.com.
To view this discussion on the web visit https://groups.google.com/d/msgid/openpnp/7f133f01-1eb1-4ca7-879a-0110c9169283%40googlegroups.com.
Anthony Webb


Michael Anton
Anthony Webb
Jason von Nieda
--
You received this message because you are subscribed to the Google Groups "OpenPnP" group.
To unsubscribe from this group and stop receiving emails from it, send an email to openpnp+u...@googlegroups.com.
To post to this group, send email to ope...@googlegroups.com.
To view this discussion on the web visit https://groups.google.com/d/msgid/openpnp/15afd2bb-d272-41c0-8b1e-5658ee0a55a4%40googlegroups.com.

Cri S
Michael Anton
Jason von Nieda
To view this discussion on the web visit https://groups.google.com/d/msgid/openpnp/fef40ec6-5d52-48b7-9153-adaf08104e1f%40googlegroups.com.
Michael Anton
Cri S
most far component first.
The point of reference is the unique camera used for checking
components that are highter
then 1/2 of free space. The only requirements is that there is at
least 1.5 mm clearance,
better if 2.5mm . I have calulated that in.
2016-01-09 0:38 GMT, Michael Anton <3d.m...@gmail.com>:
>>>> .
> --
> You received this message because you are subscribed to a topic in the
> Google Groups "OpenPnP" group.
> To unsubscribe from this topic, visit
> https://groups.google.com/d/topic/openpnp/w46THEk0Mjc/unsubscribe.
> To unsubscribe from this group and all its topics, send an email to
> To post to this group, send email to ope...@googlegroups.com.
> To view this discussion on the web visit
Anthony Webb
--
You received this message because you are subscribed to a topic in the Google Groups "OpenPnP" group.
To unsubscribe from this topic, visit https://groups.google.com/d/topic/openpnp/w46THEk0Mjc/unsubscribe.
To unsubscribe from this group and all its topics, send an email to openpnp+u...@googlegroups.com.
To view this discussion on the web visit https://groups.google.com/d/msgid/openpnp/fef40ec6-5d52-48b7-9153-adaf08104e1f%40googlegroups.com.
Anthony Webb
Cri S
Lightning is very important and there are tree independent things.
First forget buildin light. It works but its really worst.
Sure it depend what you want and need to do.
Light intensity. Without enough light fps get down and you need more then 15 or 33ms or 66.5ms
To get the image. If the CMOS sensor have high noise you need average several images. Time adds. Light uniformity and sunshine interference especially it is another issue. Depending what you want to do you need more direct or more indirect diffused light. You need to find out a compromise. As example having decent lightning its possible to know if inside pockets are components only making fixed threshold and blob detecting based on the shadows the component makes. This is less the 10ms operation. If you have time it don't really matters.
For up looking cam on modern PNP, there check coplanarity too and for this light is sequenced and in combination with plastic sheet that act as mirror there have side view of pins too.
Otherwise up looking is less critical except more diffuses light is needed. First thing is you need enough light for 30fps or higher. Second thing light uniformity. Third thing you need diffused light too. Mostly because if uniformity requirement you see a lot of LEDs
I've been thinking a lot about lighting. There are some spall LED's on the end of my USB microscope camera, which can get fairly bright, but some of the realy nice CNC machines seem to have lights that are beyond powerful on their up and down looking cameras. Can some one chime in on how important lighting is, and if there are some ideas around lighting that I need to take a look at?
--
You received this message because you are subscribed to a topic in the Google Groups "OpenPnP" group.
To unsubscribe from this topic, visit https://groups.google.com/d/topic/openpnp/w46THEk0Mjc/unsubscribe.
To unsubscribe from this group and all its topics, send an email to openpnp+u...@googlegroups.com.
To post to this group, send email to ope...@googlegroups.com.
To view this discussion on the web visit https://groups.google.com/d/msgid/openpnp/6b7f5364-af23-4347-a729-560c5232059c%40googlegroups.com.
mojalovaa1
Where you found bearing and rails for fusion360 , you are make it or have some where for download it ?
Graeme Bridge
Anthony Webb

Anthony Webb


Anthony Webb
Jason von Nieda
--
You received this message because you are subscribed to the Google Groups "OpenPnP" group.
To unsubscribe from this group and stop receiving emails from it, send an email to openpnp+u...@googlegroups.com.
To post to this group, send email to ope...@googlegroups.com.
To view this discussion on the web visit https://groups.google.com/d/msgid/openpnp/b51831bd-24db-47b4-9544-73aae7ae4536%40googlegroups.com.
Anthony Webb
mojalovaa1

Peter Betz
As you might know, I am over on the FirePick side, and was throwing the idea of switching to cartesian around, like you did. I' don't have tons of money to throw around, like abandoning the Firepick completely. I really just need the PnP functionality, I already have a 3D printer (and CNC G0704).
May I ask what you are into this machine for? Also, do you have an assembly you are willing to share? I am also using 360 (Ultimate).
Thanks for posting all of this for the community, and congratulations on the first pick and place!
Peter.
Anthony Webb

Joao Matos
Anthony Webb

Juha M
Anthony Webb
--
You received this message because you are subscribed to the Google Groups "OpenPnP" group.
To unsubscribe from this group and stop receiving emails from it, send an email to openpnp+u...@googlegroups.com.
To post to this group, send email to ope...@googlegroups.com.
To view this discussion on the web visit https://groups.google.com/d/msgid/openpnp/a880b432-465c-4080-8ef8-82027903e798%40googlegroups.com.
Anthony Webb


Jason von Nieda
--
You received this message because you are subscribed to the Google Groups "OpenPnP" group.
To unsubscribe from this group and stop receiving emails from it, send an email to openpnp+u...@googlegroups.com.
To post to this group, send email to ope...@googlegroups.com.
To view this discussion on the web visit https://groups.google.com/d/msgid/openpnp/196eea6d-a00a-4196-8983-c8118ef9976b%40googlegroups.com.
Anthony Webb
Michael Anton
Anthony Webb
Rich Obermeyer
--
You received this message because you are subscribed to the Google Groups "OpenPnP" group.
To unsubscribe from this group and stop receiving emails from it, send an email to openpnp+u...@googlegroups.com.
To post to this group, send email to ope...@googlegroups.com.
To view this discussion on the web visit https://groups.google.com/d/msgid/openpnp/99fbe591-9c23-4fea-a566-82c035c31615%40googlegroups.com.
Anthony Webb
You received this message because you are subscribed to a topic in the Google Groups "OpenPnP" group.
To unsubscribe from this topic, visit https://groups.google.com/d/topic/openpnp/w46THEk0Mjc/unsubscribe.
To unsubscribe from this group and all its topics, send an email to openpnp+u...@googlegroups.com.
To post to this group, send email to ope...@googlegroups.com.
To view this discussion on the web visit https://groups.google.com/d/msgid/openpnp/33D168FC-C113-4909-AF33-87CABBF0CCF6%40gmail.com.
Michael Anton
Michael Anton
Graeme Bridge
Rich Obermeyer
To view this discussion on the web visit https://groups.google.com/d/msgid/openpnp/f5af66ab-ddd4-4c03-977a-d04453f3dee0%40googlegroups.com.
For more options, visit https://groups.google.com/d/optout.
Peter Betz
Peter Betz
You received this message because you are subscribed to a topic in the Google Groups "OpenPnP" group.
To unsubscribe from this topic, visit https://groups.google.com/d/topic/openpnp/w46THEk0Mjc/unsubscribe.
To unsubscribe from this group and all its topics, send an email to openpnp+u...@googlegroups.com.
To view this discussion on the web visit https://groups.google.com/d/msgid/openpnp/CAOvy4mZ1-vJq0B4BCEg-4RubHps5CfbpXVBQZvwJVN_%2B-Yr2dw%40mail.gmail.com.

ja...@tetontechnology.com
Looks like the download formats are plentiful

Michael Anton
On Wednesday, January 20, 2016 at 11:09:24 AM UTC-7, Graeme Bridge wrote:
Anthony Webb
Jason von Nieda
--
You received this message because you are subscribed to the Google Groups "OpenPnP" group.
To unsubscribe from this group and stop receiving emails from it, send an email to openpnp+u...@googlegroups.com.
To post to this group, send email to ope...@googlegroups.com.
To view this discussion on the web visit https://groups.google.com/d/msgid/openpnp/0994d6a6-c680-427b-b778-e8968830baad%40googlegroups.com.
Anthony Webb

Anthony Webb


With the new camera in place we were able to return to getting the cable chain wrapped up.


We're now getting a mount together for all the plumbing and we can return to more testing in a more final type configuration. Wishing there were more hours in the day.
mojalovaa1
Anthony , whom camera you are buy ?
Anthony Webb
mojalovaa1
Anthony Webb

FredG

DAniel Dumitru
I am interested about resolution :
http://www.elpcctv.com/industrial-usb-720p-camera-module-for-monochrome-stereo-p-79.html
says : Max. Resolution 640X480 VGA
is is right ?
--
You received this message because you are subscribed to the Google Groups "OpenPnP" group.
To unsubscribe from this group and stop receiving emails from it, send an email to openpnp+u...@googlegroups.com.
To post to this group, send email to ope...@googlegroups.com.
To view this discussion on the web visit https://groups.google.com/d/msgid/openpnp/b08baf4f-a3f9-4d29-b7da-05c6dc672ef5%40googlegroups.com.
For more options, visit https://groups.google.com/d/optout.
|
|
This email has been sent from a virus-free computer protected by Avast. www.avast.com |
Anthony Webb


cf
Anthony Webb
Jason von Nieda
I would like to know this as well. Jason would probably know best what the real limitations are of the current vision system. I'd also like to know how quickly I should get another one coming as an upward looking camera :)
--
You received this message because you are subscribed to the Google Groups "OpenPnP" group.
To unsubscribe from this group and stop receiving emails from it, send an email to openpnp+u...@googlegroups.com.
To post to this group, send email to ope...@googlegroups.com.
To view this discussion on the web visit https://groups.google.com/d/msgid/openpnp/ee8a79e1-2795-462b-bf68-9e0b119f1c4f%40googlegroups.com.
Anthony Webb
FredG
Am Samstag, 19. Dezember 2015 06:09:18 UTC+1 schrieb Anthony Webb:
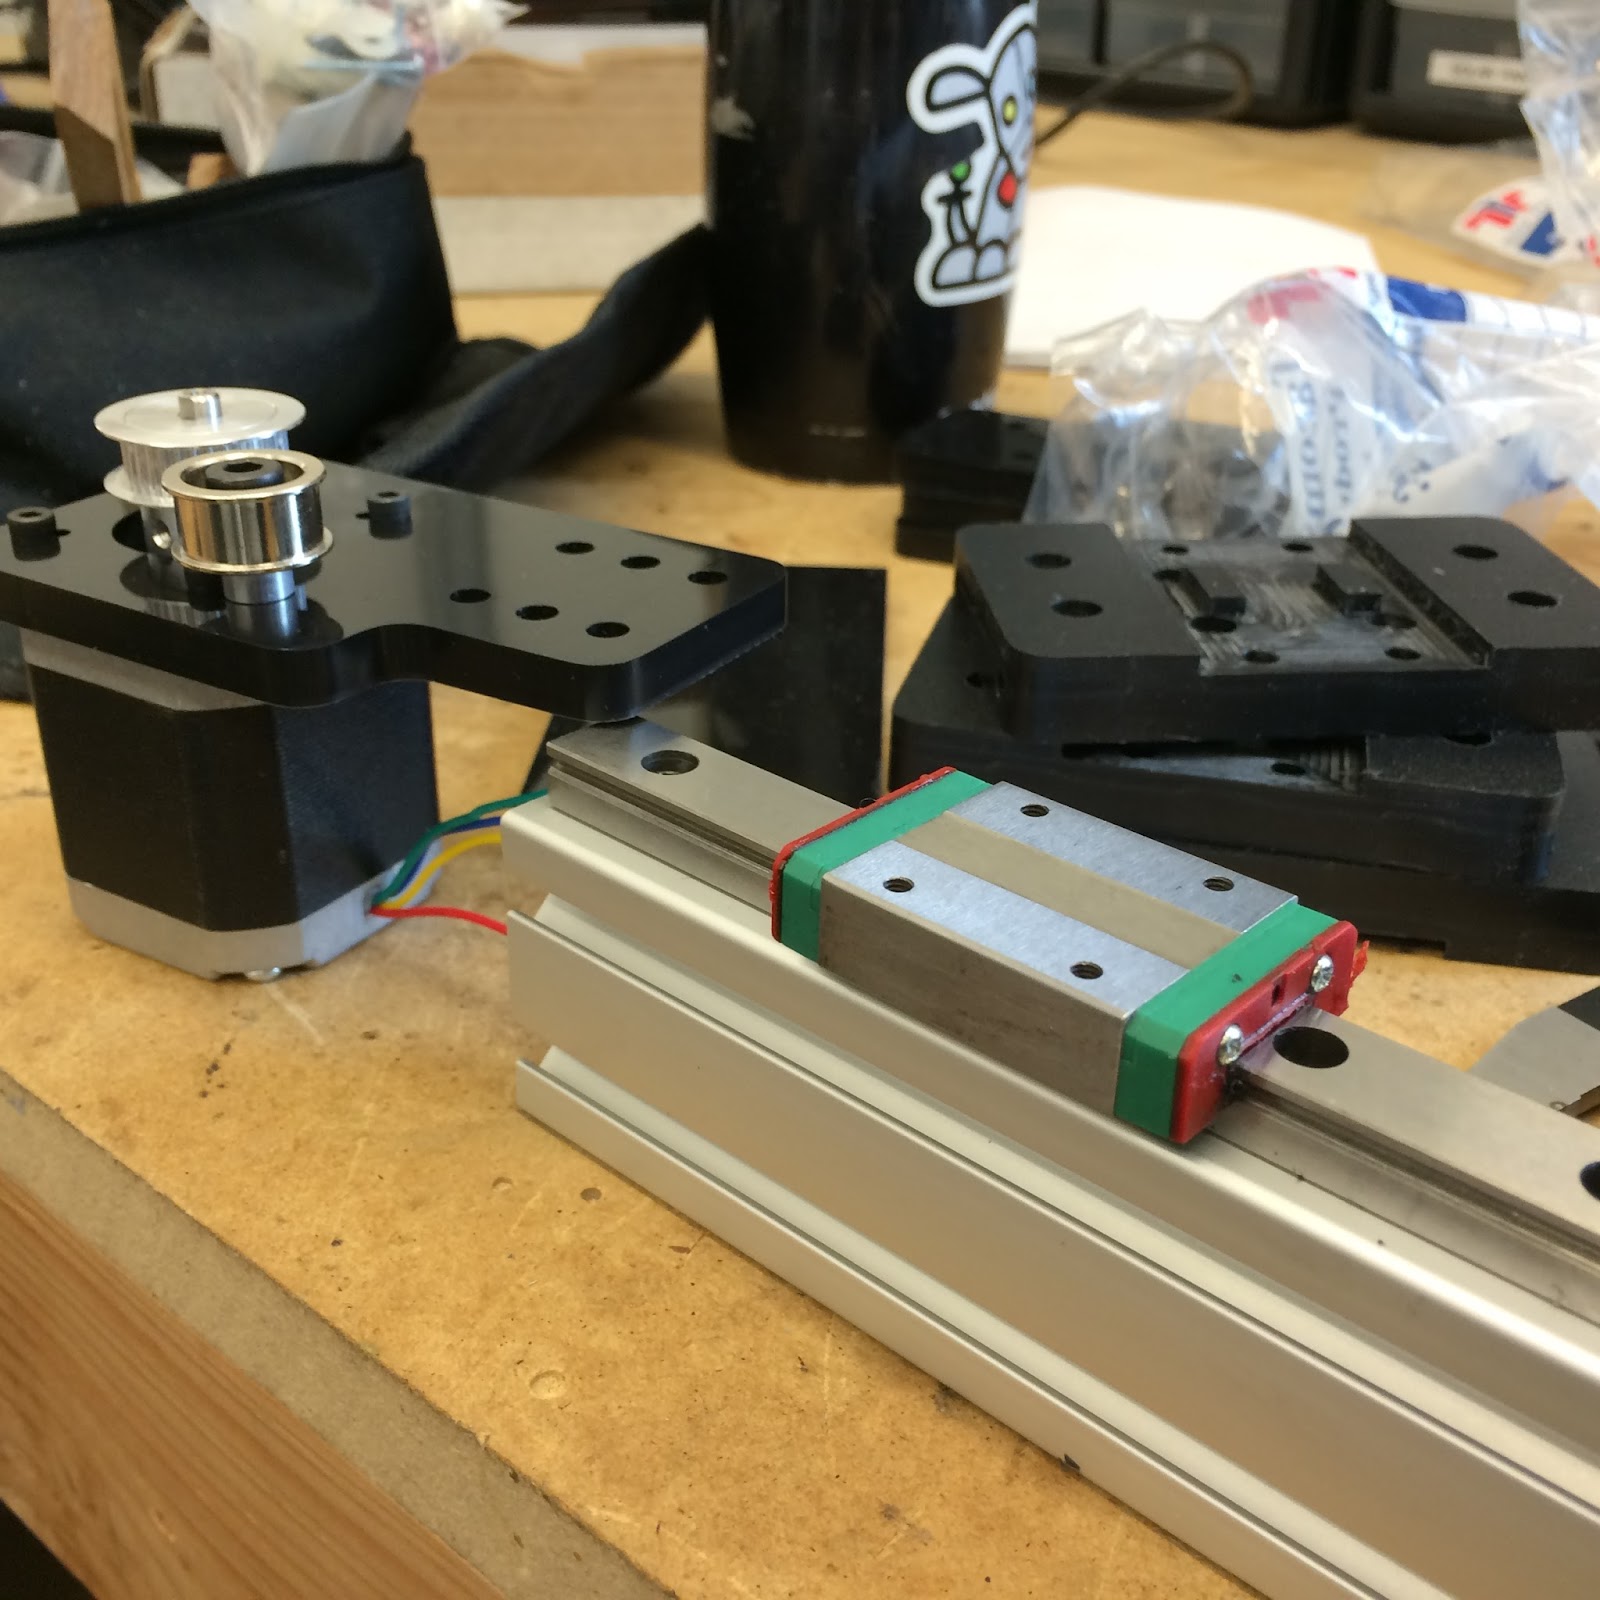
Wanted to start a new thread to report on my findings. Up until now I have been posting stuff into the thread discussing inexpensive PNP options. For those who havent followed there I will recap here. I'm on the hunt to build a cartesian pnp. I'm not looking to try and build the cheapest machine out there, but I am out to build a highly reliable and accurate machine for the least cost possible.I've been through countless 3D printers, CNC machines, and other various motion projects and have a pretty good feel for what I can live with. For that reason I have chosen to go the rail/slide and belt route as opposed the other various options out there. I think I will be able to find a motion platform for this project that checks all the boxes (cost/quality/simplicity).To this end I feel the need to know how the various price points of rail/slide options compare to each other. You can pay $20 for the inexpensive stuff, and $1000 for the real pricey stuff. Question is, when you pay more, do you get more? I'm about to find out. But I am looking to find out EXACTLY how much more you get. I'm going to measure each set of rails against each other in a torture test of sorts using a tools called firenodejs that Karl Lew has put together (https://github.com/firepick1/firenodejs) It will be a ruler capable of drill into just how well each of the rail/slide combos perform compared to each other.In order to do this analysis I needed a common platform to test them with. Task 1 was designing a test rig. I started with an actuator. Small problem is that I didnt actually know any CAD tools, but I knew what I wanted. I wanted to design something that was easy to build, modular enough to be expanded/shrunk to meet varying budgets, and I wanted the actuator to be able to mount onto other actuators to give a nice x/y platform that would ultimately be the bones for my PNP. After days in front of Fusion360, Here is what I came up with
The nice part about extrusions is that they are relatively easy to work with, you can cut them easily, bolt bits and pieces on without much trouble, etc. The beauty of what I ended up with is that I could very easily bolt on various rail/slide combinations for testing (WIN). I have a CNC and 3D printer, but I wanted the brackets to be something that a guy could make with a drill press and some delrin, so I kept them very simple. With the actuator design in place I set out to join them together in an x/y test rig. This would require some custom brackets to join together the actuators. Here is the next rev
As you can see above, I really wanted to see if a passive rail would fly. For simplicity and cost I am going to first see if this works, if not I have lots of workarounds I'll try too. I initially targeted 300x300, but after looking around I found that 500mm rails would be a better size to target. I felt ready to go ahead and start buying parts. The last 3 weeks have been spent bringing in the hardware to build what you see above. Of most importance was the rail/slide combos. I bought 3 of everything, the cheap chinese hiwin knockoffs, the run of the mill authentic hiwins, the uber expensive THK option, 12mm, 15mm, as well as some of the igus drylin stuff. Companies found out what I was doing and sent me samples of their product to test too. Basically, I have enough rail/slide combo hardware to provide a really good picture of what works and what doesnt, but more importantly to know where is the point of diminishing returns, ie at what point does spending more money not necessarily buy you more quality. From there I figure I can pretty accurately decide how much quality I want to afford :)I'm not going to make any predictions at this point, but I can tell you that I was not expecting the good stuff to be that good, nor was I prepared for the bad stuff to be that bad. I nearly didnt even bother trying to test the chinese set, sure it was 1/15th the price of some of the other stuff, but man, I couldnt even move the slide on the rail at all, I'm not joking. But after a dose of WD40 and white lithium grease it at least slides along the rail now. Definitely not the butter smooth action of the THK's out of the box.Off we go, I cut brackets and cleaned off a spot on the bench and began assembly today.
Chinese rails are up first, and as for as much as I had written them off initially after getting them all locked in I must say that they seems to move great. No slop at all. The passive rail I was worried about? Well for now I am not seeing a problem, but the proof will certainly be in the result.
Thats where I left off today. Mechanical is complete, electrical is next. I have a tinyg laying around that I have tasked with driving the motors I installed. These are off an old 3D printer, nema17 400 step (.9) per rev. I am using 32 tooth 2mm GT2 belt, not sure what kind of speed I will drive with that, but excited to give it a whirl. I am a little nervous about the steppers, I have had such great luck with my clearpath closed loop servos I almost hate to even try anything else, but if I can make steppers work I could save a bundle of money along the way so I am starting with them.
I'l be sure to post my findings as I go, the good/bad/ugly. As always if there are any questions or feedback please feel free to call me crazy, offer insight, etc. I'm very new to all of this and know many of you have been through, at the end of the day I hope to be picking and placing with the rest of you!
A short video of the rolling chassis.
Anthony Webb
--
You received this message because you are subscribed to a topic in the Google Groups "OpenPnP" group.
To unsubscribe from this topic, visit https://groups.google.com/d/topic/openpnp/w46THEk0Mjc/unsubscribe.
To unsubscribe from this group and all its topics, send an email to openpnp+u...@googlegroups.com.
To post to this group, send email to ope...@googlegroups.com.
To view this discussion on the web visit https://groups.google.com/d/msgid/openpnp/2e659587-cc47-4853-9e18-3df86c695647%40googlegroups.com.
Anthony Webb
Anthony Webb
I still think we have some optimizations left. I need to quiz Jason on why the dwell time is so long when placing the part on the board? In the machine xml for the nozzle there is a pick and place dwell that is in the xml but not in the UI (oddly the only params not in the UI) so I am not sure if mess with them? Seems to me that even though in the xml the are both set to 250, the placing appears to take longer than the pick?
I think we will be even more productive once we can use bottom layer fiducials, and of course the upward looking camera will make it that much more bombproof, but there isn't anything stopping us at all now from creating production boards.
This board is all 0603 and 1206. Waiting in some 0402 parts and test board, but I can't foresee a problem with those. Everything is spot on right now for us using the tray feeder.
Jason von Nieda
--
You received this message because you are subscribed to the Google Groups "OpenPnP" group.
To unsubscribe from this group and stop receiving emails from it, send an email to openpnp+u...@googlegroups.com.
To post to this group, send email to ope...@googlegroups.com.
To view this discussion on the web visit https://groups.google.com/d/msgid/openpnp/6eb0f2a7-4bc4-4fa2-9f20-8bb836e49622%40googlegroups.com.
Peter Betz
You received this message because you are subscribed to a topic in the Google Groups "OpenPnP" group.
To unsubscribe from this topic, visit https://groups.google.com/d/topic/openpnp/w46THEk0Mjc/unsubscribe.
To unsubscribe from this group and all its topics, send an email to openpnp+u...@googlegroups.com.
To view this discussion on the web visit https://groups.google.com/d/msgid/openpnp/CA%2BQw0jz4S8unFuqv5wU1yydp4pnBhNpGHCydN84Rs22ZCd2ycA%40mail.gmail.com.
FredG
mojalovaa1
Michael Anton
Anthony Webb
Jason von Nieda
--
You received this message because you are subscribed to the Google Groups "OpenPnP" group.
To unsubscribe from this group and stop receiving emails from it, send an email to openpnp+u...@googlegroups.com.
To post to this group, send email to ope...@googlegroups.com.
To view this discussion on the web visit https://groups.google.com/d/msgid/openpnp/e6568f93-c9ed-44f1-afb8-24b02d55c94e%40googlegroups.com.
Anthony Webb
To view this discussion on the web visit https://groups.google.com/d/msgid/openpnp/CA%2BQw0jzmQ0wkUDqaQmNozcRwDzvwwmjKALcojQfV1vZejftyMg%40mail.gmail.com.
Peter Betz
Anthony Webb
Great work!!I am going to slowly start acquiring the materials. Going to price out some derlin stock tomorrow and start machining ASAP.
One question, I imagine a Arduino Mega and Ramps 1.4 will work in leu of the smoothie? Seems to have 5 axis and the Mega combined with FIREstep on the FPD did not seem to be an issue for smooth motion.

Malte R.
congrats - your machine is looking great!
When it comes to manufacturing kits, I think laser (or waterjet) cut steel / aluminium plates would make it much easier and faster to make larger quantitities.
That is very easy to outsource, many shops will cut plates based on your DXF or SVG files - a fact that helped Juha a lot with the LitePlacer kits I suppose.
Many of the custom parts could probably be redesigned for that; you may want to consider that if you are really going to sell kits.
For all those people wanting to build a one-off instance of your machine, CNC milling + 3D printing is probably fair enough - but if you make more than a few that extra effort might pay off.
Just my $0.02 ;-)
Thanks for all your hard work and sharing the results by the way!
Peter Betz


Anthony Webb


Anthony Webb

