Rapid Star Head - New 8 nozzle head design

Shai
- Calibrating the camera that moves with the head to orient parts. Since it's fixed to the head, a new calibration method needs to be developed to calibrate nozzle run-out and camera placement.
- Another challenge is taking clear pictures of components for rotation/offset. Since the camera is fixed, parts will be captured at various heights, so the only solution I can think of is to use auto-focus camera, but I'm not sure of any off the shelf cameras that can auto focus fast enough to not slow down the entire machine. (Remember, the idea is to capture parts "on the fly"). One solution could be to use the component heights stored in OpenPNP and adjust the auto-focus based on that.
- Rotating the head proper distance to select next nozzle. This can perhaps be hacked and just use nozzle offsets?

Shai

Clemens Koller
Thank you for sharing! 8-)
What is the design goal in building this system? - Easily obtainable mechanics, low budget or high performance / cph?
When it comes to placement performance, it might get difficult to have the Z axis moving two more stepper motors. The inertial mass / energy management is propably a key to that.
I am still dreaming @:-] of a machine where moving the placement head in between the feeders and the pcb is not necessary anymore, simply because the components have way less mass then the head. Some concepts are already in my mind.
Regards,
Clemens
On 14/02/2021 21.40, Shai wrote:
> What's cooler than 4 nozzles? 8 nozzles! :)
>
> This started from a discussion on the OpenPNP discord and spun out into a full design. Inspired by machines such as the Europlacer and Siplace.
>
> Europlacer: https://www.youtube.com/watch?v=0lfPGQtXRWQ
> Siplace: https://www.youtube.com/watch?v=nMYSneJN55c
>
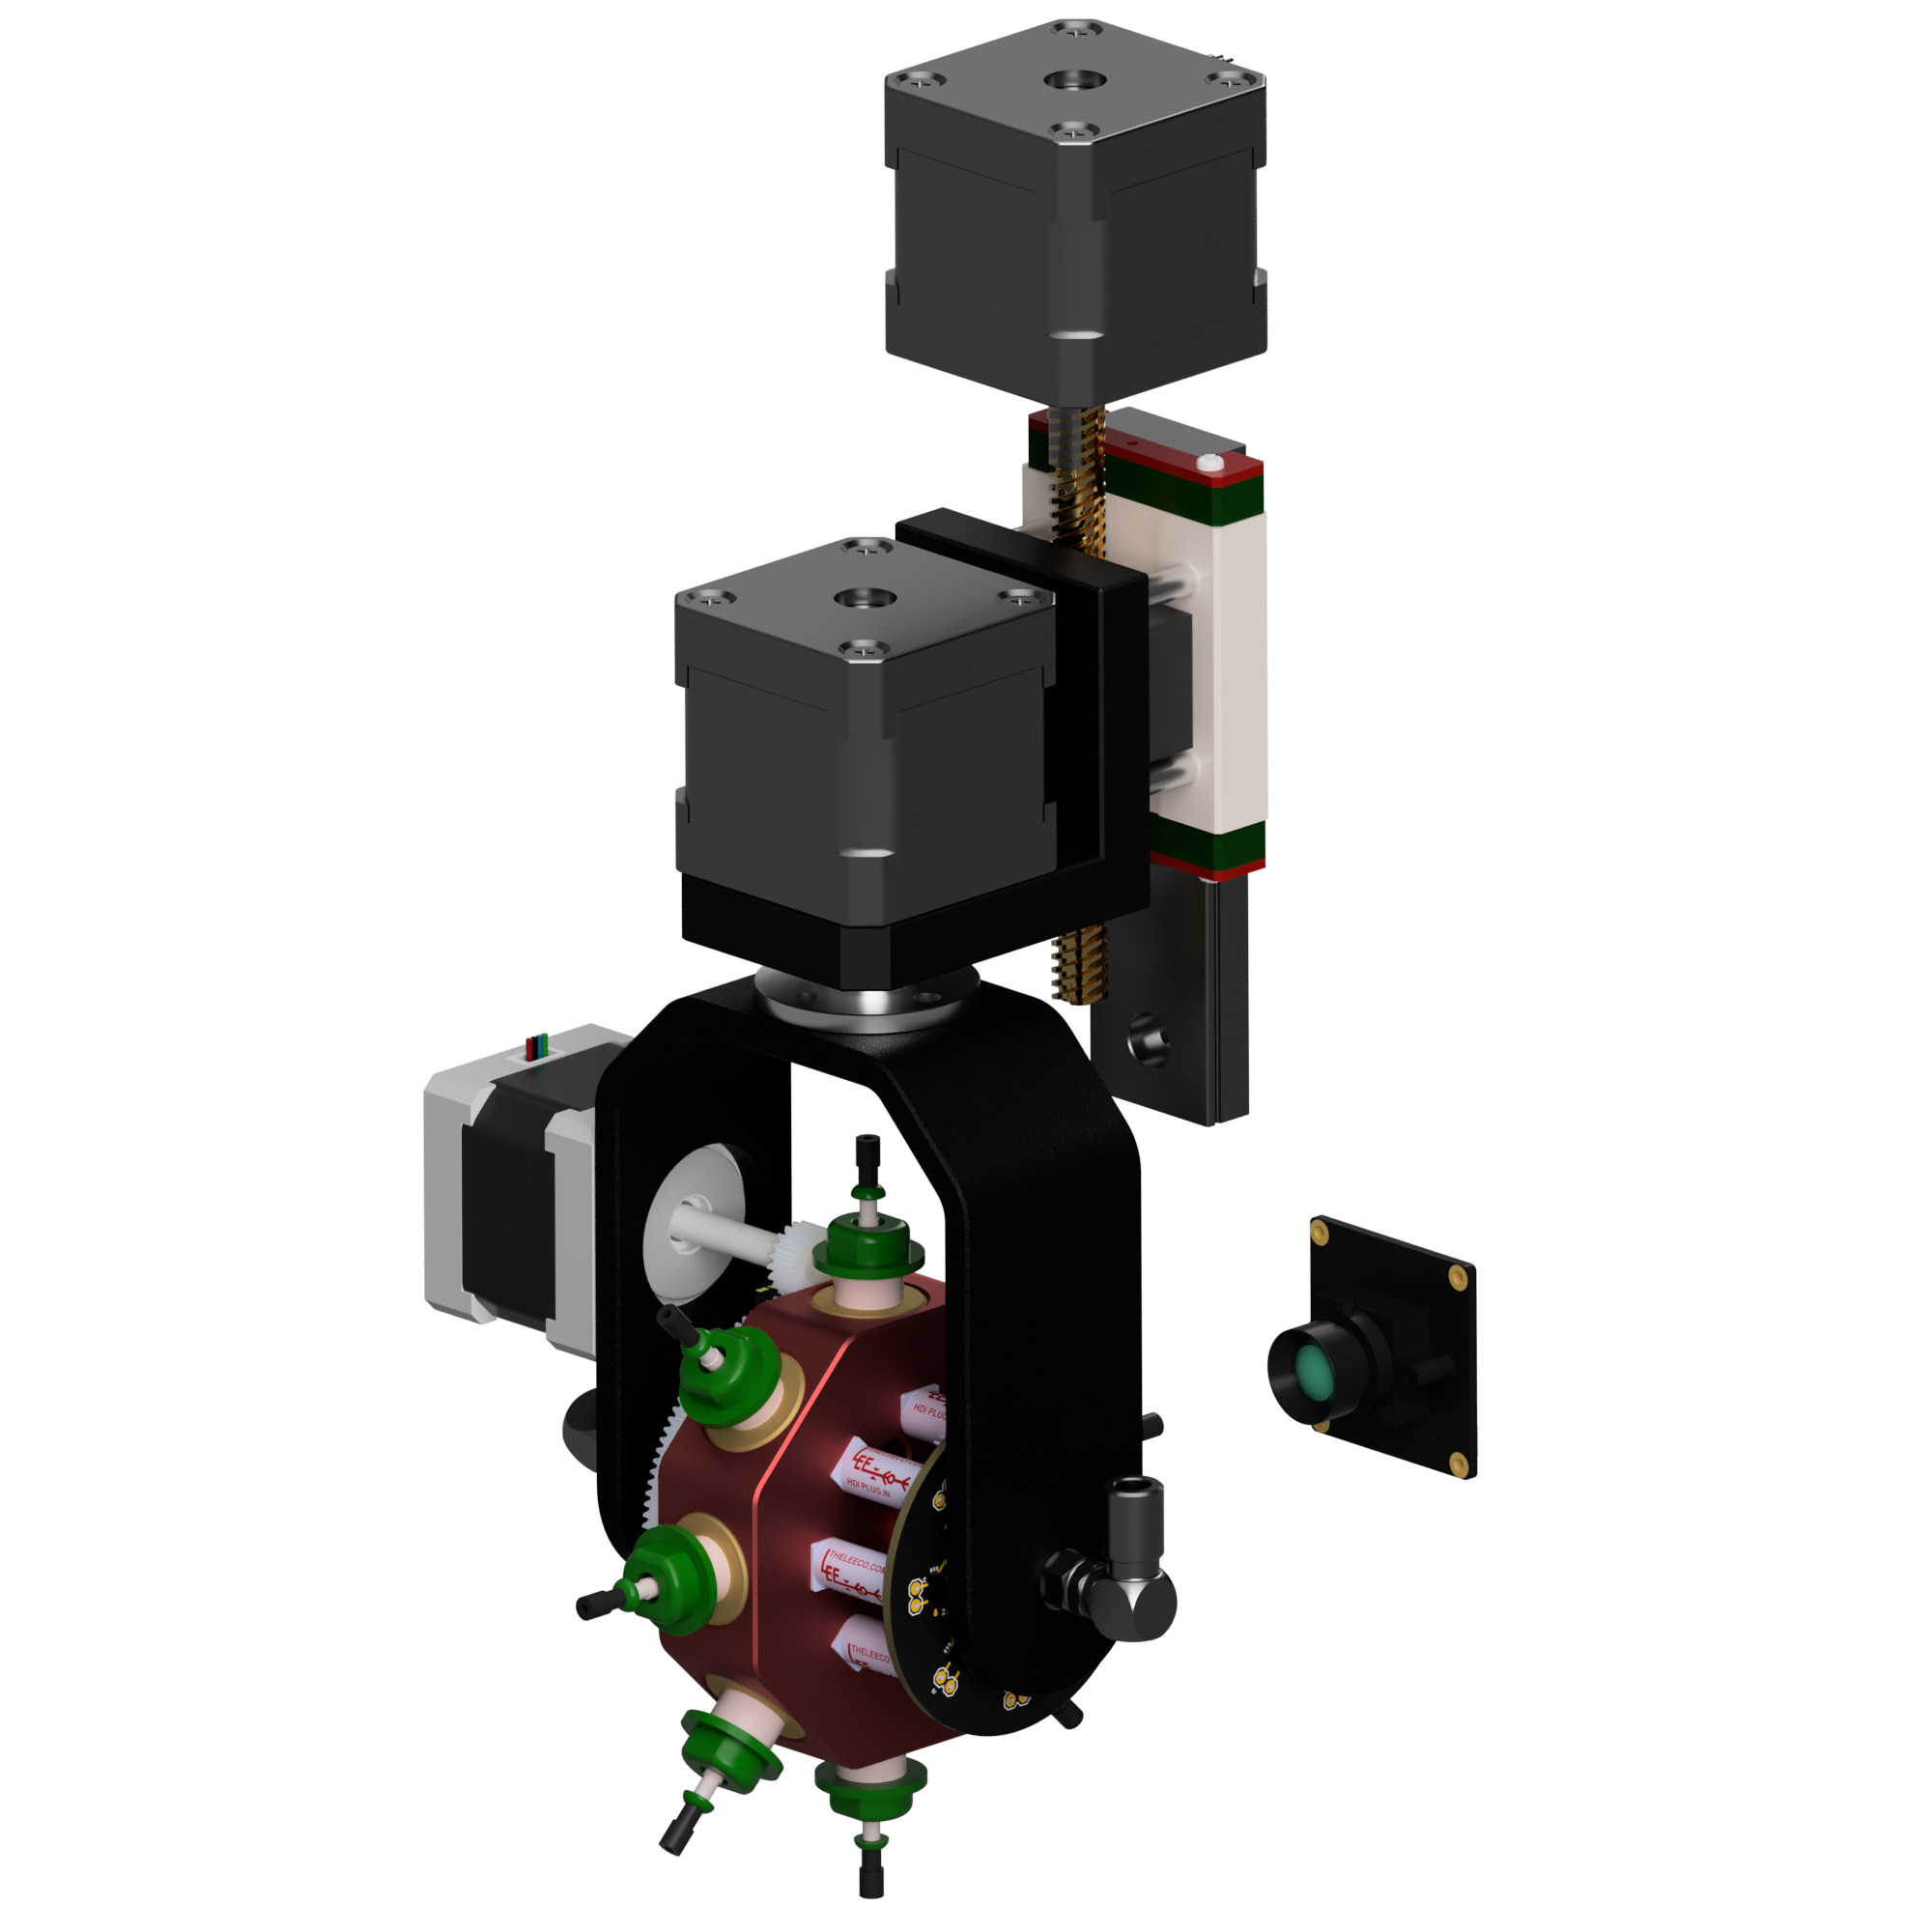
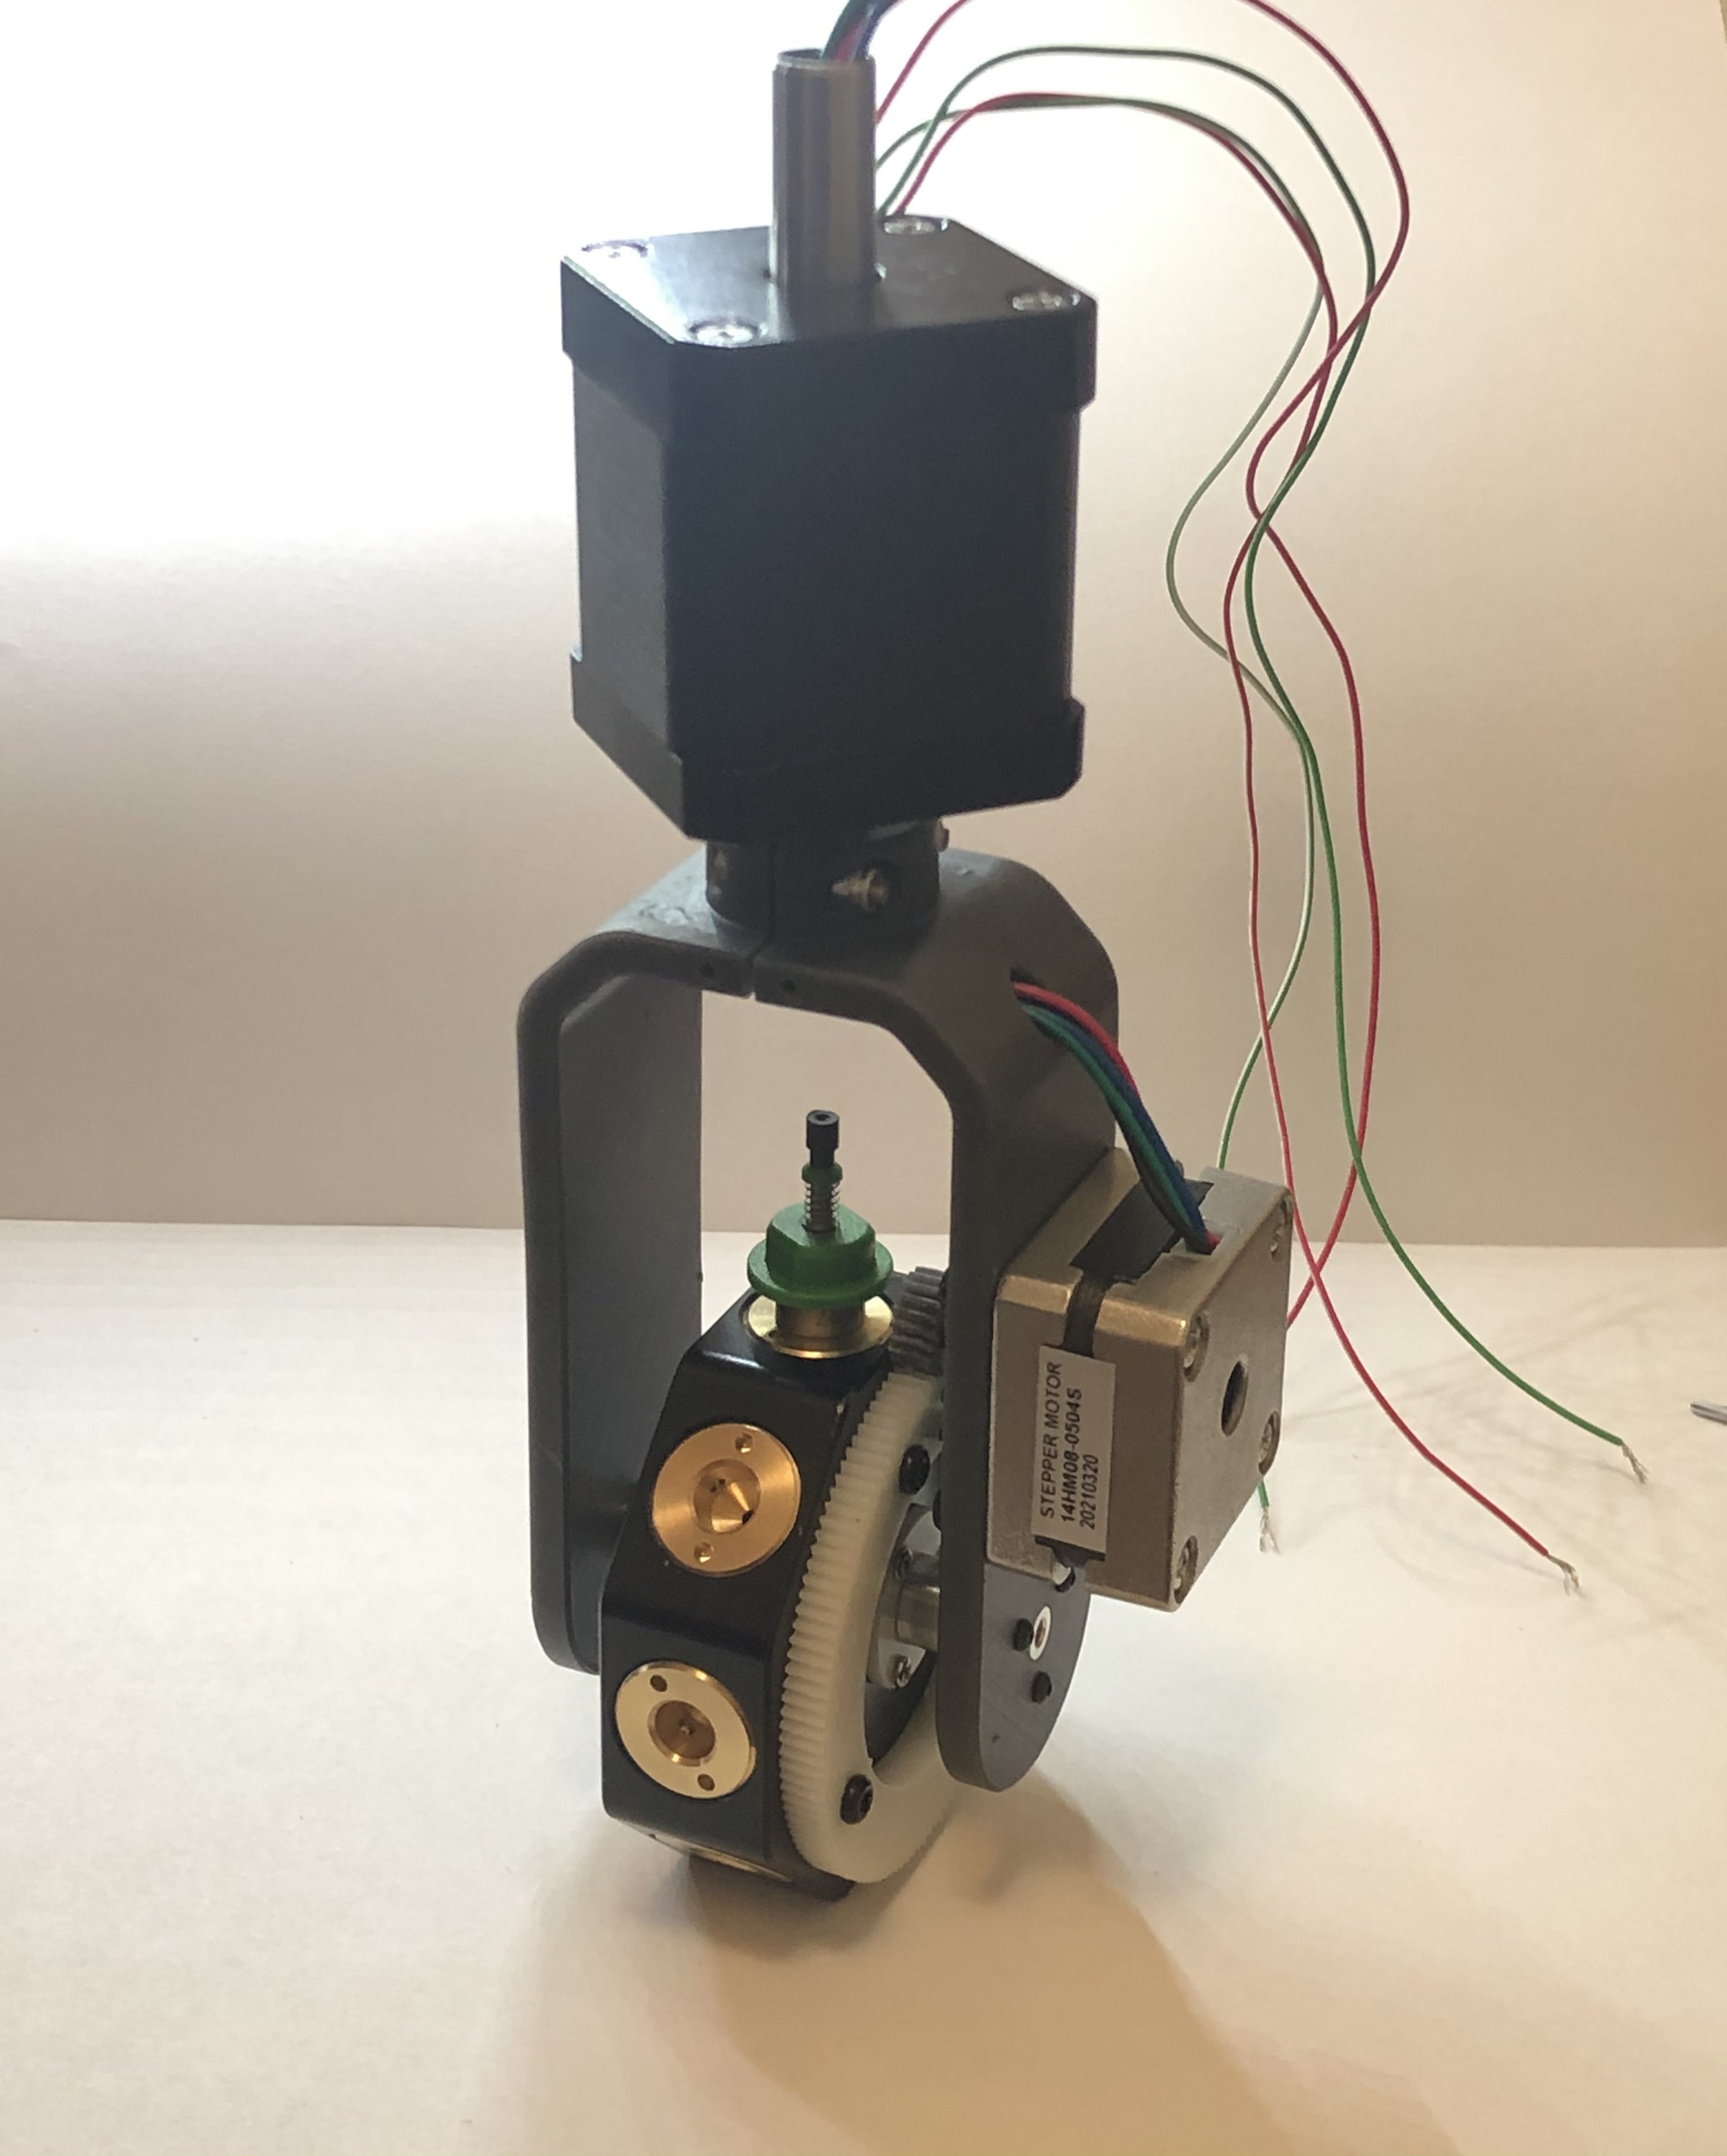
> The idea here is that you can have "unlimited". nozzles with just 5 axis controller. The Z of all the nozzles is controlled by the lead screw that lowers and lifts the entire star assembly and two other motors spin the star in the horizontal axis and vertical axis.
>
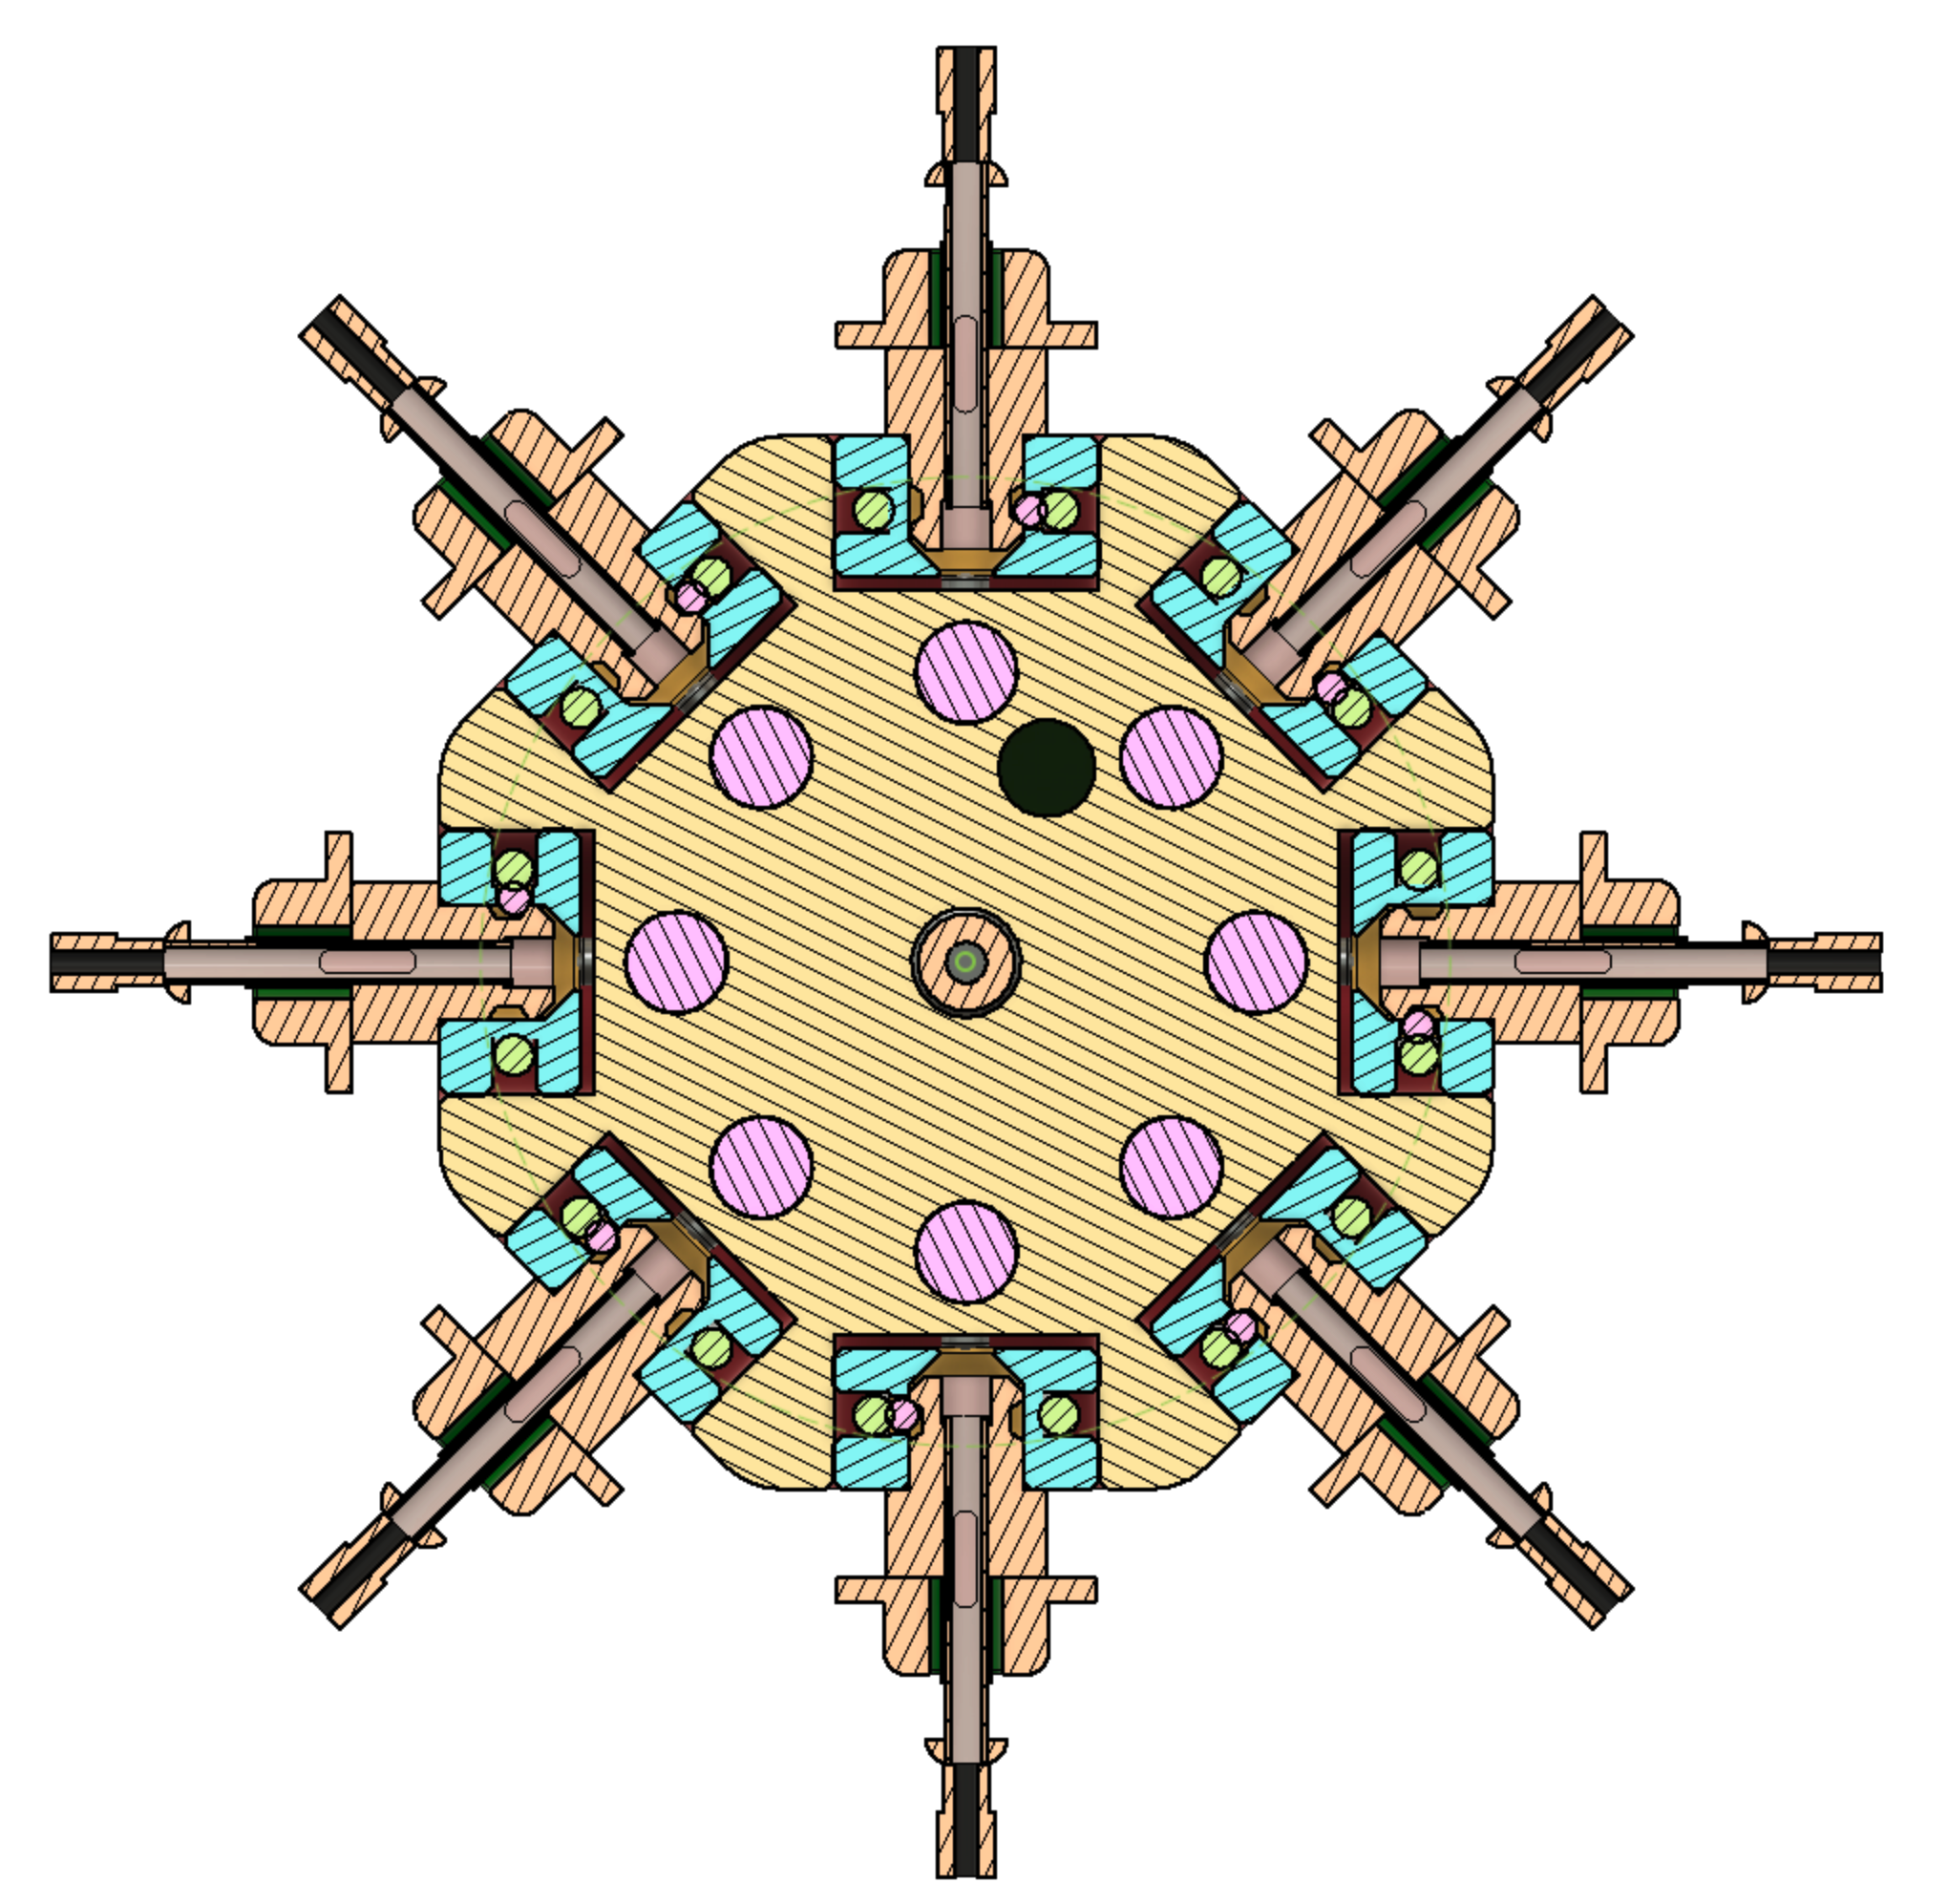
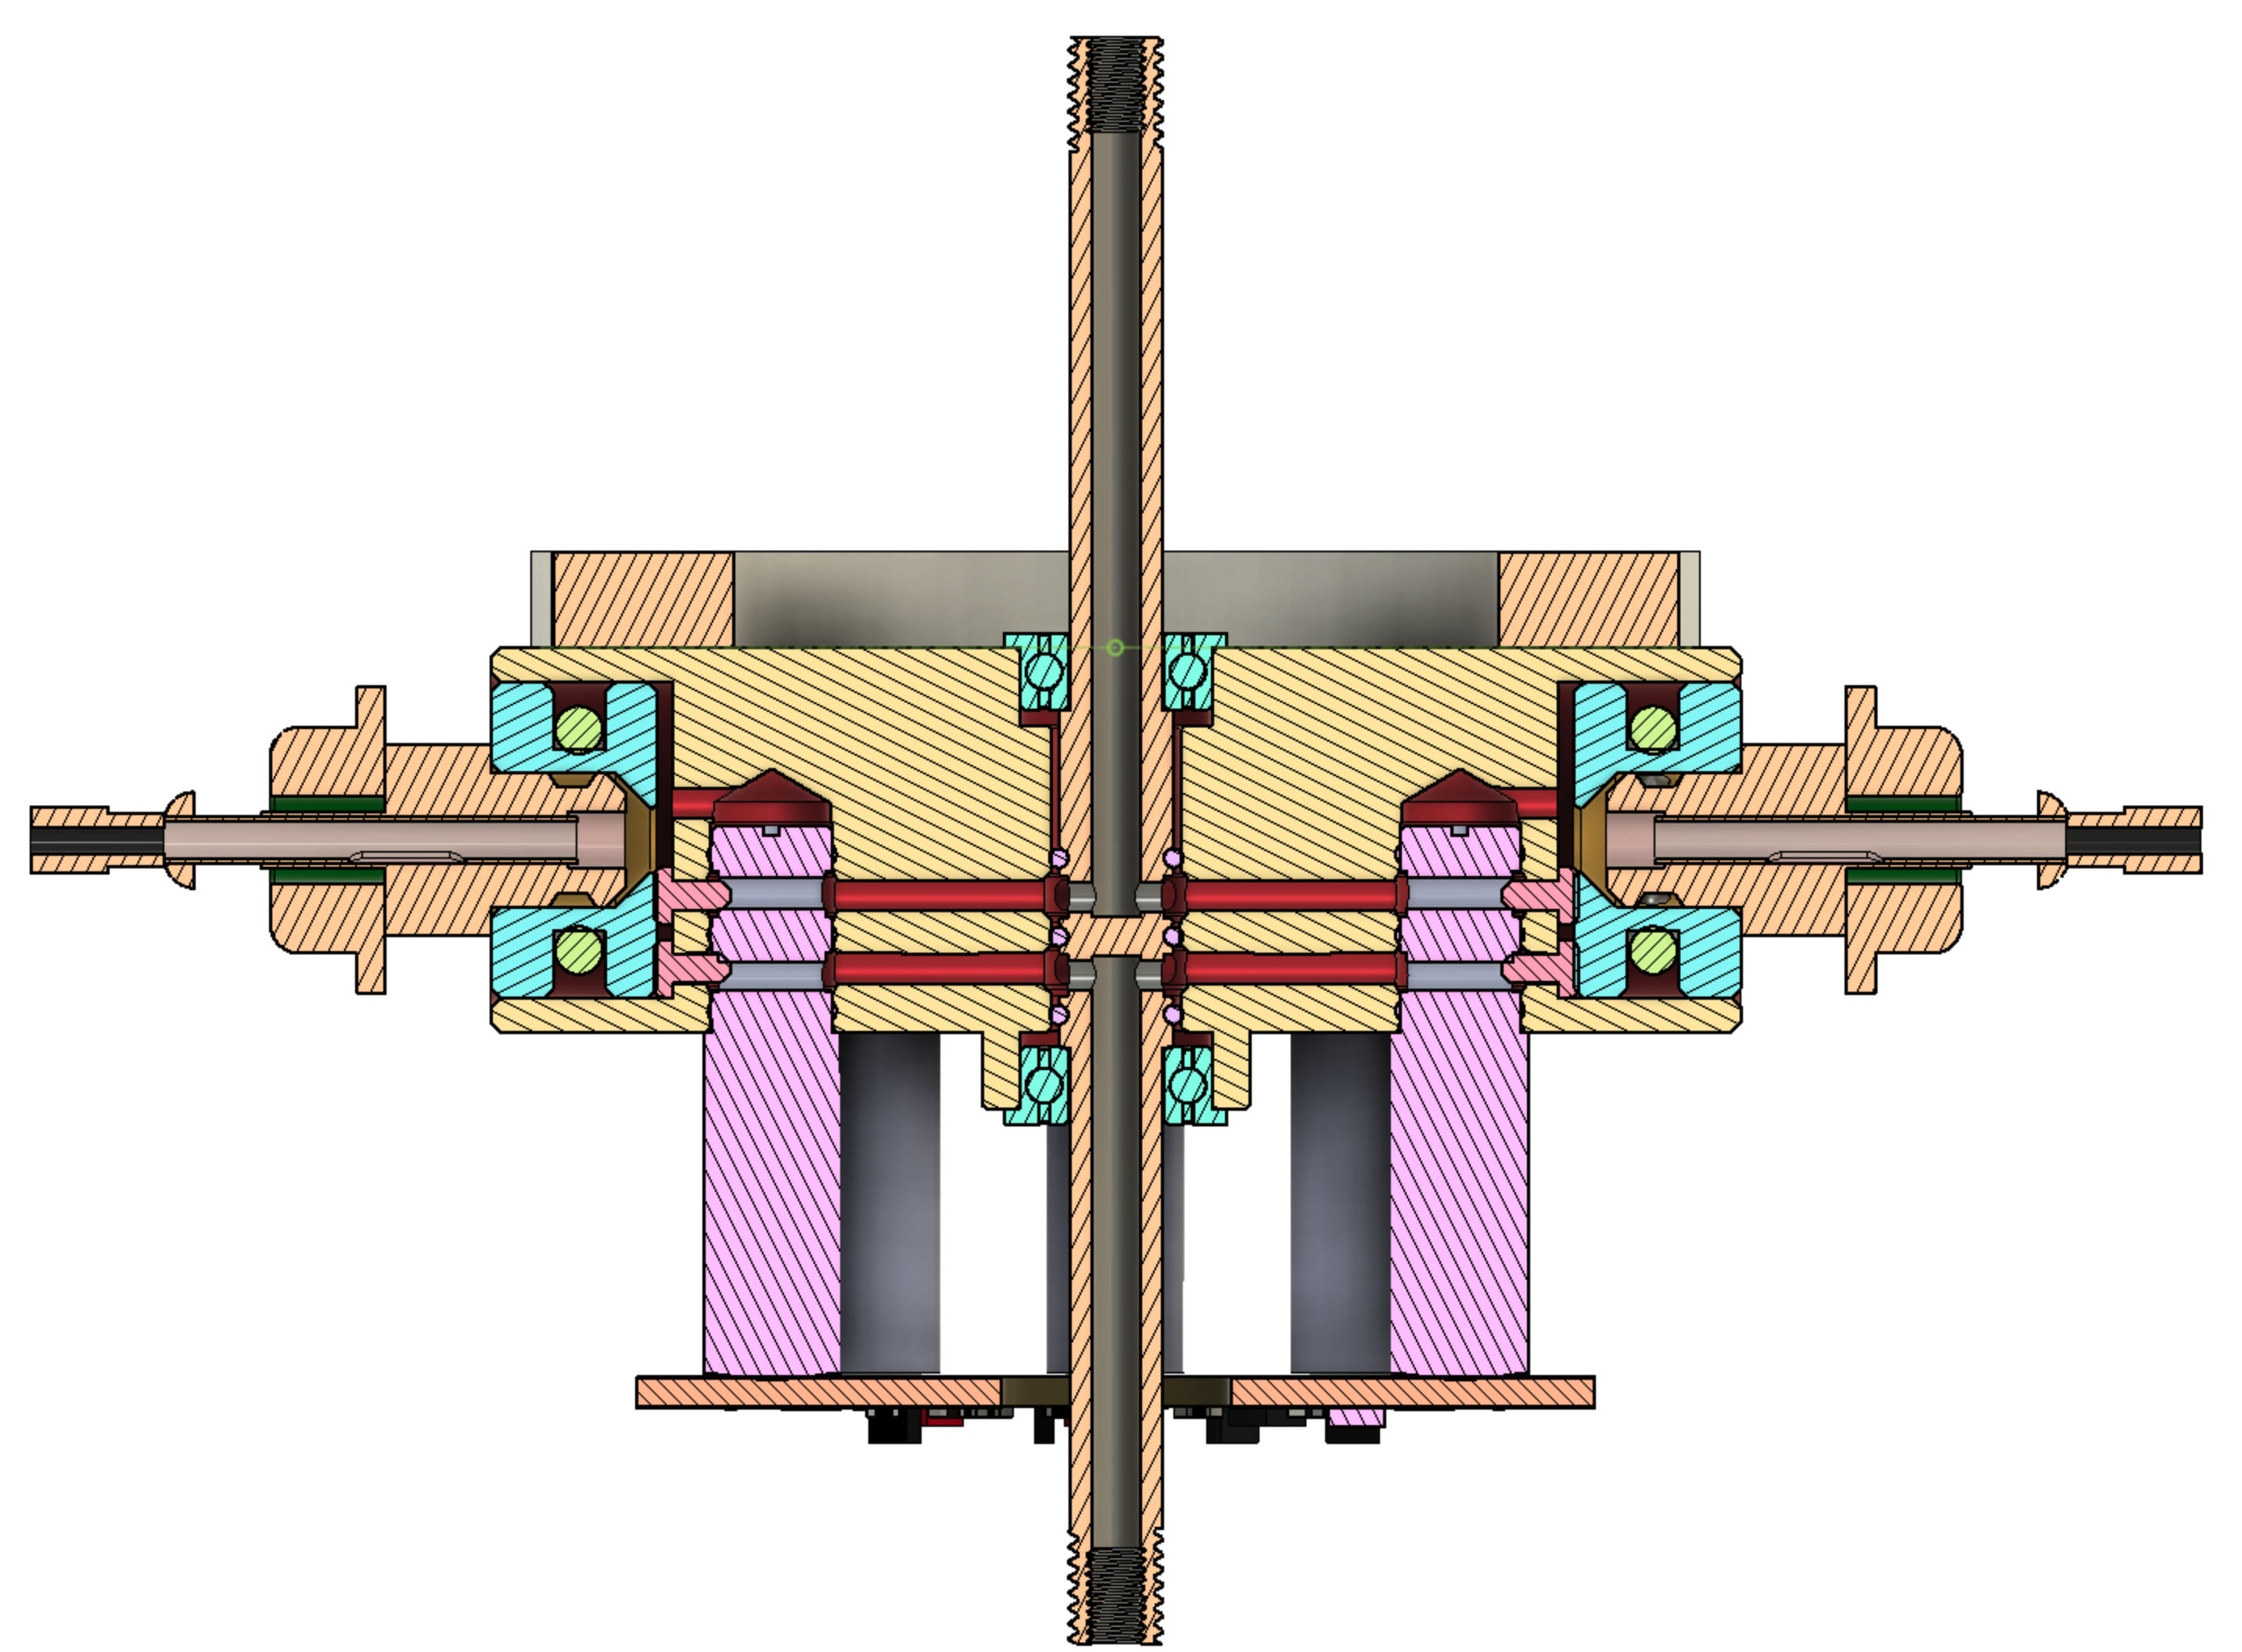
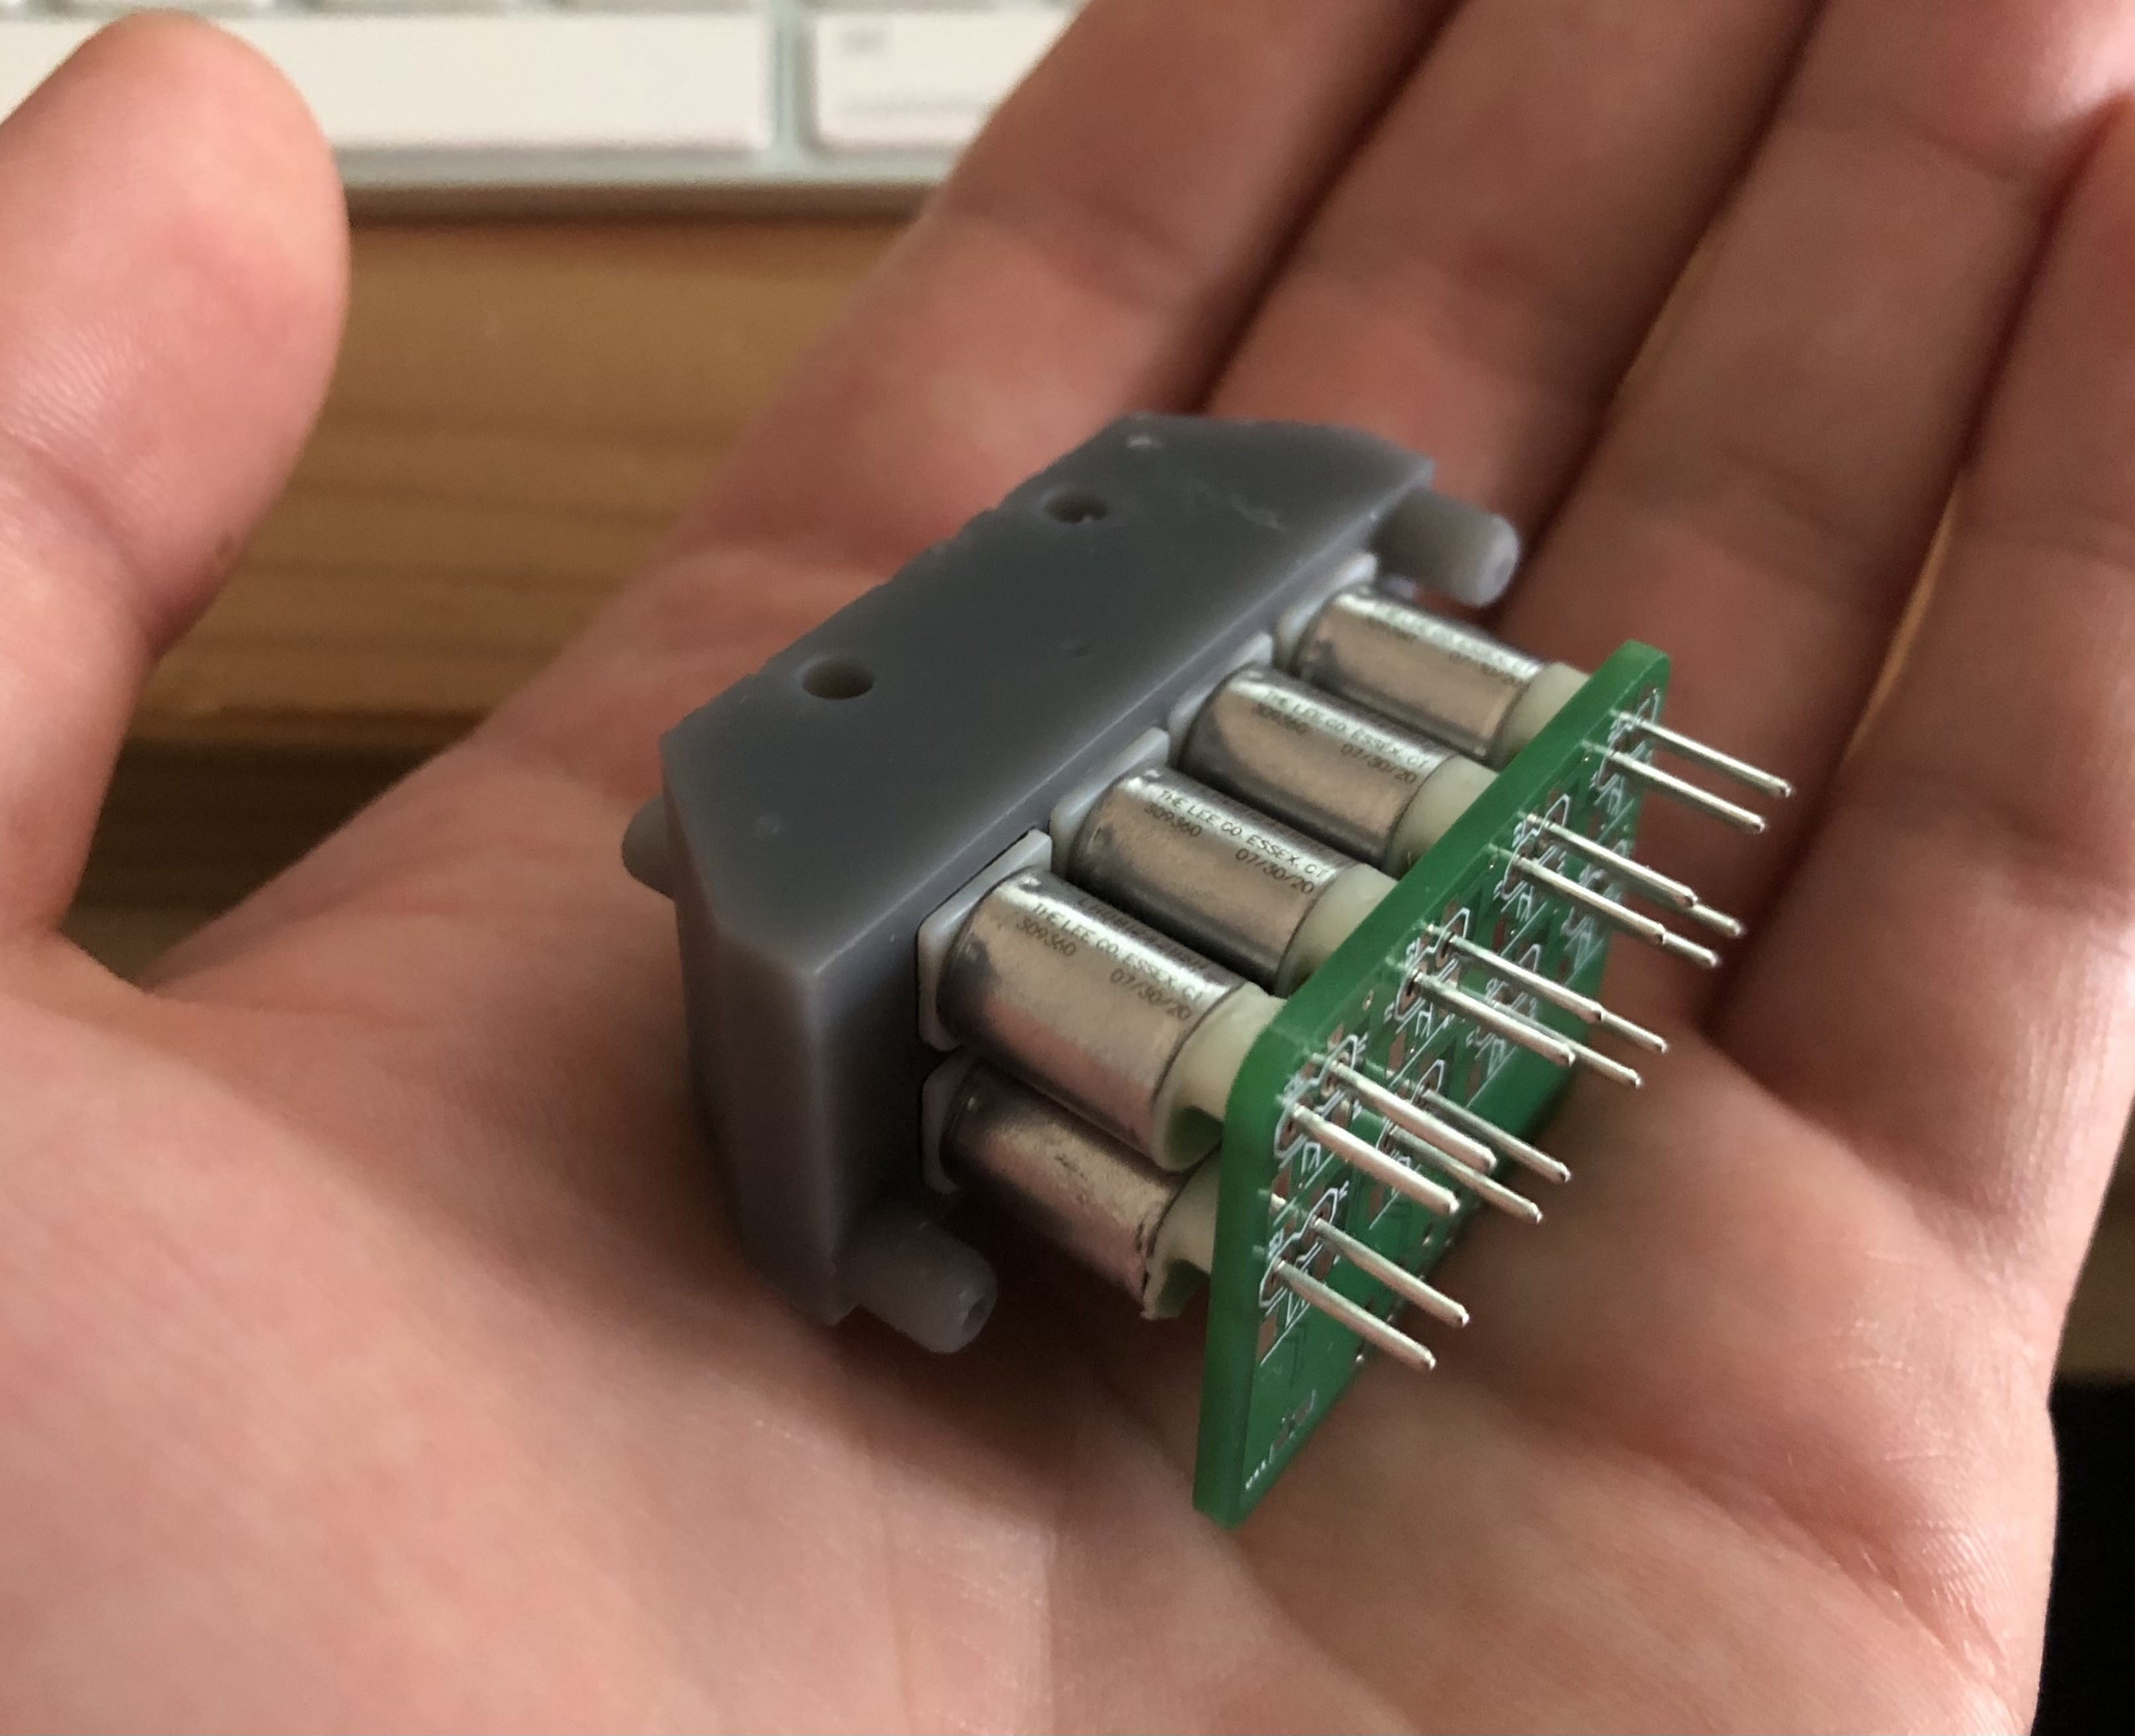
> Some of the benefits of this setup is that you can mount the camera on the head to do vision on the fly, saving a lot of travel time in the X/Y axis. The entire head is fed vac/blow via two lines and controlled via 8 x 3 port miniature solenoids.
>
> The hexagon block is designed to be easily machined out of aluminum and nozzles are held in place with 3 balls each that grab it with a tight grip.
>
> However, there are some features/challenges I see with having this work with OpenPNP at the moment:
>
> 2. Another challenge is taking clear pictures of components for rotation/offset. Since the camera is fixed, parts will be captured at various heights, so the only solution I can think of is to use auto-focus camera, but I'm not sure of any off the shelf cameras that can auto focus fast enough to not slow down the entire machine. (Remember, the idea is to capture parts "on the fly"). One solution could be to use the component heights stored in OpenPNP and adjust the auto-focus based on that.
> 3. Rotating the head proper distance to select next nozzle. This can perhaps be hacked and just use nozzle offsets?
>
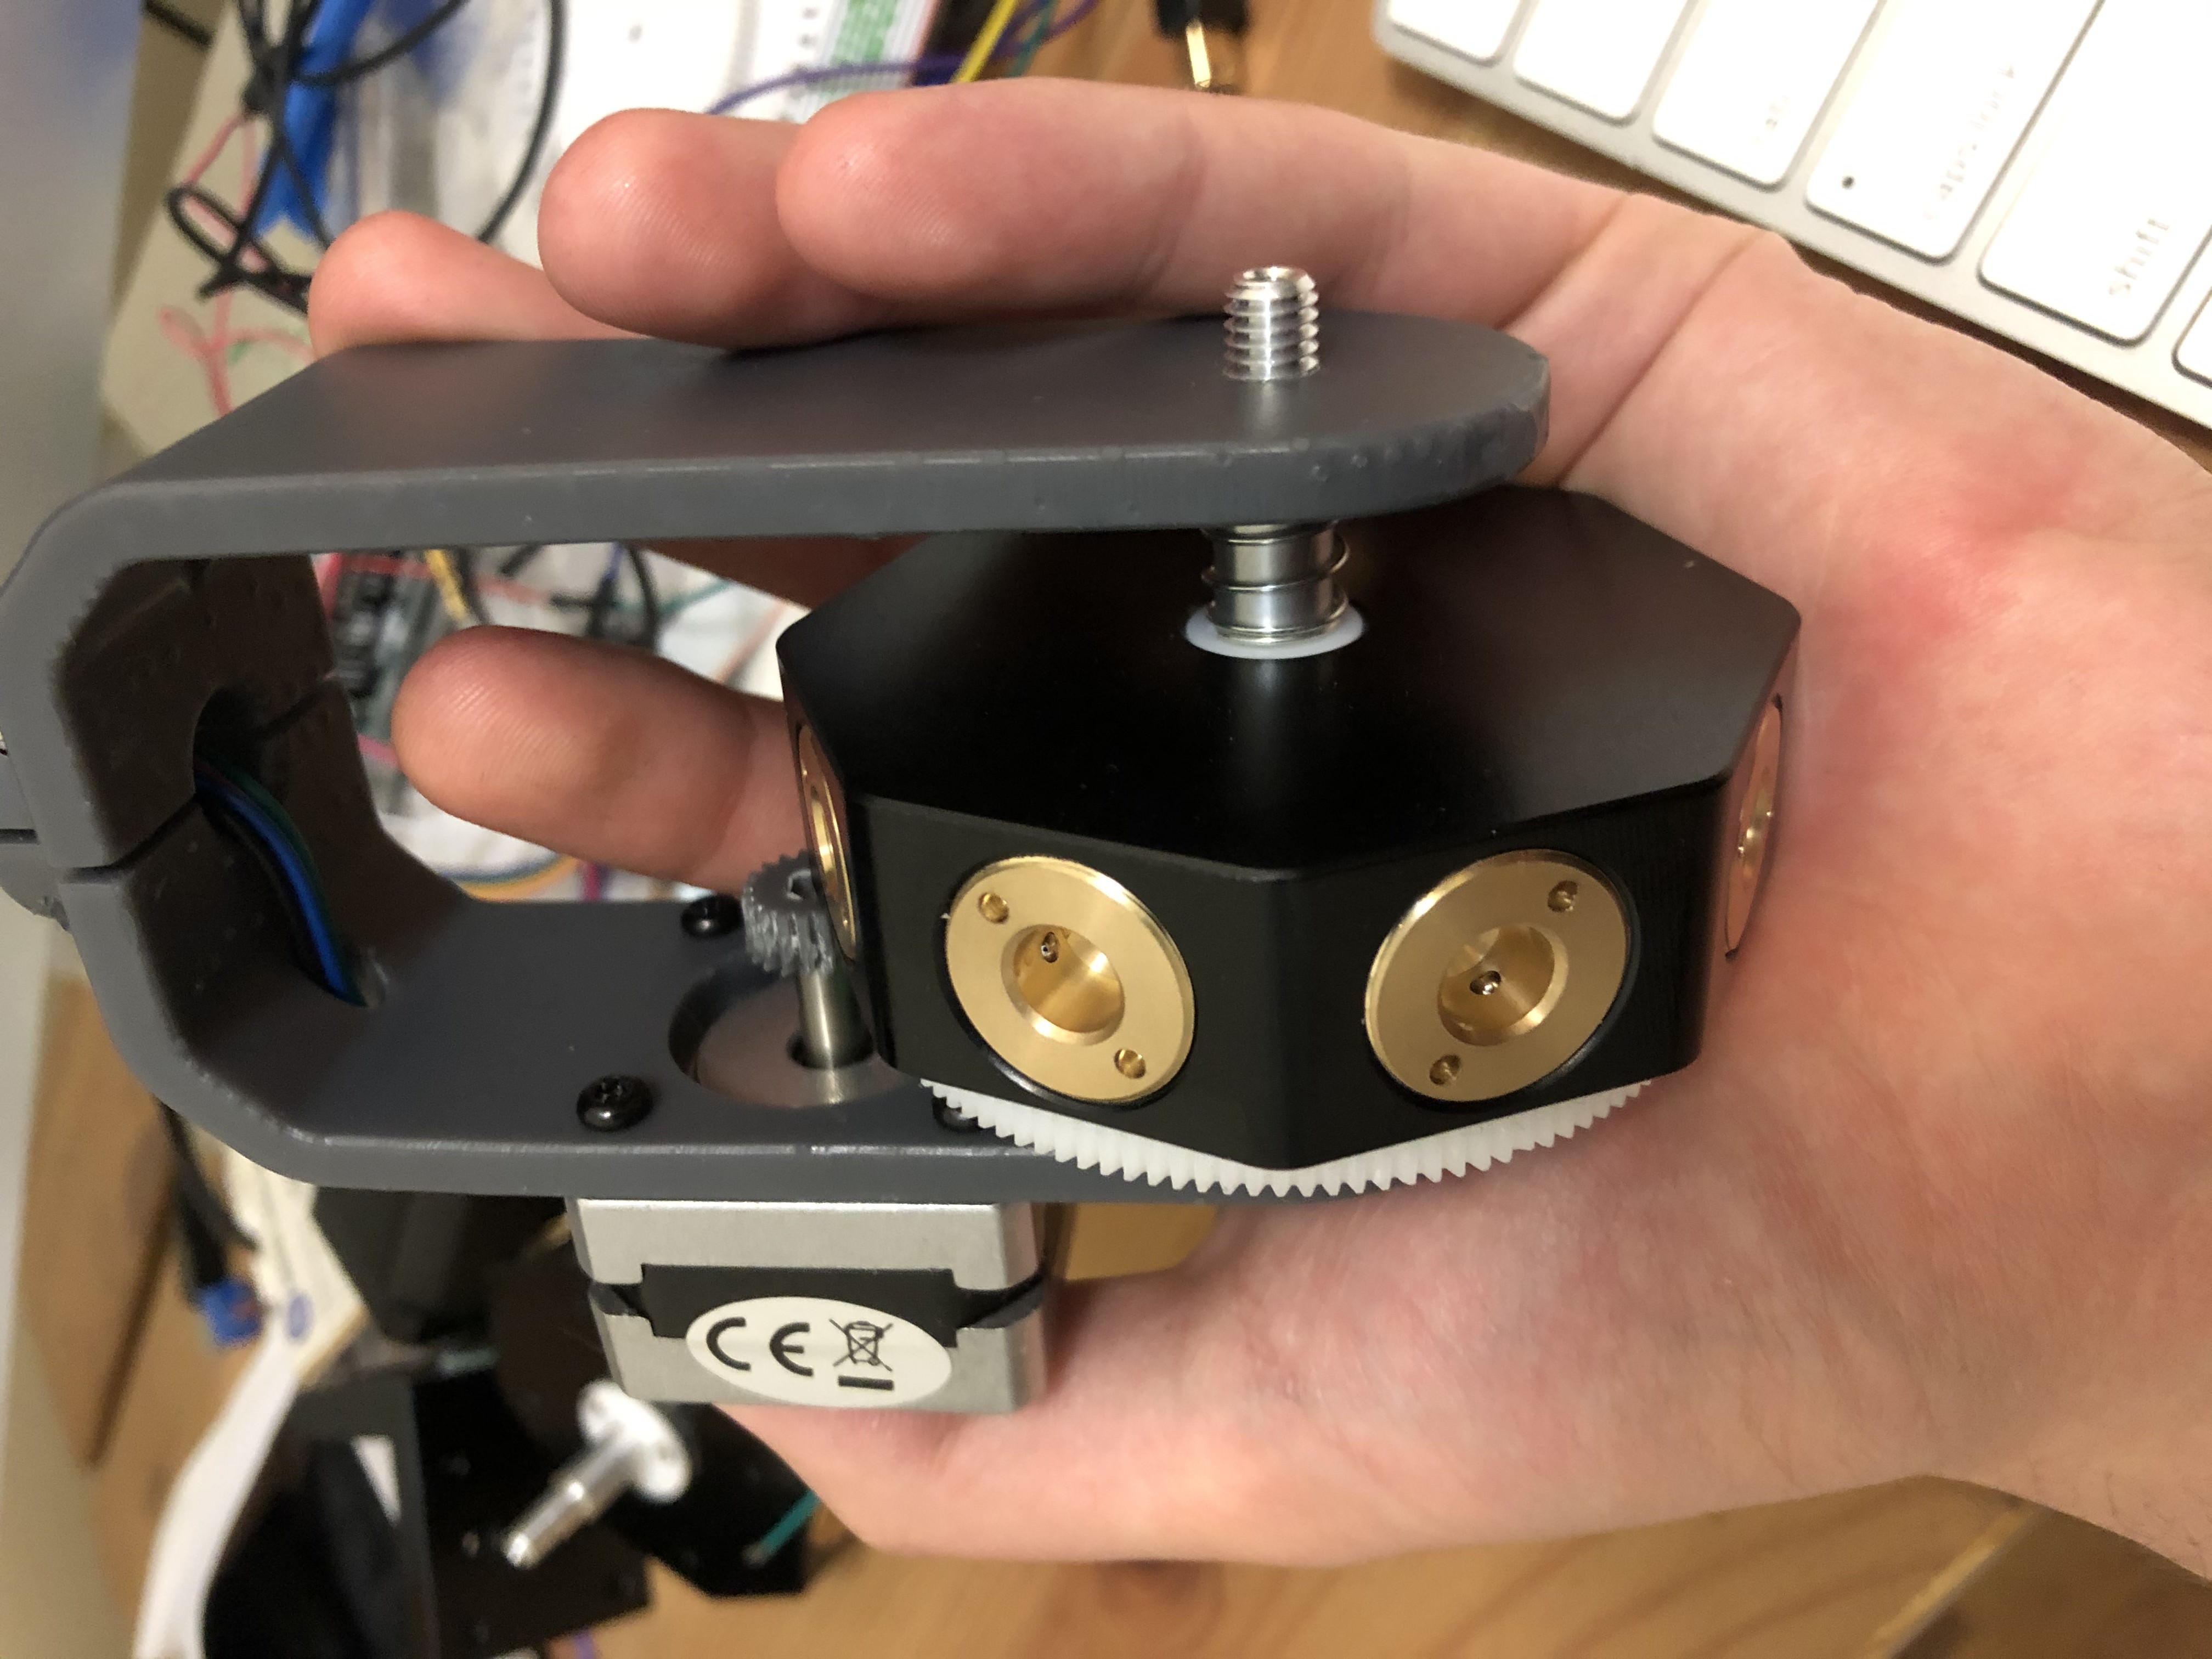
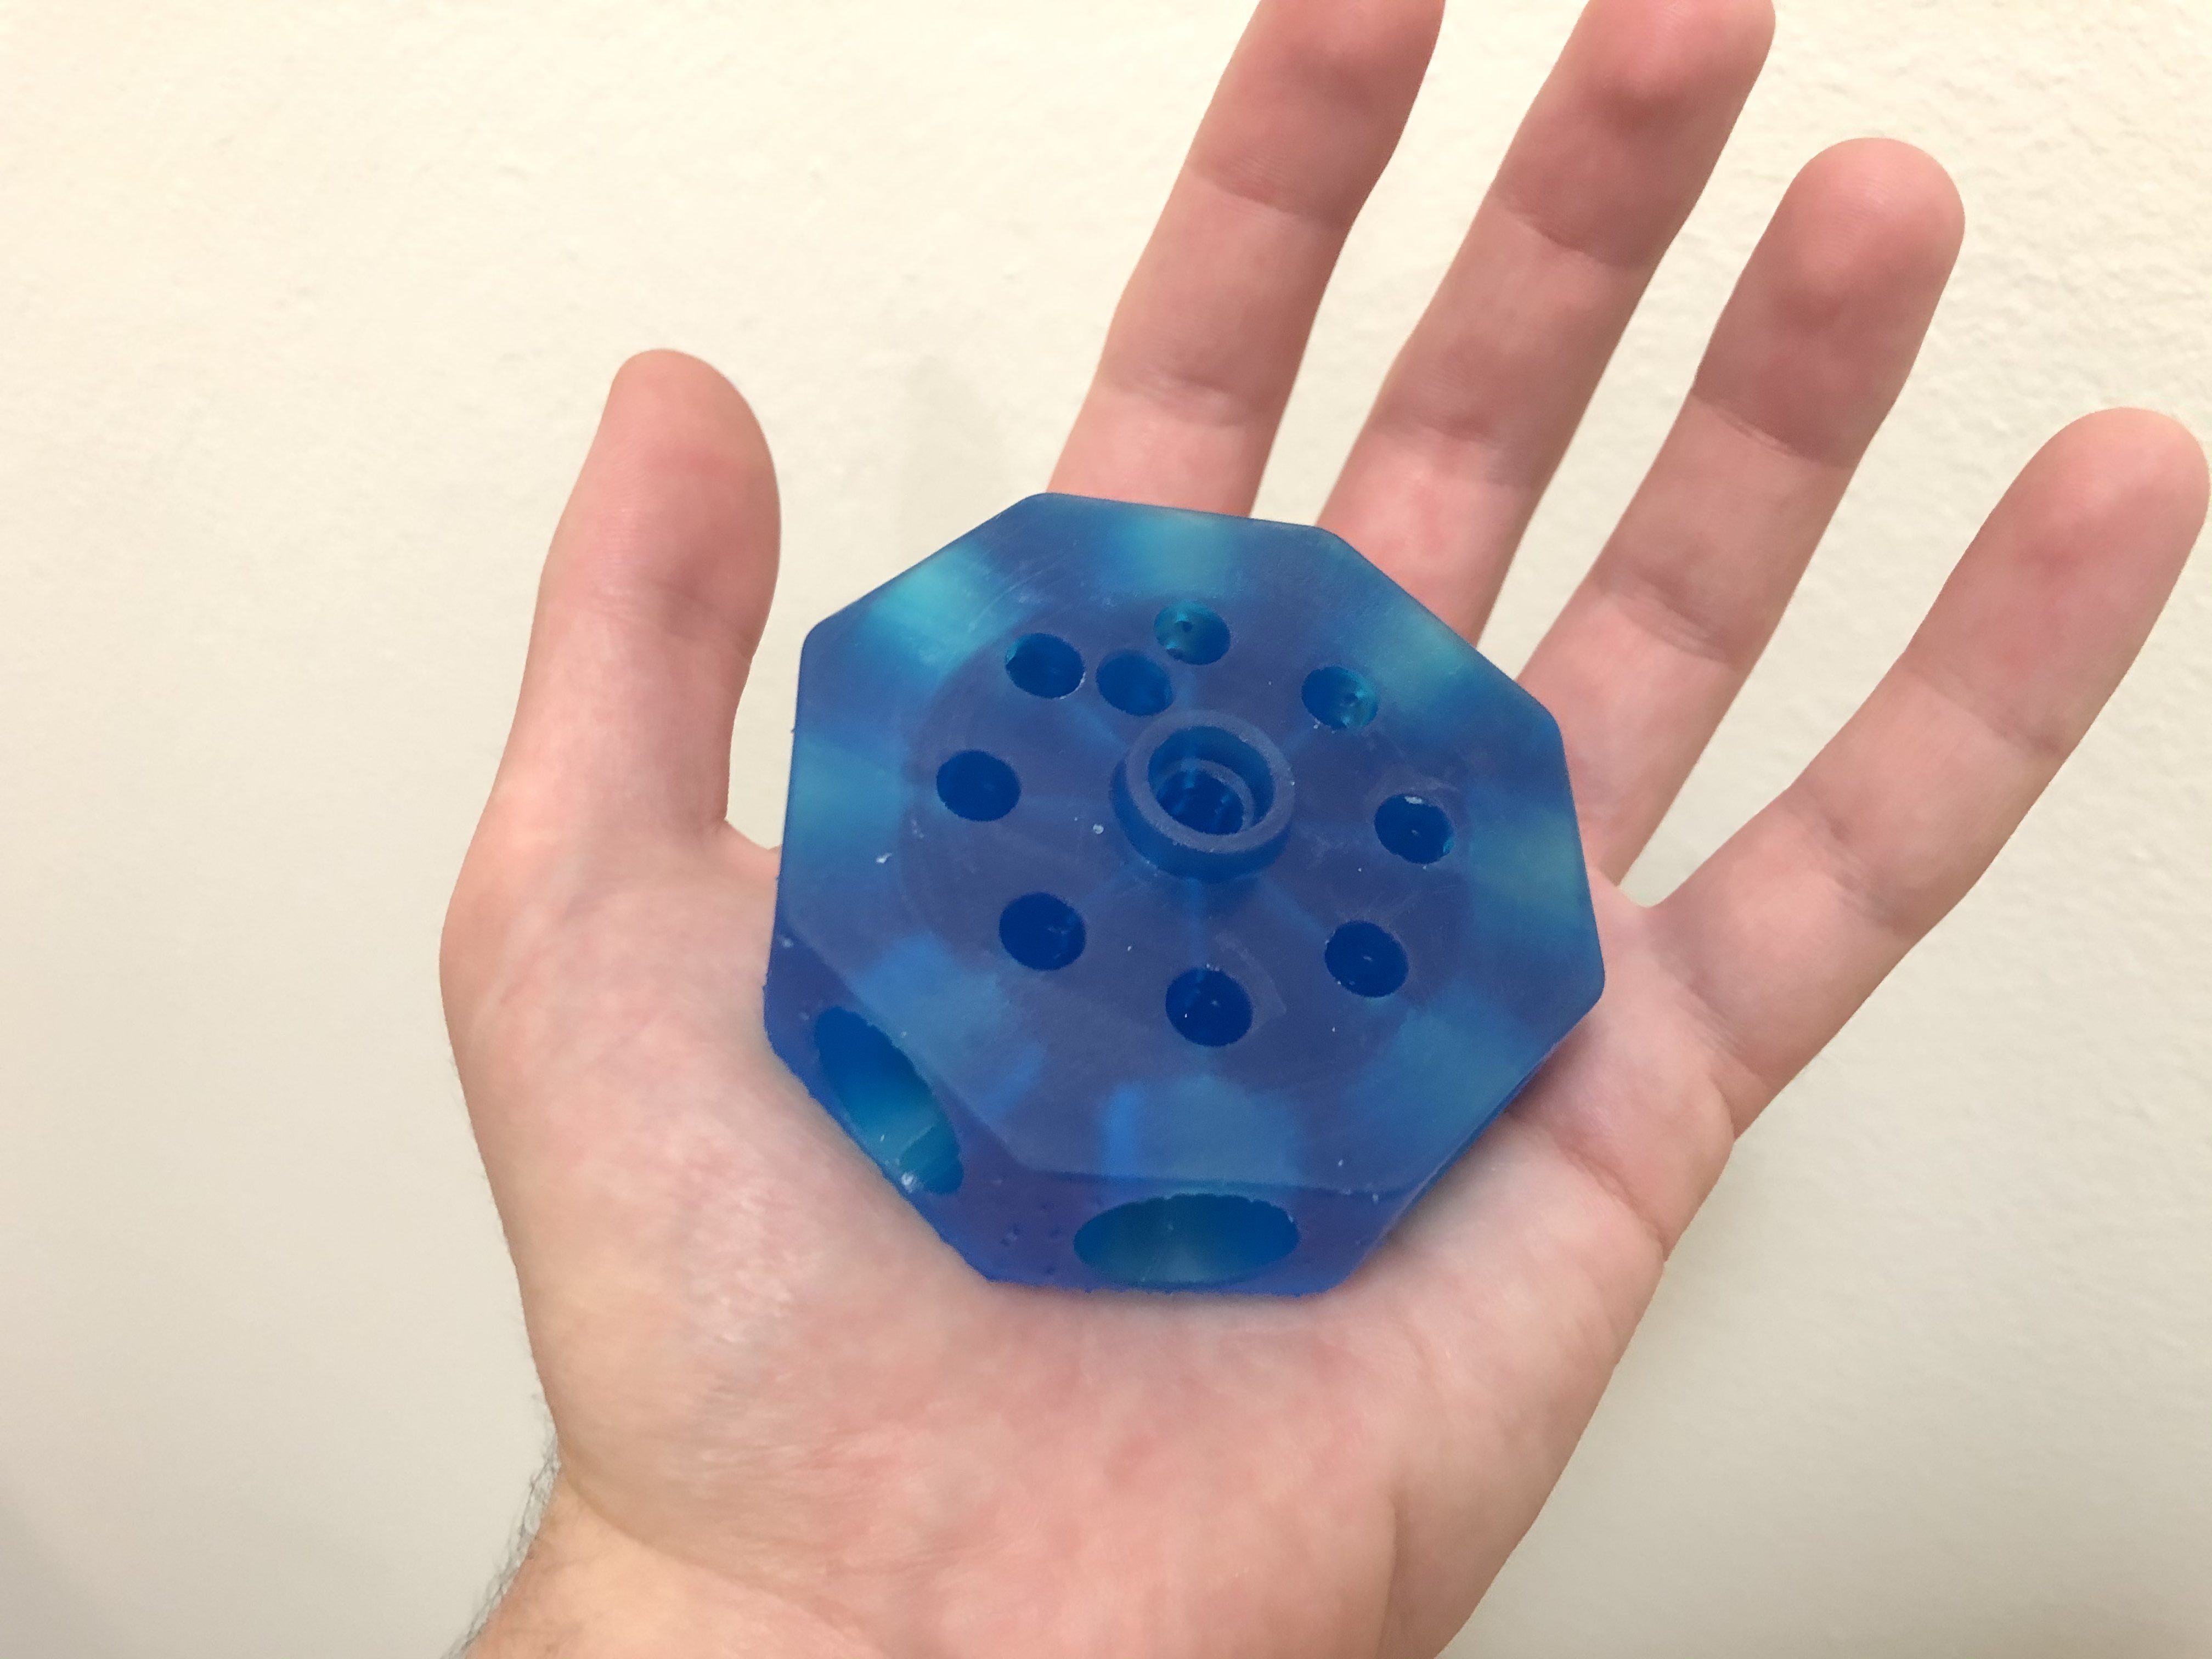
> Let me know what you think. The design is pretty much finished aside from a few tweaks and I'll be printing some parts in SLA soon to get a feel for size/weight. The overall assembly isn't that big and the hexagon can fit in your hand. If anyone wants to help code support for this into OpenPNP, that would be awesome :)
>
>
> Star Head Side View.png
>
>
> --
> You received this message because you are subscribed to the Google Groups "OpenPnP" group.
> To unsubscribe from this group and stop receiving emails from it, send an email to openpnp+u...@googlegroups.com <mailto:openpnp+u...@googlegroups.com>.
> To view this discussion on the web visit https://groups.google.com/d/msgid/openpnp/8299e777-9d4e-4135-bfb5-d13b3e82a357n%40googlegroups.com <https://groups.google.com/d/msgid/openpnp/8299e777-9d4e-4135-bfb5-d13b3e82a357n%40googlegroups.com?utm_medium=email&utm_source=footer>.
Shai

Mike Menci
Just two things
- tiny solenoids (? Link to web) are turning as well - so for 8 you would need slipring for 9 wires which I do not see in your drawing?
- how is with the vacuum to nozzles ?
I would probably rotate the star head with pulleys and GT2 belt / what do you say?
Mike
> On 15 Feb 2021, at 17.39, Shai <shai...@gmail.com> wrote:
>
> tiny solenoids
Shai
Shai


3d.m...@gmail.com
Shai
Shai

alexander...@gmail.com
Shai

Niclas Hedhman
--
You received this message because you are subscribed to the Google Groups "OpenPnP" group.
To unsubscribe from this group and stop receiving emails from it, send an email to openpnp+u...@googlegroups.com.
To view this discussion on the web visit https://groups.google.com/d/msgid/openpnp/1814d671-06ec-4c52-af05-2f914f1037b8n%40googlegroups.com.
Mike Menci
***************************Disclaimer******************
On 18 Feb 2021, at 07.49, Niclas Hedhman <nic...@hedhman.org> wrote:
To view this discussion on the web visit https://groups.google.com/d/msgid/openpnp/CADmm%2BKe6w5MuO8Yf-CbRgZKG-Zbh091%3DxL%3D6ovTh4D5HDwRRJg%40mail.gmail.com.
Mike Menci
On 18 Feb 2021, at 07.49, Niclas Hedhman <nic...@hedhman.org> wrote:
To view this discussion on the web visit https://groups.google.com/d/msgid/openpnp/CADmm%2BKe6w5MuO8Yf-CbRgZKG-Zbh091%3DxL%3D6ovTh4D5HDwRRJg%40mail.gmail.com.
Shai
Shai

ma...@makr.zone
I guess there are two goals:
- Make sure each nozzle is pointing exactly downwards (the part
is X/Y planar), when it is selected. This results in each nozzle
getting a precise star rotation (or more useful: an offset to
its nominal star rotation).
- When 1. is established, calibrate any X/Y deviation between
the nozzles. Today's nozzle tip calibration will implicitly
cover that already.
I have no idea how to calibrate 1. and how critical it is (if at
all). Just moving Z up/down and making sure the tip remains at the
same position is not a solution. This will calibrate the Z axis,
not the nozzle's true axis i.e not the part's planarity.
_Mark
--
You received this message because you are subscribed to the Google Groups "OpenPnP" group.
To unsubscribe from this group and stop receiving emails from it, send an email to openpnp+u...@googlegroups.com.
To view this discussion on the web visit https://groups.google.com/d/msgid/openpnp/f73e1aba-3128-42d0-9941-ac367cef76fdn%40googlegroups.com.
Shai

Davydavedavington
-Using a large diameter tool and wobbling the D angle (the star head angle) in front of a calibrated up facing camera and watching the warping of the nozzle tip to optimize for a circular tip. This is a bit far fetched as from what I understand detecting ovals is much harder than circles in openCV
-Shai has mentioned some kind of horizontal optical sensor that detects the tools and interpolates the center - though I realize as I write this that this would require a manual offset for the sensor itself.
ma...@makr.zone
> the camera that will travel with the head
Oh, I missed that part of your design. Forget my whole comment!
Don't read any further if you don't like Advocatus Diaboli input
>8-D
... you were warned ...
This means you can't do classical nozzle tip runout compensation
(and calibration) and also not classical multi-pass bottom vision
as you can only move the nozzle in one axis in front of the
camera.
Instead you'd need to compensate from pixel offsets alone
(one-pass). Needs very high Units per Pixel accuracy and very low
camera lens distortion.
Or you can do two multi-pass alignment phases with the part rotated in C by 90° i.e. only aligning one axis per phase (by slight star rotation). Whether this variant will in the end be faster than classical stationary vision?
Did you know the OpenPnP Job planner has no feeder co-location optimization yet? It will select eight parts from any feeder all over the machine, as long as the nozzle tip compatibility is given. And it will visit them strictly in nozzle order, not in the order the feeders are laid out. With 8 nozzles and feeders arranged around the machine, it will be zooming back and forth like crazy. And that's just the most obvious part of what is missing. For efficient 8 nozzle operation you'd also need a nozzle tip loading optimization: The worst thing to do is loading your 8 nozzles with all your mixed nozzle tips (and think you can avoid the changer). This would even increase the crazy zooming, as the OpenPnP planner will always try to fill all 8 nozzles regardless of even the most punishing detour. What you'd need is a smart nozzle tip loading planner. Ideally it would load 8 times the same nozzle tip and the pick (harvest!) those countless 0.1µF caps in one fell swoop. Gatling gun style... and once the small parts are mostly placed it would have to start leaving nozzles empty, smartly, because the detour is too costly. Oh, and then you need feeder arrangement optimization...Sorry about that... O:-}
This design is certainly full of very, very steep challenges...
_m
To view this discussion on the web visit https://groups.google.com/d/msgid/openpnp/677ad9ea-f408-4c4c-bcc2-063e2772affbn%40googlegroups.com.
Shai
Clemens Koller
> https://www.ebay.com/itm/300Rpm-Capsule-Electric-Slip-Ring-robotics-10-Circuits-Wires-21-8mm-2A-AC-240V-/324084004404?_trksid=p2349624.m46890.l49292
Really low cost! But they seem to be very brave, writing 240V/2A on it. *Gosh* ;-)
Clemens
On 18/02/2021 13.44, Mike Menci wrote:
> Low cost slip-ring 400rpm for example from here;
>
> https://www.ebay.com/itm/300Rpm-Capsule-Electric-Slip-Ring-robotics-10-Circuits-Wires-21-8mm-2A-AC-240V-/324084004404?_trksid=p2349624.m46890.l49292
> Perhaps vacuum line could run in the center...
>
> But there is probably one more slip ring needed if the whole head is turning around Z axis as well (could be limited to 355deg...)
>
> And if camera is on side like in the drawing -rotation is not possible in the camera axis... , so bottom up camera would do but the tolerances for fabrication of star-head would need to be very high or you have runout on around 6 nozzle(s) / Z axe.
> My 5 cents ?
> Mike
>
> ***************************Disclaimer******************
>
>
>> On 18 Feb 2021, at 07.49, Niclas Hedhman <nic...@hedhman.org> wrote:
>>
>>
>>
>> I don't think I have seen an answer on how to get the electricity across to 8 solenoids. Just wires flapping in the breeze? I am not convinced that is going to work reliably in the long run, but I am a very skeptical person...to everything. ;-)
>>
>> Niclas
>>
>>
>> Thanks Alex, this is indeed a very interesting design. It solves a lot of things, while creating new challenges as well :)
>>
>> You can 3D print the rest of the setup such as the U clamp that holds the star axle, etc. Let me know! Just note, the solenoids are not cheap and cost about $450 for 8 of them.
>>
>>
>> Hi Shai.
>>
>> I am conscious that you have not had much feedback so wanted to assure you that at least some of us (me) are finding your thread very interesting to follow... even if I haven't had anything to contribute... I don't have the engineering experience to have been able to look at your static image and understand how you were keeping air supplied to the 8 solenoids while they were rotating... being able to play with the STEP file and strip back the star to see what's going on inside made it much clearer and was likely very obvious to others in hindsight!
>>
>> I look forward to seeing how you progress with this!
>>
>> Good luck.
>>
>> Alex
>>
>> On Wednesday, February 17, 2021 at 3:48:38 AM UTC Shai wrote:
>>
>> Here's how small the hexagon wheel is.
>>
>>
>> --
>> You received this message because you are subscribed to the Google Groups "OpenPnP" group.
>> To view this discussion on the web visit https://groups.google.com/d/msgid/openpnp/1814d671-06ec-4c52-af05-2f914f1037b8n%40googlegroups.com <https://groups.google.com/d/msgid/openpnp/1814d671-06ec-4c52-af05-2f914f1037b8n%40googlegroups.com?utm_medium=email&utm_source=footer>.
>> --
>> You received this message because you are subscribed to the Google Groups "OpenPnP" group.
>> To view this discussion on the web visit https://groups.google.com/d/msgid/openpnp/CADmm%2BKe6w5MuO8Yf-CbRgZKG-Zbh091%3DxL%3D6ovTh4D5HDwRRJg%40mail.gmail.com <https://groups.google.com/d/msgid/openpnp/CADmm%2BKe6w5MuO8Yf-CbRgZKG-Zbh091%3DxL%3D6ovTh4D5HDwRRJg%40mail.gmail.com?utm_medium=email&utm_source=footer>.
> --
> You received this message because you are subscribed to the Google Groups "OpenPnP" group.
> To view this discussion on the web visit https://groups.google.com/d/msgid/openpnp/65164ED5-AE6C-4E3D-925E-9C9AFAA9F3CE%40gmail.com <https://groups.google.com/d/msgid/openpnp/65164ED5-AE6C-4E3D-925E-9C9AFAA9F3CE%40gmail.com?utm_medium=email&utm_source=footer>.
Davydavedavington
> the camera that will travel with the head
Oh, I missed that part of your design. Forget my whole comment!
Don't read any further if you don't like Advocatus Diaboli input >8-D
... you were warned ...
This means you can't do classical nozzle tip runout compensation (and calibration) and also not classical multi-pass bottom vision as you can only move the nozzle in one axis in front of the camera.
- I can get a nice calibration of the D axis with offsets for each tool to get the tools perpendicular to the up and side cameras
- Use that to get offsets to determine where the nozzle tip should be in the view frame because there will be a part blocking it during part alignment (I suppose I could do a peek and look at the calibrated nozzle tip with the side camera beforehand it has a part idk)
Did you know the OpenPnP Job planner has no feeder co-location optimization yet? It will select eight parts from any feeder all over the machine, as long as the nozzle tip compatibility is given. And it will visit them strictly in nozzle order, not in the order the feeders are laid out. With 8 nozzles and feeders arranged around the machine, it will be zooming back and forth like crazy. And that's just the most obvious part of what is missing. For efficient 8 nozzle operation you'd also need a nozzle tip loading optimization: The worst thing to do is loading your 8 nozzles with all your mixed nozzle tips (and think you can avoid the changer).
This would even increase the crazy zooming, as the OpenPnP planner will always try to fill all 8 nozzles regardless of even the most punishing detour. What you'd need is a smart nozzle tip loading planner. Ideally it would load 8 times the same nozzle tip and the pick (harvest!) those countless 0.1µF caps in one fell swoop. Gatling gun style... and once the small parts are mostly placed it would have to start leaving nozzles empty, smartly, because the detour is too costly.
Oh, and then you need feeder arrangement optimization...
Sorry about that... O:-}
This design is certainly full of very, very steep challenges...
_m
ma...@makr.zone
> Do the opportunities of a star design out weight the challenges? ;)
I don't know. If you are ready to tackle all the aspects and IMHO
most importantly the planner, then it could well be. :-)
Personally I would choose a completely different approach (ganged pick/ganged alignment), but that's not what you asked...
_Mark
To view this discussion on the web visit https://groups.google.com/d/msgid/openpnp/b1143bc5-d17a-4555-a23d-959022a3fc0fn%40googlegroups.com.
ma...@makr.zone
Answers inline>>
Hi Mark!Some background: I'm also building a 4 nozzle star head and sharing ideas with Shai. I'm working on the openpnp modifications to try to get these things up and running lol. Just trying to unpack your post to better understand if I'm approaching them from the right angle. In this I refer to the rotation axes as C - the traditional nozzle rotation, D - the star rotation
OK.
On Thursday, 18 February 2021 at 15:02:35 UTC-5 ma...@makr.zone wrote:
> the camera that will travel with the head
Oh, I missed that part of your design. Forget my whole comment!
Don't read any further if you don't like Advocatus Diaboli input >8-D
... you were warned ...
This means you can't do classical nozzle tip runout compensation (and calibration) and also not classical multi-pass bottom vision as you can only move the nozzle in one axis in front of the camera.
Are you referring to doing these using the head mounted side camera? I think Shai meant to say that the side facing camera would be coupled to the X/Y of the of the gantry but not angles C/D. I think regardless, an up facing camera is still necessary to do the initial nozzle tip runout for our sanity
That is of course possible. But see below.
and then only using the side camera for component alignment (which would be the common case anyways). I think theoretically I can map component offsets from the side camera to runout offsets taken from the up camera provided that:
- I can get a nice calibration of the D axis with offsets for each tool to get the tools perpendicular to the up and side cameras
- Use that to get offsets to determine where the nozzle tip should be in the view frame because there will be a part blocking it during part alignment (I suppose I could do a peek and look at the calibrated nozzle tip with the side camera beforehand it has a part idk)
Strictly speaking, runout-compensation is not needed, provided...
- You align all your parts (which can make sense with
the side facing camera). When the part is aligned with
pre-rotate, then nozzle tip runout is irrelevant i.e. it
will be compensated out together with the part offsets.
- Your nozzle tip runout is small enough so you don't need to
compensate it for other "mechanical" nozzle tip actions (tool
changer etc.). Not so on my machine ;-)
But: alignment (your point 2) still needs to be entirely
pixel based, i.e. you take a camera image and calculate the
physical offsets purely from the apparent pixel offsets. For
contrast: in multi-pass alignment the machine centers the part in
the camera again (and again) to make it symmetric in the camera
view, so you can cancel out any scaling/Units per Pixel, focal
plane (camera distance) errors, lens distortions, or parallax
effects for parts with real pins i.e. pins that are not flat on
the focal plane, and more importantly their angular reflection of
the diffusor light, plus any other asymmetric lighting effects
(etc.).
I say this, because I introduced adaptive multi-pass vision and
at least in my experiments, this was essential to get adequate
results for the semi-large 0.5mm pitch ICs I used:
https://makr.zone/extending-bottom-vision-in-openpnp/341/
Having said that: you could only use the side facing camera for
the many small parts and do the few large
buggers on the classical bottom camera.
What I ultimately want to say is that you need to be ready to implement many extensions to how OpenPnP works today. Including the possibility to use multiple alignment cameras in the first place. Be sure to read about our plans to rework the vision system, before you do anything
https://groups.google.com/g/openpnp/c/7DeSdX4cFUE/m/VYDG6x6-AAAJ.
Did you know the OpenPnP Job planner has no feeder co-location optimization yet? It will select eight parts from any feeder all over the machine, as long as the nozzle tip compatibility is given. And it will visit them strictly in nozzle order, not in the order the feeders are laid out. With 8 nozzles and feeders arranged around the machine, it will be zooming back and forth like crazy. And that's just the most obvious part of what is missing. For efficient 8 nozzle operation you'd also need a nozzle tip loading optimization: The worst thing to do is loading your 8 nozzles with all your mixed nozzle tips (and think you can avoid the changer).This would even increase the crazy zooming, as the OpenPnP planner will always try to fill all 8 nozzles regardless of even the most punishing detour. What you'd need is a smart nozzle tip loading planner. Ideally it would load 8 times the same nozzle tip and the pick (harvest!) those countless 0.1µF caps in one fell swoop. Gatling gun style... and once the small parts are mostly placed it would have to start leaving nozzles empty, smartly, because the detour is too costly.
Yes :(But I'm a big fan of the job step architecture that I was looking at while writing this :D.
It has (almost) nothing to do with the step architecture. As you
have already noticed, it is the PnpJobPlanner that you need to
look at.
What would need to change is the order in which the nozzles pick, align and place inside the steps. Currently there is only one order and it is fixed (sorted by nozzle name):
I guess my initial goal is to override PnpJobPlanner to proactively plan nozzle changes from small to large size and reorder the parts small to large (using compatible tip info) to reduce unused nozzles during moves (I guess I'll need to extend ReferenceNozzleTip with an approximate configurable nozzle tip size to be able to actually sort these). I think can get pretty good usage if each part has 2 compatible tips and the head slowly transitions to bigger and bigger tips.
For an efficient 8 nozzle machine, I believe you'd need much more
than that. You would need to take the feeder pick locations into
consideration. Group picks together by feeders that are close to
each other (including picking multiple nozzles from the same
feeder).
A first approximation could be:
- Make groups of parts/feeders based on Nozzle Tip
compatibility. Could be sub-grouped by Alignment camera
(none/bottom/side).
- Per (sub) group devise a nozzle tip strategy based on the
number of parts to be placed in the group. If you have many,
many parts, load the same nozzle tips multiple times (you must
have that on a 8 nozzle machine, IMHO).
- Within the group and nozzle tip assignment: fill the
compatible feeder pick locations into the TravellingSalesman
algorithm I introduced a while back:
https://github.com/openpnp/openpnp/blob/develop/src/main/java/org/openpnp/util/TravellingSalesman.java - Then form the placements (as the planner does today) but from
the above input order .
- Make the planner (much!) less greedy,
to avoid silly detours done just to fill an unused nozzle.
Basically: do not swallow the bait, if the next feeder
is farther away (from the other picks already assigned) than the
PCB (or than the bottom camera, if Alignment is employed).
Oh, and then you need feeder arrangement optimization...I suppose a long term goal would be to build a map of the feeder pick locations and travelling salesman it but I've been out of school for a while and forget my algos :(.
I'm quite sure I'm longer out of school. :-)
See above.
I have a Europlacer at my work like Shai posted here and the dumb planner tells me it wants me to spend 15 minutes taking out 20 common resistor feeders and move them like 5 positions to the right because it thinks the program will run 5 seconds faster... then I have to re digitize the pick locations because I moved them...so I'm not a fan of basic arrangement optimization lol :p. Continuous multi-job feeder arrangement planning is where its at but nope my boss didn't want to buy that module.
I agree there are trade-offs to be considered. And feeder
location optimization certainly comes a long way after the above.
Frankly, a 8 nozzle machine will only make sense a) for the sheer
fun of the challenge or b) if you place many, many boards
(hundreds, thousands). Then 15 minutes one-time prep might not
sound so bad after all. ;-)
Sorry about that... O:-}
This design is certainly full of very, very steep challenges...
Heh it sounds like fun
It does!
_m
--
You received this message because you are subscribed to the Google Groups "OpenPnP" group.
To unsubscribe from this group and stop receiving emails from it, send an email to openpnp+u...@googlegroups.com.
To view this discussion on the web visit https://groups.google.com/d/msgid/openpnp/9c42539b-014d-44cd-a113-4300bf5c17afn%40googlegroups.com.

Rizki Walker
--
You received this message because you are subscribed to the Google Groups "OpenPnP" group.
To unsubscribe from this group and stop receiving emails from it, send an email to openpnp+u...@googlegroups.com.
To view this discussion on the web visit https://groups.google.com/d/msgid/openpnp/f73e1aba-3128-42d0-9941-ac367cef76fdn%40googlegroups.com.
Davydavedavington


Y S
Maybe can cut costs further down
Best Regards
Shai
ma...@makr.zone
Looks really nice!
All the vacuum switchery is inside there? And how are all the connections (vacuum/electric) going in there? (I haven't followed all the discussion before and this might already haven been mentioned, sorry)
_Mark
To view this discussion on the web visit https://groups.google.com/d/msgid/openpnp/16f36b6d-c202-4125-9684-2f387365cca2n%40googlegroups.com.

sebastian...@gmail.com
Shai
Shai