Loose Part Pickup Pipeline and IC Pickup
490 views
Skip to first unread message

John Lettang
Aug 17, 2022, 11:57:22 AM8/17/22
to OpenPnP
Hi All,
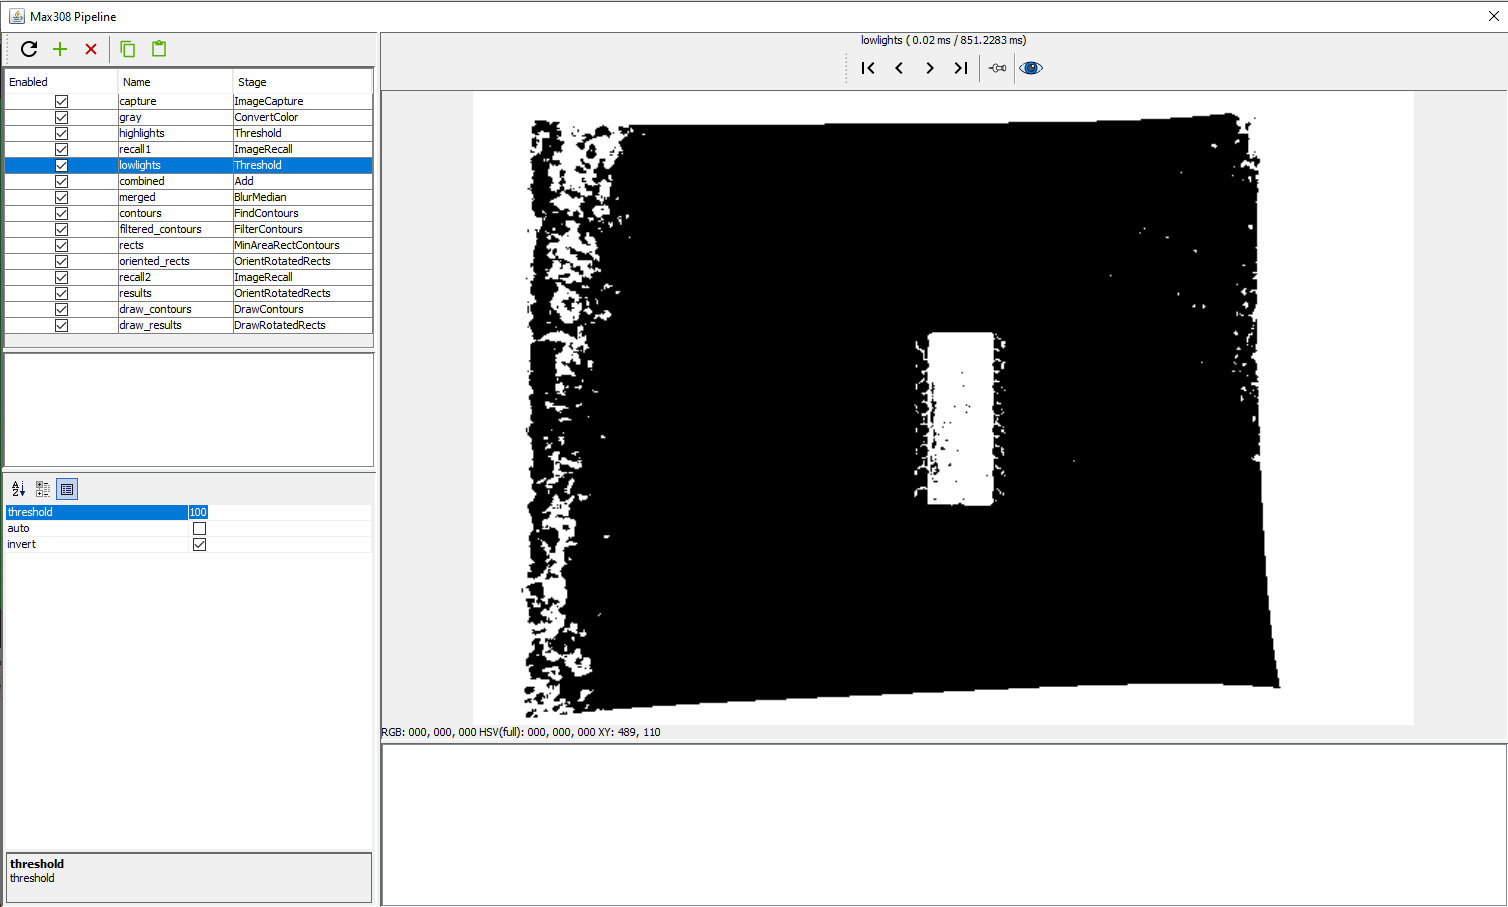
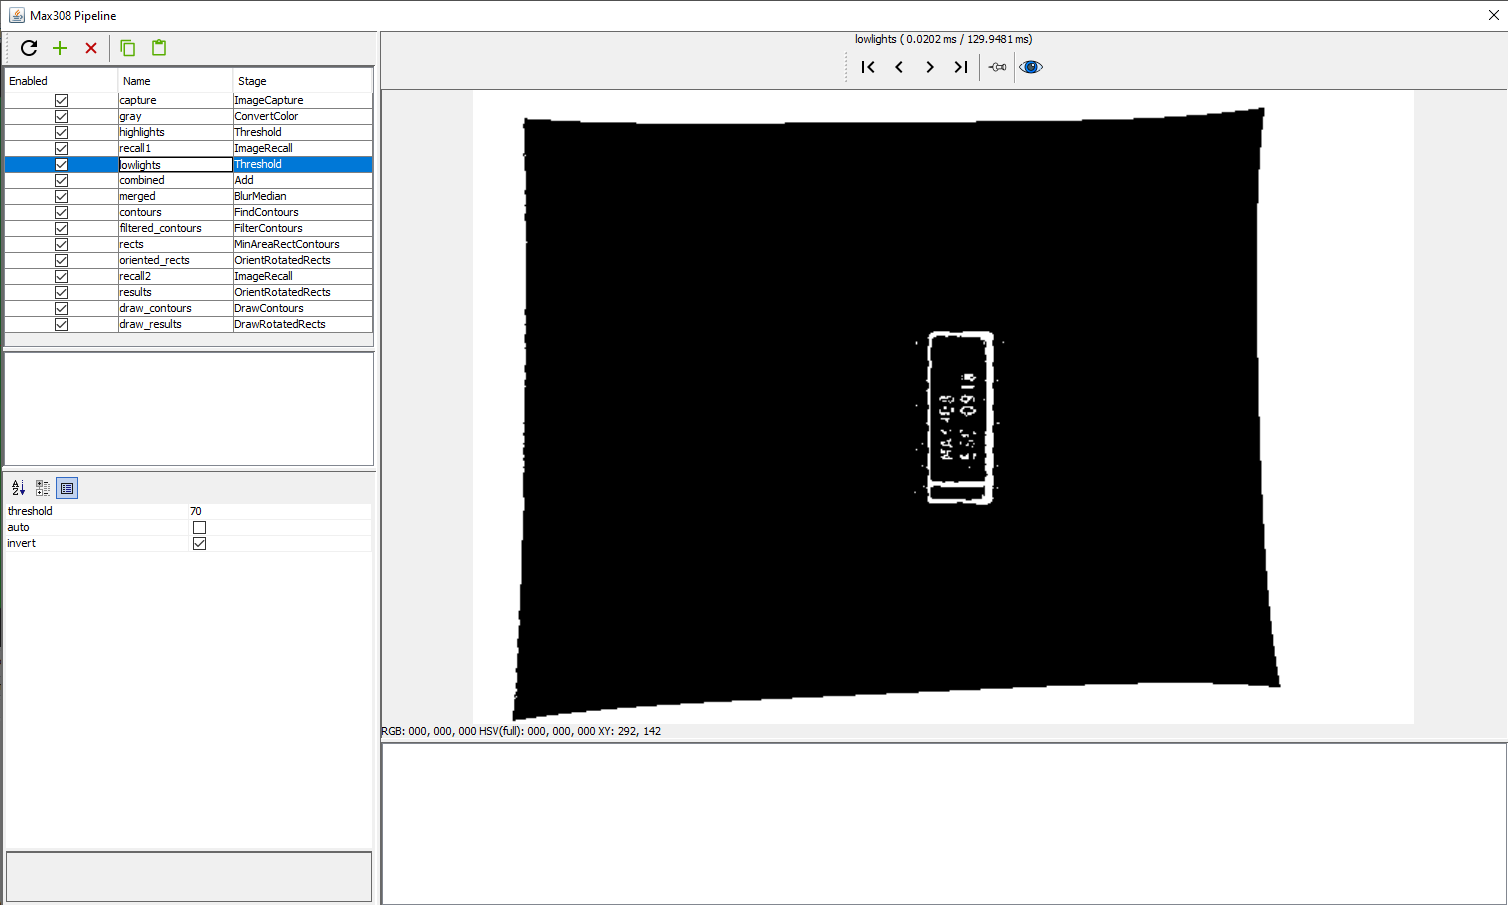
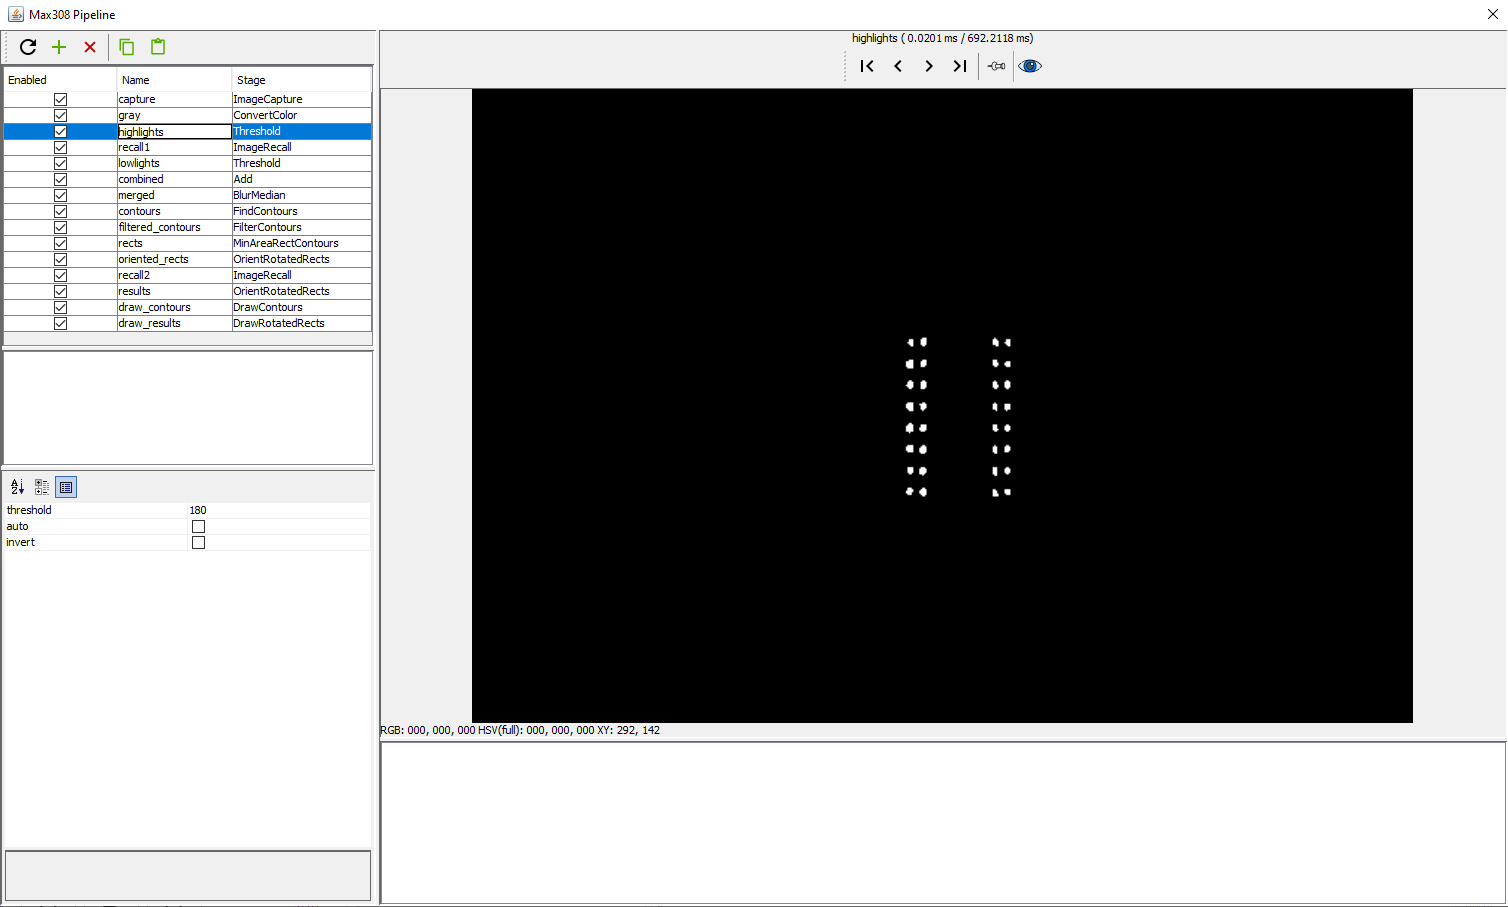
Right now I am struggling a bit with the loosepartpickup pipeline. I have a pretty dark background (dark green construction paper) however I am not getting the threshold to work. I would be curious about adding a cropping feature in order to limit the darker outside of the picture but I was wondering if that would make it so the area that would get picked up would also be more limited.
My understanding is that this algorithm draws a rectangle around the overlap area but i am not getting anything as the final result. The highlight result looks good but I am having issues with the lowlight.
On a secondary note, I was wondering if anyone had a recommended way that they feed IC's other than loose part pickup. Perhaps a 3D printed tray feeder or something. I would love to get some ideas.
Thanks again all,
John

mark maker
Aug 17, 2022, 12:21:35 PM8/17/22
to ope...@googlegroups.com
Hi John,
- First I recommend setting the slider on Advanced Camera
Calibration to Crop All Invalid Pixels.

- Then go to the feeder with the camera. Ideally put multiple
ICs there.
- Double click the camera view, it should flash.
- Then send the snapshot from your $HOME/.openpnp2/snapshots/
directory.
- Also tell me your camera's Units per Pixel.
I will try to make a pipeline. No promises.
_Mark
--
You received this message because you are subscribed to the Google Groups "OpenPnP" group.
To unsubscribe from this group and stop receiving emails from it, send an email to openpnp+u...@googlegroups.com.
To view this discussion on the web visit https://groups.google.com/d/msgid/openpnp/886f8425-657f-4b19-b3d8-e3159deddc30n%40googlegroups.com.

Blowtorch
Aug 18, 2022, 4:55:25 AM8/18/22
to OpenPnP
Hi John

I made a simple tray out of 3mm black acrylic which I cut with an LED laser. It works very well, and is dead simple to set up in OpenPnP. Vision is not used for picking so it is super fast. When I designed it I ensured the pocket spacing was a easy increment, which then was input to openpnp. Pic attached. The tray with the bigger pockets are for 20 pin SSOP , the smaller is for 8 pin SOIC. Loading the tray from tubes is dead simple. I put the end of the tube into the furthest pocket, then tap the tube (manual vibration feeder !). The IC slide forward into the pocket, as I withdraw the tube. I fill a 50 cavity in this manner very quickly.
I still thought I may bevel the edges to ensure each IC slides into place easily, but honestly it is so quick to fill I will probably leave as is. So far I have picked around 200 parts from this, with no miss picks. Happy to email you the lightburn files if you want them.
It looks rather shabby, but what I did was cut a bunch of identical MDF blocks, all with identical locating holes and a corresponding 4mm steel pin. This way, I mount feeders etc on the MDF (superglue), and can easily swap out the whole block. When I create the feeders in openpnp, I prefix them with the block number, so there is no setup required when changing blocks other than to enable the correct feeder.

Ravi Ganesh
Aug 20, 2022, 11:28:59 AM8/20/22
to OpenPnP
Cool Stuff. I too use laser cut acrylic for feeders. But getting it done from the vendor is very tedious and delayed.
What laser diode are you using? Can you share some insight into your laser cutter.
Ravi

Noël
Aug 20, 2022, 5:43:37 PM8/20/22
to OpenPnP
Ravi,
I used to struggle a lot with the default pipeline for loose part feeder and never managed to get anywhere with it.
Until I decided to build my own pipeline. It is here below. It is a lot easier to setup and more importantly it does work.
Most things to adjust are the mask rectangle / the threshold / the min and max area. With that you should have enough to get your parts detected.
I hope this can be useful to anyone else.
<cv-pipeline>
<stages>
<cv-stage class="org.openpnp.vision.pipeline.stages.ImageCapture" name="0" enabled="true" default-light="true" settle-first="false" count="1"/>
<cv-stage class="org.openpnp.vision.pipeline.stages.MaskRectangle" name="1" enabled="true" width="700" height="850"/>
<cv-stage class="org.openpnp.vision.pipeline.stages.ConvertColor" name="2" enabled="true" conversion="Bgr2Gray"/>
<cv-stage class="org.openpnp.vision.pipeline.stages.BlurGaussian" name="7" enabled="true" kernel-size="9" property-name="BlurGaussian"/>
<cv-stage class="org.openpnp.vision.pipeline.stages.Threshold" name="3" enabled="true" threshold="125" auto="false" invert="false"/>
<cv-stage class="org.openpnp.vision.pipeline.stages.FindContours" name="4" enabled="true" retrieval-mode="List" approximation-method="None"/>
<cv-stage class="org.openpnp.vision.pipeline.stages.FilterContours" name="6" enabled="true" contours-stage-name="4" min-area="300.0" max-area="5000.0" property-name="FilterContours"/>
<cv-stage class="org.openpnp.vision.pipeline.stages.MinAreaRectContours" name="9" enabled="true" contours-stage-name="6"/>
<cv-stage class="org.openpnp.vision.pipeline.stages.OrientRotatedRects" name="results" enabled="true" rotated-rects-stage-name="9" orientation="Landscape" negate-angle="true" snap-angle="0"/>
<cv-stage class="org.openpnp.vision.pipeline.stages.ImageRecall" name="8" enabled="true" image-stage-name="0"/>
<cv-stage class="org.openpnp.vision.pipeline.stages.DrawContours" name="draw_results" enabled="true" contours-stage-name="6" thickness="2" index="-1">
<color r="255" g="0" b="51" a="255"/>
</cv-stage>
</stages>
</cv-pipeline>
John Lettang
Aug 26, 2022, 4:55:55 PM8/26/22
to OpenPnP
Hi All,
Apologies for the late response, I have school now so I don't have quite as much time to work on the pick and place.
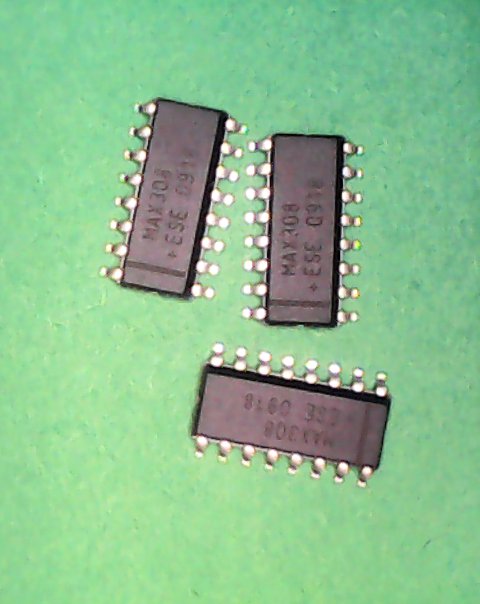
Mark and Noel - I have the following pictures below with all of the needed information. I don't have a ton of experience with the computer vision side of things but I have messed around with the pipeline settings on the openpnp pipeline as well as the one that Ravi has suggested with no avail. Any help/advice with the pipeline or even just my set up would be suggested. And if I should get a different camera or something as well, that is also something I can look into.
Blowtorch - Your Acrylic feeders look great and you seem to have a very good way of setting them up. At the moment I am more looking for 3D printed options as that is what is most easily available to me. In fact right now I am working on getting Mark's pushpull feeder up and running (which currently, I am having some issues with the lever bending after a few uses if there are any suggestions).
But I think I will try to go ahead and make a 3D model of a similar setup. Perhaps messing with some slanted slots as to allow flexibility for what ICs can be loaded and also allow each IC to be well centered. Either way I think seeing your acrylic tray is a great example of what's possible.
But I think I will try to go ahead and make a 3D model of a similar setup. Perhaps messing with some slanted slots as to allow flexibility for what ICs can be loaded and also allow each IC to be well centered. Either way I think seeing your acrylic tray is a great example of what's possible.
Best,
John
mark maker
Aug 27, 2022, 4:35:46 AM8/27/22
to ope...@googlegroups.com
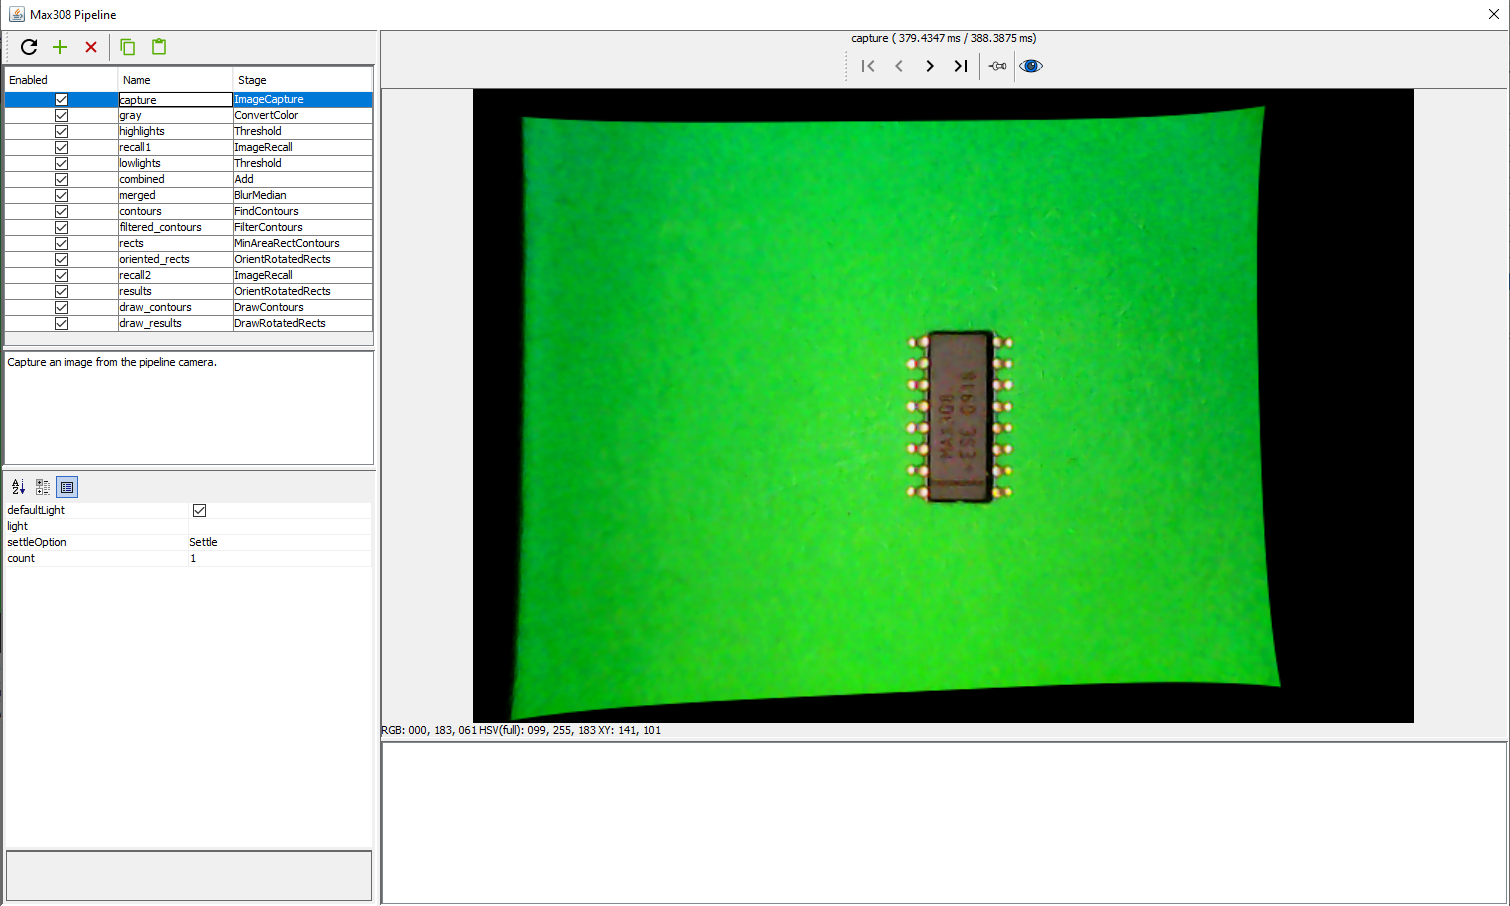
Hi John
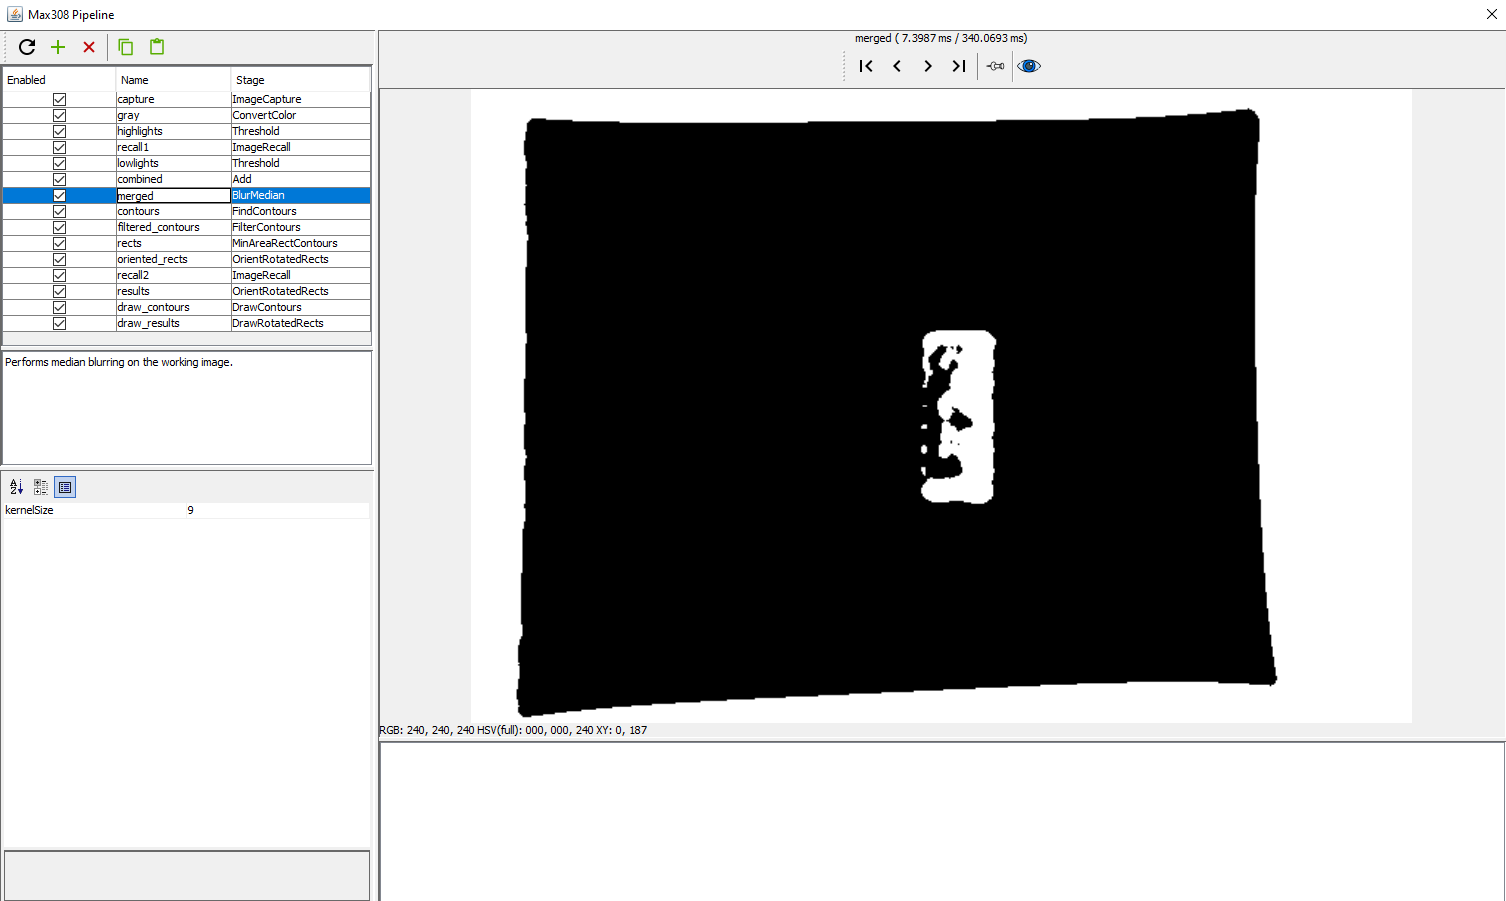
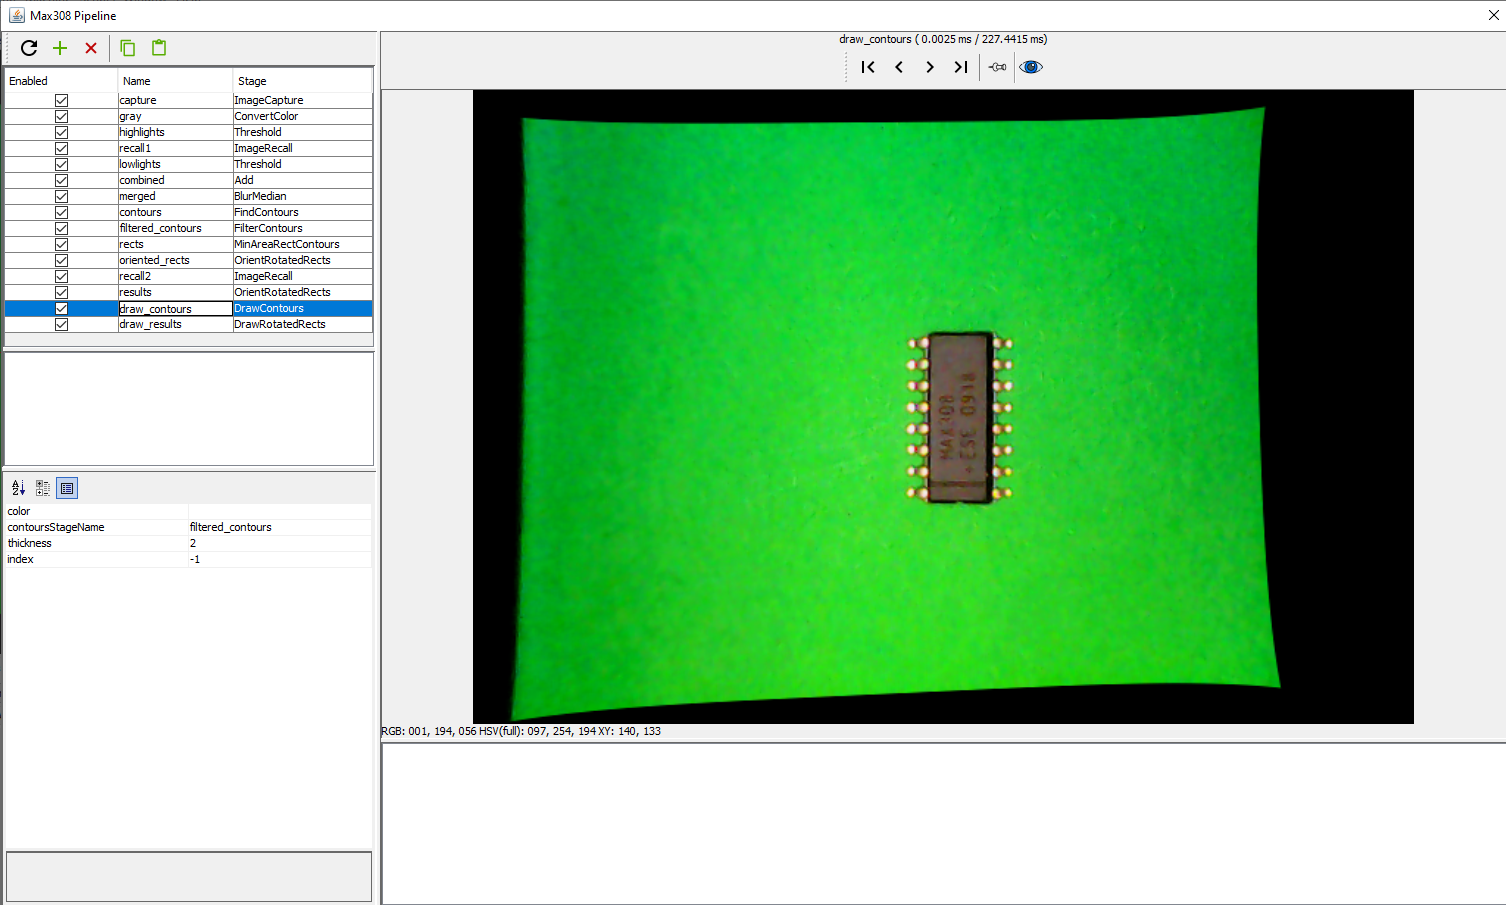
With your image, I propose this pipeline:
<cv-pipeline>
   <stages>
      <cv-stage class="org.openpnp.vision.pipeline.stages.ImageCapture" name="capture" enabled="true" default-light="true" settle-option="Settle" count="1"/>
      <cv-stage class="org.openpnp.vision.pipeline.stages.ConvertColor" name="hsv" enabled="true" conversion="Bgr2HlsFull"/>
      <cv-stage class="org.openpnp.vision.pipeline.stages.MaskHsv" name="1" enabled="true" auto="false" fraction-to-mask="0.0" hue-min="60" hue-max="120" saturation-min="100" saturation-max="255" value-min="50" value-max="255" soft-edge="0" soft-factor="1.0" invert="false" binary-mask="true" property-name="MaskHsv"/>
      <cv-stage class="org.openpnp.vision.pipeline.stages.BlurMedian" name="2" enabled="true" kernel-size="9"/>
      <cv-stage class="org.openpnp.vision.pipeline.stages.FindContours" name="contours" enabled="true" retrieval-mode="External" approximation-method="Simple"/>
      <cv-stage class="org.openpnp.vision.pipeline.stages.FilterContours" name="filtered_contours" enabled="true" contours-stage-name="contours" min-area="500.0" max-area="1000000.0" property-name="FilterContours"/>
      <cv-stage class="org.openpnp.vision.pipeline.stages.MinAreaRectContours" name="rects" enabled="true" contours-stage-name="filtered_contours"/>
      <cv-stage class="org.openpnp.vision.pipeline.stages.OrientRotatedRects" name="oriented_rects" enabled="true" rotated-rects-stage-name="rects" orientation="Landscape" negate-angle="false" snap-angle="0"/>
      <cv-stage class="org.openpnp.vision.pipeline.stages.OrientRotatedRects" name="results" enabled="true" rotated-rects-stage-name="rects" orientation="Landscape" negate-angle="true" snap-angle="0"/>
      <cv-stage class="org.openpnp.vision.pipeline.stages.ImageRecall" name="recall2" enabled="true" image-stage-name="capture"/>
      <cv-stage class="org.openpnp.vision.pipeline.stages.DrawContours" name="draw_contours" enabled="true" contours-stage-name="filtered_contours" thickness="2" index="-1"/>
      <cv-stage class="org.openpnp.vision.pipeline.stages.DrawRotatedRects" name="draw_results" enabled="true" rotated-rects-stage-name="oriented_rects" thickness="2" draw-rect-center="true" rect-center-radius="3" show-orientation="true">
         <color r="51" g="255" b="51" a="255"/>
      </cv-stage>
   </stages>
</cv-pipeline>
Because you have that green backdrop, you can easily use binary
green-screening.
See the most important stages animated in the gif (hope this
works):

_Mark
To view this discussion on the web visit https://groups.google.com/d/msgid/openpnp/150e57b2-c8a5-474a-91c3-3a56747423f5n%40googlegroups.com.
Ravi Ganesh
Aug 29, 2022, 2:57:59 PM8/29/22
to OpenPnP
Very Impressive. I gave up on CV as it did not work for me. Even fiducials are done using human vision - i.e manual camera jogging.
I now understand the value of tuning and shall give CV a try once again.
John Lettang
Sep 16, 2022, 1:32:54 PM9/16/22
to OpenPnP
Sorry for the very slow reply but that works great! Thanks for the pipeline and looking at how it works gives me some ideas for fixing a couple other cv issues I have.
Best,
John
John Lettang
Sep 30, 2022, 3:13:40 PM9/30/22
to OpenPnP
I had this issue come up after some recalibration but unfortunately now the pipeline is giving the entire exterior of my camera vision a box as well. I tried using a maskrectangle to fix this problem but that didn't work at all. Any ideas for what I can add to the pipeline to get it to work again?
<cv-stage class="org.openpnp.vision.pipeline.stages.ConvertColor" name="hsv" enabled="true" conversion="Bgr2HlsFull"/>
<cv-stage class="org.openpnp.vision.pipeline.stages.MaskHsv" name="1" enabled="true" auto="false" fraction-to-mask="0.0" hue-min="60" hue-max="120" saturation-min="100" saturation-max="255" value-min="50" value-max="255" soft-edge="0" soft-factor="1.0" invert="false" binary-mask="true" property-name="MaskHsv"/>
<cv-stage class="org.openpnp.vision.pipeline.stages.BlurMedian" name="2" enabled="true" kernel-size="9"/>
<cv-stage class="org.openpnp.vision.pipeline.stages.FindContours" name="contours" enabled="true" retrieval-mode="External" approximation-method="Simple"/>
<cv-stage class="org.openpnp.vision.pipeline.stages.FilterContours" name="filtered_contours" enabled="true" contours-stage-name="contours" min-area="500.0" max-area="1000000.0" property-name="FilterContours"/>
<cv-stage class="org.openpnp.vision.pipeline.stages.MinAreaRectContours" name="rects" enabled="true" contours-stage-name="filtered_contours"/>
<cv-stage class="org.openpnp.vision.pipeline.stages.OrientRotatedRects" name="oriented_rects" enabled="true" rotated-rects-stage-name="rects" orientation="Landscape" negate-angle="false" snap-angle="0"/>
<cv-stage class="org.openpnp.vision.pipeline.stages.OrientRotatedRects" name="results" enabled="true" rotated-rects-stage-name="rects" orientation="Landscape" negate-angle="true" snap-angle="0"/>
<cv-stage class="org.openpnp.vision.pipeline.stages.ImageRecall" name="recall2" enabled="true" image-stage-name="capture"/>
<cv-stage class="org.openpnp.vision.pipeline.stages.DrawContours" name="draw_contours" enabled="true" contours-stage-name="filtered_contours" thickness="2" index="-1"/>
<cv-stage class="org.openpnp.vision.pipeline.stages.DrawRotatedRects" name="draw_results" enabled="true" rotated-rects-stage-name="oriented_rects" thickness="2" draw-rect-center="true" rect-center-radius="3" show-orientation="true">
<color r="51" g="255" b="51" a="255"/>
</cv-stage>
</stages>
</cv-pipeline>
-John
<cv-pipeline>
<stages>
<cv-stage class="org.openpnp.vision.pipeline.stages.ImageCapture" name="capture" enabled="true" default-light="true" settle-option="Settle" count="1"/>
<stages>
<cv-stage class="org.openpnp.vision.pipeline.stages.ImageCapture" name="capture" enabled="true" default-light="true" settle-option="Settle" count="1"/>
<cv-stage class="org.openpnp.vision.pipeline.stages.MaskRectangle" name="0" enabled="false" width="500" height="300"/>
<cv-stage class="org.openpnp.vision.pipeline.stages.ConvertColor" name="hsv" enabled="true" conversion="Bgr2HlsFull"/>
<cv-stage class="org.openpnp.vision.pipeline.stages.MaskHsv" name="1" enabled="true" auto="false" fraction-to-mask="0.0" hue-min="60" hue-max="120" saturation-min="100" saturation-max="255" value-min="50" value-max="255" soft-edge="0" soft-factor="1.0" invert="false" binary-mask="true" property-name="MaskHsv"/>
<cv-stage class="org.openpnp.vision.pipeline.stages.BlurMedian" name="2" enabled="true" kernel-size="9"/>
<cv-stage class="org.openpnp.vision.pipeline.stages.FindContours" name="contours" enabled="true" retrieval-mode="External" approximation-method="Simple"/>
<cv-stage class="org.openpnp.vision.pipeline.stages.FilterContours" name="filtered_contours" enabled="true" contours-stage-name="contours" min-area="500.0" max-area="1000000.0" property-name="FilterContours"/>
<cv-stage class="org.openpnp.vision.pipeline.stages.MinAreaRectContours" name="rects" enabled="true" contours-stage-name="filtered_contours"/>
<cv-stage class="org.openpnp.vision.pipeline.stages.OrientRotatedRects" name="oriented_rects" enabled="true" rotated-rects-stage-name="rects" orientation="Landscape" negate-angle="false" snap-angle="0"/>
<cv-stage class="org.openpnp.vision.pipeline.stages.OrientRotatedRects" name="results" enabled="true" rotated-rects-stage-name="rects" orientation="Landscape" negate-angle="true" snap-angle="0"/>
<cv-stage class="org.openpnp.vision.pipeline.stages.ImageRecall" name="recall2" enabled="true" image-stage-name="capture"/>
<cv-stage class="org.openpnp.vision.pipeline.stages.MaskRectangle" name="3" enabled="false" width="500" height="300"/>
<cv-stage class="org.openpnp.vision.pipeline.stages.DrawContours" name="draw_contours" enabled="true" contours-stage-name="filtered_contours" thickness="2" index="-1"/>
<cv-stage class="org.openpnp.vision.pipeline.stages.DrawRotatedRects" name="draw_results" enabled="true" rotated-rects-stage-name="oriented_rects" thickness="2" draw-rect-center="true" rect-center-radius="3" show-orientation="true">
<color r="51" g="255" b="51" a="255"/>
</cv-stage>
</stages>
</cv-pipeline>

tonyl...@gmail.com
Sep 30, 2022, 6:15:11 PM9/30/22
to OpenPnP
I think you can just educe the max-area="1000000.0" value you have on your FilterContours stage to weed-out those really large contours.
mark maker
Oct 1, 2022, 3:30:44 AM10/1/22
to ope...@googlegroups.com
It seems you since performed Advanced Camera Calibration. Go to the camera, Advanced Calibration tab, and pull the slider all to the left (valid pixels only). This should crop your image.
_Mark
To view this discussion on the web visit https://groups.google.com/d/msgid/openpnp/5a66a3a5-0f02-476c-a705-48f1522db41en%40googlegroups.com.
John Lettang
Oct 7, 2022, 1:19:54 PM10/7/22
to OpenPnP
That makes sense and it works now, thank you!
Reply all
Reply to author
Forward
0 new messages