Brad's extra-fancy cable chain trick

Brad Parcels
Hi all,
I came up with a cable-chain alternative a while back, but never did get around to sharing/posting it anywhere… As I was relocating my bottom-vision camera last week, I took a few photos to help illustrate for anybody doing some cable-wrangling of their own:
Basically, it does the same job as normal cable-chain – but it is quieter, lower resistance, and a fair bit cheaper to boot! It won’t work for everything (i.e. thick/stiff cables) – but works amazingly well for thinner/flexy stuff like stepper motor wiring etc!
The finished product:

The shopping list:
- Cheap cable-braiding (I guess it doesn’t have to be cheap… your call):
- A cheap tape-measure… or at least the “tape” part, harvested from within…. In this case “FIXA” from Ikea for $1.75 (and that’s Canadian… so probably only $0.25 for most of you)! Tape width/sizing will depend on the cable you are trying to wrangle… (A wider/stronger tape will be better at controlling bigger cables):

That’s it!
If you support both ends of the tape, you’ll notice that it makes a lovely self-supporting “U” shape, and that it keeps that shape when you move either end in line with the “arms”:

So just whip up a mount for either end of the tape (and make sure you don’t crush the curve of the tape in the mounting… for this tape, I used a 16mm radius on the mounting point):
(I punched holes in this one, to screw down onto the mount… But glue, clamping, etc. has also worked well for me in the past)

With mounts in hand, cut your tape to length, and sheath up your cable/tape. Note: Here I’ve got the braid on the tape alone, and then the cable and tape together… Not always necessary, but this USB cable was getting too “grabby” without something between them:

Throw some heat-shrink on the end to keep things tidy:

Then just lather, rinse, and repeat for the other side… Finally - throw it into place and give it a try:

With everything tightened down, finalized, and rolling perfectly – it’s a great time to think about the other two pairs of wire that you meant to include…. (sigh):

Cheers,
Brad

Anthony Webb
Hi all,
I came up with a cable-chain alternative a while back, but never did get around to sharing/posting it anywhere… As I was relocating my bottom-vision camera last week, I took a few photos to help illustrate for anybody doing some cable-wrangling of their own:
Basically, it does the same job as normal cable-chain – but it is quieter, lower resistance, and a fair bit cheaper to boot! It won’t work for everything (i.e. thick/stiff cables) – but works amazingly well for thinner/flexy stuff like stepper motor wiring etc!
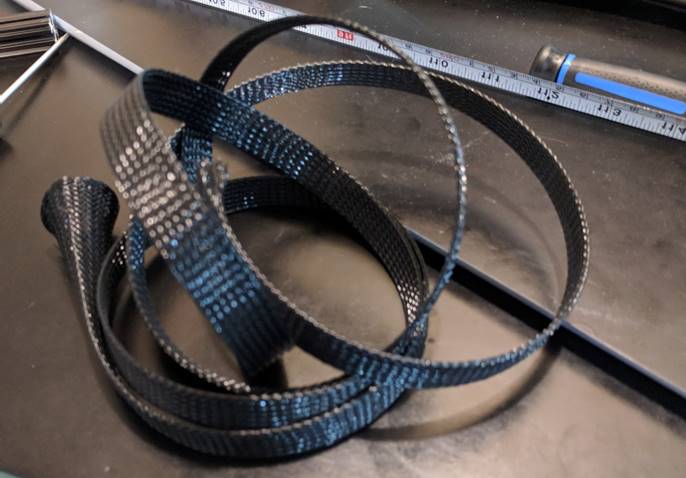
The finished product:
<image003.jpg>
The shopping list:
- Cheap cable-braiding (I guess it doesn’t have to be cheap… your call):
<image005.jpg>
- A cheap tape-measure… or at least the “tape” part, harvested from within…. In this case “FIXA” from Ikea for $1.75 (and that’s Canadian… so probably only $0.25 for most of you)! Tape width/sizing will depend on the cable you are trying to wrangle… (A wider/stronger tape will be better at controlling bigger cables):
<image007.jpg>
That’s it!
If you support both ends of the tape, you’ll notice that it makes a lovely self-supporting “U” shape, and that it keeps that shape when you move either end in line with the “arms”:
<image011.jpg>
So just whip up a mount for either end of the tape (and make sure you don’t crush the curve of the tape in the mounting… for this tape, I used a 16mm radius on the mounting point):
(I punched holes in this one, to screw down onto the mount… But glue, clamping, etc. has also worked well for me in the past)
<image015.jpg>
With mounts in hand, cut your tape to length, and sheath up your cable/tape. Note: Here I’ve got the braid on the tape alone, and then the cable and tape together… Not always necessary, but this USB cable was getting too “grabby” without something between them:
<image017.jpg>
Throw some heat-shrink on the end to keep things tidy:
<image019.jpg>
Then just lather, rinse, and repeat for the other side… Finally - throw it into place and give it a try:
<image022.png>
With everything tightened down, finalized, and rolling perfectly – it’s a great time to think about the other two pairs of wire that you meant to include…. (sigh):
--<image023.jpg>
Cheers,
Brad
You received this message because you are subscribed to the Google Groups "OpenPnP" group.
To unsubscribe from this group and stop receiving emails from it, send an email to openpnp+u...@googlegroups.com.
To post to this group, send email to ope...@googlegroups.com.
To view this discussion on the web visit https://groups.google.com/d/msgid/openpnp/c54526fe19974137affa1edbb125df0f%40viopix.com.
For more options, visit https://groups.google.com/d/optout.

Michael Anton
On Wednesday, December 13, 2017 at 4:22:50 AM UTC-7, Bradley Parcels wrote:
Hi all,
I came up with a cable-chain alternative a while back, but never did get around to sharing/posting it anywhere… As I was relocating my bottom-vision camera last week, I took a few photos to help illustrate for anybody doing some cable-wrangling of their own:
Basically, it does the same job as normal cable-chain – but it is quieter, lower resistance, and a fair bit cheaper to boot! It won’t work for everything (i.e. thick/stiff cables) – but works amazingly well for thinner/flexy stuff like stepper motor wiring etc!
The finished product:
The shopping list:
- Cheap cable-braiding (I guess it doesn’t have to be cheap… your call):
- A cheap tape-measure… or at least the “tape” part, harvested from within…. In this case “FIXA” from Ikea for $1.75 (and that’s Canadian… so probably only $0.25 for most of you)! Tape width/sizing will depend on the cable you are trying to wrangle… (A wider/stronger tape will be better at controlling bigger cables):
That’s it!
If you support both ends of the tape, you’ll notice that it makes a lovely self-supporting “U” shape, and that it keeps that shape when you move either end in line with the “arms”:
So just whip up a mount for either end of the tape (and make sure you don’t crush the curve of the tape in the mounting… for this tape, I used a 16mm radius on the mounting point):
(I punched holes in this one, to screw down onto the mount… But glue, clamping, etc. has also worked well for me in the past)
With mounts in hand, cut your tape to length, and sheath up your cable/tape. Note: Here I’ve got the braid on the tape alone, and then the cable and tape together… Not always necessary, but this USB cable was getting too “grabby” without something between them:
Throw some heat-shrink on the end to keep things tidy:
Then just lather, rinse, and repeat for the other side… Finally - throw it into place and give it a try:
With everything tightened down, finalized, and rolling perfectly – it’s a great time to think about the other two pairs of wire that you meant to include…. (sigh):
Cheers,
Brad
Bradley Parcels
LOL - alike indeed! It was actually another Cicoil product that inspired my version... They have something called "FlexRail" that embeds a steel strip on either side of the ribbon (https://www.youtube.com/watch?v=sVmYyb4aWzE)...
First time I tried it was also for a 3D printer... and while the photo below shows a standard ribbon, that's only because my Cicoil ribbon hadn't arrived yet!!! :-)

DigiKey also carries a fair bit of their stuff - not cheap, but definitely the best cabling I've come across!