Question on recommended design parameters for elevated fingerboards...especially on classicals
186 views
Skip to first unread message

rolo
May 24, 2017, 6:00:05 PM5/24/17
to Robert O'Brien Guitar Building Forum
I know that this topic was touched on a while back, but I was wondering what those with experience as either players and/or builders like with an elevated fingerboard and how to best go about it? How does it affect the top bracing, I suspect especially from about mid-way up the soundhole? For right now, I'm thinking mostly classical, but don't mind looking into steel string options. Do you do anything special with the solera? Can I use my existing solera? Are there concerns with bending the top to match the tapered sides? I also think McPherson has a cool take on this as well. Anyway, I would love to hear any design considerations that might help me. Hmm, I'd like to do another guitar like I just did, but with a raised fingerboard. Thanks in advance.
Rolo

Sen Goh
May 24, 2017, 10:30:23 PM5/24/17
to Robert O'Brien Guitar Building Forum
As a player, elevated fingerboard definitely helps in the LH for the upper notes (> 12th frets).
For elevated fingerboard basically there is 2 types of geometry:
- Tilted neck (i.e. neck and top are at different plane of projection)
- Bent Top (Upper bout of the top is bent to form the elevation)
Method 1
Body build as per normal and the necks comes in at an angle - the neck plane and top plane (lower bout esp.) are different.
For the first, the easier part is the body building as it is like normal.
The hardest part is the making the bridge to compensate for the neck angle.
The saddle has to be tilted backward by a little to keep it straight (w.r.t. to neck)
Method 2
Body starts to go down at the waist (bend over large radius) to create the elevated part.
The neck and lower bout are at the same plane (well almost)
This is the Byers method
The hard part is the body taper at the upper bout since it was bent.
More specifically the curvature starts at the centre of the sound hole.
If you build like traditional, i.e. sides on top of top, then the sides need to be profile to match the bent top.
If you build like Romanillos method, (except that for Romanillos, its in the lower bout), the sides can wrap around the exact sized top.
After that you can use a block plane to plane away the protrusion.
Similarly, the lining (between sides and top) has be compensated for the angle difference in the upper bout.
When doing purfling and binding it will be a little tricky too since now there are oblique angles to talk about.
The solera needs to have a ramp at the upper bout for this.
The ramp will force the top to be bent.
After bracing and sound hole reinforcement it will stay in shape.

Most elevated fingerboard are done with neck and body separately (mortise joint / spline joint etc).
For Byers, the neck is joined to the body using a spline
For others they are using bolted on.
I chose the Byer's method for my #3 which the upper bout was bent.
The order of construction is to keep the neck and heel separately.
During the making of the neck, an alignment holes are drill (3 or 2 holes) to keep the neck top and heel block aligned.
When assembly, only the heel block is used.
I.e. heel block glued to the top and sides glue to heel block end block top.
And finally the back is closed.
The neck is only glued to the body after the bindings and purfling are done on the box.
In this way it is easier to access to the binding and purfling.

rolo
May 24, 2017, 11:36:48 PM5/24/17
to Robert O'Brien Guitar Building Forum
Dear Sen,
The detailed information you've provided is gold to me. Sadly, the images aren't showing up for me. Would you mind trying again or maybe another way if possible? Again, your information is too good to let slip by. Thank you so much for your time and effort in putting this information together.
Sincerely,
Rolo
Sen Goh
May 25, 2017, 2:06:43 AM5/25/17
to Robert O'Brien Guitar Building Forum

Different geometry - top is tilted neck bottom is bent top

My way of doing integrated elevated fb neck.

tvanevery
May 25, 2017, 7:32:27 AM5/25/17
to Robert O'Brien Guitar Building Forum
Rolo,
Tom Bills has an excellent course on elevated fingerboards. It helped me a great deal. The concept is simple. Guitar bodies are typically deeper at the tail block than at the neck block with the top being the reference plane. With the elevated fretboard, the back becomes the reference plane with the neck roughly parallel to that reference plane and the fingerboard elevation making up the difference in the depth of the body at the neck and tail. The geometry of the body doesn't need to change. The most important (and most difficult) thing is to take care that the neck angle is properly set to get the desired string height at the saddle. I do not modify the bridge for an elevated fretboard.
I've used elevated fingerboards on both steel string and classicals using a bolt on/off neck with a butt joint. I found a cantilevered fretboard extension which is clear of the top easier to execute. I have done one classical with the elevated fingerboard bolted on flush with the top. It was a bit of a nightmare getting the neck angle correct and having to floss both the heel block and the fretboard extension. I won't do that again. If I were to do another in that style, I'd adopt Sen's method and floss the heel block and fret board extension separately before joining them.
However, having seen Trevor Gore's elegant adjustable neck with elevated fret board, I intend to adopt that style for all future builds. That makes getting the correct string height a breeze and allows for seasonal adjustment under full string tension.
Good luck and have fun!
Tim
rolo
May 25, 2017, 10:22:06 PM5/25/17
to Robert O'Brien Guitar Building Forum
Thanks Sen. What kind of height do you like to see at its thickest point...right at the heel?
Rolo
rolo
May 26, 2017, 12:17:29 AM5/26/17
to Robert O'Brien Guitar Building Forum
Tim,
Thanks for that information. Now I have these ideas dancing around in my head...Next step, design and then implement.
Rolo
Sen Goh
May 26, 2017, 2:42:02 AM5/26/17
to Robert O'Brien Guitar Building Forum
Hi Rolo,
Mine is about 20mm around the 12th fret region.
But you can easily change the thickness if you use a solera.
With the Byer's method the neck geometry is same as traditional build.
If you need more elevation, just make the solera's ramp higher ==> the top depress / bend more
Here is a look of my solera
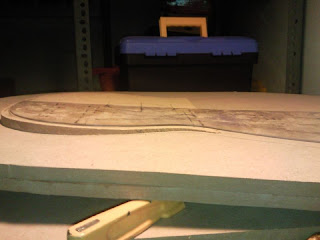
After I made the solera I increase the ramp height actually

Solera in action
If you are interested my journal on the build is here
rolo
May 26, 2017, 10:12:39 AM5/26/17
to Robert O'Brien Guitar Building Forum
Thanks again Sen. I'm telling you...this is Gold! Good stuff!
Rolo

patrick.metzroth
Aug 27, 2017, 9:30:35 PM8/27/17
to Robert O'Brien Guitar Building Forum
Sen,
I am getting ready to start working on an elevated fingerboard style guitar and was wondering is the there an advantage to one method over the other
I am getting ready to start working on an elevated fingerboard style guitar and was wondering is the there an advantage to one method over the other
Sen Goh
Aug 27, 2017, 9:48:44 PM8/27/17
to Robert O'Brien Guitar Building Forum
I think method 1 should be easier as method 2 has a lot more details to take care of in the upper bout assembly.
E.g. the sides will no longer be 90 deg with the top at certain places.
For method 1 all the sides wrt to the top are still pretty much the same as normal build.
the only tricky part is the bridge as u might need to rout the saddle leaning back at an angle depending on the elevation
On Thursday, 25 May 2017 06:00:05 UTC+8, rolo wrote:
rolo
Nov 30, 2017, 9:45:56 AM11/30/17
to Robert O'Brien Guitar Building Forum
Hi Sen and others that may have suggestions,
Sen, you mentioned that you have approximately 20mm at the thickest part of your elevated fingerboard? Just want to make sure, does that include the fingerboard thickness as well?
Thanks,
Rolo
Reply all
Reply to author
Forward
0 new messages