14-digit nixie calculator project with clock function

newxito
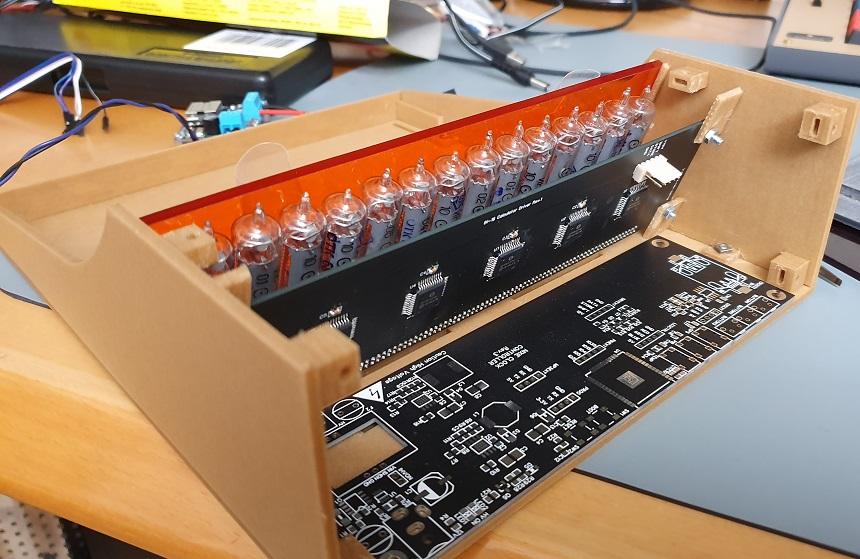
I started with the display board. I don’t know if it’s possible to multiplex 14 nixies with enough brightness, so I decided to use direct drive. Now waiting for small neons for the dots and the minus sign. I already ordered the controller board, the board for the keyboard (MX keys) and the keycaps.

Nicholas Stock
I started with the display board. I don’t know if it’s possible to multiplex 14 nixies with enough brightness, so I decided to use direct drive. Now waiting for small neons for the dots and the minus sign. I already ordered the controller board, the board for the keyboard (MX keys) and the keycaps.
--
You received this message because you are subscribed to the Google Groups "neonixie-l" group.
To unsubscribe from this group and stop receiving emails from it, send an email to neonixie-l+...@googlegroups.com.
To view this discussion on the web, visit https://groups.google.com/d/msgid/neonixie-l/5a25720b-b231-46dd-84c3-a998baae93d9%40googlegroups.com.
<calc.jpg>

martin martin
To view this discussion on the web, visit https://groups.google.com/d/msgid/neonixie-l/66AA7E0E-AB96-4AFA-A75C-7526F965D612%40gmail.com.

Mac Doktor
On Jan 10, 2020, at 9:25 AM, Nicholas Stock <nick...@gmail.com> wrote:Cool! I’ve always wanted to build a nixie calculator....I bought a set of Scott Baker’s pcb’s to do such a thing, but I could not got more details out of him about construction..
"The Mac Doctor"
"Every kid starts out as a natural-born scientist, and then we beat it out of them. A few trickle through the system with their wonder and enthusiasm for science intact."—Carl Sagan, Psychology Today, 1996
newxito
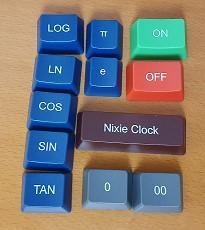
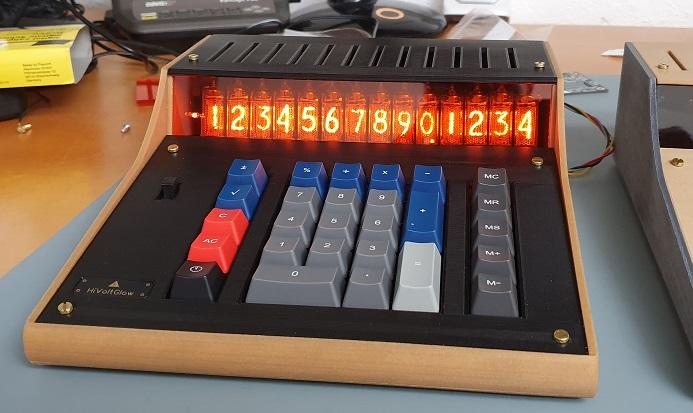
The 14 neons for the dots and minus sign are now installed and everything seems to work fine. The board with the switches is also fully assembled, it uses a HT16K33. I will start with this keyboard layout. I have to start now designing the case, that’s the hardest part of this project. If the case looks ok, I probably will design a new board with more keys and functions and buy some custom keycaps. By the way, custom keycaps seem to be really expensive!

Bill Notfaded
Bill
newxito

Richard Scales
newxito
Thanks for your input, Richard. I don’t have access to a CNC device right now, but such a router is on the top of my (maker) wish list.
I have found a place where you can define the text and color (no graphics) of every keycap for an entire keyboard. So, basically you get 104 custom keycaps for 50$, that’s ok for me, I will only made one or two of these calculators.
newxito
Here is the finished IN-17 calculator. I thought programming a calculator would be a 2 hour job. I was wrong...
For this project I switched to VS Code, PlatformIO and Git. I think it was worth the effort, the editor is great with the IntelliSense thing, really helpful.
I will now make an IN-16 version, I already have the boards.

David Eustace
--
You received this message because you are subscribed to the Google Groups "neonixie-l" group.
To unsubscribe from this group and stop receiving emails from it, send an email to neonixie-l+...@googlegroups.com.
To view this discussion on the web, visit https://groups.google.com/d/msgid/neonixie-l/f0df9680-655f-4125-b3c0-0e6367fa5436%40googlegroups.com.
Nicholas Stock
To view this discussion on the web, visit https://groups.google.com/d/msgid/neonixie-l/CALY4pG0QSx3STTrb7OEDz72bE0qVwRFBg5cex3pgJGzSQEZT9A%40mail.gmail.com.

jb-electronics


Paul Andrews
newxito
newxito
newxito
Sorry that I don’t share the electronics. See https://groups.google.com/forum/#!topic/neonixie-l/txmEbShA3CI (I’m not an EE...)
For the keyboard I’m using a HT16K33 in a 3 x 9 matrix
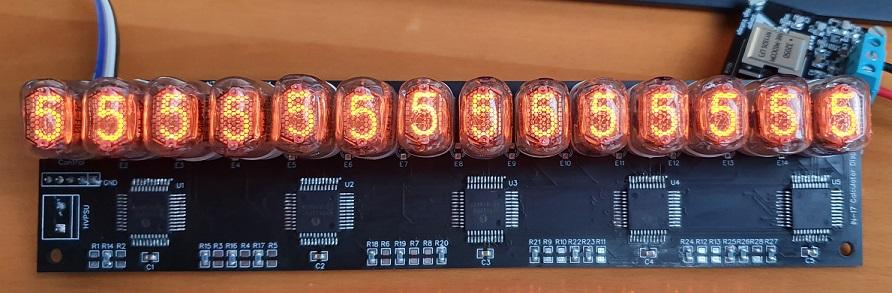
The display board uses 5 cascaded HV5622 shift registers. Since the IN-17 has no dot, I had to use 3mm neons. Also, a 3mm neon is used for the minus sign.
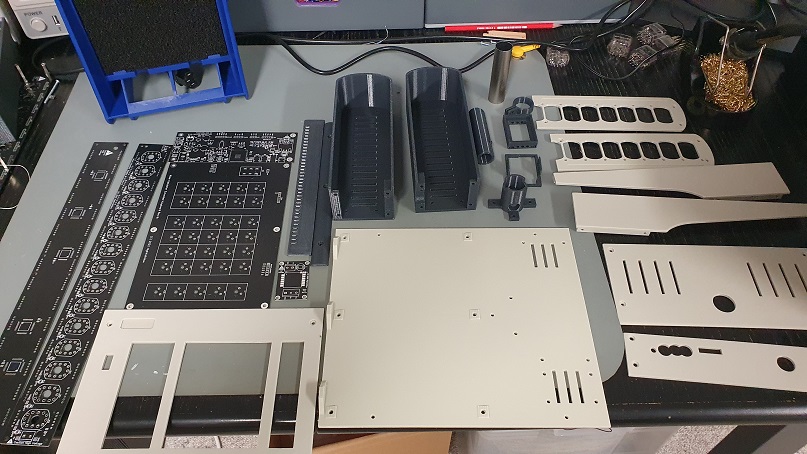
If anyone is interested, feel free to use or modify the case STL files, at your own risk. Check the build dimensions of your 3D printer. The front panel is a piece of transparent brown acrylic (203mm x 50mm x 3mm). In the back, there are 3 holes where you can mount the IO-shield for your controller.
For the top and the keyboard cover I have used wood filament, the surface looks much nicer than normal PLA. The label is just a small ENIG PCB.
Note for mounting the keyboard in the case:
screw->washer->bottom panel->20mm spacer->PCB(1.6mm),10mm spacer->keyboard cover->screw and screw->washer->bottom panel->thin washer->PCB(1.6mm)->10mm spacer->keyboard cover->screw

GastonP
Mac Doktor
On Feb 17, 2020, at 3:18 PM, newxito <axt...@gmail.com> wrote:This is the finished IN-16 version. I'll add some more clock modes with date and some animations with the decimal points. That’s it!
"The Mac Doctor"
It said that the stars were suns, only very far away.
The Sun was a star, but close up.”—Carl Sagan, Cosmos, 1980
newxito
I added a stopwatch function to the calculator. I'm a little bit concerned about the nixies displaying the 100th of a second because of the fast digit switching. Will this shorten the life of the tubes? I don’t know if this is similar to multiplexing.
newxito

Jack Buechler
If you use commonly found tubes – then this would be a great project ot share / buy / sell /barter etc.
Whats the plan please? Is there a plan?
--
You received this message because you are subscribed to the Google Groups "neonixie-l" group.
To unsubscribe from this group and stop receiving emails from it, send an email to
neonixie-l+...@googlegroups.com.
To view this discussion on the web, visit
https://groups.google.com/d/msgid/neonixie-l/06adb876-3743-4d1e-9f7c-e24e920ba18cn%40googlegroups.com.
newxito
newxito
Nicholas Stock
The B-5870 calculator is now finished. In this version I made some minor changes to the case, added more keys and functions and there is now a RGB backlight.This is definitely the last version, the project got a little bit out of control :-)
--
You received this message because you are subscribed to the Google Groups "neonixie-l" group.
To unsubscribe from this group and stop receiving emails from it, send an email to neonixie-l+...@googlegroups.com.
To view this discussion on the web, visit https://groups.google.com/d/msgid/neonixie-l/025cd5e9-ba4a-4cc8-8bbb-1898194c8237n%40googlegroups.com.
martin martin
To view this discussion on the web, visit https://groups.google.com/d/msgid/neonixie-l/CAOX%2BRH%2Bi1sbzihyMthsmG%3D%3D6GsYZM3kP%2BDU96SJYCwY60-G2Pg%40mail.gmail.com.

David Forbes
The B-5870 calculator is now finished. In this version I made some minor changes to the case, added more keys and functions and there is now a RGB backlight.This is definitely the last version, the project got a little bit out of control :-)
--
You received this message because you are subscribed to the Google Groups "neonixie-l" group.
To unsubscribe from this group and stop receiving emails from it, send an email to neonixie-l+...@googlegroups.com.
To view this discussion on the web, visit https://groups.google.com/d/msgid/neonixie-l/025cd5e9-ba4a-4cc8-8bbb-1898194c8237n%40googlegroups.com.
newxito

Aiden Fang
Richard Scales
On Friday, 10 January 2020 08:29:54 UTC, newxito wrote:
I started with the display board. I don’t know if it’s possible to multiplex 14 nixies with enough brightness, so I decided to use direct drive. Now waiting for small neons for the dots and the minus sign. I already ordered the controller board, the board for the keyboard (MX keys) and the keycaps.
newxito

Dekatron42
newxito
newxito
newxito

Michail Wilson
From: neoni...@googlegroups.com <neoni...@googlegroups.com>
On Behalf Of newxito
Sent: Sunday, May 16, 2021 9:50 AM
To: neonixie-l <neoni...@googlegroups.com>
Subject: [neonixie-l] Re: 14-digit nixie calculator project with clock function
In case anyone is still interested, there is some work in progress to make the project (IN-16 and IN-17 versions) available on github.
--
You received this message because you are subscribed to the Google Groups "neonixie-l" group.
To unsubscribe from this group and stop receiving emails from it, send an email to
neonixie-l+...@googlegroups.com.
To view this discussion on the web, visit https://groups.google.com/d/msgid/neonixie-l/6f780555-6dc0-43f7-893a-20f69c4e7699n%40googlegroups.com.
Mac Doktor
On May 16, 2021, at 12:50 PM, newxito <axt...@gmail.com> wrote:In case anyone is still interested, there is some work in progress to make the project (IN-16 and IN-17 versions) available on github.
newxito
Mac Doktor
On May 17, 2021, at 4:18 AM, newxito <axt...@gmail.com> wrote:My knowledge about non-numeric nixies is very limited. I know the IN-19 versions matching the IN-14 tubes and the IN-15 versions for the IN-12, that's it.
I used IN-16 and IN-17 because they are only 13mm wide. I don't know if there are +, -, E tubes that will fit.
That's why I used a horizontal neon bulb for the minus sign. The reason why the minus sign is now on the right is just a personal preference. A non-floating minus sign on the left looked kind of strange.
Displaying results using scientific notation should be only a firmware change. Instead of an E, a blank tube in between should do the job. The decimal point of the blank tube could indicate a negative exponent.
Anyway, there are no plans to implement scientific notation, 14 digits are good enough for my needs :-)
Errors and over/underflows are indicated showing the 14 decimal points
I’m not sure, but I think making a RPN version should be just a firmware thing and some keycap legend changes (Enter)
newxito
Today I assembled the IN-16 calculator and wrote the assembly instructions. Documenting things seems to be hard work…
I’ve uploaded the instructions, “Docs/Assembling the IN-16 calculator.pdf”
newxito

tntmod54321
I really thought I was done with the hardware... the keyboard has a FTDI header to program the firmware, but I completely forgot that there must be also a way to upload the bootloader for the 328p-AU directly on the keyboard. I normally use my prog tool with a TQFP-32 socket for that. Anyway, I have designed a new revision of the keyboard with a new header. The additional header should allow to upload the bootloader using a standard Arduino. Now waiting for the board for testing...
--
You received this message because you are subscribed to the Google Groups "neonixie-l" group.
To unsubscribe from this group and stop receiving emails from it, send an email to neonixie-l+...@googlegroups.com.
To view this discussion on the web, visit https://groups.google.com/d/msgid/neonixie-l/050163d5-09d9-44b0-9e35-c01cd4cc8afcn%40googlegroups.com.
newxito
If everything works as expected, I hope I will have the project ready to share by end of June.
Audrey
--
You received this message because you are subscribed to the Google Groups "neonixie-l" group.
To unsubscribe from this group and stop receiving emails from it, send an email to neonixie-l+...@googlegroups.com.
To view this discussion on the web, visit https://groups.google.com/d/msgid/neonixie-l/fc520d1f-db44-48f2-b4ea-70e1db36c0cfn%40googlegroups.com.
newxito
newxito
newxito

Michail Wilson
Nice.
Display both time and date.
As for a display case, an easy choice might be one of those acrylic cases for a baseball bat. 😊
Michail Wilson
From: neoni...@googlegroups.com <neoni...@googlegroups.com>
On Behalf Of newxito
Sent: Saturday, October 1, 2022 9:54 AM
To: neonixie-l <neoni...@googlegroups.com>

--
You received this message because you are subscribed to the Google Groups "neonixie-l" group.
To unsubscribe from this group and stop receiving emails from it, send an email to
neonixie-l+...@googlegroups.com.
To view this discussion on the web, visit https://groups.google.com/d/msgid/neonixie-l/22c3a7a8-903c-48ad-9e84-2cb430caa659n%40googlegroups.com.
Bill Notfaded
You received this message because you are subscribed to a topic in the Google Groups "neonixie-l" group.
To unsubscribe from this topic, visit https://groups.google.com/d/topic/neonixie-l/Dh5ANwTrqkQ/unsubscribe.
To unsubscribe from this group and all its topics, send an email to neonixie-l+...@googlegroups.com.
To view this discussion on the web, visit https://groups.google.com/d/msgid/neonixie-l/MW2PR0102MB3435430AF083DE279B98389782599%40MW2PR0102MB3435.prod.exchangelabs.com.

Adrian Godwin
To view this discussion on the web, visit https://groups.google.com/d/msgid/neonixie-l/CADToqn1uBTbX%2BZ58ecWuftUFwwC8xhD-yNFRAMUwXUG6rrGUdA%40mail.gmail.com.
newxito

Dave ZL3FJ
Good work-very space age looking.
But here’s a Burroughs original - all 16 digits of it….. from the 1960s, IIRC.
DaveB, NZ
From: neoni...@googlegroups.com [mailto:neoni...@googlegroups.com] On Behalf Of newxito
Sent: Monday, October 03, 2022 20:59
To: neonixie-l
Subject: Re: [neonixie-l] Re: 14-digit nixie calculator project with clock function
No worries, this is a strictly limited edition, this thing is serial number 1 of 1 :-)
I cheated a little bit; I just modified the original case and connected the display part with a metal tube.
--
You received this message because you are subscribed to the Google Groups "neonixie-l" group.
To unsubscribe from this group and stop receiving emails from it, send an email to neonixie-l+...@googlegroups.com.
To view this discussion on the web, visit https://groups.google.com/d/msgid/neonixie-l/2f3a95ac-b6d1-4ca2-b956-5b063aeab739n%40googlegroups.com.
Adrian Godwin
To view this discussion on the web, visit https://groups.google.com/d/msgid/neonixie-l/008901d8d703%2495d07510%24c1715f30%24%40silverbears.nz.

Max Di Noi

MrNixie (UK)
newxito
Max Di Noi
newxito
Paul Andrews
martin martin
--
You received this message because you are subscribed to the Google Groups "neonixie-l" group.
To unsubscribe from this group and stop receiving emails from it, send an email to neonixie-l+...@googlegroups.com.
To view this discussion on the web, visit https://groups.google.com/d/msgid/neonixie-l/2b6bb5d6-6d26-4c2c-8e5b-a56cc48392afn%40googlegroups.com.
Max Di Noi
On 3 Oct 2022, at 13:39, newxito <axt...@gmail.com> wrote:
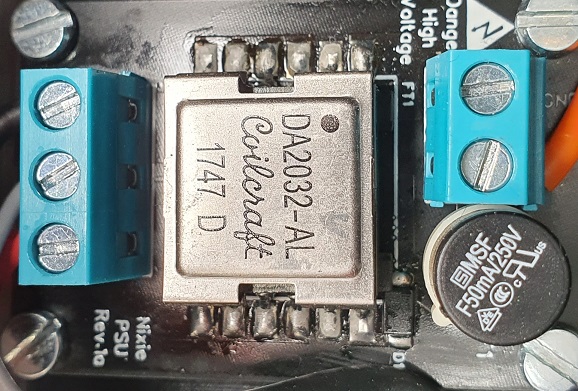
I use a flyback design based on a schematic from the LT3757 datasheet. The version I made for the calculator goes up to 70 mA. Since this project only needs max. 40mA, I use a 50mA fuse.
The efficiency is quite good (>90% from 30 to 70mA), so no problems with heat.
<PSU.jpg>
To view this discussion on the web, visit https://groups.google.com/d/msgid/neonixie-l/172875b7-1418-481e-804a-7c23e7329333n%40googlegroups.com.
<PSU.jpg>
newxito
OT: For some of the parts (for example the keyboard shield) I used the ironing feature of the slicer. On my 3D printer, in order to avoid nozzle clogging after ironing, I have to add some lines of G-code to increase the temperature und advance some filament before the cooling phase starts. After sanding with 120 and finally wet sanding with 180-grit sandpaper the surface looks really nice. For me, sanding works only with light colors, like the light gray I’m using for this project. I don’t know why, but after sanding dark PLA, the surface is ok, but the color is no longer uniform.
Michail Wilson
Looks great.
PLA – What I have done after sanding on black pla is to take a torch (lighter) and graze over the area. It quickly turns back to the color you would expect.
Michail
From: neoni...@googlegroups.com <neoni...@googlegroups.com>
On Behalf Of newxito
Sent: Sunday, October 30, 2022 5:08 AM
To: neonixie-l <neoni...@googlegroups.com>

--
You received this message because you are subscribed to the Google Groups "neonixie-l" group.
To unsubscribe from this group and stop receiving emails from it, send an email to
neonixie-l+...@googlegroups.com.
To view this discussion on the web, visit https://groups.google.com/d/msgid/neonixie-l/c3412739-c99f-4a65-912d-97bddad733e6n%40googlegroups.com.
newxito

Yohan Park
I uploaded a draft of the calculator manual. This will be the functionality of the first public firmware release... still work in progress...