Constantly sticking to the Flexvat
2,202 views
Skip to first unread message

R Chritz
Oct 30, 2015, 11:06:27 AM10/30/15
to mUVe 3D Support Group
I have owned this printer for months and have yet to get a 100% completed part. I have tried reverything. I have gone through 2 Flexvats thinking I may have screwed up the first one. Every time it starts are good, gets halfway through the print more or less, and then it stops sticking to the latest layer on the plate and starts building up on the vat itself. Muve claims the FEP is non-stick but when I go to clean and try again it is stuck pretty well. This is with the Red maker resin since they say its the easiest to work with. I just get tired of cleaning everything over and over again to restart and try again. Its been very frustrating and if anyone has any other advice than shared here I would love to hear it. Thanks.

mUVe 3D Admin
Oct 30, 2015, 12:16:35 PM10/30/15
to mUVe 3D Support Group
By the sounds of things, you may be printing parts that are either too large for the peel speeds, or the peel speeds are just too high in general. If you're getting adhesion to the build plate initially, then suction is the cause of the detachment later on in the print.
It's also important to consider the size of the object you're printing to properly estimate the amount of suction you need to overcome. Since nothing can bond to the FEP material, any "sticking" you're experiencing would have to be from highly scratched FEP, or just suction forces at work. The resin is thick, and the forces required to peel a printing part from the reservoir floor are really high when you start to consider that this liquid has to pull in from the sides of the peeling part to displace the vertical motion. If you print a large part, the physics at plat would much rather the printed part come detached from the build plate than to move the resin around it. In these cases, slow is the key, and will be the only thing that will allow for successful printing.
Our suggestion would be to slow down the peel to very low speeds until you stop having the issue. Another sometimes helpful adjustment is hollowing out the part. The resins are so strong that it's often not required to have anything than walls that are a few millimeters thick. Not only will this save resin, but it will make the parts easier to print because the surface area at any given printed layer will be lower. And therefore will have less suction.
Let us know if we can be of more help!
mUVe 3D Support

Dangre
Oct 30, 2015, 1:37:26 PM10/30/15
to mUVe 3D Support Group
Make sure you dial your machine in using a 'simple' model such as a hollow 20mm cube or one of the small calibration models. What object(s) are you having issues with?
R Chritz
Oct 30, 2015, 3:45:03 PM10/30/15
to mUVe 3D Support Group
It was the Marvin model but it was definitely solid. So I will test again on a hollow piece. I also ordered an alternative build plate from Muve to test that as well.
Dangre
Oct 30, 2015, 3:58:44 PM10/30/15
to mUVe 3D Support Group
The Marvin model is simple. What size are you printing it at? Make sure you have an adequate base to start with. If Marvin's feet are too small it could be an issue.
R Chritz
Oct 30, 2015, 4:05:48 PM10/30/15
to mUVe 3D Support Group
Not big at all, 20mm at most. With a base and support structures. I even tried printing other small things including a cube with the same results. Build up halfway, then stopped sticking to the model and sticking to the vat. Before the failure the piece looks great.

Hellenicopter
Oct 30, 2015, 7:28:45 PM10/30/15
to mUVe 3D Support Group
Hi there,
Just a thought: are you sure that the mechanics are OK?
Do you have the same issue at the same step for every structure you print?
If there is a problem with the trapezoidal screw there could easily be a small jump and then you lose the contact with the rest of the structure and everything is stuck to the vat.

Ryan LaBarre
Dec 9, 2015, 1:35:07 AM12/9/15
to mUVe 3D Support Group
So i may have resolved my board timing out (not sure exactly yet because it hasnt gotten a long ways past the usual spot). however, now im seeing INSANE sticking to the vat.
im printing a pawn chess piece, so not that big, base about the size of a quarter.
right now im trying to do a 10 second 10mm peel to see if that will help
what happens is about the 7mm mark or slightly less of the part it stops adhering to the plate and now sticks to the bed of course.
i can hear now around layer 25 the suction forces to remove it. i am not overcuring it (although i do 40 second cures on the bottom four layers).
Ryan LaBarre
Dec 9, 2015, 1:37:43 AM12/9/15
to mUVe 3D Support Group
and now of course my z axis is off because its so strong it made the left stepper miss some steps so im not level anymore.
im about to throw this thing out the window
mUVe 3D Admin
Dec 9, 2015, 6:06:38 AM12/9/15
to mUVe 3D Support Group
Ryan,
Are you sure your stepper motor drivers are turned up enough? What motor drivers are you using? The ones we ship with the printers should have more than enough power but I understand you're not running a RAMPS system yet, still a non-standard board from a gently used system? There could be some problems there that still need to be worked out.
10mm/s peel speed is pretty darn high and I can't say I'm surprised you're having parts come off the build plate. It all depends on how much things are sticking due to suction, and based on your description you're getting some pretty solid suction.
Try 2-4mm/s and 6-10mm peel distance, the main point being that the speed drops substantially. Cutting that speed down will almost ensure you don't continue to have the same problem you're having now. In this case it's not like ripping a band aid off, it's like lifting a flat plate off the bottom of pool of water, the faster and harder you pull the higher those forces become and the more likely it is to cause a print failure.
mUVe 3D Support

Matthew Caron
Dec 9, 2015, 8:31:41 AM12/9/15
to mUVe 3D Support Group
FWIW, I've been using 1mm/s peel speed and am only now experimenting with higher speeds at later layers. Suction forces are cruel mistress...
Ryan LaBarre
Dec 9, 2015, 12:28:28 PM12/9/15
to mUVe 3D Support Group
so i ran 5 tests last night.. I overcured a bit and seemed to have a full complete part, until it peeled off... then i turned the speed down and the cure down as well and the print failed (holes or missing pieces all over the part) and but the print stayed attached.
ill try long cure times, and long lift times...
Ryan LaBarre
Dec 9, 2015, 1:00:00 PM12/9/15
to mUVe 3D Support Group
Dean/others what is your default stepper voltage on the ramps? im set to 1.0 per the previous owner right now.
thanks
Matthew Caron
Dec 9, 2015, 1:05:21 PM12/9/15
to mUVe 3D Support Group
I turned mine down until they started to skip, when executing a peel move from a vat full of resin, then turned them up a bit.
Ryan LaBarre
Dec 9, 2015, 1:06:16 PM12/9/15
to mUVe 3D Support Group
do you have a value? is there any issue with leaving it turned up? except that you may shorten the life of the stepper?
Matthew Caron
Dec 9, 2015, 1:07:45 PM12/9/15
to mUVe 3D Support Group
Nope, never measured it. I did find that, if I turned it up too high, it would start to skip again, so there's kind of a "goldilocks zone".
Hellenicopter
Dec 9, 2015, 2:44:22 PM12/9/15
to mUVe 3D Support Group
Hi All,
The adjustment of the voltage must be done by taking into consideration the maximum current allowed by the stepper motors.
I have upgraded my controllers to DRV8825 and Pololu has a very educative video on how to adjust the voltage/current (see link here)
The same approach holds for the A4988 controller but the reference resistance has a different value for the voltage to current conversion so pay attention.
I have done that and neither the controllers nor the motors get overheated or are losing steps.
Cheers
Ryan LaBarre
Dec 9, 2015, 11:38:12 PM12/9/15
to mUVe 3D Support Group
im running a test right now with these settings.
Z lift distance - 8mm
Z lift speed - 40mm/m
Z Bottom speed 20 mm/m
Slow as all hell and will take 100000000 hours to complete, but lets see what happens.
Matthew Caron
Dec 10, 2015, 7:43:06 AM12/10/15
to mUVe 3D Support Group
FYI - despite it saying mm/m in CW, I think it actually ends up being mm/s in RAMPS. Not sure about your board.
Hellenicopter
Dec 10, 2015, 8:19:16 AM12/10/15
to mUVe 3D Support Group
Hi,
The key function is the plan_buffer_line () in the Marlin firmware.
If you open the firmware file planner.cpp you will see that speeds are in mm/s and accelerations in mm/s^2.
In M651 procedure the speeds are introduced directly into the plan_buffer_line() from the definition in M650 so they are in mm/s.
If you use the variables from CW to feed M650 then the numbers are translated in mm/s.
Cheers
Hellenicopter
Dec 10, 2015, 8:37:24 AM12/10/15
to mUVe 3D Support Group
That said, Ryan's speeds are way too fast!
Matthew Caron
Dec 10, 2015, 8:46:49 AM12/10/15
to mUVe 3D Support Group
Right, but he's not using the same board, so maybe he's not using Marlin either?
Hey Ryan, what firmware is in that board? If it's Marlin, I think you're going faster than anyone has ever tried.
Ryan LaBarre
Dec 10, 2015, 9:53:10 AM12/10/15
to mUVe 3D Support Group
Thats interesting, because those were the settings the seller had for me, and the first couple prints i got, worked :) that was one of the things he mentioned, that it can go FAST :)
So with those settings above my print was solid, it stuck, and worked flawlessly (until the board rebooted haha).
so the part failed almost at the end, but it stuck and looked good.
So now i have to figure out this board (or replace it with ramps, which one is arriving today).
the speeds are SOOOOOOO slow though.
conversion says im doing like .4mm/s which is just super slow. if thats what it takes to print, then i wont be keeping it haha
Ryan LaBarre
Dec 10, 2015, 10:21:54 AM12/10/15
to mUVe 3D Support Group
so interesting... its printing again, but seems to be sticking WAY more .
the ONLY variable is where i placed the part on the build area.
last nights test that largely worked fine (just slow) was on right side of the platform, but center.
this one is center, but front side of the platform.. i can hear it two rooms away sticking.
I have a new FEP on order along with my uber z axis. perhaps i should just replace the FEP anyway
Hellenicopter
Dec 10, 2015, 10:41:24 AM12/10/15
to mUVe 3D Support Group
Hmm, I had the exact same problem at slow speeds.
Is the FEP tight enough?
Is the FEP tight enough?
Ryan LaBarre
Dec 10, 2015, 10:45:10 AM12/10/15
to mUVe 3D Support Group
i dont know... id have to stop the print and drain it.. which i will certainly do. is there a way to tighten it? or is it just buy a new piece?
Matthew Caron
Dec 10, 2015, 11:10:24 AM12/10/15
to mUVe 3D Support Group
I wish I knew of a way to tighten it. I ended up getting a new piece (or, more correctly, using the spare I bought) as mine got so stretched that the holes on the edges finally tore through. But, I figured it was because of all the times I took it apart and put it back together, and not from normal use.
Ryan LaBarre
Dec 10, 2015, 12:06:19 PM12/10/15
to mUVe 3D Support Group
matthew i sent you an email btw... just looking to get a screenie of the slicer configs,
thanks
Matthew Caron
Dec 10, 2015, 1:11:03 PM12/10/15
to mUVe 3D Support Group
Got your email, sent you the screenshot. Also including it here for community reference.

Ryan LaBarre
Dec 10, 2015, 1:48:21 PM12/10/15
to mUVe 3D Support Group
So here is my issue.. Right now im about to finish my first full size cheese piece with this printer (hopefully its at 90% now). If it finishes, it will have taken almost 5 hours to complete.
My settings are such that im running about
.3mm/m lift speed for all layers (roughly doing the math).
thats not mm/s its mm/m.
So its awfully slow. Unuseably slow. So there has to be some other reason why im getting such insane sucking forces and the part pulling loose.
When you level your build plate down on the FEP are you guys going really tight or just barely touching?
thanks

Chrissie
Dec 10, 2015, 3:03:52 PM12/10/15
to mUVe 3D Support Group
Just touching, not more.
Chrissie
Dec 10, 2015, 3:09:11 PM12/10/15
to mUVe 3D Support Group
For me, your problem sounds like your Z is constantly (all the way through the build) wrong, too close to the FEP?
Is it a problem with Homing / end-switch maybe? If the homing is too tight on the FEP, wouldnt ALL layers be too close to the FEP then? Causing too much pressure, and suction forces in all layers?
Is it a problem with Homing / end-switch maybe? If the homing is too tight on the FEP, wouldnt ALL layers be too close to the FEP then? Causing too much pressure, and suction forces in all layers?
mUVe 3D Admin
Dec 10, 2015, 3:35:01 PM12/10/15
to mUVe 3D Support Group
Ryan,
At 100 micron X/Y/Z you should expect about 25mm per hour at decent tunings. So that rook taking 5 hours sounds about right based on the vertical height.
One thing you need to remember. You can also do 2,3,4,5 or however many rooks you can fit in that same amount of time. Which is something that can't be done on a FDM machine. So in those cases your time savings is going to be huge. That being said, even with the best tuning you're probably look at 1.5x the estimated time in CW. It unfortunately seems too that the adjustments to help calculate proper time don't adjust anything, so the estimator is locked and broken.
Suction: In reference to this, each resin is different and even pigment will change the resins in a big way. Black resin has always been a tough one for us, we're not really surprised you're having a little trouble with it. For the best performance stick to the Red colored resin. Too, in your firmware that is running on your custom setup, what is the acceleration value of your Z and E0 axis set to? Too high an acceleration will cause big problems.
Zeroing the build plate: We leave it so that it is just touching, if it's pressing hard then you'll usually have a large ridge in the bottom of the print, or it'll eventually detach. Having a lightly touching build plate and a solidly overcured 1-2 starting layers is the best way to keep things stuck down. When in doubt, overcure overcure overcure. The worst that can happen is the print gets stuck to the build plate, breaks on removal, and needs to be reprinted. But at least you have the satisfaction of a completed print, lol.
Once all parts come into play, you can expect to find that some parts can be printed with very quick peel speeds. Probably 8mm/s or better. But you'll still have to peel slow for the first say 30-80 layers, speed up peeling after that. That's where the big time savings come in.
mUVe 3D Support
Chrissie
Dec 10, 2015, 3:40:49 PM12/10/15
to mUVe 3D Support Group
One other thought regarding forces: if there is too much resin in the vat, and the build plate is completely diving all the time.
Ryan LaBarre
Dec 10, 2015, 4:14:47 PM12/10/15
to mUVe 3D Support Group
Thanks Dean and Chrissie.. Good stuff...
Chrissie. I am the type of person that likes to fill it higher than it should be because i dont want to keep refilling it haha. Ill tone that down.
Dean. The pawn in question is 50mm, so given its .05 i should expect 12.5mm/h so its not far off the expectation. Its crazy though. I just know how the previous owner had this thing (and I saw his prints) he was printing at insane speeds, and it worked. Even my first few prints. I printed my first pawn at 50% scale, so 25mm high (the only other print i got to finish). in 41 minutes at .05.
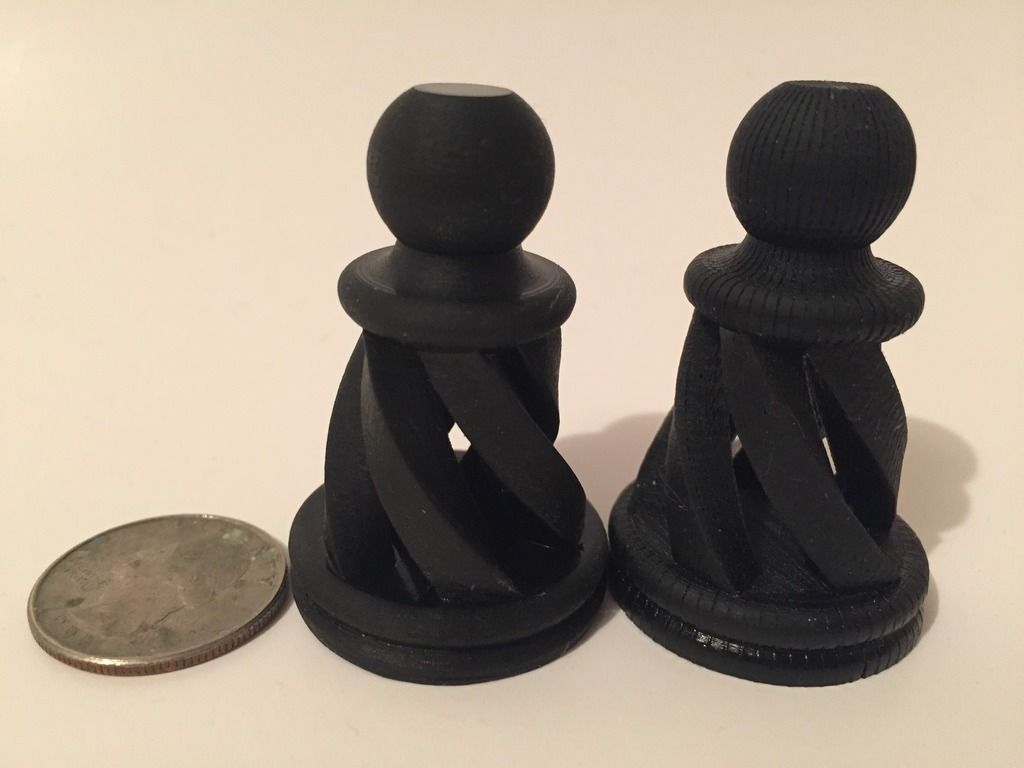
Anyway. here is a picture of the pawn that finished. One is a Formlabs 1+ clone and one is the Muve. I knew DLP quality was insane, but until you really look at them side to side you dont realize just how much different they are in the XY direction.
Chrissie
Dec 11, 2015, 3:54:35 AM12/11/15
to mUVe 3D Support Group
Great Ryan, nice foto!!!
Yes, the quality is breathtaking :-)
Yes, 10mm per hour is about normal. Better fit more parts into the buildplate.
Yes, the quality is breathtaking :-)
Yes, 10mm per hour is about normal. Better fit more parts into the buildplate.
Chrissie
Dec 11, 2015, 3:57:15 AM12/11/15
to mUVe 3D Support Group
Yes, I filled up too much in the beginning too, which leads to very high forces. Now I prefer to keep it as low as possible all the time, the base of the vat just covered, and pouring additional resin in during the build if necessary.
Matthew Caron
Dec 11, 2015, 9:01:45 AM12/11/15
to mUVe 3D Support Group
FWIW, I keep between 3mm and 5mm of resin in the vat. I rarely have had to add anything mid print job unless I'm printing a large volume.
Ryan LaBarre
Dec 11, 2015, 10:23:52 AM12/11/15
to mUVe 3D Support Group
so ive found that very small parts, i can get away with printing around 60 mm/h reliably. ive done a few tests. once i get quarter sized adhesion piece or larger the forces to pull at those speeds are too great.
i also failed a print over night with a huge chunk missing. is that usually undercuring? i think i had it at 6 seconds per layer cure time, up from 2.5s when i got it (and that will work again on small parts).
so truthfully, as everyone knows this is 100x more complicated than SLA. My sla printer i put fluid in, i hit print i go away.
there are SOOOO many more variables to dial in. I feel like perhaps with Matthews resin templates I can cut down the learning curve a bit, but im going to waste a liter of resin per color to dial it in . ive already wasted a liter of black.
thanks :)
mUVe 3D Admin
Dec 11, 2015, 10:57:58 AM12/11/15
to mUVe 3D Support Group
Ryan,
The best way to prevent wasted resin is to always start tuning with slow peel settings, and high cure times. Then it's easier to get completed prints, so that you have visual feedback and can make adjustments. When I test a new resin I usually have it calibrated within 3-4 prints at most. The problem I think here is that you were working with someone else's setup and they left you in a place that was more suited to a seasoned user rather than a newcomer. Especially because you're not using red Resin, black is tougher by a large margin in our experience. Truthfully speaking, the amount of variables we're dealing with here is really minimal when you compare to FDM printing, and our SLA laser machines are also a bit more complex due controlling peels and laser output. When referencing a push button and print setup, you're typically talking about locked settings, and a small number of customization and resin options. So it's really a weighted scale that is eventually decided by your needs as an operator. But comparing the two typically means you're comparing very different types of machines with different target audiences.
Read through the firmware readme and the getting started instructions so that you know all the codes and what they mean, go through your start, lift, and ending GCode and make sure it's what you want to happen. Set your peels speeds to 1-2mm/s and don't use advanced peel techniques, set your initial layer cure times to something like 45-60 seconds, your standard layer times to 10 seconds, and see if you don't at least get some output each time. No matter what the resin. If you have a technique like that to start each new material, you'll save a lot of material. It's also useful to always use a standard part as the starting part each time. Then you have a baseline that you personally, visually, know. So you can use that moving forward to help tune each new resin. We typically use the Make Magazine SLA torture piece from Thingiverse once we think we have it dialed in. It's tiny and wastes very little resin if you have a failure.
Having the chunk missing is usually an undercure, or pigment settling situation. Any time you see that it's because curing couldn't take place anymore and it is slowly overcoming the ability to print. That's why it is usually missing and starts tapering at angle getting large along the way.
mUVe 3D Support
Ryan LaBarre
Dec 11, 2015, 11:24:21 AM12/11/15
to mUVe 3D Support Group
good stuff bossman. I got cocky :) i got a machine that worked well (i assume, i have no true proof, but i trust him) for the last user. so i figured i could just hit the ground running.
I will go back to the basics.
I did get a good print when i went SUPER slow. so ill go back to that and see what happens. i have some red here ill test with too. screw the black for now.
Ryan LaBarre
Dec 11, 2015, 12:49:06 PM12/11/15
to mUVe 3D Support Group
so im running a test right now with settings at
Red MJ SF
10mm peel distance
20mm/m bottom layers
30mm/m top layers.
so thats 30 seconds per peel on the bottom
and 20 seconds for other layers.
Given my previous peel speeds of 100 (defined by previous owner) for normal layers thats like 4 seconds to move 10mm or 2.5mm/s so its not far off... at those speeds I was getting NO love whatsoever from the peel. Perhaps i wasnt curing long enough at the same time.

João Maia e Silva
Dec 11, 2015, 2:41:51 PM12/11/15
to mUVe 3D Support Group
It is remarkable how settings can change between machines
FYI, my last settings for the MJ SF red, which I've been improving in the last few days are:
D = 4; R = 3; S= 3 and P = 0; I just manipulate factors in the G-code, I have set every parameter in CW regarding the peel move to 1
I'm not currently using $curslice, there's something wrong on that layer transition which I haven't understood yet
3 bottom layers
15 sec exposure per bottom layer
2 sec exposure per layer
0.05 mm layer
and it is working quite nice, and I might reduce even further the layer cure time
best
Ryan LaBarre
Dec 11, 2015, 2:56:19 PM12/11/15
to mUVe 3D Support Group
how big of parts are you talking?
I can run those settings as well if the part is very small.
once it gets any size to it, i cant.
I really think some of the difference between printers can only be attributed to build plate pressure against the vat. thats one of the only REAL variables if All software things are equal.
im curious to see how the successfull folks have theirs set.
what i do is with an empty vat, lower it until it touches and i have no wiggle room when i press all four corners. its tight.
mUVe 3D Admin
Dec 11, 2015, 3:02:54 PM12/11/15
to mUVe 3D Support Group
This is mostly because of the array of factors at play. Unless you're also sharing your projector, mask, lamp life, and also X/Y resolution in microns, a direct comparison can't really be made. This is why our starting profiles are so generalized, though we'll be updating them in the near future to better handle the FlexVat. We're still sharing the original QSil and FEP on Glass profiles at the moment.
On top of all that, there have been different versions of the resins. So there's a possibility a difference could lie there as well.
This is why at the end of the day, until we have lots of cheap sensors and the capability to auto calibrate, or a database connected software with a feedback loop, the best thing you can do to enable yourself is to learn the machine and to understand how your changes in the software effect the output. Once you get that down the rest is easy.
mUVe 3D Support
Chrissie
Dec 11, 2015, 3:34:07 PM12/11/15
to mUVe 3D Support Group
Ryan, for me, in hindsight, the 2 most important points: at first, use a standard calibration part (with a thick , 5mm base), and basic standard layertimes and peelmoves (maybe ultra slow for the first 30 layers). And use a standard easy resin like the red that comes with the Muve3d. Then it should work nicely. The whole process and machine are very robust, and easy to dial in, if you do it like this.
Ryan LaBarre
Dec 11, 2015, 3:58:16 PM12/11/15
to mUVe 3D Support Group
its funny i just want to produce good parts now :) im not patient, but yet i do love tinkering as well... its like when im done tinkering and things just work, i get bored... then i buy some other printer.
I mean i had my SLA laser printer for all of 3 weeks before i bought the muve3d haha. and it despite a burnt out LCD is working quite great.
im in hour 3.5 of my red, marvin keychain at incredibly almost molasses speeds. if it produces a part, ill work up from there.
Reply all
Reply to author
Forward
0 new messages