
Juan Antonio
- Module Bluetooth HC06.
- Keypad 4x4.
- Module I2C to Keypad.

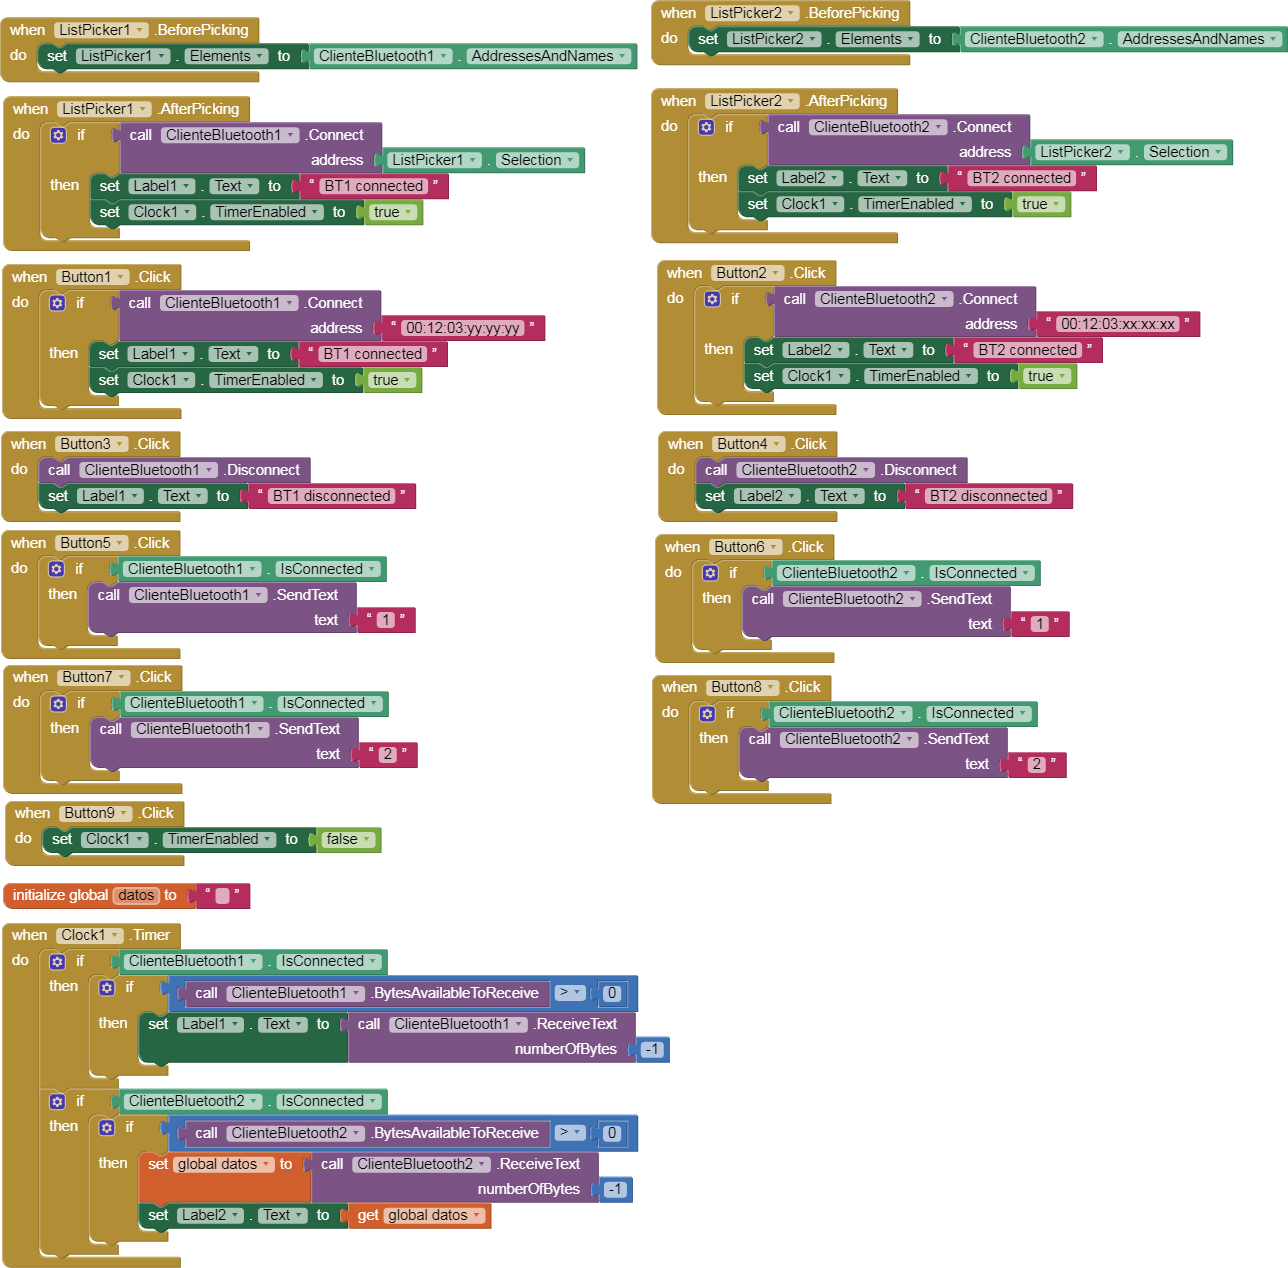
1.- Choose BT1 and/or BT2 by ListPickers
or
2.- If you know address Mac Bluetooth, connect directly by Buttons.
3.- You can ON/OFF Arduino LED13 of BT1 and/or BT2
4.- If you push a key in keypad of BT1, send a char to Label1
5.- If you push a key in keypad of BT2, send a char to Label2
Arduino code:
/////////////////////////////////////// two_bluetooth.ino ///////////////////////////////////////////////////////
// Juan A. Villalpando
// KIO4.COM

#include <Wire.h>
#include <Keypad_I2C.h>

char val;
#define LED13 13

const byte ROWS = 4;
const byte COLS = 4;

char keys[ROWS][COLS] = {
{'1','2','3','A'},
{'4','5','6','B'},
{'7','8','9','C'},
{'*','0','#','D'}
};

byte rowPins[ROWS] = {0,1,2,3};
byte colPins[COLS] = {4,5,6,7};

int i2caddress = 0x27; // Debes cambiar esta dirección por la de tu módulo.

Keypad_I2C kpd = Keypad_I2C( makeKeymap(keys), rowPins, colPins, ROWS, COLS, i2caddress);

void setup(){
  Serial.begin(9600);
  kpd.begin();
  pinMode(LED13, OUTPUT);
}

void loop(){
// Leer datos.
if( Serial.available() ) {
  val = Serial.read();

  if( val == '1' )
  { digitalWrite(LED13, HIGH);}

  if( val == '2' )
  { digitalWrite(LED13, LOW);}
}
// Enviar datos.
  char key = kpd.getKey();
  if (key){
    Serial.print(key);
    Serial.print("\n"); // Fin de línea. Importante.
  }
  delay(100);
}
///////////////////////////////////////////////////////
7.- Load this code in each Arduino.
8.- Set you addres i2c module in this line: int i2caddress = 0x27;
9.- What is the i2c address of my module?
With this code you can get i2c address: http://kio4.com/arduino/31pantallaLCD.htm#i2c
10.- Remember:
Clock.TimeInterval = 90 < delay(100);
Regards.
Juan Antonio Villalpando.
http://kio4.com/appinventor/9X_bluetooth_dos_arduino.htm (Tutorial in Spanish)