Skip to first unread message

SteveJG
May 17, 2018, 6:36:41 PM5/17/18
to mitappinv...@googlegroups.com
App Inventor GPS Trak Basics
Simple trak, marker and information construction
This exercise shows a way to display a simple location waypoint trak using coordinates from a csv table file with an MIT Map component. The example creates a trak between multiple locations (waypoints), a Marker at each location and displays information about the location as a Marker Title or Description using design time components.


Posting this csv results in a trak between the Washington Capital, the White House and the Lincoln Memorial ( 38.889931,-77.009003\n38.897957,-77.036560\n38.8892686,-77.05017599999996 ). The \n control character is embedded in the csv text to create the table format. The example shows how to use Map component design time components. Using run time components is more complex.
An aia file, MITMapTracksSample.aia is attached.
Static Map Traks
This example app has two parts. The first part recreates the Google Static Map paths example ( https://developers.google.com/maps/documentation/maps-static/intro#quick_example ) using App Inventor. It recreates the trak (called a path in the article) by using the information in the section Maps Static API Paths. Use the Static Map Path Example button to display this panel.

The second part (clicking the Auto Trak box) creates traks between waypoints in real time at your location. The trak is saved to a List. Therefore, the trak is ephemeral, it will disappear when you exit the app. If you want to save the trak for future use, code a save routine. Save the theTrak List to a TinyDB ; then retrieve the saved List from the TinyDB to display it (code is not shown).
A Google Static Map Url and a WebViewer displays the map, shows the current location with a map pin and displays a trak line between visited points. The map pin updates your present location at 30 second intervals.

The screen capture shows a track of points made with a device on a table top. Map pins with simple ID's can also be plotted (not shown in the example) at each waypoint. A developer could also produce a series of geocoordinates for each waypoint in a List . This introduction does not show that List nor does it show how to save traks for future display using a TinyDB. Save each trak before closing the app to a TinyDB with perhaps a tag showing the date or a user provided tag in the app. Of course, saving tracks requires lots of additional code.
There is a manual map zoom method. The map centers on the last known device location. The zoom values are provided by a ListPicker. A Slider could be used as well as a ListPicker to change the zoom factor. To zoom, the url must be reproduced with the new zoom factor and sent to the WebViewer url., Changing the map scale this way is awkward but does work, depending on how your app is used, it might not be necessary to change the zoom at all.
There are minimal error handling routines in the example app. The basics of a Static Map are shown, the bells and whistles your app might require are up to you.
Here are the Blocks for both parts 1 and 2

Edit: Since the article was posted, Google changed their policy regarding Static Map Urls and free usage; a project key is now REQUIRED as the last item in the url string. Get one from Google. See this link https://developers.google.com/maps/documentation/maps-static/intro#quick_example It shows where you have to place the api key.
How to Use the Trak App
Click Check for Auto Traks to start making traks. The GPS hardware must acquire two separate locations to produce the initial trak display. It takes over a minute or more to achieve the necessary satellite fixes. Your app is not dead, it is just waiting to properly display the first trak segment.
Clear Trak completely erases your current trak. To save it, write additional code blocks.
Your device must be connected to WIFI or a cell network. The app will not work in an emulator; a real device is required.
The aia is StaticMapTrackSimple.aia
MIT Map Component Traks
This is the Map Component Trak example. The Map component documentation is here http://ai2.appinventor.mit.edu/reference/components/maps.html It is a fantastic resource. I recommend a developer read the entire list and descriptions of tool features. Unfortunately, Map is a huge component. To develop a successful app, you need to understand the terms and tools.
The Map component displays the map, shows the current location with a map Marker that is a person or a small green arrow ( depending on how the device and app is used) and displays a trak line (displayed with a LineString) between visited points. To simplify the example, no run time Map Markers are shown, LineString traks only are used. Search the Forum for MIT Map Create Markers, I believe there is an example aia showing how to use run time Markers. (This link shows some Blocks https://groups.google.com/forum/#!searchin/mitappinventortest/MIT$20Map$20Create$20Markers$20run$20time%7Csort:date/mitappinventortest/TzgV7czL-mY/ngMcQT3oBgAJ . Another is here https://groups.google.com/forum/#!searchin/mitappinventortest/MIT$20Map$20aia%7Csort:date/mitappinventortest/UI4LtbA5f68/JTJx66UFAgAJ . I think there is another link that shows an example aia )
The screen capture shows a track of points made with a device on a table top (not moving, apparent motion is due to the Accuracy and uncertainty of the actual GPS determined location over a period of time.

Maps can be made to zoom manually, however, you use your fingers on the map to zoom and un-zoom with the example app. Easy compared to how this is done using the Static Map example.
This version of the app uses the event handler of a LocationSensor.LocationChanged block to continually update the user's location and traks every 30 seconds. A routine to use an IntervalTime larger than 30000 ms for the first satellite link would make the app load quicker probably but would require extra code. You will have to code that feature. Instead of a LocationSensor, a developer can use a Clock event handler to used with the Map1.ShowUser block. Calling the Map1.ShowUser forces a Map update. The Map component has its own LocationSensor that refreshes about each minute, however the built in LS does not have a LocationChanged event handler.
The app saves a List containing the list of waypoints. The list is not permanent unless you write the blocks to 'save' the trak list for future use in a TinyDB.
Here are the Blocks:

How to add run time Markers to the Project -------------------------------
The following modifications (circled in Fuchsia) will permit display of Map Markers in the app with a minimum of code. You must have a single design time Marker in your App with Visible set to False; e.g. Marker1.Visible to False.
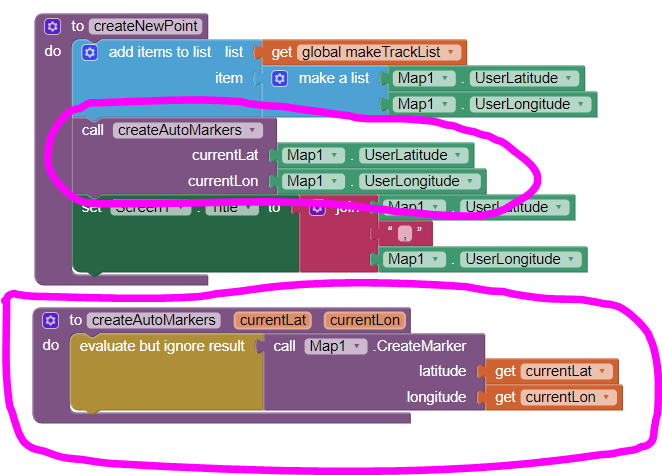
and you can produce a display like this:

The createAutoMarker is a Procedure you need to create.
More difficult is to provide ID information and a timestamp, change the Marker color etc. You will use the Any Component blocks (see the links above regarding run time Markers). If you add more information the block code rapidly becomes very complex. Easier is to add a conditional statement to toggle the createAutoMarkers block to use it or not dependent on whether you want Markers to display (not shown how to do this...it is simple)..
---------------------------------------------------------------------------------------------------
Click Auto Trak to start making traks. The GPS must acquire two separate locations to produce the initial trak display. This will take over a minute. Your app is not dead, just waiting to properly display the first trak segment.
Clear Trak deletes the current Trak and updates the display. Careful, the app does not have blocks to use a TinyDB to save the Trak as a LIst. A project for you.
The MITMapTracksLocationSensor.aia is the complete app.
Other
The traks that are used and created with these apps are not standard trak files as used by some GIS programs. The trak list created used in the Static Map example is very different .With a little ingenuity, 'standard' trak files can be created from the trak List or a 'standard' trak can be converted to the format use for either technique.
There are numerous ways to build these apps. If you come up with a better idea, please post your solution.
I hope this is useful. I show how to do some of the basics. These examples were 'cut out' of two Projects that were significantly more elaborate. A developer can make a very powerful app using either a Static Map (which creates a 'real' Google Map display) or using the MIT Map component (which connects to the OpenStreetMaps server and that uses the OSM API).
Regards,
Steve
Reply all
Reply to author
Forward
0 new messages