ESP32 BLE MIT2 app. How to receive AND send data at the same time over BLE?

1,278 views
Skip to first unread message

Tim Vos

unread,
Sep 13, 2019, 10:19:26 PM9/13/19
to MIT App Inventor Forum
Hi everyone,

I have been struggling for a while now with my MIT2 app. The app contains 4 sliders and connects via BLE to an ESP32 microcontroller. The values of the sliders (ranging from 20 to 255) are sent to the ESP32 and some random junk, solely for testing purposes, is sent back from the ESP32 to the app running on an Oppo R17 Pro. 

So far I managed to get both the sending and transmitting working in the app, however only separately. See attached screenshots of what is happening. Basically when the app is configured with the "RegisterforBytes" block the app will receive the data from the ESP32, as expected. However, at that stage the app stops sending the slider values to the ESP32. When I delete the RegisterForBytes block the values are sent again to the ESP32. This has really been puzzling me, especially since with nRF Connect I can both send AND receive data at the same time, see screenshot.

The code running on the ESP32 is basically a slightly adapted version of Neil Kolban's UART program. 

Does anyone know what's happening here? Any help would be greatly appreciated!


IMG20190914115443.jpg
Screenshot_2019-09-14-11-48-10-23.jpg
Screenshot_2019-09-14-11-48-13-78.jpg
Screenshot_2019-09-14-11-54-18-23.jpg
BLE APP.png
nRF screenshot Rx and Tx characteristics.jpg
nRF screenshot Tx characteristic.jpg
Serial Port ESP32 with nRF Connect.jpg

Chris Ward

unread,
Sep 14, 2019, 6:49:39 AM9/14/19
to mitappinv...@googlegroups.com
Hello Tim

You are trying to send and receive with only one instance of the BLE module, which can be done, but not simultaneously.  Think of the BLE - Device connection as a single railway line. You can send your train from BLE to Device, but you can't send another train from Device to BLE without a crash occurring.

A solution is to use two instances of BLE, one to send, one to receive. 

Tim Vos

unread,
Sep 14, 2019, 4:17:48 PM9/14/19
to MIT App Inventor Forum
Hi Chris,

Thank you for your reply. I get what you're saying. My choice of words was a bit poor. "Simultaneously" should be read as "as soon as I include the RegisterForBytes block the program stops to work as expected". With the same code running on the microcontroller and nRF Connect on my phone I am able to both send and receive data. But with the app inventor app running with the RegisterForBytes block included the sending of data over the Tx UUID becomes blocked it seems.

What do you mean by adding another BLE device? How do I go about?

Tim

Chris Ward

unread,
Sep 14, 2019, 4:49:05 PM9/14/19
to MIT App Inventor Forum
Hello Tim

Firstly - I said another "instance" of BLE, not another device - When you drag and drop BLE from the Pallet you get instance BluetoothLE1. Repeat that D & D and you get instance BluetoothLE2.

However, you are not sending-receiving simultaneously and can simply use the "Read Bytes" block - that gives you more control, perhaps manually via a Button or periodically via a Clock Timer. When you use the "Register For Bytes" block, BLE is constantly in a detection mode for the arrival of that data type and therefore dominates the connection, as you discovered.

Tim Vos

unread,
Sep 14, 2019, 8:09:08 PM9/14/19
to MIT App Inventor Forum
Okay, I will give that a go, adding another BLE instance.

I have already tried the unregister for data trick. That doesn't work. As soon as I include the RegisterForBytes block the program doesn't do what it's supposed to do anymore. Hence I believe there's an issue with that RegisterForBytes block... especially because other apps (nRF Connect) do work correctly. The reason that RegisterForBytes block was created is to facilitate notifications (which work in a similar fashion as websockets for HTML, i.e. pushing notifications from server to client without the client requesting).

Has anyone come across this same issue? Could anyone send me a working app that both transmits and receives data?

Tim Vos

unread,
Sep 15, 2019, 12:48:24 AM9/15/19
to MIT App Inventor Forum
Adding to my latest msg, without RegisterForBytes I do not receive any data at all. The use of read bytes only seems to work in combination with RegisterForBytes... 😒

Chris Ward

unread,
Sep 15, 2019, 6:36:06 AM9/15/19
to MIT App Inventor Forum
Hi Tim

without RegisterForBytes I do not receive any data at all.


Are you saying that a block like this does not work?:

BleReadBytes.png


...ensure that Bluetooth is switched on, both devices.

...Smartphone: ensure that Location is switched on 

...Test as an APK


Tim Vos

unread,
Sep 15, 2019, 7:42:24 AM9/15/19
to MIT App Inventor Forum
Hi Chris,

I've only tested.apk files directly on my Oppo R17 pro.

A block like you suggested would probably work provided I send the messages from my microcontroller with a write command. However I absolutely need it to work as a notify command because the messages sent come from a potmeter attached to the uC, hence they may change at any time.

I will give it a go though, but will have to wait a week or so... 😣

Why does the RegisterForBytes take control of the entire communication? Why does it not clear up the channel as soon as a byte is received, like it's supposed to as per BLE protocol?

Gerard Bucas

unread,
Sep 15, 2019, 7:44:12 AM9/15/19
to mitappinv...@googlegroups.com
Tim Vos

I suggest

1.  you put back the "RegisterForBytes" block into your Connected Event Handler (it is needed!)

Screen Shot 2019-09-15 at 7.36.22 AM.png


2. You REMOVE the "Call BleutoothLE1.ReadBytes" block from the "BluetoothLE1.BytesReceived" block.
When your "RegistForStrings", the BytesReceived Event will automatically be called each time some Bytes are available. There is no need to call the ReadBytes block (again or ever!), So remove that block & see if it solves your problem.

Screen Shot 2019-09-15 at 7.37.23 AM.png


Chris Ward

unread,
Sep 15, 2019, 7:54:42 AM9/15/19
to MIT App Inventor Forum
Hi Gerard

That is just a confusion of the different things Tim has been trying. Using Register for Bytes is a problem because it is preventing any kind of send

Gerard Bucas

unread,
Sep 15, 2019, 8:06:56 AM9/15/19
to mitappinv...@googlegroups.com
PS:
Personally I use only StringsReceived (instead of BytesReceived) with my nrf based BLE module.
With StringsReceived one "simply" RegisterForStringsReceived and then waits for the "StringsReceived" event to be (successively) called automatically. I NEVER use "ReadStrings". The whole purpose of "RegisterFor...", is to automatically receive whatever you registered for (when data is sent by the BLE device and becomes available). 

I have used this for a number of different BLE devices and have never had any problems.

Maybe your particular device needs "Bytes" to be read (instead of Strings) - possible but I don't know - but I would imagine the "mechanism" is the same. In other words once you have "Registered For....", you simply "sit back & wait" for the "BytesReceived" (or StringsReceived depending on what you registered for) event to be raised (executed/called) automatically.

Good luck

Gerard

Chris Ward

unread,
Sep 15, 2019, 8:17:49 AM9/15/19
to mitappinv...@googlegroups.com
Tim

Some stones left unturned:

1) Ensure you are using the latest version BLE extension edu.mit.appinventor.ble-20181124.aix
2) Post your Script for the ESP32 microcontroller
3) Oppo R17 Pro is running on Android 8.1 Oreo - is that correct or have you upgraded it?

Tim Vos

unread,
Sep 15, 2019, 11:07:10 AM9/15/19
to MIT App Inventor Forum
Hi Chris and Gerard,

Currently I haven't got the chance to test as I fried my ESP32 playing around with a potentiometer (and 12V unfortunately...). To answer your 3 questions Chris:

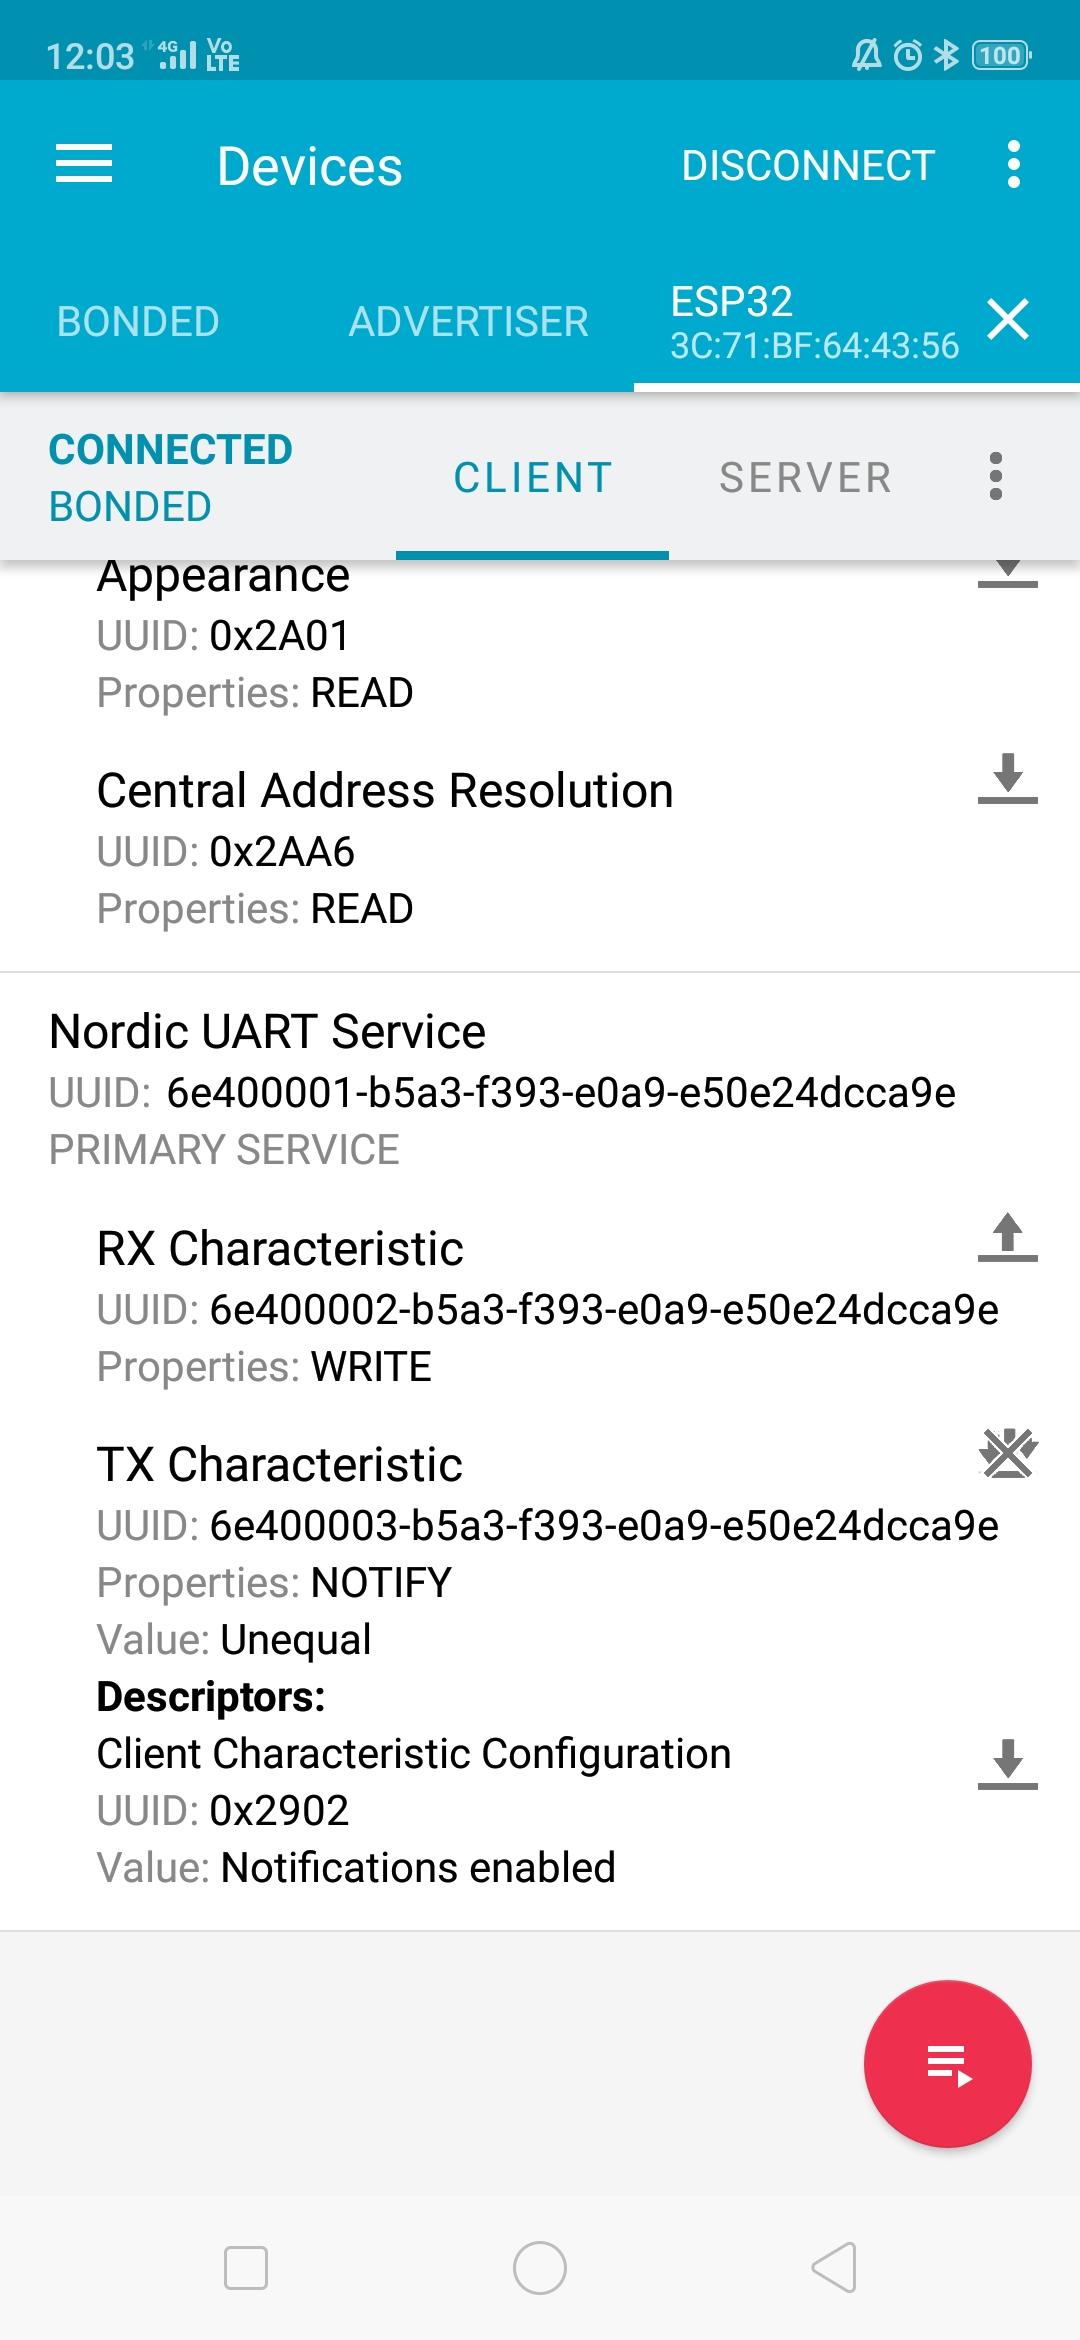
1. Yes, I had already checked that and made sure that that is the case
2. See below:
#include <BLEDevice.h>
#include <BLEServer.h>
#include <BLEUtils.h>
#include <BLE2902.h>
#include <BLESecurity.h>

BLEServer* pServer = NULL;
BLECharacteristic* pTxCharacteristic;
BLECharacteristic* pRxCharacteristic;
BLECharacteristic* pRxPot1Characteristic;
bool deviceConnected = false;
bool oldDeviceConnected = false;

static const int PWM_Pin1 = 13; //here we set the pins that will output a PWM signal
static const int PWM_Pin2 = 12;
static const int PWM_Pin3 = 25;
static const int PWM_Pin4 = 26;

const int potPin = 34;
int potValue = 0;

// setting PWM properties
const int freq = 5000;  //a 5kHz frequency assures that LED's which are connected do not flicker. It also gives us a signal that many MOSFET's, for amplification, are capable of handling.
const int ledChannel_1 = 0; //channels 0 and 1 share same freq. as do 2,3 and 5. Internally the ESP32 microcontroller sets a led channel that is later assigned to pins.
const int ledChannel_2 = 1;
const int ledChannel_3 = 2;
const int ledChannel_4 = 3;
const int resolution = 8; // apparently the resolution of the PWM can be altered. 8 bits gives us 255 steps.

String PWM_state_1;
String PWM_state_2;
String PWM_state_3;
String PWM_state_4;

// See the following for generating UUIDs:


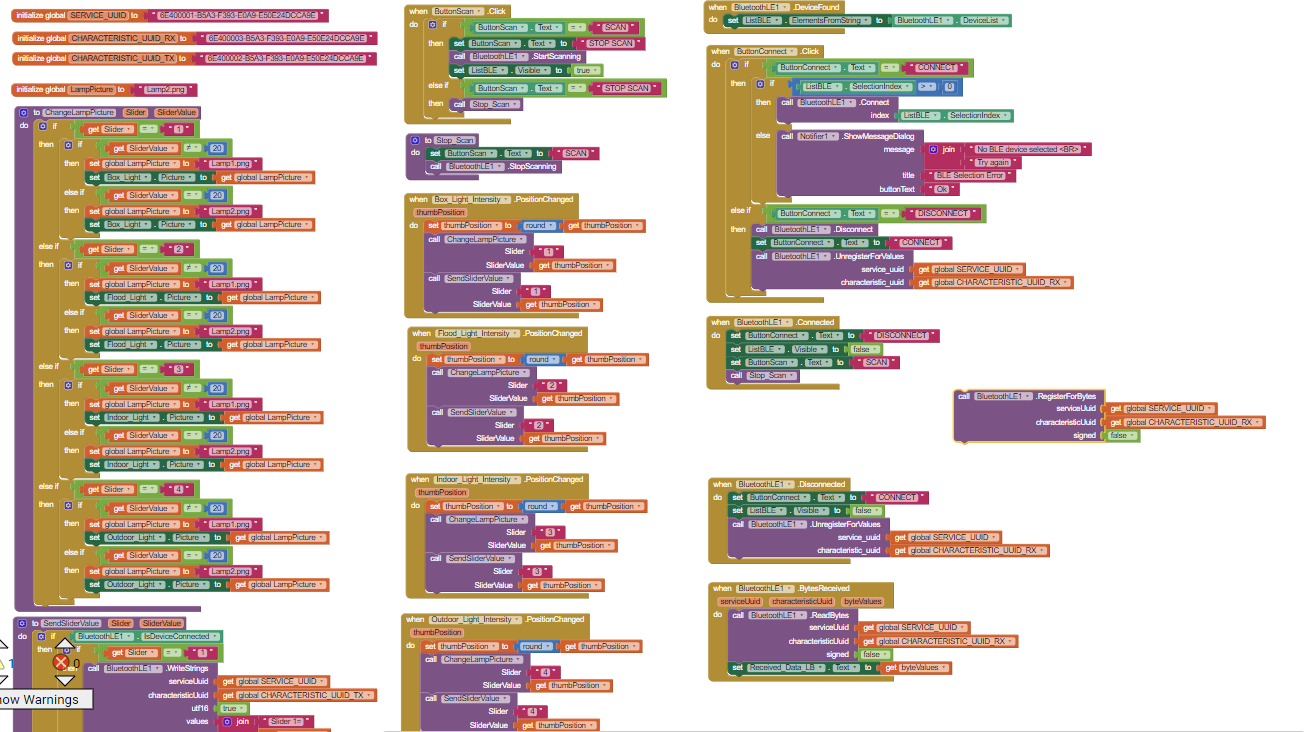
#define SERVICE_UUID           "6E400001-B5A3-F393-E0A9-E50E24DCCA9E"
#define CHARACTERISTIC_UUID_RX "6E400002-B5A3-F393-E0A9-E50E24DCCA9E"
#define CHARACTERISTIC_UUID_TX "6E400003-B5A3-F393-E0A9-E50E24DCCA9E"

int OldPotmeter = 0;
int NewPotmeter = 1;
int dutyCycle = 0;

//The MyServerCallbacks handles the BLE connection status. It sets flags to true or false so it knows whether it is connected or disconnected.
class MyServerCallbacks: public BLEServerCallbacks {
    void onConnect(BLEServer* pServer) {
      deviceConnected = true;
      BLEDevice::startAdvertising(); //the start advertising is used here to enable multiple connections. Normally after a connection the server stops advertising, hence it is repeated here.
      Serial.println("Client connected");
    };

    void onDisconnect(BLEServer* pServer) {
      delay(500);
      deviceConnected = false;
      Serial.println("Disconnected");
    }
};


//The MyCallbacks handles RECEIVED data from the app.
class MyCallbacks: public BLECharacteristicCallbacks {
    void onWrite(BLECharacteristic *pCharacteristic) {
      std::string rxValue = pCharacteristic->getValue();
      String msg = "";
      String sub1 = "";
      String sub2 = "";
      if (rxValue.length() > 0) {
        for (int i = 0; i < rxValue.length(); i++) {
          msg += rxValue[i];
        }

      }
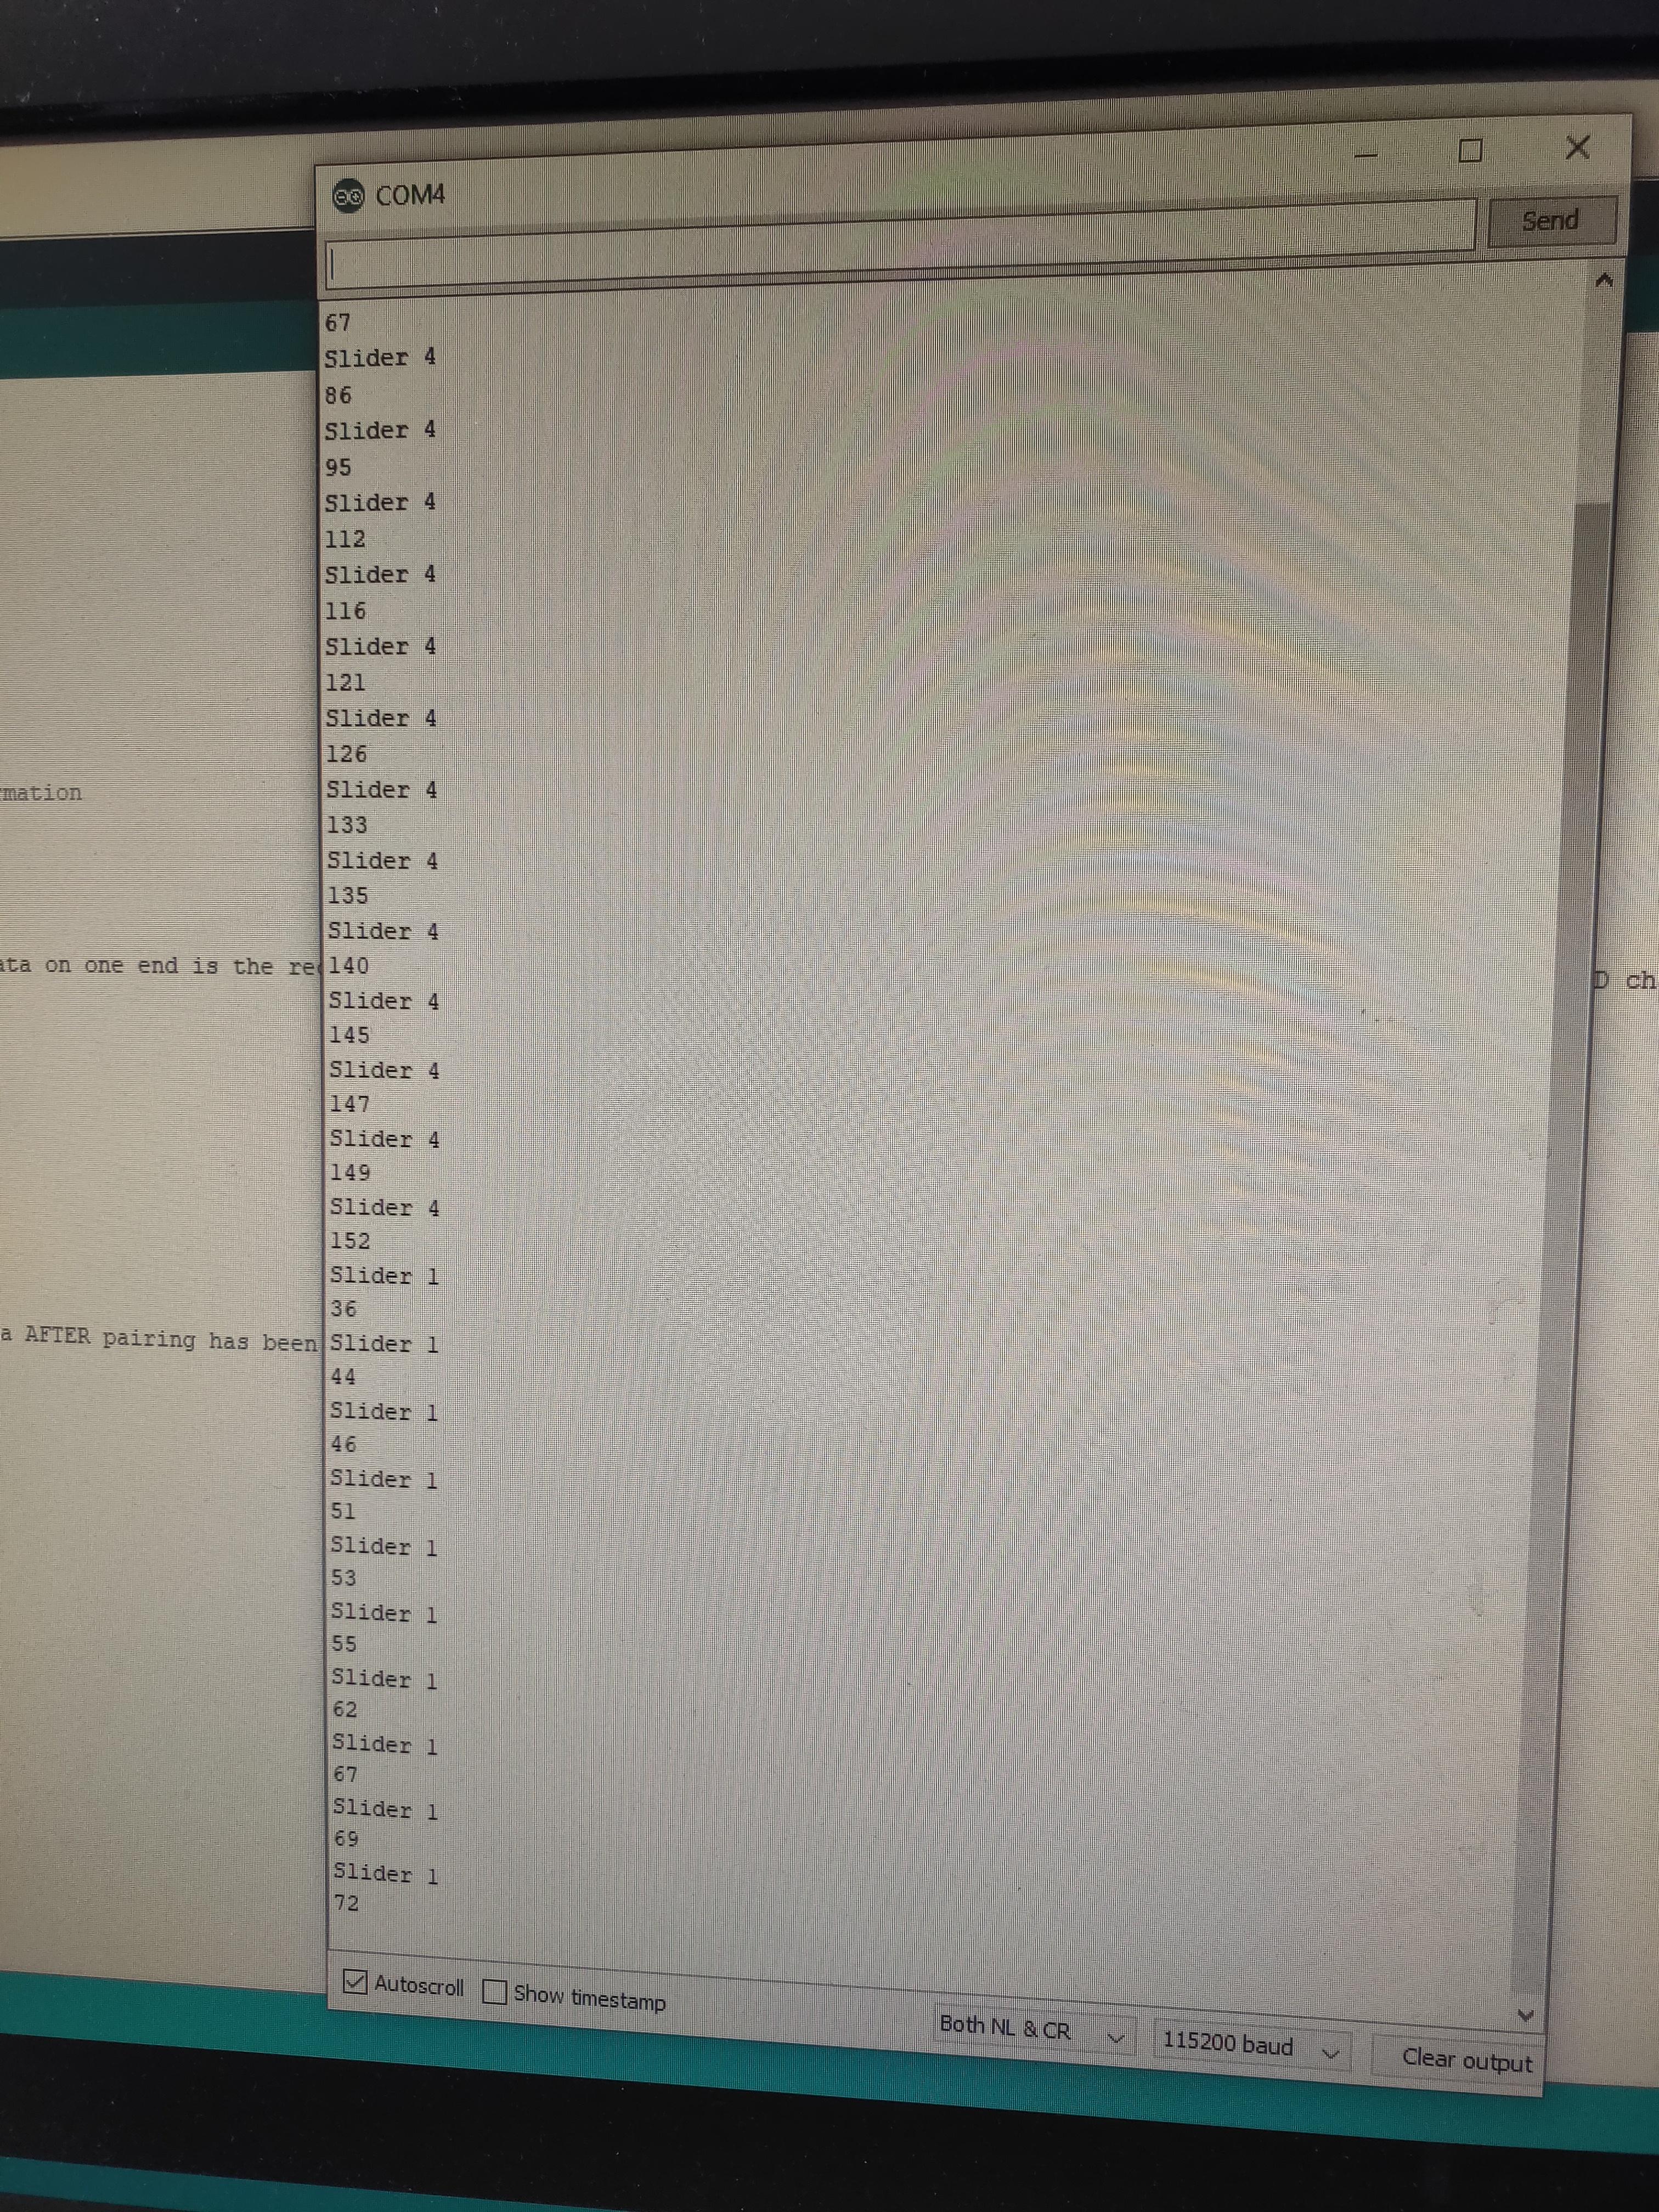
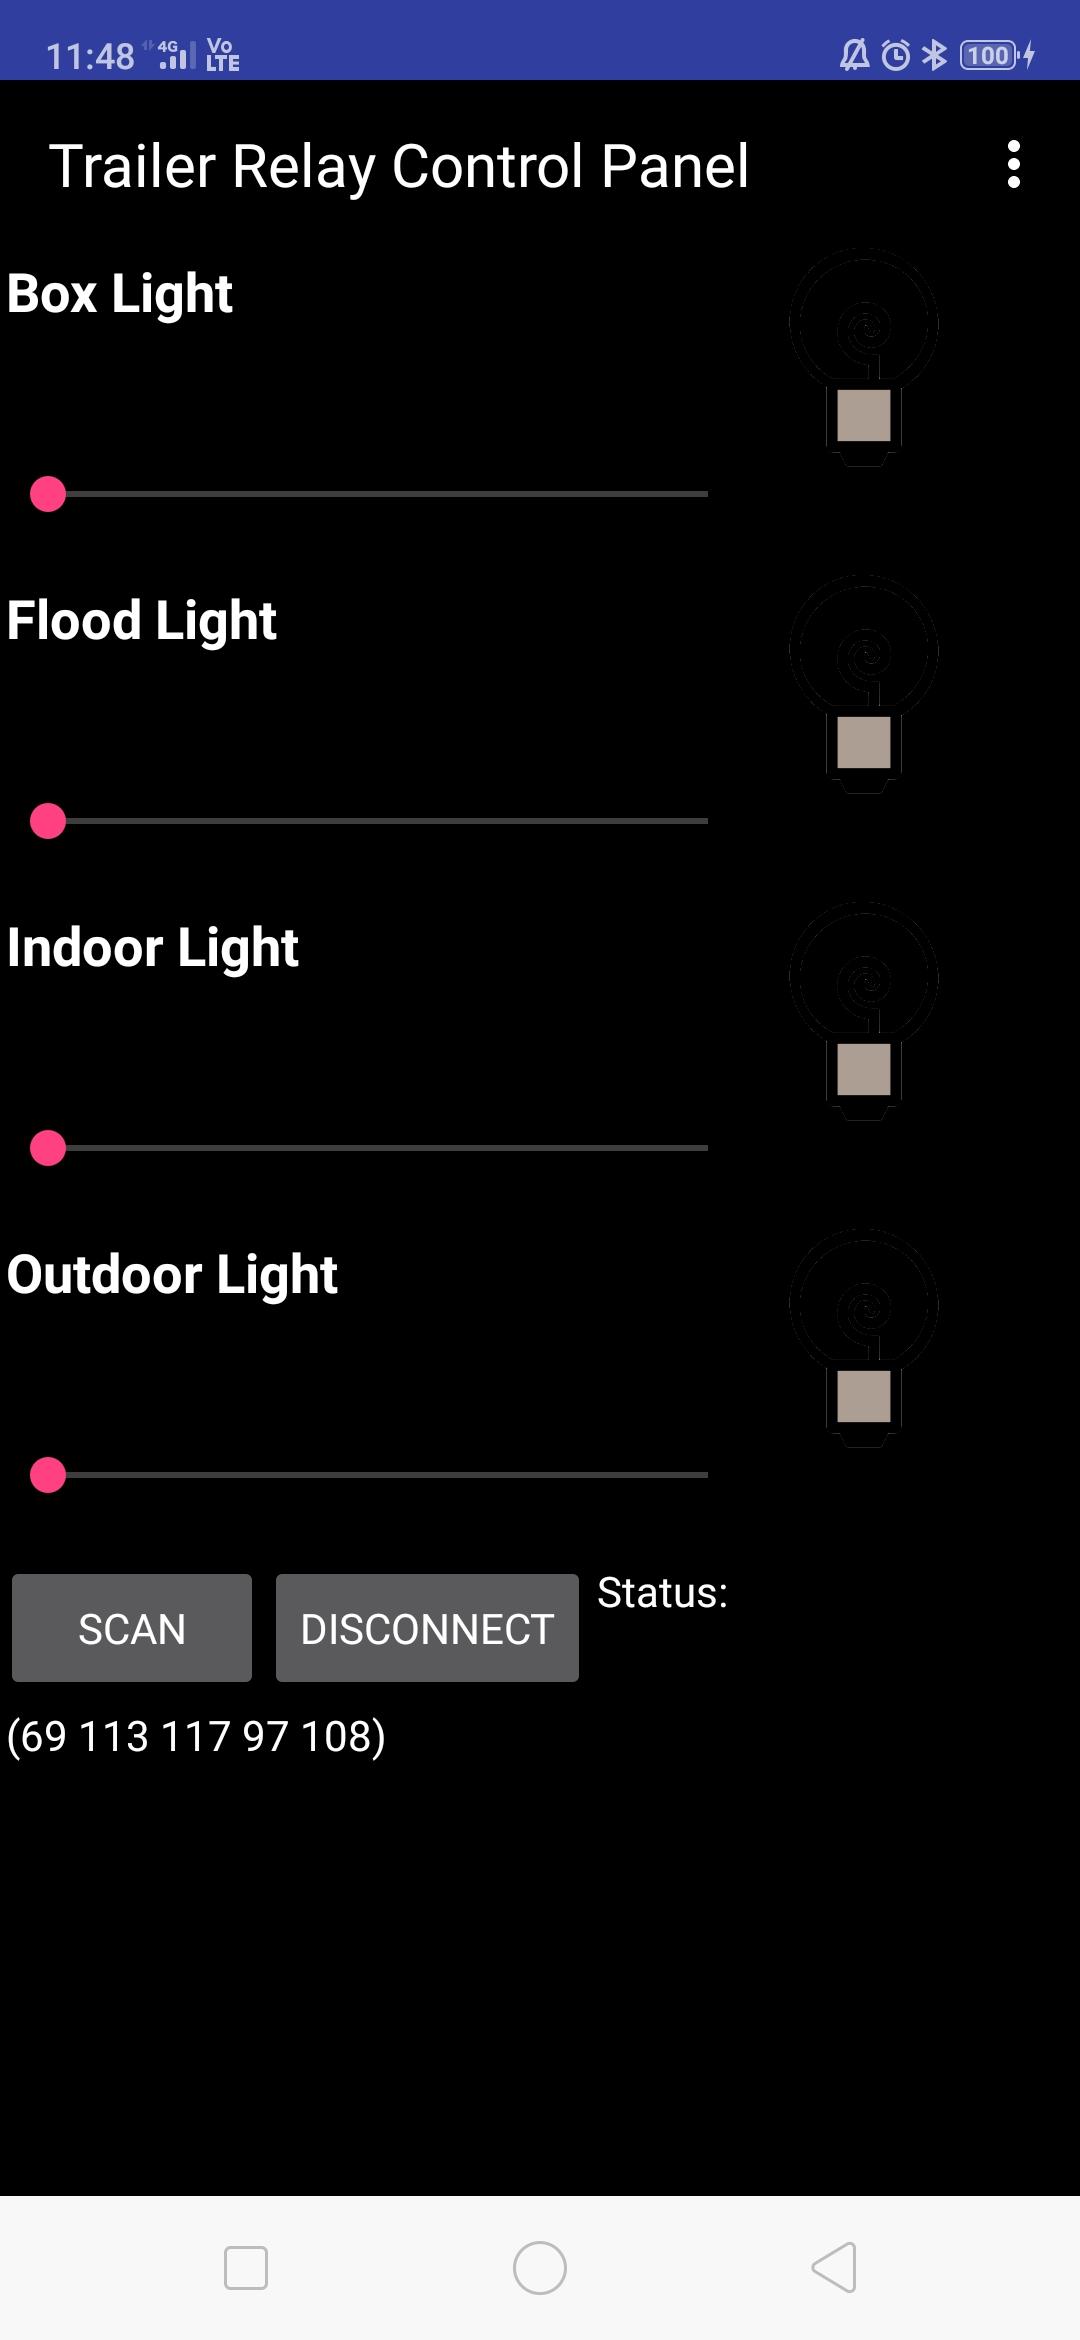
      // Do stuff based on the command received from the app. For now we print the slider nr and its corresponding value to the Serial Monitor screen.

      sub1 = msg.substring(0, msg.indexOf("="));
      sub2 = msg.substring((msg.indexOf("=") + 1), (msg.length() - 1));
      Serial.println(sub1);
      Serial.println(sub2);
      if (sub1 == "Slider1") {
        ledcWrite(ledChannel_1, sub2.toInt());
      }
      else if (sub1 == "Slider2") {
        ledcWrite(ledChannel_2, sub2.toInt());
      }
      else if (sub1 == "Slider3") {
        ledcWrite(ledChannel_3, sub2.toInt());
      }
      else if (sub1 == "Slider4") {
        ledcWrite(ledChannel_4, sub2.toInt());
      }
    }
    //With this code here the callback function also sends back text to the Client (app on phone) upon a change in value. However, when a slider is changed it pushes that value back as well.
    //In conclusion, the callback function works for both received and sent messages.
};

class MySecurity : public BLESecurityCallbacks {

    uint32_t onPassKeyRequest() {
      ESP_LOGI(LOG_TAG, "PassKeyRequest");
      return 123456;
    }
    void onPassKeyNotify(uint32_t pass_key) {
      ESP_LOGI(LOG_TAG, "The passkey Notify number:%d", pass_key);
    }
    bool onConfirmPIN(uint32_t pass_key) {
      ESP_LOGI(LOG_TAG, "The passkey YES/NO number:%d", pass_key);
      vTaskDelay(5000);
      return true;
    }
    bool onSecurityRequest() {
      ESP_LOGI(LOG_TAG, "SecurityRequest");
      return true;
    }

    void onAuthenticationComplete(esp_ble_auth_cmpl_t cmpl) {
      ESP_LOGI(LOG_TAG, "Starting BLE work!");
    }
};

void setup() {
  Serial.begin(115200);
  // Create the BLE Device
  BLEDevice::init("ESP32");
  BLEDevice::setPower(ESP_PWR_LVL_P7);

  // Create the BLE Server
  pServer = BLEDevice::createServer();
  pServer->setCallbacks(new MyServerCallbacks());

  // Create the BLE Service
  BLEService *pService = pServer->createService(SERVICE_UUID);

  // Enable encryption
  BLEDevice::setEncryptionLevel(ESP_BLE_SEC_ENCRYPT);
  /*
     Required in authentication process to provide displaying and/or input passkey or yes/no butttons confirmation
  */

  BLEDevice::setSecurityCallbacks(new MySecurity());

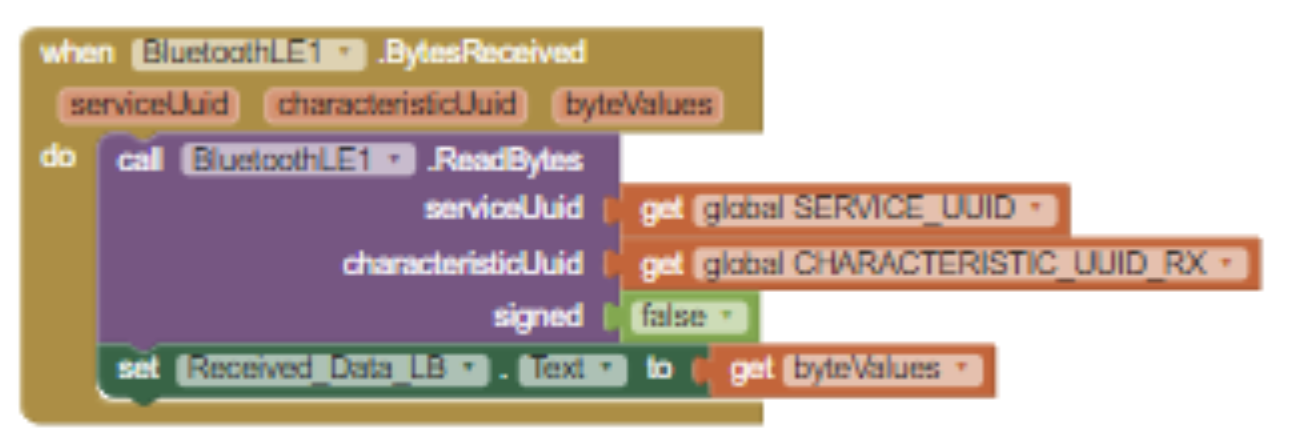
  // Create two BLE Characteristics, one for transmitting (TX), other for receiving (RX). The transmitted data on one end is the received data on the other end and the RX UUID characteristics in the app are the TX UUID characteristics of the ESP32 and vice versa.
  // DO NOT CHANGE THE ORDER/SEQUENCE OF CODE. First TX, then Descriptor, then RX, then Callback
  pRxCharacteristic = pService->createCharacteristic(
                        CHARACTERISTIC_UUID_RX,
                        //BLECharacteristic::PROPERTY_READ  |
                        //BLECharacteristic::PROPERTY_NOTIFY  |
                        //BLECharacteristic::PROPERTY_INDICATE |
                        BLECharacteristic::PROPERTY_WRITE
                      );


  pRxCharacteristic->setCallbacks(new MyCallbacks()); //is the MyCallbacks used to transmit and receive data AFTER pairing has been established???

  pTxCharacteristic = pService->createCharacteristic(
                        CHARACTERISTIC_UUID_TX,
                        //BLECharacteristic::PROPERTY_READ |
                        BLECharacteristic::PROPERTY_NOTIFY
                        //BLECharacteristic::PROPERTY_INDICATE |
                        //BLECharacteristic::PROPERTY_WRITE
                      );
  pTxCharacteristic->addDescriptor(new BLE2902());


  // Start the service
  pService->start();

  // Start advertising

  pServer->getAdvertising()->start();
  Serial.println("Waiting a client connection to notify...");
  esp_ble_auth_req_t auth_req = ESP_LE_AUTH_REQ_SC_MITM_BOND;     //bonding with peer device after authentication
  esp_ble_io_cap_t iocap = ESP_IO_CAP_OUT;           //set the IO capability to No output YES input. Otherwise use ESP_IO_CAP_NONE;
  uint8_t key_size = 16;      //the key size should be 7~16 bytes
  uint8_t init_key = ESP_BLE_ENC_KEY_MASK | ESP_BLE_ID_KEY_MASK;
  uint8_t rsp_key = ESP_BLE_ENC_KEY_MASK | ESP_BLE_ID_KEY_MASK;
  //set static passkey
  uint32_t passkey = 123456;
  uint8_t auth_option = ESP_BLE_ONLY_ACCEPT_SPECIFIED_AUTH_DISABLE;
  // uint8_t oob_support = ESP_BLE_OOB_DISABLE;
  esp_ble_gap_set_security_param(ESP_BLE_SM_SET_STATIC_PASSKEY, &passkey, sizeof(uint32_t));
  esp_ble_gap_set_security_param(ESP_BLE_SM_AUTHEN_REQ_MODE, &auth_req, sizeof(uint8_t));
  esp_ble_gap_set_security_param(ESP_BLE_SM_IOCAP_MODE, &iocap, sizeof(uint8_t));
  esp_ble_gap_set_security_param(ESP_BLE_SM_MAX_KEY_SIZE, &key_size, sizeof(uint8_t));
  esp_ble_gap_set_security_param(ESP_BLE_SM_ONLY_ACCEPT_SPECIFIED_SEC_AUTH, &auth_option, sizeof(uint8_t));
  //    esp_ble_gap_set_security_param(ESP_BLE_SM_OOB_SUPPORT, &oob_support, sizeof(uint8_t));
  /* If your BLE device act as a Slave, the init_key means you hope which types of key of the master should distribut to you,
    and the response key means which key you can distribut to the Master;
    If your BLE device act as a master, the response key means you hope which types of key of the slave should distribut to you,
    and the init key means which key you can distribut to the slave. */
  esp_ble_gap_set_security_param(ESP_BLE_SM_SET_INIT_KEY, &init_key, sizeof(uint8_t));
  esp_ble_gap_set_security_param(ESP_BLE_SM_SET_RSP_KEY, &rsp_key, sizeof(uint8_t));
  Serial.println("Characteristic defined! Now you can read it in your phone!");


  //Configure pins to which PWM signal is written
  ledcSetup(ledChannel_1, freq, resolution);
  ledcSetup(ledChannel_2, freq, resolution);
  ledcSetup(ledChannel_3, freq, resolution);
  ledcSetup(ledChannel_4, freq, resolution);
  ledcAttachPin(PWM_Pin1, ledChannel_1);
  ledcAttachPin(PWM_Pin2, ledChannel_2);
  ledcAttachPin(PWM_Pin3, ledChannel_3);
  ledcAttachPin(PWM_Pin4, ledChannel_4);

  /*//ledcWrite(ledChannel_1, 255); //the PWM signal is fully on at start-up, i.e. initial app load. 
    //ledcWrite(ledChannel_2, 255); 

    PWM_state_1 = "255"; //the value set here is passed to app at first load, i.e. upon first connection or app re-start (also a first connection)
    PWM_state_2 = "255";
    PWM_state_3 = "255";
    PWM_state_4 = "255";
  */
}

void loop() {
  // notify changed value
  if (deviceConnected) {
    if (NewPotmeter == OldPotmeter) { //for now alter between "equal" and "unequal" as a notification for test purposes.
      pTxCharacteristic->setValue("Equal");
      pTxCharacteristic->notify();
      NewPotmeter = 25;
      delay(500);
    }
    else {
      pTxCharacteristic->setValue("Unequal");
      pTxCharacteristic->notify();
      NewPotmeter = OldPotmeter;
      delay(500);
    }
    
  }
  // disconnecting
  if (!deviceConnected && oldDeviceConnected) {
    delay(500); // give the bluetooth stack the chance to get things ready
    pServer->startAdvertising(); // restart advertising
    Serial.println("start advertising again");
    oldDeviceConnected = deviceConnected;
  }

  // connecting
  if (deviceConnected && !oldDeviceConnected) {
    // do stuff here on connecting
    oldDeviceConnected = deviceConnected;
  }
  /*
  potValue = analogRead(potPin);
  Serial.println(potValue);
  Serial.println(potValue);
  dutyCycle = map(potValue, 0, 4095, 20, 255);
  ledcWrite(ledChannel_1, dutyCycle);
  delay(500);
  */
}

3. Correct, it's running on Android 8.1.0 

@Gerard, thanks heaps for the suggestion. I haven't got the chance to test that but I will soon. Once complete I will write my feedback here. I sure am hoping that solves the problem because this has been causing me lots of headaches :-(

Juan Antonio

unread,
Sep 15, 2019, 5:28:00 PM9/15/19
to MIT App Inventor Forum
use a simple code to test, for example this one by Neil Kolvan:


 To get the values ​​in the app use RegisterForStrings or (ReadStrings + Clock).

Tim Vos

unread,
Sep 15, 2019, 9:32:15 PM9/15/19
to MIT App Inventor Forum
Hi Juan,

I started with Neil Kolban's examples to begin with. I made it work and was able to receive data on my app. Then I created an app and corresponding ESP32 code to send Slider values (numbers in string format) to the ESP32. That also worked. Then I combined the two programs and it turns out that the RegisterForBytes block blocks the connection, i.e., it holds up the line so the app cannot send Slider values anymore whereas the nRF Connect app can...

Juan Antonio

unread,
Sep 16, 2019, 4:32:20 PM9/16/19
to MIT App Inventor Forum

This is a simple code to try, you can Register for bytes and/or for strings


ble_22.png


Tim Vos

unread,
Sep 16, 2019, 9:07:04 PM9/16/19
to MIT App Inventor Forum
Hola Juan,

Muchas gracias por su ayuda y recomendacion de aplicativo de prueba. Creo que ya lo había intentado (o al menos algo así) pero no hace daño intentarlo nuevamente.

Por ahora no puedo probar nada porque mi microcontrolador está "frito" (el no se gusta de 12V) 😂😂😂

Tim

Chris Ward

unread,
Sep 18, 2019, 7:43:23 AM9/18/19
to MIT App Inventor Forum
Hi Tim

On the App Inventor side, you could try this Block combination:

SendAndReceive.png


I have only ever got the 'With Response' block to work once before, with a digital indicator (used for CNC setups). In this case it would be best to have your script reply with a short string, e.g. 'OK'.


Tim Vos

unread,
Oct 3, 2019, 9:27:22 PM10/3/19
to MIT App Inventor Forum
Hi Gerard,

I finally had the chance to test just now. It works perfectly!!! So glad you posted your suggestion. The solution is indeed just "RegisterForStrings" and add a block "when BLEdevice.StringsReceived", NOT the ReadStrings block as is suggested in some online articles and videos. 

Thanks heaps,

Tim

Reply all
Reply to author
Forward
0 new messages