Bibliocraft 1.9 Custom Paintings Tutorial
7,336 views
Skip to first unread message

Maize
Nov 14, 2014, 1:30:05 AM11/14/14
to minecraft...@googlegroups.com
I have been looking forward to using the new features in 1.7 for ages, but I have been having no luck with re-creating my worlds - the mods are not cooperating! >_< Some don't have 1.7 versions available yet and others don't work as well...*pouts profusely*
Luckily I was saving the new version of Biblocraft for just such an occasion! I love the clocks, the atlas is super cool, the additional book saving features are great and the mob stories are wonderful, but it's the custom paintings I'm so excited about!! (with mobs stories a close second...;) At the moment I have A LOT of paintings in my Gallery World using the Paintings++ mod but I have run out of room using the biggest template, having to squish multiple images onto one canvas, resizing for limited choice of aspect ratios, etc. Well Bibliocraft just made everything a whole lot easier - now I can now include as many paintings as I want, any size I want! The pout is over! XD
Bibliocraft has added a new "painting press" that will read image files from a resource pack and "print" them onto a canvas. No more resizing and lining up graphics to fit a template, just drop the files into a resource pack and copy it to the server. I tossed some arbitrary artwork in for a test and I was blown away! The paintings frame has settings for size and aspect ratio, plus if you use a high resolution image it will maintain the quality. Bibliocraft now does everything the Paintings Selection Gui and Paintings++ mods do without the hassle of working with sprite sheets, Yay! :D
Here is a brief tutorial on how to use the custom paintings in Bibliocraft 1.9 for MinecraftEdu 1.7.10 Build 11:
Download the Bibliocraft mod version 1.9 here:
Bibliocraft Website Download Page
Open the file with an archive program like WinRaR(PC) or iPack(Mac)
Extract only the example resource pack zip file
Close the jar file then install the mod on the client and server. (Use the Mod Import feature in the MinecraftEdu launcher)
Open the example resource pack with an archive program (like you did with the jar file) and add your graphics to the custom paintings folder. You can sort your images into directories, Bibliocraft reads the contents of subfolders!
If you are already using a custom resource pack, open it and drag the bibliocraft folder from the example file to the assets folder of your current resource pack, then add your images.
NOTE: The image files must be in PNG format
Save and close the zip file then rename it to resourcepack.zip
Copy the resource pack your MinecraftEdu world folder. The clients connecting to the server will automatically download the new images, it may take a minute (or few) for the paintings to load. More information about installing server-side resource packs is available on the MinecraftEdu Wiki.
Print a custom painting and display it:
Place a Painting Press in the world and right-click it to open the GUI.
Put a Painting Canvas in the small square, select an image and click the "Transfer" button.
Note that the file name of the image will become the name of the painting...WOOT! :D
Place a Painting Frame in one of the corners of the display area and right-click it to open the GUI. Set the size and other options then press Esc to close the gui.
One thing the Painting Frame does not do is disappear behind transparent images. The back is still visible even with a borderless frame, but it still looks pretty good!
Maize
Luckily I was saving the new version of Biblocraft for just such an occasion! I love the clocks, the atlas is super cool, the additional book saving features are great and the mob stories are wonderful, but it's the custom paintings I'm so excited about!! (with mobs stories a close second...;) At the moment I have A LOT of paintings in my Gallery World using the Paintings++ mod but I have run out of room using the biggest template, having to squish multiple images onto one canvas, resizing for limited choice of aspect ratios, etc. Well Bibliocraft just made everything a whole lot easier - now I can now include as many paintings as I want, any size I want! The pout is over! XD
Bibliocraft has added a new "painting press" that will read image files from a resource pack and "print" them onto a canvas. No more resizing and lining up graphics to fit a template, just drop the files into a resource pack and copy it to the server. I tossed some arbitrary artwork in for a test and I was blown away! The paintings frame has settings for size and aspect ratio, plus if you use a high resolution image it will maintain the quality. Bibliocraft now does everything the Paintings Selection Gui and Paintings++ mods do without the hassle of working with sprite sheets, Yay! :D
Here is a brief tutorial on how to use the custom paintings in Bibliocraft 1.9 for MinecraftEdu 1.7.10 Build 11:
Download the Bibliocraft mod version 1.9 here:
Bibliocraft Website Download Page
Open the file with an archive program like WinRaR(PC) or iPack(Mac)
Extract only the example resource pack zip file

Close the jar file then install the mod on the client and server. (Use the Mod Import feature in the MinecraftEdu launcher)
Open the example resource pack with an archive program (like you did with the jar file) and add your graphics to the custom paintings folder. You can sort your images into directories, Bibliocraft reads the contents of subfolders!
If you are already using a custom resource pack, open it and drag the bibliocraft folder from the example file to the assets folder of your current resource pack, then add your images.
NOTE: The image files must be in PNG format

Save and close the zip file then rename it to resourcepack.zip
Copy the resource pack your MinecraftEdu world folder. The clients connecting to the server will automatically download the new images, it may take a minute (or few) for the paintings to load. More information about installing server-side resource packs is available on the MinecraftEdu Wiki.

Print a custom painting and display it:

Place a Painting Press in the world and right-click it to open the GUI.
Put a Painting Canvas in the small square, select an image and click the "Transfer" button.
Note that the file name of the image will become the name of the painting...WOOT! :D

Place a Painting Frame in one of the corners of the display area and right-click it to open the GUI. Set the size and other options then press Esc to close the gui.


One thing the Painting Frame does not do is disappear behind transparent images. The back is still visible even with a borderless frame, but it still looks pretty good!

![]()
Maize

MisterA
Nov 14, 2014, 3:36:41 AM11/14/14
to minecraft...@googlegroups.com
Wow Maize....
That has just made my day. I also was upset about not having Paintings++ in 1.7.10, but I am even more so loving the Bibliocraft. Been a long time user but I hadn't seen this int here yet. I need to play more apparently.
Thanks

Lisa Douthit
Mar 29, 2015, 7:38:55 PM3/29/15
to minecraft...@googlegroups.com
Hey Maize,
I was trying this out today and having another resource pack running may have confused me. I am running a resource pack called John Smith Legacy for this world I am building for a 4th grade project. I opened it with iPack and put the Bibliocraft folder with from assets folder into the John Smith Legacy assets folder. I saved the John Smith legacy resource pack back out. Then I had the JSLegacy Resource and another called eduserverresourcepack.zip. I renamed that one resourcepack.zip and put it in the World>MCEdu folder. Was this right? I do know the paintings I added did not show up in the custom section of the paint press, so I did something wrong. This is going to be so great, as I am adding some image they will be able to use in their build! -Lisa
Lisa Douthit
Apr 7, 2015, 4:29:58 PM4/7/15
to minecraft...@googlegroups.com
I am not sure what I did differently, but suddenly the resourcepack.zip (server-side) is working. I just kept tossing and putting it in until on one login that resources pack appeared in the list of resource packs. I am also getting some other strange behaviors in 1.7.10b15 so wondering if there are glitches, but will try to find the right place to post that question.
-Lisa
Maize
Apr 7, 2015, 7:56:42 PM4/7/15
to minecraft...@googlegroups.com
Hi Lisa, glad you got things working! Is your bibliocraft folder now
inside the assets folder? From the screenshot it looks like they are at
the same level, which might have been the problem. The directory structure should look like this:

I've
been away but I'm back now and looking forward to finding strange behaviours in the new updates...just as soon as I dig my way out of a mountain of emails!
>_<
Maize
P.S.: Actually...I couldn't wait!!!
;p
P.S.: Actually...I couldn't wait!!!
;p
Lisa Douthit
Apr 8, 2015, 8:55:20 AM4/8/15
to minecraft...@googlegroups.com
Ah...perhaps. Ulitmately I just kept replacing the resourcepack.zip file server side until it worked. Now on to working with Lots of Mobs...heh. Got that message in the LoM post. Trying to control what shows up in world. Thanks for responding and glad you can get back to playing :^)

Juanita Coleman
Oct 2, 2015, 9:19:26 PM10/2/15
to Minecraft Teachers
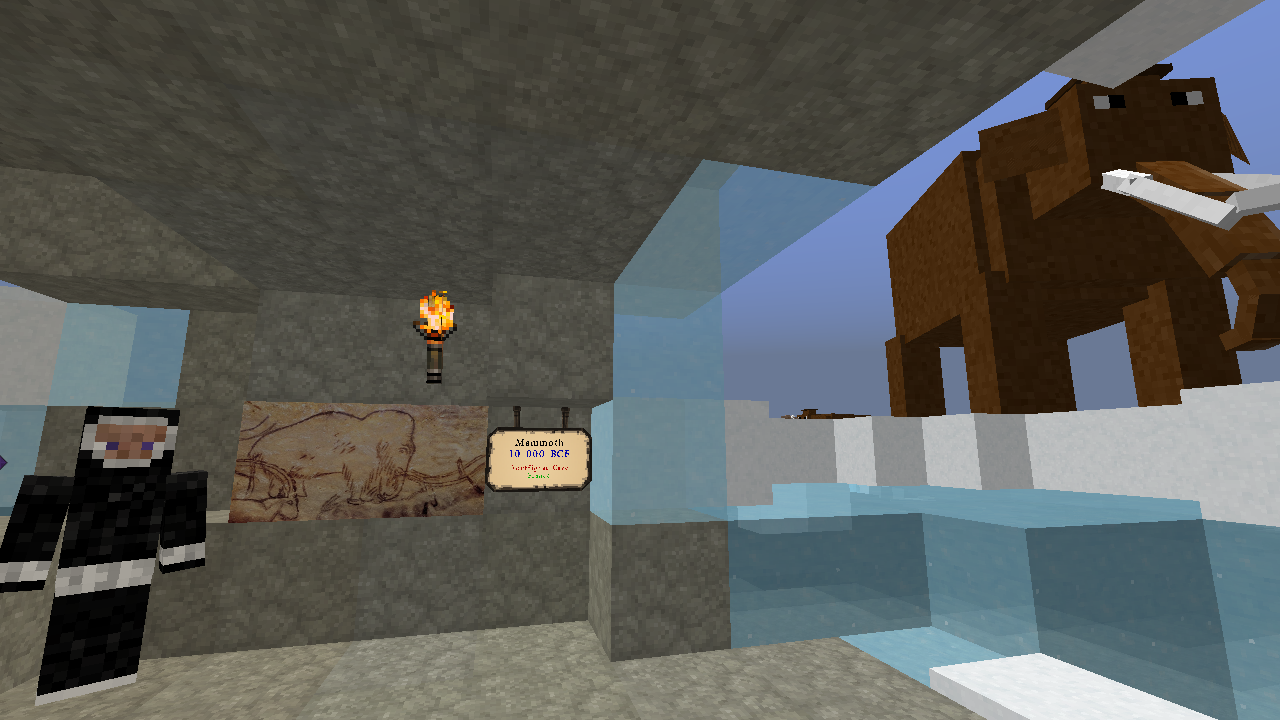
I have been working on creating a world to create a history lesson, and this string of posts was most useful in getting custom images and creating large, continuous frames. THANK YOU!
Message has been deleted
Message has been deleted

broke...@gmail.com
May 4, 2016, 11:40:23 PM5/4/16
to Minecraft Teachers
Made a resource pack with a whole bunch of paintings in the appropriate folder. Loaded the resource pack and it's technically working fine, but the "custom" tab in the painting press is still empty. What am I doing wrong? Are there restrictions on how large the paintings can be or what file types?

Myst Wolfe
Apr 23, 2018, 11:07:57 PM4/23/18
to Minecraft Teachers

Ok, so i know that this post is old as heck, but I've had a strange occurrence in the latest bibliocraft update and was wondering if you or anyone else has experienced this:
it is supposed to appear circular, and this isnt the only custom pic that does this. i dont expect a responce, but will be over joyed to get one that may have a solution. if you need any data from logs and such, reply with directions on how to do so. Im no nerd XD installing mods is as close as i'll get to one. thank you.
Reply all
Reply to author
Forward
0 new messages