Making the MiniMap Guide

Hatrixor
I'm writing this for everyone interested in making minimaps, it may seem hard to achieve, but it really isn’t, math to the rescue! ;)
Basically it's as simple as taking a screenshot of your entire/part of the map from tiled and move it around according to the players current position and clipping the context to make it fit the minimap frame(border) which I presume you already have(the one I used is copyrighted and bought from envanto).
Note that in this tutorial you are going to make the minimap move on X axis alone at first, that will save you a lot of time and effort in case the minimap is inaccurate and values need to be changed.
Step 1: Map offsets
Does the minimap image cover the entire map?
Yes: there are no offsets and you’re taking the whole map area as a screenshot.
Zoom out in tiled take that screenshot with Snipping Tool or any other screen capture tool.
Go to map>map resize and write down height and width for later use. (don’t forget to multiply them by tile size)

Real map width = 100*32
Offset=0
No: you just have to mark the zone you want it as a minimap with a tile that will help you crop the screenshot precisely, calculate offsets and the map size represented by the minimap. The tile coordinates in the bottom left corner multiplied by tile size (32px in my case) and some math will get you there.
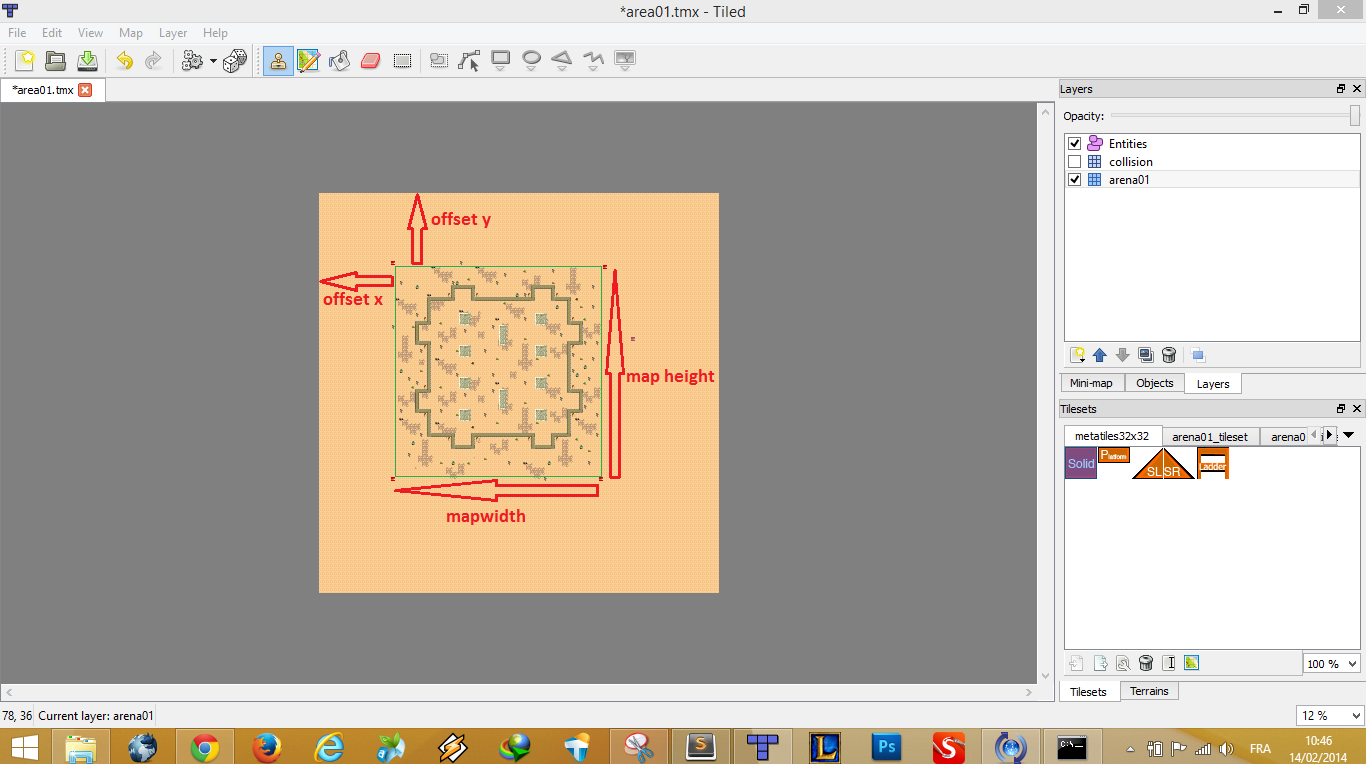
(green square represents minimap taken from this screenshot.
Example: minimap zone width starts from 19:17 to 69:17.
Offset x = 19*32 =608
Real map width = (69-19)*32=1600
(calculate real map height and offset y too for later use)
Minimap image size (368x375)
Step 2: Real map/Mini map size ratio
(ratio really depends on you map size and tiled zoom level, before you continue put the map frame over the mini map in your favorte image editor and ask your self if the shown area in the minimap is actually too big, too small or just perfect for a minimap and resize the minimap image accordingly .)
Nothing fancy, divide the real map width by the mini map image width .
1600/368~=4.347
Step 3: HUD
Render the minimap frame and the minimap image in HUD.js. (tip minimap frame has to be drown first)
Init:
//just
change the x,y vaues to make the map in viewport for now
game.data.minimap=new game.HUD.MiniMap(300,10,me.loader.getImage("map1"));
this.addChild(game.data.minimap);
_____________________
game.HUD.MiniMap = me.SpriteObject.extend({
"init" : function (x, y, image) {
this.parent(x, y, image);
this.x = x;
this.y = y;
this.floating = true;
this.anchorPoint=new me.Vector2d(0,0);
}
});
____________________
don’t forget to add minimap image to resources.js and minimap variable in game.js data object, don’t worry about the mini map frame and minimap image positions we’ll handle that later.
Step 4: Formula
Finally in your player entity update method well add a “scalling formula”:
Minimapx=(playerx - offsetx) / ratio
In our example that will look like:
game.data.minimap.pos.x=(this.pos.x-610)/4.324;
console.log(game.data.minimap.pos.x);
save and run. you’ll notice the map moving based on the player position but not like a minimap should, don’t panic, continue to step 5.
Step 5: Minimap movement
hover the map with you player and naviguate to the horzizantal edges of the map, move you player to the farest position you can reach to the east(right) open console and write down the last number logged, this number will help us make the minimap move the opposite direction.
I found 322 in the console, your new formula is:
game.data.minimap.pos.x=322-((this.pos.x-610)/4.324);
Put the console logging line in comments we no longer need it for minimap X variable.
Step 6: Testing
At this point the minimap should be accurate ( on X axis only), and don’t be afraid to add/substract if the map is completely outside viewport.Now, try to put the mouse on the current player position in the minimap and move you player around (if you move your player with the mouse just put something on the screen indicating current player position on the minimap *giggle*, move you player around to see if it’s accurate enough. If your map has no offsets you have NO excuse to fail the accuracy test.
Accurate : congrats, now go back to steps 1, 4 and 5 and make the same thing for Height and Y axis.
You’ll have something like:
game.data.minimap.pos.x=322-((this.pos.x-610)/4.324);
game.data.minimap.pos.y=316-((this.pos.y-545)/4.324);
Not Accurate : Usually this is caused by false measurements taken in step 1 and 2, you have to make sure that you know the exact real-map width of what the minimap image shows. ( +-10 px difference in real map measurements is okay).
Step 7: Polishing
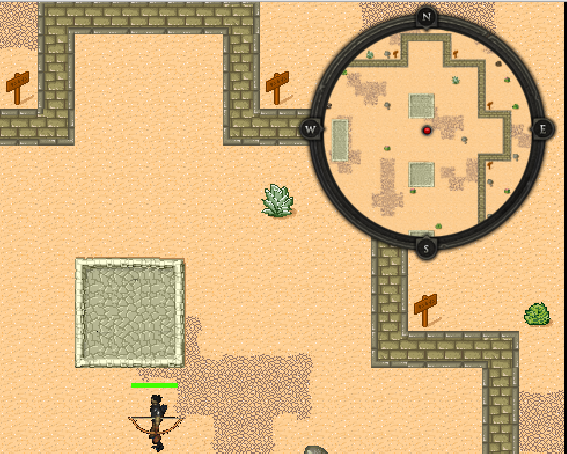
I presume you already placed your minimap frame (border) on the screen which has a small dot/arrow in the center (red dot in my example), now you just need to place the minimap on the screen in a way the player dot is actually indicating current player position.
Example:
game.data.minimap.pos.x=(322-((this.pos.x-610)/4.324))+384;
game.data.minimap.pos.y=(316-((this.pos.y-545)/4.324))-215;
Step 8: Clipping
Now all we
need to do is clipping the minimap image to make it visible only inside the map
frame.
Thanks to Jay for pointing this out you can read his post here.
All you have to d is add the following draw function to the minimap object:
"draw" : function(context)
{
context.save();
context.beginPath();
context.arc(715,113,100,0,Math.PI*2,true);
context.clip();
this.parent(context);
context.restore();
}
TADA !!
Feel free to ask any questions, I will be happy to help.

Andre Schmitz - Cian Games
Nice tutorial :)
Thanks!

melonJS
On Saturday, February 15, 2014 2:26:31 AM UTC+8, Andre Schmitz - Cian Games wrote:
Hi
Nice tutorial :)
Thanks!
Hatrixor
Too bad we can't edit our own posts, those grammar mistakes. :(
-Tiled has a "save as image using current zoom level" option, It can be handy if your map is too big to zoom it out and screen it and way more precise then taking screenshots, for maps with offset's just crop the exported image (don't forget to mark the area with 4 obvious tiles).