Why multiple bodies when I print?
184 views
Skip to first unread message

Adam Hester
Mar 2, 2014, 10:30:52 PM3/2/14
to make...@googlegroups.com

I am using a replicator 2X. I am still very new to this, but have had some success in printing different parts. Recently I tired to print a logo that I had extruded into a 3D shape. It thought it looked good until I looked closer and started to handle it. I saw gaps between the letters and the oval shape that was supposed to join them all together. The section of letters then were easily pulled apart as seperate bodies. The printer has created a surface for both parts of the logo, I would have expected no internal surface at all. I use Solidworks for modelling. Is there a setting I should have to ensure that a single body is printed rather than seperate bodies? I have attached photos of the print and the STL file. Your help would be appeciated.

Ryan Carlyle
Mar 3, 2014, 9:57:25 AM3/3/14
to make...@googlegroups.com
If you give the printer a file made of multiple solids, it will print multiple solids. I'm not too familiar with SolidWorks, but I'm sure there's an operation to merge the different sections into one solid. Like a "union" tool or something like that.
If you can't make good models, the backup option is to upload your file to http://cloud.netfabb.com/ and it will fix almost everything for you automatically.

Joseph Chiu
Mar 3, 2014, 10:05:51 AM3/3/14
to make...@googlegroups.com
I take it that this is an assembly and not a single part? I had a customer job where he output the stl directly from the SW assembly which resulted in overlapped bodies. The result was as you described - a part that seemed like a single solid ended up being built as two adjacent parts.
I recall there is an option to Boolean or merge the parts together into a single shell. I don't have SW so I don't know exactly.
On Mar 3, 2014 6:44 AM, "Adam Hester" <adam.d...@gmail.com> wrote:
 I am using a replicator 2X. I am still very new to this, but have had some success in printing different parts. Recently I tired to print a logo that I had extruded into a 3D shape. It thought it looked good until I looked closer and started to handle it. I saw gaps between the letters and the oval shape that was supposed to join them all together. The section of letters then were easily pulled apart as seperate bodies. The printer has created a surface for both parts of the logo, I would have expected no internal surface at all. I use Solidworks for modelling. Is there a setting I should have to ensure that a single body is printed rather than seperate bodies? I have attached photos of the print and the STL file. Your help would be appeciated.
--
You received this message because you are subscribed to the Google Groups "MakerBot Operators" group.
To unsubscribe from this group and stop receiving emails from it, send an email to makerbot+u...@googlegroups.com.
For more options, visit https://groups.google.com/groups/opt_out.

DHeadrick
Mar 3, 2014, 10:19:49 AM3/3/14
to make...@googlegroups.com
It is better to make this as a part instead of an assembly (if that's what it is). However, if it is an assembly, you can use the "Join" command to make a new part which is a union of all the parts in the assembly. Then save this part. The help has good instructions on what is required to use the join command.
Adam Hester
Mar 3, 2014, 1:55:47 PM3/3/14
to make...@googlegroups.com
Thanks for your comments guys,
This file was made in Solidworks as a single part, not an assembly. I was pretty sure that I had the option ticked to merge the features/bodies together. Unfortunately the original Solidworks file has been overwritten so I cant go back to check. I will have to make another file to test this out and get back to you. If I get the same problem I will have a try with Netfab. Thanks again for the feedback.

Brian33433
Mar 3, 2014, 7:48:54 PM3/3/14
to make...@googlegroups.com
Post the solidworks file and will take a look

Eighty
Mar 3, 2014, 8:22:41 PM3/3/14
to make...@googlegroups.com
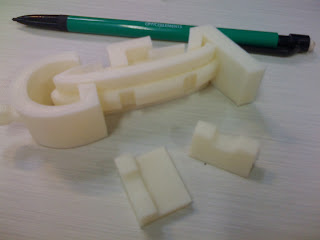
It's obviously two separate bodies, and the slicer doesn't know what to do with it. Instead of combining the two bodies, you're getting nothing at the overlap. Look at the notches on each piece - those are the overlaps. Using a Boolean "join" or "union" (whatever SW calls it) will elongate the issue.
NZScout
Mar 5, 2014, 7:37:47 PM3/5/14
to make...@googlegroups.com
Ok so I did a quick experiment and made two new Solidworks files, One I deliberately left as seperate multiple bodies and the other I used the "combine comand" to ensure it was only a single body.
So the results quickly confirmed, as many of you had said, that my original file must have been created as multi body file. I will ensure that I do a check now on each file before export as a STL format that there is only one solid body. Thanks for your help everyone.
On Monday, March 3, 2014 4:30:52 PM UTC+13, Adam Hester wrote:

Count Spatula
Mar 6, 2014, 8:27:03 AM3/6/14
to make...@googlegroups.com
You can also run it through netfabb cloud which should make it into one shell. Netfabb basic won't.
Reply all
Reply to author
Forward
0 new messages