For those looking to try Mattercontrol
500 views
Skip to first unread message

TobyCWood
Oct 31, 2014, 2:02:08 AM10/31/14
to makerbo...@googlegroups.com

Jetguy
Oct 31, 2014, 3:47:11 AM10/31/14
to makerbo...@googlegroups.com
Problem is that page is missing a few steps.
For example, a novice will read that and then ask, "Where in the heck do I find the import button because on the select printer page it's not an option".
So, these are the missing steps that MUST happen before you can follow the above link.
#1 download and install the latest version http://www.mattercontrol.com/#jumpMatterControlDownloads
#2 Once that is downloaded and installed, grab the Rep-2 slice file from here and save to a known location for later import https://www.matterhackers.com/downloads/AMIfv94uvdE2tqqrDJFyUvsW1cGrK7ikhbU6lNJ94rHnItgPWOnqtuVnAOxP-IlMKhtrfr3ZKS32cC83MlWNSyTA_bA1zemPJBa3dfEHHBVBfB9fTEKtiGohdARK94N7-B2i-MdadKzJQQODMILWZkCG_8m5heZE9AiBp6DfAxRe88500DyDwt4
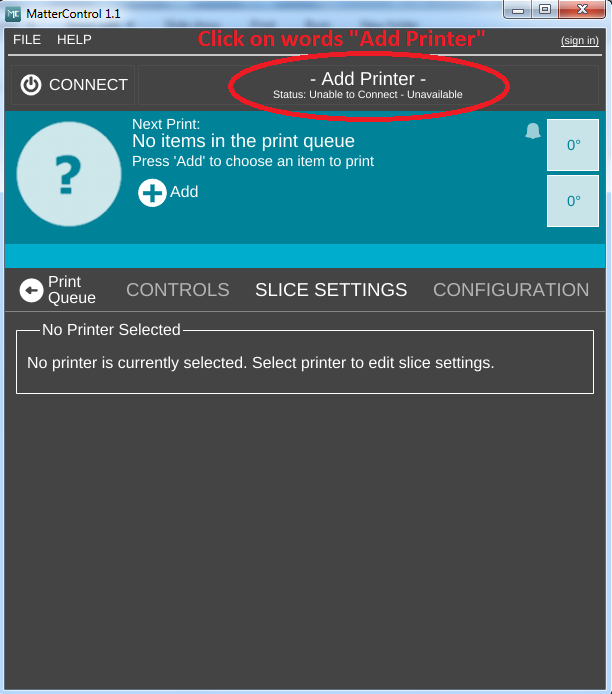
#3 Open MatterControl and you must first create the "printer". You'll notice on the first start, the bar says "Add printer".
#4 New Add Printer window opens. Notice you choose "Other" for both make and model.
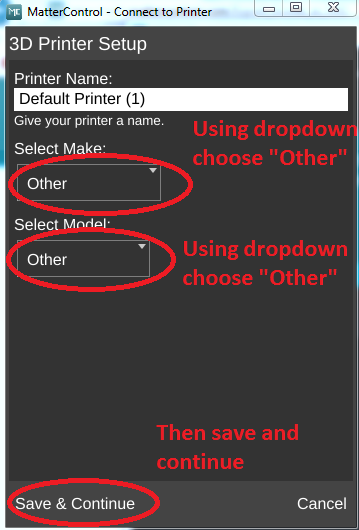
#5 Next is the baud rate, choose 115200

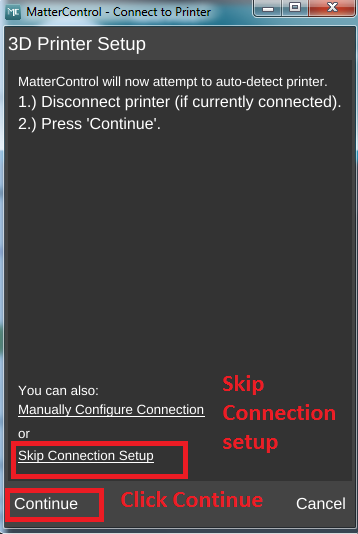
#6 Now you Skip Connection Setup (note, picture says click continue but when you click over the words "Skip Connection Setup" it moves to the next screen).
#7 We need to do a final edit on the printer you just created
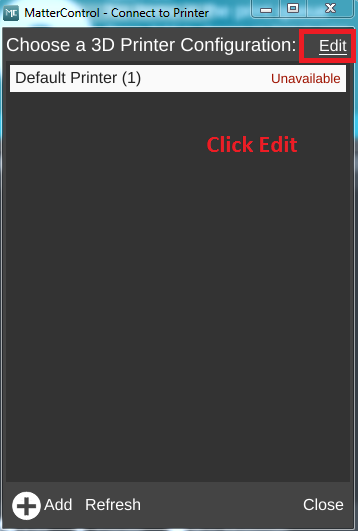
#8 edit the printer
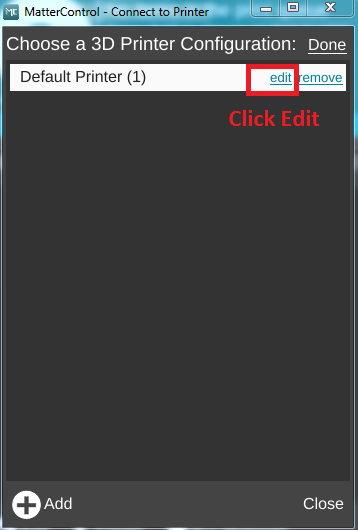
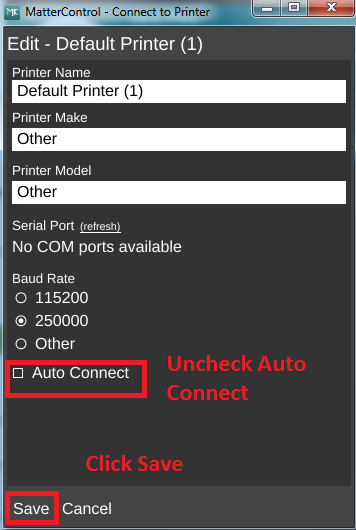
#9 Uncheck "Auto Connect" then save.
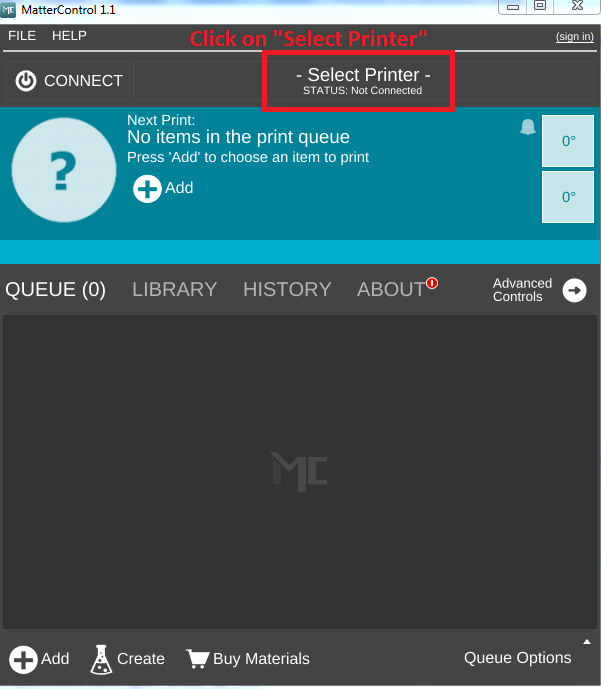
#10 Now we have a printer we can use for further steps. Notice the screen now says "Select Printer" VS before we added a printer it said "Add printer".
#11 We click on the printer we made earlier

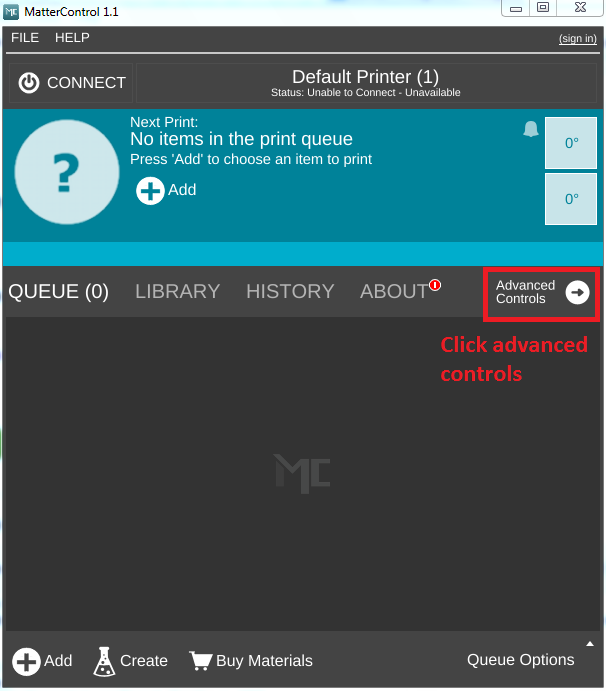
#12 Now we have the printer selected and can now edit even more properties. Again, Notice the top bar changed and now shows we have selected a printer.
#13 Finally, we click and see that we are now back and in sync with the X3G tutorial steps from the Wiki!!!!

#14 a little more detail here on the import profile for a Replicator 2 we downloaded earlier. Note, the screen is orange but may not be in your screen unless you have a model STL loaded.

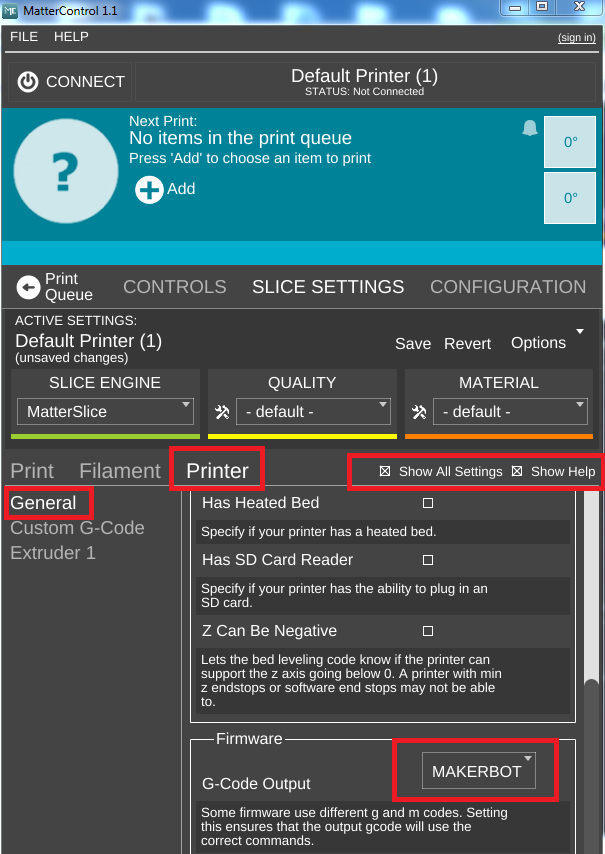
#15 Import the actual Rep-2 slice file

#16 back at the main screen after the import, now we can edit the type of gcode produced. Note, I had to switch on "show all settings" and "Show help" to get my dropdown box to properly display the menu for MakerBot. that might be due to screen resolution or some other issue.
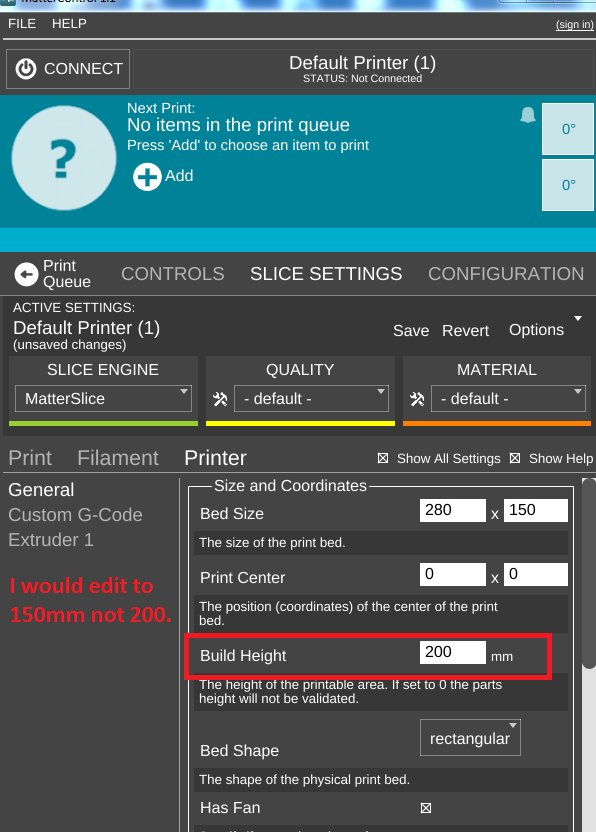
#17 One concern with the profile was they said 200mm Z height? I would change to 150mm
On Friday, October 31, 2014 2:02:08 AM UTC-4, TobyCWood wrote:
Jetguy
Oct 31, 2014, 4:20:44 AM10/31/14
to makerbo...@googlegroups.com
I just saved my edits to what I think is a better profile. Note, I turned on the heated bed option and changed mine for lower extrusion temps (200C extruder and 50C heated bed).
This is NOT yet tested but an export of a 20mm test cube in both gcode and X3G looked reasonable.
Again, follow my above steps to make a printer you can import the file into.
Also, it should default to MakerBot style gcode. unlike the stock file they provided which has Reprap in it???????
Again, YMMV, this could blow up your printer-etc..
FYI, I'm testing on a Duplicator 4 that I put 18T pulleys into and acts like a 2X now. I just had to adjust bed size and so forth. Still want to see if it's possible to get dual extrusion going???

teamca...@gmail.com
Oct 31, 2014, 6:00:00 AM10/31/14
to makerbo...@googlegroups.com
I'm a Simplify3d user, I've heard of mattercontrol before, but havent looked into it yet. Would there be any benefit to using mattercontrol over S3D, or is it better thought of as a free alternative to Makerware?
Jetguy
Oct 31, 2014, 9:15:52 AM10/31/14
to
Understand the difference. Simplify 3D is a working commercial product that officially supports nearly every 3D printer on the market. You are getting what you paid for and then some in Simplify 3D.
MatterControl right now is a free alternative that does not yet officially support MakerBot or variants. Heck, if you paid attention here, the instructions they provided were incomplete and the config file provided has flaws that only a very experienced person might even have a chance to make it work correctly. This is the edge of hacky and buggy. I also think since MatterControl is donationware, they might also start charging for later version. Maybe, maybe not. The point is, it's far, far, far from choose your printer type, load a model and click print simplicity of Makerware.
Don't let me be too harsh here to the MatterControl folks, it's a slick application, and all new slicer by them that seems to work really well. They added in GPX by whpthomas to be able to work with the Replicator 2 and that was just to kind of show at a basic level it could be done. As is, it's not configurable via the user interface to edit and get it to produce an X3G for anything other than a Replicator-2 because GPX is just being called in default mode which defaults to a Replicator-2 profile. This is why I just discovered during testing that I wasn't getting heated bed commands even though they are clearly in the gcode- the X3G conversion of the profile using the defaults of GPX strips heated bed commands for the Rep-2 because you would have to specific Rep-2 +HBP.
Again overall I'm impressed and certainly with extensive knowledge floating around in this thread, there are workaround and backend hacks we can apply and make this work for other printers. Calling GPX with a config is not that big of a deal. But, I need to say that it's night and day difference to your question. Makerware even can detect a real makerbot at startup and apply the right machine type in many cases. It's all about ease of use. Simplify 3D is a powerful paid slicer that has hundreds of extra features over Makerware and has profiles supporting nearly every 3D printer on the market. For those with multiple machines or really knee deep into the hobby, S3D is like the Swiss Army Knife or Leatherman tool of slicers. You don't leave home without it. MatterControl has a lot of promise as a future alternative. Not sure if it will remain free, not sure how intent they are supporting X3G based machines or how much development will go into that. Right now, they did the absolute bare minimum to help an experienced user kind of make it work.
TobyCWood
Nov 2, 2014, 1:54:57 AM11/2/14
to makerbo...@googlegroups.com
From the Matterfolks in Mission Viejo:
I told them they were making a BIG mistake regarding x3g based machine profiles. If you agree with me email them!!!
"Thanks for letting your listeners know about MatterControl! Thanks also for the suggestion on the slice engine switching. We have a new version (1.1.4) about to go out for testing, it is scheduled for general release Nov 10th. It includes the new .x3g export feature (avail. in pre-release only right now), as well as:
Support for multi-extrusion printers/printing
Support for generating multi-extrusion parts
Support for AMF file format (import, create, edit, export, print, etc.)
Plenty of upgrades and enhancements to the MatterSlice slicing engine (incl. better support and raft generation)
A more touchscreen-friendly control scheme (less hover dependent)
Ability to override print position
Lots of bug fixes and performance improvements (esp. rendering of 3D layer view)
To be honest we don't feel the .x3g profiles (Flashforge, Rep2) have had enough coverage and testing to be included as default profile options just yet, but my hope is that with with the public release we'll be able to get more feedback. "
Reply all
Reply to author
Forward
0 new messages