5th Gen Custom Firmware!!!!!!

joshu...@ieee.org


- extract makerbot's official firmware image
- mount the rootfs image
- modify whatever you need
- re-create the rootfs
- remove the signature file
- generate the hash file
- repackage the firmware bundle
- load your custom firmware from MakerBot Desktop
- When prompted with an Unknown FW, just accept to continue


Jeff Davis
joshu...@ieee.org
HOWTO: Load a Custom Firmware Image onto the 5th Gen Replicator
Assumption
This procedure assumes that you are performing under a linux host. I did this in Ubuntu 14.04 under VMware Player.
Host System Preparation
Modify your kernel to include support of the NAND flashchip used in the 5th Gen Makerbot (this is a repeat of Dan’s post at: https://groups.google.com/forum/#!topic/makerbot-users/4DUfxiO2G-8 )
Download the kernel source apt-get source linux-image-$(uname –r)
Modify the nand_ids.c file and add the following line at line 46:
{“MB 1M NAND 4G 3.3V 8-bit”, { .dev_id = 0x80 }, .pagesize = SZ_4K, .chipsize = SZ_4K, .erasesize = SZ_1M, .options = SP_OPTIONS},
sudo apt-get build-dep linux-image-$(uname –r)
change to your kernel source tree and type the following:
fakeroot debian/rules clean
fakeroot debian/rules binary-headers binary-generic
this should produce a number of *.deb files at the parent directory of the kernel source root folder
navigate to the parent directory where the *.deb files are and type:
sudo dpkg –i linux*3.13.0-45*.deb
sudo reboot
Firmware Preparation
Select an official firmware version as your starting point. You can do this by opening up your browser and navigate to the machine’s IP.
Click on the firmware directory and it will show the previous firmware that you’ve loaded to the machine. There should only be one file called: firmware.zip
Extract this file to a directory (let’s call this firmware_dir from now on)
Switch to root:
sudo su
Then follow Dan’s post on how to mount the rootfs at https://groups.google.com/forum/#!topic/makerbot-users/4DUfxiO2G-8. The instructions are repeated here. Please type the following commands in a shell:
modprobe nandsim first_id_byte=0x00 second_id_byte=0x80 third_id_byte=0x00 fourth_id_byte=0x00
mtdinfo /dev/mtd0
ubiformat /dev/mtd0 –s 4096 –O 4096
modprobe ubi
modprobe ubifs
ubiattach /dev/ubi_ctrl –m 0 –O 4096
ubimkvol /dev/ubi0 –N rootfs –s $((0x8000000))
ubiupdatevol /dev/ubi0_0 rootfs
mount –t ubifs ubi0:rootfs /mnt/the_directory_where_you_want_to_mount
Modify the Firmware
For the purpose of the following discussion, we will assume that you’ve mounted the rootfs image under /mnt. Furthermore, please stay as root for the rest of the procedure.
Navigate into /mnt/usr/settings
Open up firmware_version.json and change the build number to something else. I’ve used 250 to distinguish it from the official firmware.
You can also modify the Preheat temperature at line 367 of the printer_settings.json file. For the demonstration purposes, I just changed it to 179.
The interesting stuff are located under /mnt/usr/lib/python3.3/site-packages/kaiten. It seems that this is where a lot of the actions are happening.
I also enabled ssh (but I forgot to configure the ssh daemon to enable remote root login so couldn’t really post a demo screenshot). Anyway, I am not an expert on this and you can probably Google around to get the detailed instructions.
Once you’ve completed your modifications, type:
mkfs.ubifs –r /mnt –o custom –m 4096 –c 300 –e 1040384 –q
This will generate a custom ubifs image called custom.
Packaging the custom firmware
You can switch back to normal user now if you want.
Delete the following files from the original firmware directory (firmware_dir):
signature
rootfs
Copy the custom image that you’ve created into the firmware_dir and rename it to rootfs
Copy the attached gen_hash.py and check_hash.py files to the parent folder of firmware_dir
Now we have to generate the hash file. To do this execute gen_hash.py within firmware_dir. This will generate a hash file called ‘hash’.
python3 ../gen_hash.py
Next, check the generated hash file by executing:
python3 ../check_hash.py
Finally, modify the version number in manifest.json to match the version number that you’ve set in the previous step. If you are following this example, then change the last number under version to 250. You can set it to whatever you want as long as it matches the one you set in firmware_version.json.
Just for kicks, I also modified the description to: “Wong’s custom firmware version 1.6.1.250” J This is completely optional but it just helps you visualize what you are loading in the desktop program.
zip the following files together:
hash
manifest.json
rootfs
uImage
Take care that you DO NOT create a directory structure in the zip file or the desktop program will complain that the firmware is corrupted.
Load Your Firmware
Finally, fire up Makerbot Desktop and go to Update Firmware
Then Browse to the custom firmware that you’ve created and you are good to go.
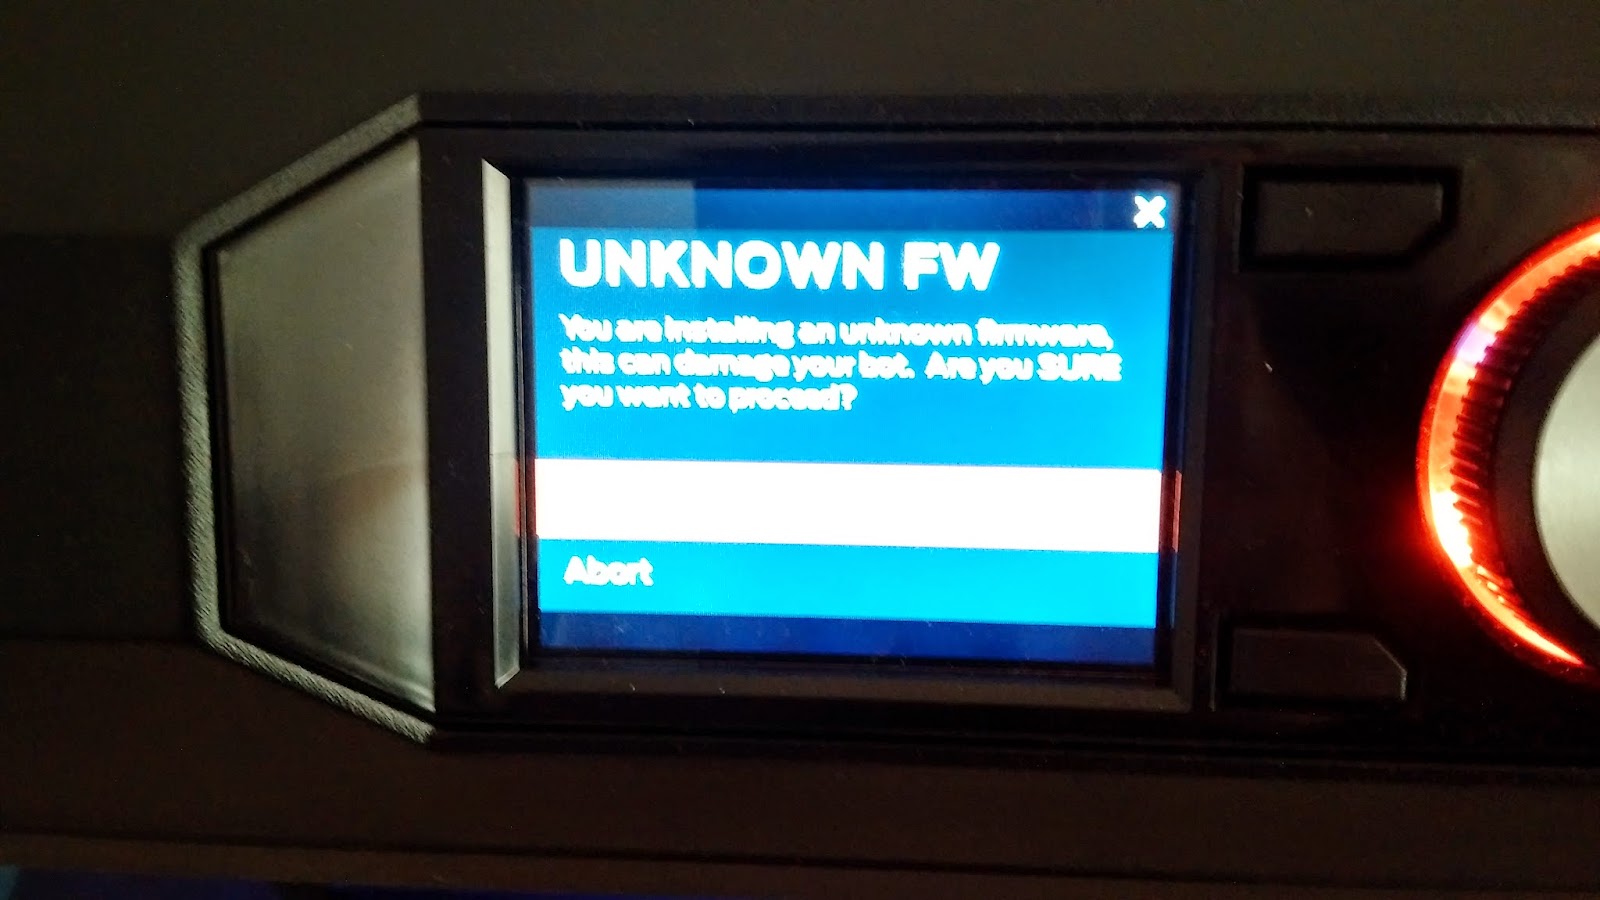
After the file is transferred on to your machine, it will go through a verify process. Since we don’t have a valid signature it will complain whether you still want to go ahead or not.
At this point, if you are still brave enough then just accept to continue.
If you couldn’t handle the risk of bricking your machine then cancel.
So that’s pretty much it folks. Happy printing!
Josh
joshu...@ieee.org
On Sunday, February 22, 2015 at 6:46:36 PM UTC-5, Jeff Davis wrote:
Nice work Josh!
joshu...@ieee.org

Enginwiz
What kind of information does the 5th generation spybot send back to Makerbot?
Hopefully they don't dare to use the crappy webcam ...

Jetguy
joshu...@ieee.org

Hynek Štětina
I did try to upload modified firmware to my Mini but with no success. I did follow all the steps without any problems except the last one. It fails on firrmware verification. On the Mini, there is no LCD, so I cant see or confirm the message about unofficial firmware.
Any hint what can be wrong?
Thanks,
Hynek
joshu...@ieee.org
Hynek Štětina
I did it on version 1.7. But after that I tried to downgrade my Mini to FW 1.5 and repeat the firmware modification also on this firmware. I was worried that MakerBot implemented some protection to the newest firmware.
Thanks,
Hynek