MakerBot Desktop 3.5 is out: nothing to see hear; please move on
932 views
Skip to first unread message

Dan Newman
Feb 5, 2015, 9:10:38 PM2/5/15
to makerbo...@googlegroups.com
Looks like MakerBot Desktop 3.5 is out. No new features for non Gen 5 machines other
than "automatic update" of Desktop. But I did like the one comment so far: a Rep 2X
user is finding that assigning Tool 1 for support plastic isn't working and everything
is printing with Tool 0. Clearly a gcode problem. MBI's response, "please reset your
printer to factory defaults". Yeah, right. At best that will do nothing.
Worst case is it'll make his printer think it's a Rep 2 (1 extruder, no HBP)
and have the wrong PID/VID values causing MakerBot Desktop to not recognize
it as a Rep 2X. [I've had to bail a number of people out of that problem-o.]
Dan

Jake Clark
Feb 5, 2015, 9:17:00 PM2/5/15
to makerbo...@googlegroups.com
Being able to change the temperature right in the settings is nice. Now I don't have to go into my profiles.....

iwant 3dprint
Feb 5, 2015, 9:23:20 PM2/5/15
to makerbo...@googlegroups.com
Very surprised they enabled this considering the track record of their smart extruders. Guess if it jams they have the ability to blame the user for setting an incorrect temperature
Dan Newman
Feb 5, 2015, 9:25:58 PM2/5/15
to makerbo...@googlegroups.com
On 05/02/2015 6:17 PM, Jake Clark wrote:
> Being able to change the temperature right in the settings is nice. Now I
> don't have to go into my profiles.
Mind you, that was a feature regression: their earlier slicer, RepG had that feature.
> Being able to change the temperature right in the settings is nice. Now I
> don't have to go into my profiles.
And all the other slicers I've used -- Cura, S3D, KISSlicer, and slic3r -- have
had it as well. So, frankly, it was pretty embarrassing that they didn't have that
back in 2012 when they introduced MakerWare. And still didn't have it when
they abandoned their support RepG which did have it.
Dan
Dan Newman
Feb 5, 2015, 9:31:25 PM2/5/15
to makerbo...@googlegroups.com
On 05/02/2015 6:24 PM, Dan Newman wrote:
> On 05/02/2015 6:17 PM, Jake Clark wrote:
>> Being able to change the temperature right in the settings is nice. Now I
>> don't have to go into my profiles.
P.S. The reason they didn't have it along with filament diameter, another embarrassing
> On 05/02/2015 6:17 PM, Jake Clark wrote:
>> Being able to change the temperature right in the settings is nice. Now I
>> don't have to go into my profiles.
omission, was that they were trying to simplify things for new users. Not confuse them
with too many choices. That's a valid consideration. However, it's also been something
of solved problem in UI/UX design for a number of years: have an "advanced features" toggle
or similar.
The feature they really need to come out with is a good profile editing interface.
(Or did they do that and I missed it? I'm somewhat gunshy about upgrading MakerWare.)
Dan
Jake Clark
Feb 6, 2015, 5:31:34 PM2/6/15
to makerbo...@googlegroups.com
If you guys have 5th Gen printers you should try the new software. The car looks the same, but there's tweaks under the hood that have helped out on our Z18 quite a bit.
John Borlaug
Feb 7, 2015, 4:21:59 AM2/7/15
to makerbo...@googlegroups.com
I was doing some beta testing last night with my Snow Leopard, checked out the new firmware-it doesn't recognise 2x as being on the list and comments were invisible to me.( latest as 7.6- and I got to do a "special" survey! hahahah.

Jeff Davis
Feb 7, 2015, 10:51:13 PM2/7/15
to makerbo...@googlegroups.com
Was there new FW as well? Or just the new Desktop?
Dan Newman
Feb 7, 2015, 11:02:14 PM2/7/15
to makerbo...@googlegroups.com
On 07/02/2015 7:51 PM, Jeff Davis wrote:
> Was there new FW as well? Or just the new Desktop?
Firmware 1.6 as well.
> Was there new FW as well? Or just the new Desktop?
Gotta love the comment on the blog where someone wrote that their Z18
was working nearly as well as their Rep 2 and thus kudos to the MBI
development team. Not too sure how to read that,
1. Kudos to your professional, salaried development team which after more
than 1.5 years of working on the firmware still doesn't have something
working as well as the open-source, community developed firmware of your
Rep 2 of 2012?
2. Kudos to your professional, salaried development team that 1 year
after first showing the printers at CES they now have the Z18 working
almost as well as your discontinued, 2012 printer which sold for $4,000
less.
3. The comment (which MBI took seriously) was really sarcasm.
Dan

Joseph Chiu
Feb 8, 2015, 12:55:30 AM2/8/15
to Dan Newman, makerbo...@googlegroups.com
Speaking of... according to this post on Reddit, the Gen5's can have a significant disconnect between extrusion motion and path motion, causing extrusion errors: http://www.reddit.com/r/makerbot/comments/2tzc9o/makerbot_mini_any_idea_why_its_doing_this/co42c61
I would think that's a sign that motion commands are not sent synchronously with controlled timing if what has been reported is true...
Dan Newman
Feb 8, 2015, 1:04:38 AM2/8/15
to Joseph Chiu, makerbo...@googlegroups.com
On 07/02/2015 9:55 PM, Joseph Chiu wrote:
> Speaking of... according to this post on Reddit, the Gen5's can have a
> significant disconnect between extrusion motion and path motion, causing
> extrusion errors:
> http://www.reddit.com/r/makerbot/comments/2tzc9o/makerbot_mini_any_idea_why_its_doing_this/co42c61
>
> I would think that's a sign that motion commands are not sent synchronously
> with controlled timing if what has been reported is true...
Makes me wonder if they tried implementing an advance algorithm and botched it.
> Speaking of... according to this post on Reddit, the Gen5's can have a
> significant disconnect between extrusion motion and path motion, causing
> extrusion errors:
> http://www.reddit.com/r/makerbot/comments/2tzc9o/makerbot_mini_any_idea_why_its_doing_this/co42c61
>
> I would think that's a sign that motion commands are not sent synchronously
> with controlled timing if what has been reported is true...
1. When we dumped the firmware/OS environment we didn't see any required acknowledgement of
using JKN advance but there were some config files with K and K2 default values. They
may have subsequently added an attribution to using JKN advance.
2. In JKN advance you run the extruders on a separate/distinct interrupt from the
XYZ stepper interrupt. That so that you can run them at different speeds during
accel and decel phases.
If MBI is using JKN advance or a different advance which requires running the extruder
on a separate interrupt AND if they got their interrupt priorities messed up then
something like this might be feasible. In the very least, having them get out of
sync if something else is consuming cycles is a possibility. And MBI has demonstrated
in the past some lack of understanding of interrupt priorities and scheduling.
When they first adopted Sailfish, they messed around with that stuff and got it
seriously wrong. Jetty pointed that out to them and they corrected some of it,
but not all of it: they left the XYZ stepper interrupt on the lowest priority
interrupt. Sigh.
Dan

joshu...@ieee.org
Feb 8, 2015, 7:19:44 PM2/8/15
to makerbo...@googlegroups.com, joe...@joechiu.com
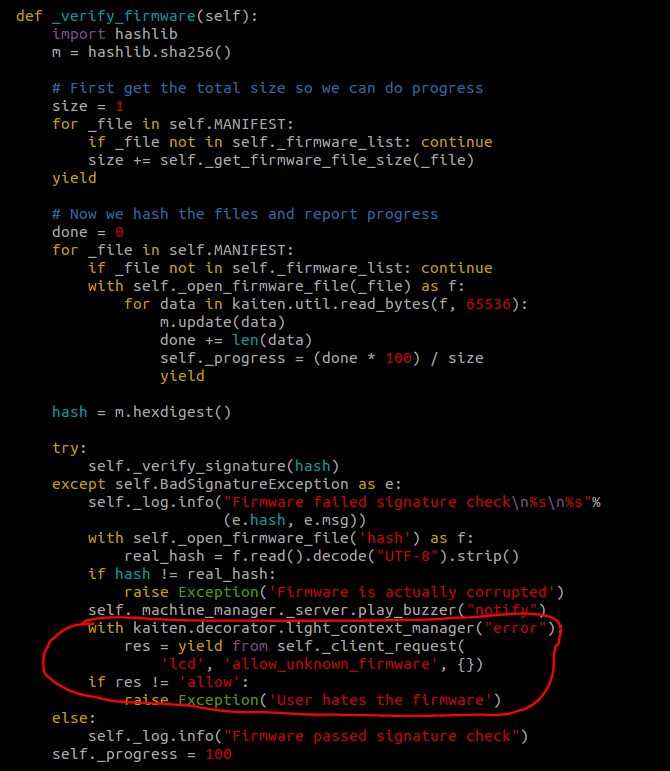
Speaking of firmware, I've recently started investigating what's inside. The control software seems to be written in Python. Furthermore, I noticed that there is a possibility of loading a custom firmware onto the 5th Gen (see image below).
The only problem is I never played with ubifs and don't know how to create one and load it to the printer (I've read tutorial online but don't know what I am doing :( )
Anyway, if you are curious and just wanted to take a look at the 5th Gen code, you can extract the firmware by doing the following in a Linux machine (I run Ubuntu inside VMware Player) (from https://github.com/jrspruitt/ubi_reader)
1) sudo apt-get install liblzo2-dev
2) sudo apt-get install python-lzo
3) git clone https://github.com/jrspruitt/ubi_reader.git
4) unzip the firmware
5) copy the rootfs file to the directory where you cloned the ubi_reader
6) cd into the ubi_reader directory
7) sudo ./extract_files.py rootfs
Now you have the entire 5th Gen firmware located inside the output subfolder under ubi_reader. The interesting stuff seems to be located under:
output/rootfs/usr/lib/python3.3/site-packages/kaiten
You can also see where various values are being stored under the usr/settings directory. For example, the pre-heat temperature is hardcoded as 180 under the printer_settings.json file.
Furthermore, it is also theoretically possible to enable the ssh daemon by removing the authorized keys check lines under the S50sshd file located in etc/init.d directory.
Now, if someone in the forum is familiar with how to create a ubifs image and load it to the 5th gen then we can start fixing MBI mess (such as removing the z-homing sequence before each print that causes nozzle deformation)
Dan Newman
Feb 8, 2015, 10:14:17 PM2/8/15
to makerbo...@googlegroups.com
On 08/02/2015 4:19 PM, joshu...@ieee.org wrote:
> Speaking of firmware, I've recently started investigating what's inside.
> The control software seems to be written in Python. Furthermore, I noticed
> that there is a possibility of loading a custom firmware onto the 5th Gen
> (see image below).
>
> The only problem is I never played with ubifs and don't know how to create
> one and load it to the printer (I've read tutorial online but don't know
> what I am doing :( )
>
> Anyway, if you are curious and just wanted to take a look at the 5th Gen
> code, you can extract the firmware by doing the following in a Linux
> machine (I run Ubuntu inside VMware Player) (from
> https://github.com/jrspruitt/ubi_reader)
>
> 1) sudo apt-get install liblzo2-dev
> 2) sudo apt-get install python-lzo
> 3) git clone https://github.com/jrspruitt/ubi_reader.git
> 4) unzip the firmware
> 5) copy the rootfs file to the directory where you cloned the ubi_reader
> 6) cd into the ubi_reader directory
> 7) sudo ./extract_files.py rootfs
>
> Now you have the entire 5th Gen firmware located inside the output
> subfolder under ubi_reader. The interesting stuff seems to be located
> under:
>
About a day or two after the firmware was first released, we posted how to do this.
> Speaking of firmware, I've recently started investigating what's inside.
> The control software seems to be written in Python. Furthermore, I noticed
> that there is a possibility of loading a custom firmware onto the 5th Gen
> (see image below).
>
> The only problem is I never played with ubifs and don't know how to create
> one and load it to the printer (I've read tutorial online but don't know
> what I am doing :( )
>
> Anyway, if you are curious and just wanted to take a look at the 5th Gen
> code, you can extract the firmware by doing the following in a Linux
> machine (I run Ubuntu inside VMware Player) (from
> https://github.com/jrspruitt/ubi_reader)
>
> 1) sudo apt-get install liblzo2-dev
> 2) sudo apt-get install python-lzo
> 3) git clone https://github.com/jrspruitt/ubi_reader.git
> 4) unzip the firmware
> 5) copy the rootfs file to the directory where you cloned the ubi_reader
> 6) cd into the ubi_reader directory
> 7) sudo ./extract_files.py rootfs
>
> Now you have the entire 5th Gen firmware located inside the output
> subfolder under ubi_reader. The interesting stuff seems to be located
> under:
>
Frankly, no one is (or was) particularly interested. I certainly wasn't. Mostly
just worked on figuring it out so that I could poke around a little.
Dan
Dan Newman
Feb 8, 2015, 10:19:12 PM2/8/15
to makerbo...@googlegroups.com
images. I've not checked to see if it still works. It worked for the first few
months of these firmware releases. This is the info that I had posted in the past.
Dan
The firmware downloads get a list of firmware from
http://firmware.makerbot.com/bwfw/list.json
and the .zip files referenced come from that same "directory".
As a side note, the new MakerWare embedded in Makerbot Desktop
has profiles for the 5th Gen bots under the name "birdwing".
So, that appears to be the platform or firmware name and the
"bwfw" in the above URL is likely "birdwing firmware".
The sole firmware file right now is
http://firmware.makerbot.com/bwfw/firmware_replicator_release_1_0_0_2.zip
Downloading that and unpacking yields four files all dated
10 March 2014,
manifest.json (291 bytes)
rootfs (91553792 bytes)
signature (230 bytes)
uImage (2788552 bytes)
That "rootfs" looks suspiciously like a "root file system" image.
But how to mount it? That's described at the end of this message.
From our mounting this rootfs, it looks like MBI is using ARM 9 and
they may be using the PRUSS (real time subsystem). Kind of a tricky
beast to use. And they appear to be using TI's angstrom linux build
which is unfortunate as the sole person maintaining it is reported to
have left TI a few months back; its future is uncertain. Also, TI's
angstrom is reportedly much more buggy than the Beaglebone variant.
And, WiFi is known to be pretty dodgy. Is WiFi working yet on the
Gen 5's? It's listed in the marketing material, but doesn't appear
in the online user manual.
Mounting the rootfs
-------------------
Using a Ubuntu 13.10 x64 Desktop virtual machine, download the kernel
sources and build them as per,
https://wiki.ubuntu.com/Kernel/BuildYourOwnKernel
But before building, modify
drivers/mtd/nand/nand_ids.c
by adding the section indicated by the diff below,
# diff -Naur nand_ids.c nand_ids.c.orig
--- nand_ids.c 2014-03-16 13:36:45.316000000 -0600
+++ nand_ids.c.orig 2014-03-16 08:57:38.476000000 -0600
@@ -44,13 +44,6 @@
{ .id = {0x98, 0xde, 0x94, 0x82, 0x76, 0x56, 0x04, 0x20} },
SZ_8K, SZ_8K, SZ_2M, 0, 8, 640},
- {"MB 1M NAND 4G 3.3V 8-bit",
- { .dev_id = 0x80 },
- .pagesize = SZ_4K,
- .chipsize = SZ_4K,
- .erasesize = SZ_1M,
- .options = SP_OPTIONS },
-
LEGACY_ID_NAND("NAND 4MiB 5V 8-bit", 0x6B, 4, SZ_8K, SP_OPTIONS),
LEGACY_ID_NAND("NAND 4MiB 3,3V 8-bit", 0xE3, 4, SZ_8K, SP_OPTIONS),
LEGACY_ID_NAND("NAND 4MiB 3,3V 8-bit", 0xE5, 4, SZ_8K, SP_OPTIONS),
[Hint: you're adding to nand_ids.c the section with the "-" marks. Leave the
"-" out.]
This change will create a new nand flash device with id 0x80, 4K block size,
and a 1MB erase block size.
To install the kernel after compiling, you can follow the BuildYourOwnKernel
directions,
# from the kernel source root directory,
cd ..
dpkg -i linux*3.11.0-18.32*.deb
then reboot. The dpkg command above may complain about linux-tools dependencies.
You like can ignore them -- we did and the world didn't end, the VM booted fine.
We did need to do an apt-get install -f to force some things since Ubuntu did
want those linux-tools after rebooting.
After Ubuntu reboots, run these commands,
apt-get install mtd-utils
mkdir /mnt/ubi
You only need to do those commands once; no need to do them each time you reboot.
Now, to load that rootfs image from the zip file,
1. Mount an SD card into your physical machine and make sure it is available
to the Ubuntu VM.
2. Move to the directory containing the rootfs file from the .zip file.
3. Run the load-rootfs.sh shell script below. It wipes the SD card,
loads the rootfs image onto it, and then mounts the SD card with that
file system at the mount point /mnt/ubi you previously created
# cat load-rootfs.sh
#!/bin/sh
modprobe nandsim first_id_byte=0x00 second_id_byte=0x80 third_id_byte=0x00 fourth_id_byte=0x00
mtdinfo /dev/mtd0
flash_erase /dev/mtd0 0 0
ubiformat /dev/mtd0 -s 4096 -O 4096
modprobe ubi
modprobe ubifs
ubiattach /dev/ubi_ctrl -m 0 -O 4096
ubimkvol /dev/ubi0 -N rootfs -s $((0x8000000))
ubiupdatevol /dev/ubi0_0 rootfs
mount -t ubifs ubi0:rootfs /mnt/ubi
Note that the device /dev/mtd0 is created by modprobe. Do not worry
that you do not see /deb/mtd0 before you run the script.
Once mounted,
# ls /mnt/ubi
4. To unmount, you can use this shell script,
# cat unload-rootfs.sh
#!/bin/sh
umount /mnt/ubi
ubidetach -d 0
modprobe -r ubifs
modprobe -r ubi
modprobe -r nandsim
joshu...@ieee.org
Feb 9, 2015, 9:08:51 AM2/9/15
to makerbo...@googlegroups.com
Thanks for the info Dan. I am going to try to get ssh access first. It will be a long learning curve for me but I am willing to try.
Josh

Brandon
Feb 11, 2015, 1:07:01 PM2/11/15
to makerbo...@googlegroups.com
I like the following blurb about Makerbot Desktop 3.5....
"With versions 3.5 and later of MakerBot Desktop, you can enroll in the Early Access Program. Enrolling in the Early Access Program gives you access to new versions of MakerBot Desktop before they are released publicly. That means that you will receive the latest bug fixes and improvements as quickly as possible, but the software won’t be tested as thoroughly as it is for public releases."
So more of the same.

Ryan Carlyle
Feb 11, 2015, 8:47:52 PM2/11/15
to makerbo...@googlegroups.com
Wait, they test their software?
...Huh.
Dan Newman
Feb 12, 2015, 12:28:11 AM2/12/15
to makerbo...@googlegroups.com
have lots of regressions and bugs in new releases. And if you'd look at their github
history some of the systemic problems (and offenders) weren't hard to spot: literraly
hours before cutting a release, there would be a number of significant checkins,
including new features/behaviors. Then sure enough, some of those would turn out to
be the bugs or regressions in that release. Many people got quite gunshy about upgrading
firmware or RepG back in the day.
I'm sure they've been told by plenty of people that they should do field testing with
a reasonable sized pool of users (at least several dozen). And they really should.
Unfortunately, they never have that I'm aware of and this "early access" program isn't
being pitched as such either.
Dan
P.S. One time, they asked Jetty and I to test a new RepG they'd be issuing. We
spent a good number of hours over the course of a week testing it. Then, within
an hour or two of cutting the official release, they checked in a bunch of clearly
untested changes. That was RepG 0040, their final release of RepG. Some of those
untested changes were the ones which broke RepG whenever it's used to set onboard
parameters on (any) firmware with a version number of 7.0 or greater. That was an
extreme disservice to their installed base. And it was a slap in the face to the
whomever they asked to test RepG. And it continued their tradition of their poor
software practices.
John Borlaug
Feb 12, 2015, 2:11:44 AM2/12/15
to makerbo...@googlegroups.com
WOW! and I'm a beta tester for TurboCAD Mac, and we're running 7 fellas- each in their own specialties! this is just too-too---!!

TobyCWood
Feb 12, 2015, 1:08:59 PM2/12/15
to makerbo...@googlegroups.com
Makes sense... their SW Eng practices are as bad as all their other "Engineering" practices. They are fundamentally incompetent in just about all respects. Except for one; customer antagonism.
SSYS needs to step in and severely clean house. Maybe even close up the headquarters and factories and move them and in the process start from scratch using just the fundamental Rep design starting point and the brand name. I can't see any other solution or we will see a couple more $100m markdowns in coming quarters.

Jetguy
Feb 21, 2015, 3:57:27 AM2/21/15
to makerbo...@googlegroups.com
Dear lord is this new release buggy. I just updated to the latest firmware on my Mini along with desktop 3.5 and man, what a disaster.
Print 1- software hung monitoring a print job that actually completed fine. OK, except stopping and restarting the service did nothing.
Printer was fine and could be connected to and accessed by another computer so it was simply desktop being buggy as hell.
Print 2- attempting printing raftless on the mini since we can now set offset adjustment for Z axis. Mine requires -0.60 which I consider and insanely large value but hey, it is printing raftless so just go with it. That said, First time around, I tried with 0 offset and obviously saw on first layer not sticking, hit the front panel button on the mini which paused the print and lowered the bed. I then canceled that print from the computer. Once it did all the end stuff, I could change the offset and then attempt the same print.
Well, except hitting print slices again, sends the code over the wireless, and even gives you the option to preview but instead of print being on the screen, I had to reach over to the printer and hit the button. So it's printing but I have a dialog box open that I can either preview the gcode again or cancel the print. That should not be there.
So again, we have a name for this- buggy as hell.
Seriously, how does this pass basic testing? How does the manager of the software development still have a job??
How does Jenny still have a job?? That's the real question!!!
John Borlaug
Feb 21, 2015, 5:44:33 AM2/21/15
to makerbo...@googlegroups.com
Maybe it's the same thing gaberwocky said yesterday- only the idiots have job retentions!
Jetguy
Feb 21, 2015, 9:53:10 AM2/21/15
to makerbo...@googlegroups.com
Also, I did get a nozzle jam multiple times last night from this crap filament I was using on purpose to test the new hotend under worst case conditions.
Point being, the checkbox for detect jams was enabled- even after following the reset to factory defaults after a firmware upgrade, power cycling just to make sure- this thing didn't detect JACK @$#$#@.
The only thing detected was when out of anger when I found it air printing, I yanked the filament out of the extruder and that tripped the no filament present switch and THEN it paused. In other words, it ground the filament for probably 45 minutes with ZERO filament movement and never detected an error, but sure as heck- the empty no filament present switch in the very top of the extruder. I don't know if this is only specific to the Mini or the latest firmware or what, but I assure you jam detection is NOT working on the Mini in the latest firmware. This is total BS.
Don't sell a customer a feature if it doesn't even remotely work as intended. These guys need the pants sued off them.
I hope, I pray, I one day get to meet Jenny or a Stratasys executive because I assure you, they will get an earful.
I've gone from being disappointed in a nearly $1400 product to just stomping mad. It's nearly a full year after I got the mini and the number of even remotely OK prints from this thing are just a slap in the face. I cannot believe that anyone who owns one is happy. Between the noise, the crap smart extruder that isn't. The Beta firmware and software bugs and the never ending onslaught of promises that will never be kept- MakerBot is a farce of a company. I honestly hope Stratasys cans the entire lot of folks and just cuts their losses. Even then, crooks like Jenny walk away with a nice pile of cash and the hard working employees who have to support this junk are the ones hurt and left out in the wind. But that's better than even one more customer getting F'ed in the A into buying one of these and then fooled into keeping it past the return policy by open promises that it will be better in the next software/firmware release. Really, this is beyond criminal.
Harsh enough words cannot be said today.
Dan Newman
Feb 21, 2015, 11:13:41 AM2/21/15
to makerbo...@googlegroups.com
> So again, we have a name for this- buggy as hell.
> Seriously, how does this pass basic testing? How does the manager of the
> software development still have a job??
> How does Jenny still have a job?? That's the real question!!!
And with Bre's "Cult of Done" manifesto,
http://www.brepettis.com/blog/2009/3/3/the-cult-of-done-manifesto.html
having been enshrined in the past on posters adorning the walls of MBI and
also on T-Shirts given to the employees, there's definitely some ingrained
culture which is at odds with producing, robust, reliable, working finished
products.
Dan
John Borlaug
Feb 22, 2015, 4:34:23 AM2/22/15
to makerbo...@googlegroups.com
So as I wright this with a cat walkin' on my keyboard, I remember the last 3 tymes a company has a drug problem, they told me I have an employment problem,It's only a one buck lossto work @ wallywerld all the 'interns' coming in- I wonder the more I read, the worse my condition gets- and I went to anger management 3 times!

Scott K
Mar 6, 2015, 5:39:24 PM3/6/15
to makerbo...@googlegroups.com
Jetguy, we just acquired a Mini from our operations team (they bought it on a whim so they could be more innovative) who spent a couple days trying to print things and gave up on it. We have been happily using our REP2X (heavily modded) for almost 2 years. Is there any value in us messing with this Mini or should we just give it back and save ourselves a lot of headaches?

AL M
Mar 6, 2015, 7:28:48 PM3/6/15
to makerbo...@googlegroups.com
Is there a way to stop the continue - download screen from popping up every time i light up MB Desktop.I am running ver 3.4.1.124 on a MB 2X
Thank You ,Al

tramalot
Mar 6, 2015, 10:37:36 PM3/6/15
to makerbo...@googlegroups.com
imo, get your money back... fire your bosses
Jetguy
Mar 7, 2015, 2:49:11 AM3/7/15
to makerbo...@googlegroups.com
In all honesty, Get rid of it and get anything else.
If you like the Wifi and stuff and want something more modern- get a Flash Forge Dreamer with an understanding that I only print PLA in mine, removed the front door, side windows and lid, and will never print ABS since there is a thermocouple termination design that causes slight thermal runaway when the bot is run enclosed. In other words, you have a mini now that does only PLA. While they claim the Dreamer is all material- truth is, move it to PLA mode (again remove from door, sides and lid) and it becomes a highly reliable machine IMO. Basically, what happened there is they terminated the thermocouple above the extruders in a box. Basically, they put the temperature sensor inside the same place that warms up over time during the print. Well, that artificially offsets the extrusion temp, raising it by the rise in chamber temp.
If you want ABS and PLA out of the box, switch over to a Duplicator 4S by Wanhao http://wanhaousa.com/products/duplicator-4s-steel-exoframe
It's generally a few hundred dollars cheaper than the Dreamer.
Here's the basics in software as well.
Dreamer- has a nice touch LCD control and custom but closed source firmware. Also tied to Flashprint slicing software but in theory, since it is open gcode standard, other slicers maybe work. Simplify 3D software ($140) also works. Even though it is closed, I'm honestly very happy with print quality and usability. There are still a few bugs they are chasing down so recently I print from SD card not over Wifi as sometimes, the connection drops and the print just stops over wifi. FYI, all prints from USB or Wifi print from an internal microSD card that the file is copied to first. There is no reason we shouldn't be able to print over wifi- like I said, it's just a bug they hopefully fix soon. It was working in the past, so again, just some glitch. Since the firmware is not open- we cannot fix it for them.
D4S- ships with Sailfish firmware. Excellent and well proven, works with Makerware desktop as a Replicator Dual (machine type) Do not use a Replicator 2X profile- your prints will be 6% off in size.
Again, my general opinion is, even with glitches, I kinda like the Dreamer firmware and control system. It's a decent modern working system. The biggest problem is the hardware of the printer and it's a mix of insanely good- and then a few bad choices. For example, Z stage is an upgraded stamped steel one. Very stable and kind of the industry standard right now. Plastic frame, annoying rattle box and since it's made of multiple panels, maybe not the strongest most rigid thing on the planet, but it's OK. The machined aluminum corner blocks that hold the mechanics are genius and as good as I could possibly imagine I wish more printers used that. I hate the hot ends on the extruders but the truth is- nearly everyone in the industry is using that exact one so we kind of live with it. The bad is the termination of the thermocouples above the extruders in this little junction box. That had to do that because with the lid, and the wire routing to the head, there is extreme flex on the wires going to the head. Likely, a normal solid TC wire simply broke from flexing. SO they terminate the thermocoupled in the junction box and then use flexible copper wiring in the snake that goes to the head. This is not ideal, but works fine as long as you don't enclose the chamber and minimize the chance of the box and thus the junction heating up and throwing temps off. So like I said, if you open the bot up, rip the door off, pop out the side window things, and never, ever use the lid- no big deal, it's a great PLA printer.
The D4S is an all metal frame printer. A lot sturdier. It's slightly older tech but well proven and obviously, Sailfish is about the best firmware and feature wise- unmatched. At the same time- no direct Wifi (add on Toshiba Flash air SD card is helpful, but not the same as Dreamer). The one advantage is P-stop meaning, and external Filament monitoring system can be used. http://www.toybuilderlabs.com/products/tunells-3d-printer-filament-monitor-for-makerbots The good news is the D4S comes with a spare endstop cable and has the connector already on the mainboard making this nearly plug and play since the D4S also now ships with Sailfish.
That gives you basically a "smart extruder" that actually works, compared to the 5 gen junk you are playing with now.
Reply all
Reply to author
Forward
0 new messages