Skip to first unread message

wladimir mikielievich
Jan 24, 2021, 4:46:53 PM1/24/21
to AtoM Users
Hi i´m Ignacio and i work at the Museum of the City of Rosario "Wladimir Mikielievich". We are trying to install Atom 2.6 using Ubuntu 18.04. I have done every step of the manual posted on the website but when i open localhost and start to configure i cant go further the first page introducing name and password of the created database (local). Once i click on next it shows a blank screen with the notice "error 504 gateway timeout nginx" (or something like that). How can i find a solution to this problem?
Keep in mind i am a beginner at linux,
Thanks in advance
Hola a todos, soy Ignacio y trabajo en el Museo de la Ciudad de Rosario "Wladimir Mikielievich" (Argentina). Estamos tratando de instalar atom en ubuntu 18.04. Segui todos los pasos de la guía publicada en la web pero cuando abro localhost y empiezo a configurar no puedo pasar mas allá de la primera pantalla donde va nombre y pass de la base de datos (local). Cuando le doy siguiente me sale una pantalla en blanco con el error 504 timeout. Cómo puedo solucionar ésto? Mi conocimiento en linux es bastante básico...
Cualquier ayuda se agradece

Dan Gillean
Jan 25, 2021, 9:42:48 AM1/25/21
to ICA-AtoM Users
Hola Ignacio,
I believe that you may have encountered a known issue - but fortunately, there's a fairly simple workaround you can try - see this thread:
In the meantime, we've filed a ticket to track this issue and hope to include a more permanent fix in a future release.
Cheers,
In the meantime, we've filed a ticket to track this issue and hope to include a more permanent fix in a future release.
Cheers,
he / him
--
You received this message because you are subscribed to the Google Groups "AtoM Users" group.
To unsubscribe from this group and stop receiving emails from it, send an email to ica-atom-user...@googlegroups.com.
To view this discussion on the web visit https://groups.google.com/d/msgid/ica-atom-users/7c8673f9-047c-4847-8dfa-eb5e7b822753n%40googlegroups.com.
wladimir mikielievich
Jan 25, 2021, 9:55:32 AM1/25/21
to AtoM Users
Hi Dan, Thanks for the info... i entered http://localhost/index.php/sfInstallPlugin/configureSite and a page shows up but i enter the inforation and there is no continue o finish button... how do i confirm the info?
Dan Gillean
Jan 25, 2021, 2:39:05 PM1/25/21
to ICA-AtoM Users
Hi again,
Hmmm, that's strange. Our devs can't see any conditions for the Save and Continue button to load. You might want to try a hard refresh in your browser, and/or testing in an Incognito browser perhaps, to see if it makes a difference? You could also try that step in a different browser (e.g. if you're using Firefox, try Chrome) to ensure there's not some browser-specific CSS or Javascript issue interfering with the page display.
Otherwise, I would suggest going back to the loadData page, and waiting an additional 20-30 seconds after getting the timeout error, just to make sure any remaining processes have completed their request attempts, before proceeding.
Finally, you could perhaps try running the configureSearch page while using Debug mode, to see if any further information is revealed. See:
If it still doesn't work, please send us a screenshot of the resulting Configure Search page, and I'll ask our developers if they have any other suggestions.
Cheers,
he / him
To view this discussion on the web visit https://groups.google.com/d/msgid/ica-atom-users/fe693640-36a7-42f5-b0e0-20430130c54bn%40googlegroups.com.
wladimir mikielievich
Jan 27, 2021, 9:48:02 AM1/27/21
to AtoM Users
Hi again dan, i reinstall all over again and the problem remains so i try to go directly to /configureSite and now i could fill the info and press "save and continue". sadly when i do that the following error page appears
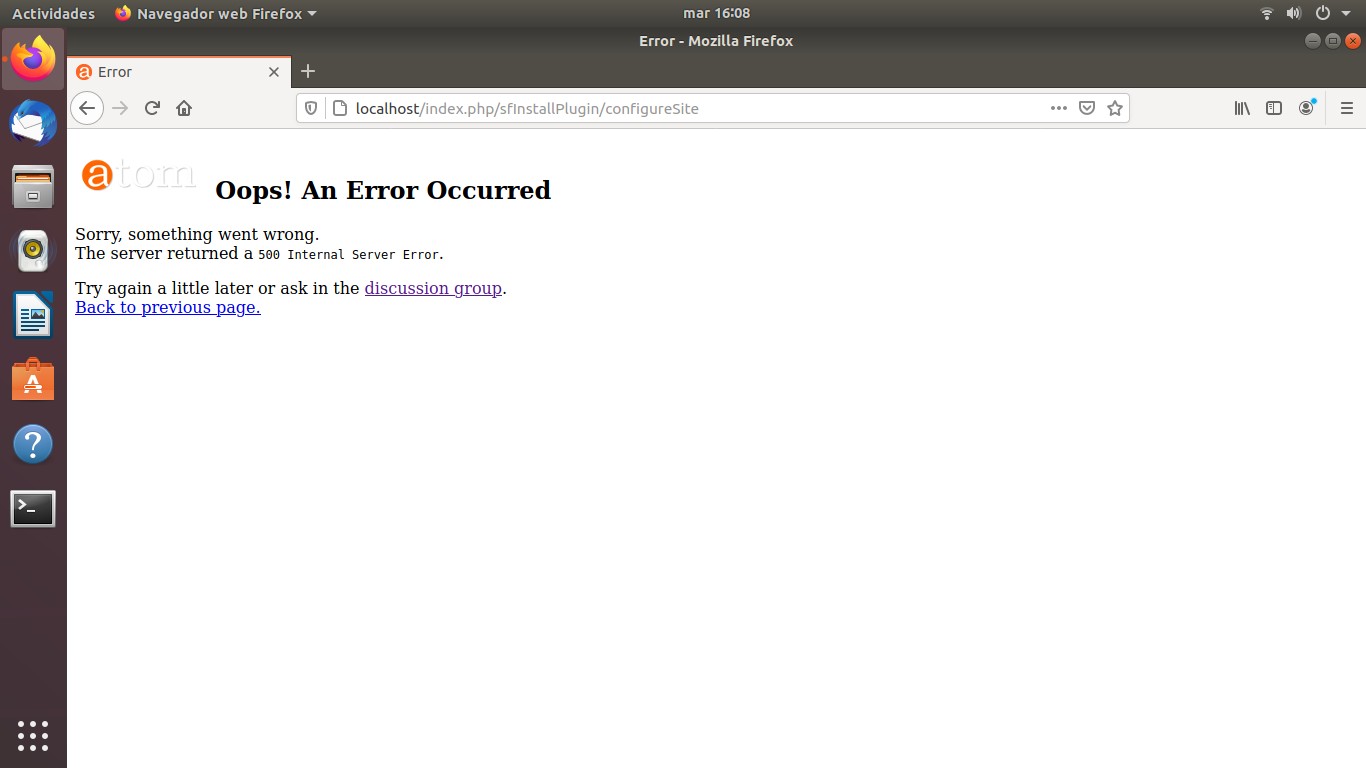
Dan Gillean
Jan 27, 2021, 10:32:19 AM1/27/21
to ICA-AtoM Users
Hi Ignacio,
Any time you encounter a 500 error like this, I suggest taking a look in the webserver error logs so we can learn more about the nature of the error. See:
Please share any related error message you find - hopefully it will give us more insight into what's happening, so we can provide further suggestions.
In the meantime, if you haven't already, then you may want to try the second solution mentioned in the original solution thread - editing the Nginx fastcgi_read_timeout value to increase the setting allowing the loaddata call to complete. If you do try this, remember two things:
- This needs to be done before the data is loaded - so you may need to ensure you have a backup of your sql data, and then drop/recreate the database, run the purge task to clear any residual data, and then implement the recommended changes before reloading your data, running the upgrade task, etc.
- After making any changes to the Ngnix configuration file, you'll want to reload Nginx.
Implementing these reminders will look something like this:
First, make sure you have a copy of your sqldump outside of AtoM - we are going to delete ALL data currently held there, and try reloading it. If this is a brand new installation and you're not loading any legacy data from an earlier version, then don't worry, there's nothing to lose.
We'll need to access the MySQL command prompt, which means you'll need to know the database name and user that were established during the installation process. Instructions on how to access the MySQL command prompt, and how to find this information if you don't remember it, can be found here:
As shown in step 4 of the Upgrading documentation, we'll want to drop and recreate the database.
- mysql -u username -p -e "DROP DATABASE IF EXISTS atom;"
- mysql -u username -p -e "CREATE DATABASE atom CHARACTER SET utf8mb4 COLLATE utf8mb4_0900_ai_ci;"
Replace username with the database user name used during installation. You'll be prompted for the password used during installation as well.
Additionally, after dropping and recreating the database, but BEFORE loading your backup, you can also try to run the tools:purge command-line task. This will flush any residual data from the db, which can sometimes be useful after multiple installation attempts. Remember, be sure you have a copy of your sqldump outside of AtoM before running this - everything will be deleted! Run the following from the root AtoM installation directory - typically this is /usr/share/nginx/atom if you have followed our recommended installation instructions:
- php symfony tools:purge
Now we can make the changes to the Nginx configuration file recommended in option B of the solution thread I linked to in my last post.
We'll want to reload Nginx for the changes to take effect after:
- sudo systemctl reload nginx
Now you can follow the rest of the Upgrading instructions to load your data (e.g. load the sqldump, run the upgrade task, restart services, reindex, etc). If you have no data to load and all other normal installation steps have been completed, then you can try re-launching the web installer by returning to the loadData page.
Note that some users report that adjusting the PHP execution times can help as well. See:
You may also find that running a resource monitor will help to know when it's safe to advance to the next page if you continue to encounter timeout issues. See for example this part of the thread:
We have some recommendations on how to run such tools here:
I'm sorry that this has been a frustrating process! We are hoping to remove the web installer completely for the 2.7 release to avoid these kinds of issues - since 90% of the installation process is done in the command line, there's no reason such a resource intensive process at the end should need to be executed via a web browser. Up until now we've relied on the web installer provided by the Symfony framework, but given these continued installation issues, our hope is that removing it and moving to a command-line-only installation process will avoid these issues in the future.
Let us know what you find in the error logs, and if you try this second option, let us know how it goes.
Cheers,
he / him
To view this discussion on the web visit https://groups.google.com/d/msgid/ica-atom-users/b01bbf9a-c7c2-451a-a5bf-97fb66c82f32n%40googlegroups.com.
wladimir mikielievich
Jan 28, 2021, 2:53:16 PM1/28/21
to AtoM Users
hi again the error log shows this:
PHP message: PHP Fatal error: Uncaught Zend_Acl_Exception: addRole() expects $role to be of type Zend_Acl_Role_Interface in /usr/share/nginx/atom/plugins/qbAclPlugin/lib/vendor/Zend/Acl.php:124
Stack trace:
#0 /usr/share/nginx/atom/plugins/qbAclPlugin/lib/QubitAcl.class.php(328): Zend_Acl->addRole(NULL)
#1 /usr/share/nginx/atom/plugins/qbAclPlugin/lib/QubitAcl.class.php(63): QubitAcl->buildUserRoleList(Object(myUser))
#2 /usr/share/nginx/atom/plugins/qbAclPlugin/lib/QubitAcl.class.php(70): QubitAcl->__construct()
#3 /usr/share/nginx/atom/plugins/qbAclPlugin/lib/QubitAcl.class.php(261): QubitAcl::getInstance()
#4 /usr/share/nginx/atom/plugins/qbAclPlugin/lib/QubitAcl.class.php(134): QubitAcl::isAllowed(Object(myUser), 'userInterface', 'translate', Array)
#5 /usr/share/nginx/atom/apps/qubit/templates/_footer.php(3): QubitAcl::check('userInterface', Array)
#6 /usr/share/nginx/atom/cache/qubit/prod/config/config_core_compile.yml.php(3895): require('/usr/share/ngin...')
#7 /usr/share/nginx/atom/vendor/symfony" while reading response header from upstream, client: 127.0.0.1, server: _, request: "GET /plugins/arDominionPlugin/css/main.css HTTP/1.1", upstream: "fastcgi://unix:/run/php7.2-fpm.atom.sock:", host: "localhost", referrer: "http://localhost/index.php/sfInstallPlugin/configureSite"
hope it means something to you haha , i dont have any idea
meanwhile i will try the otrhers solutions you provide, thanks!
wladimir mikielievich
Jan 28, 2021, 3:32:50 PM1/28/21
to AtoM Users
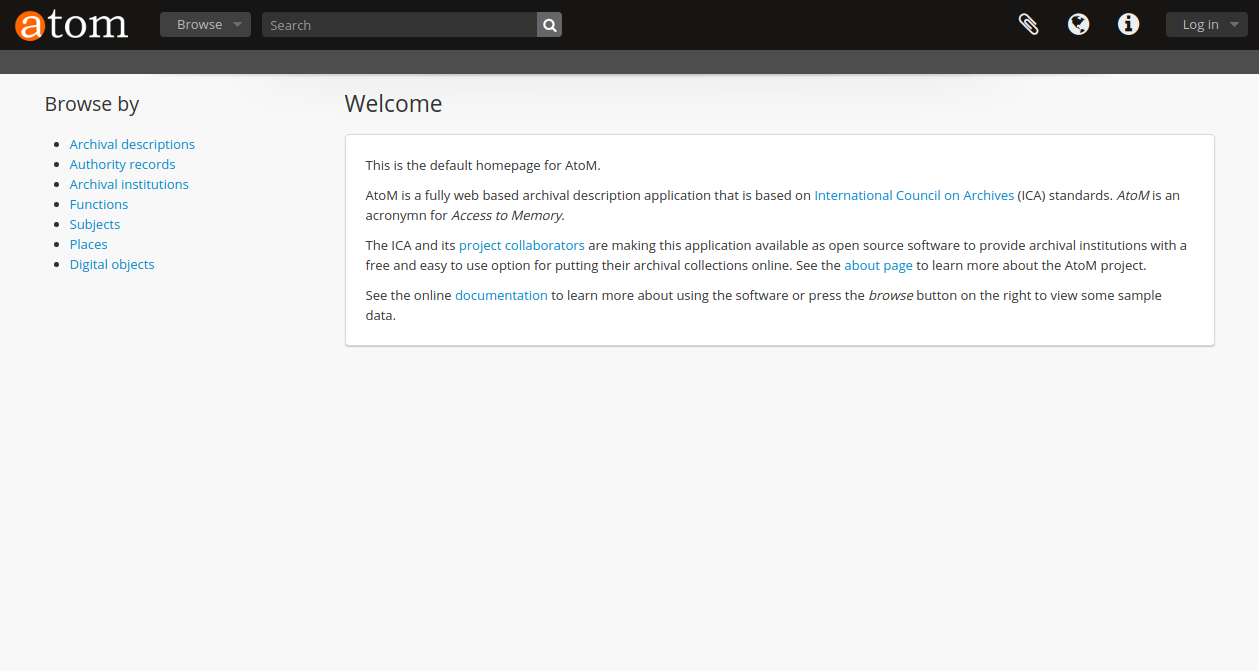
i manage to finnally load all the data with the changes!!!!
but now the web looks like this, like it doesnt load objects:

Dan Gillean
Jan 28, 2021, 4:29:15 PM1/28/21
to ICA-AtoM Users
Some progress, great!
At this point, it might just be that the CSS for the base Dominion theme needs to be recompiled. We will first need to install some dependencies we don't include in the tarball by default, because the CSS is usually precompiled in our downloadable tarballs. To install the required dependencies:
- curl -sL https://deb.nodesource.com/setup_6.x | sudo -E bash -
- sudo apt install nodejs npm make
- sudo npm install -g "less@<2.0.0"
Some of these dependencies may give you warnings - they are older versions, but are what are currently required to be able to recompile the base Dominion theme CSS, so you can ignore them and proceed. Also, don't miss the dash ( - ) at the end of the first command!
Once you have these installed, you can then try recompiling the base Dominion theme with the following command:
- sudo make -C /usr/share/nginx/atom/plugins/arDominionPlugin
If you are using a custom theme plugin, then you should do the same for it, changing arDominionPlugin in the command above to the name of your custom theme plugn.
After that, I recommend clearing the application cache and restarting PHP-FPM, to ensure when you test again you are seeing an updated version of the page, and not a cached copy. Remember as well that your web browser has its own cache - I also recommend that you clear your web browser cache before re-testing, and/or test in an incognito or private browser window, where the cache is typically disabled by default.
Let us know if it helps!
Cheers,
he / him
To view this discussion on the web visit https://groups.google.com/d/msgid/ica-atom-users/7491f323-5f92-42e4-82cd-1c799ffbe471n%40googlegroups.com.
wladimir mikielievich
Jan 28, 2021, 6:31:48 PM1/28/21
to AtoM Users
great thanks!!!
when i made one of the step (php symfony cache:clear) the response was: "Could not open input file: symfony"
nevertheless now it looks ok!!!
Dan Gillean
Feb 1, 2021, 9:55:09 AM2/1/21
to ICA-AtoM Users
Great!
Usually when we see ""Could not open input file: symfony" as an error, it's because the command has been executed in the wrong directory. Any command that begins with php symfony must be run from the root AtoM installation directory - if you have followed our recommended installation instructions this is usually /usr/share/nginx/atom. Try running the command again from the directory where you installed AtoM and see if it works!
Cheers,
he / him
To view this discussion on the web visit https://groups.google.com/d/msgid/ica-atom-users/461d8239-433a-48b2-aad5-99e40c12a2e9n%40googlegroups.com.
Reply all
Reply to author
Forward
0 new messages