
Béatrice Lecomte
Aug 20, 2019, 3:02:10 PM8/20/19
to ica-ato...@googlegroups.com
Hello AtoM Users,
Since this morning I am unable to use AtoM that is installed on my computer to run some tests. The VM is installed since last winter and always worked well until now. The problem occurs when we launch Vagrant. It returns the following message (see also in attachement):
There was an error while executing 'VBoxManage', a CLI used by Vagrant for controlling VirtualBox. The command and stderr is shown below.
Command: ["strartvm". 58e96af3-b34de0-8f84-7bc5967529e0", "--type", "headless"]
Stderr: VBoxManage.exe: error: VT-x is not available (VERR_V'X_NO_VMX)
VBoxMagage.exe: error: Details: code E_FAIL (0x80004005), component ConsoleWrap, interface IConsole
I deactivated HyperV as some on other Forums suggested and uninstalled Docker even thought it was not running anymore, just in case.
I am aware that it is most probably a VM problem, but do you have any clue on how to fix it?
Thanks a lot!
Béatrice

Dan Gillean
Aug 20, 2019, 4:15:38 PM8/20/19
to ICA-AtoM Users
Hi Béatrice,
Are you on a Windows host computer? Based on the error message you shared, I suspect that virtualization may not currently be enabled in your BIOS.
On many Windows computers, virtualization is often disabled in the BIOS by default, and needs to be manually enabled/allowed. Modern CPUs include hardware virtualization features that help accelerate virtual machines created in VirtualBox, VMware, Hyper-V, and other apps. But those features aren’t always enabled by default.On systems with an Intel CPU, the Intel VT-x feature can be disabled via a BIOS or UEFI firmware setting. In fact, it’s often disabled by default on new computers - meaning you will need to go into your BIOS/UEFI settings to enable it manually.
PCs made prior to the release of Windows 8 probably use BIOS. PCs made after Windows 8 came out may use UEFI instead, and the likelihood of using UEFI grows the more modern the PC. If you're curious, you can read more about the difference between BIOS and UEFI here and here.
On a BIOS-based system, you’ll access BIOS settings by restarting your PC and pressing the appropriate key right when it first boots. The key you press depends on your PC’s manufacturer, but it’s often the "Delete," "ESC," or "F2" key. You also will most likely see a message during startup that says something like, "Press {Key} to access setup." If you can’t figure out the right key to get into your BIOS settings, just perform a web search for something like "{computer} {model_number} access BIOS."
Once again, it will depend on your particular computer and the BIOS version it uses, but places to look to find the setting you will want to enable are:
- Look in the Power or Advanced Chipset Settings sections
- Look for "Virtualization Technology" setting
- Make sure this is set to "Enabled"
If your computer uses UEFI, you can still access the BIOS settings, but they make it a bit harder. The following links cover both cases:
- https://www.howtogeek.com/213795/how-to-enable-intel-vt-x-in-your-computers-bios-or-uefi-firmware/
- https://www.shaileshjha.com/step-by-step-guide-to-enable-intel-vt-x-or-amd-v-in-bios-or-uefi-in-windows-10-and-windows-8/
- https://www.smarthomebeginner.com/enable-hardware-virtualization-vt-x-amd-v/
One other thing I find it is often good to check on Windows based computers: check the Virtualbox Adapter settings.
Sometimes, you might need to adjust Windows' default adapter settings for it to work with Virtualbox. This can be necessary during first installation, but sometimes also after upgrading your version of Virtualbox. To do so, first make sure Vagrant and Virtualbox are shut down, and then:
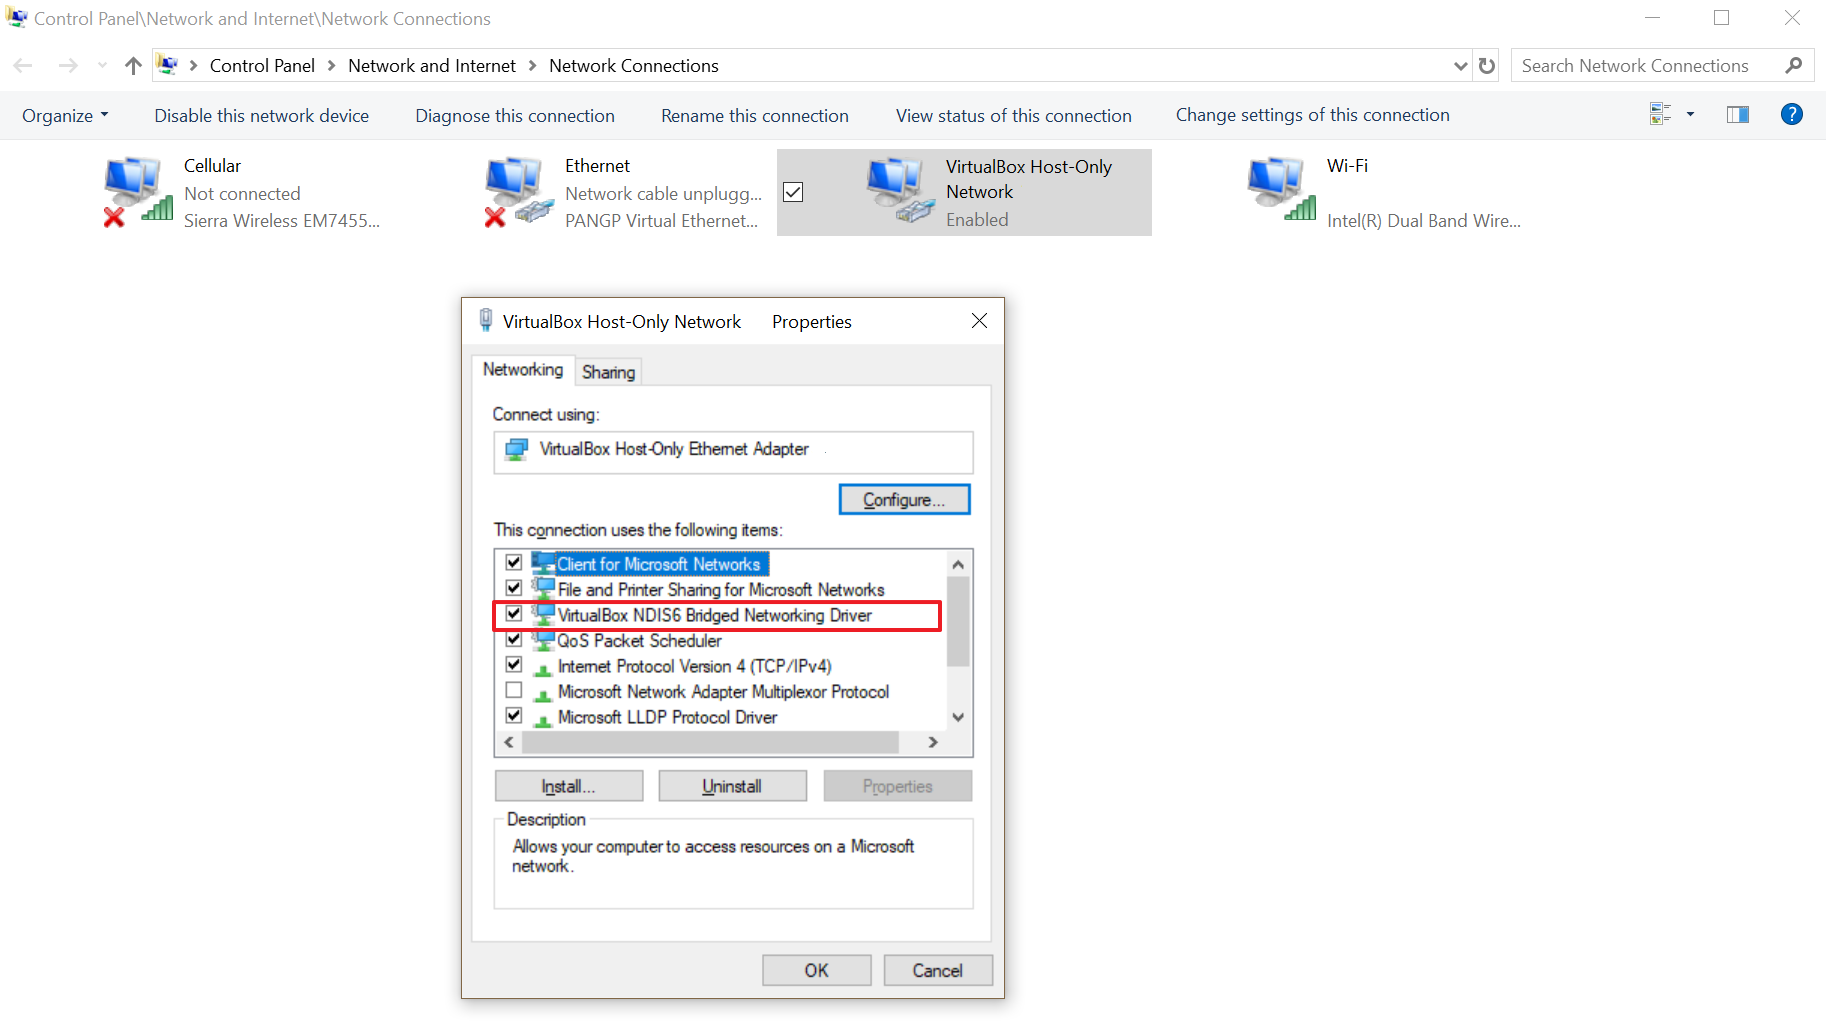
- Open the Control Panel, and navigate to Network and Internet > Network and Sharing Center
- In the left sidebar, click on the link to "Change adapter settings"
- Windows will open a new window - one of the connections should be call the "VirtualBox Host-Only Network"
- Click once on it, and then in the header bar, click the option that appears to "Change the settings of this adapter"
- Another dialogue window will pop up
- In the Network tab of this new window, make sure that the "Virtualbox NDIS6 Bridged Networking Driver" option is checked
- Save your changes
Let us know if that helps!
Regards,
--
You received this message because you are subscribed to the Google Groups "AtoM Users" group.
To unsubscribe from this group and stop receiving emails from it, send an email to ica-atom-user...@googlegroups.com.
To view this discussion on the web visit https://groups.google.com/d/msgid/ica-atom-users/193aaeeb-d37a-47ad-b90e-568f623cb70c%40googlegroups.com.
Béatrice Lecomte
Aug 22, 2019, 9:10:52 AM8/22/19
to ica-ato...@googlegroups.com
Thank you Dan for this very complete and detailled answer.
Unfortunately everything seems ok with the settings that enables virtualization. I will try to start from scratch again, I guess!
Thanks again!
Béatrice
To view this discussion on the web visit https://groups.google.com/d/msgid/ica-atom-users/CAC1FhZKoC6dg5PEf09wZVR%3D1T7FmvkMX_5Jqi6-52rppdmyppA%40mail.gmail.com.
Dan Gillean
Aug 22, 2019, 10:55:06 AM8/22/19
to ICA-AtoM Users
Hi again Béatrice,
I believe that there are newer versions of both Virtualbox and Vagrant that have been released recently. I have run into similar issues myself in the past, and once solved them by deleting those dependencies, and re-installing the newer versions. If you are starting again, I would suggest upgrading as well - it might help!
Regards,
To view this discussion on the web visit https://groups.google.com/d/msgid/ica-atom-users/CAMv_mMQADk-VeBsE31C%3DDBbEzQRLpoTfafSkDkQ_V68yFGPo4g%40mail.gmail.com.
Béatrice Lecomte
Aug 22, 2019, 11:16:31 AM8/22/19
to ica-ato...@googlegroups.com
To view this discussion on the web visit https://groups.google.com/d/msgid/ica-atom-users/CAC1FhZ%2BnqWqPJidt%3DKmeEQEvS9g5GaN6zgCype8iq63F9caLQw%40mail.gmail.com.
Reply all
Reply to author
Forward
0 new messages