Hugin Assistant tab changes
150 views
Skip to first unread message

Bruno Postle
Jul 29, 2022, 3:18:02 PM7/29/22
to hugin and other free panoramic software
Thomas has made some changes to the Assistant tab in the Fast Preview that I hope are a big improvement.
The Assistant is the first thing that new users see, it has a simplified 1. 2. 3. workflow that seems to work for most people. Though it has some quite scary empty fields for entering lens details that are usually not needed for normal photos.
Now it is just three big simple buttons: Load images... Align... and Create panorama...
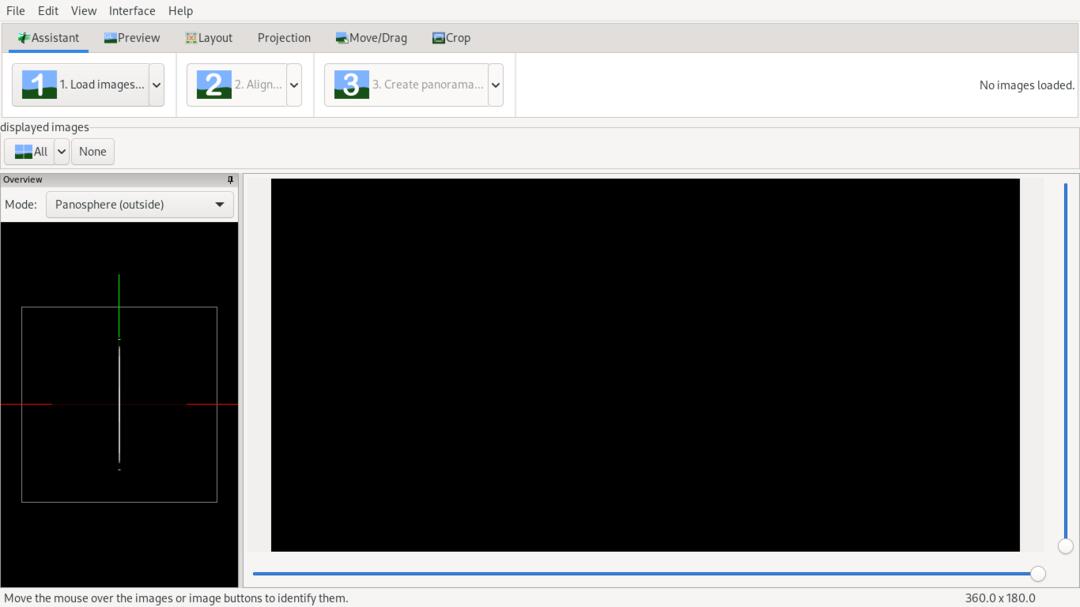
You can click the three buttons in-turn to stitch a panorama as before, and I hope it is less scary.
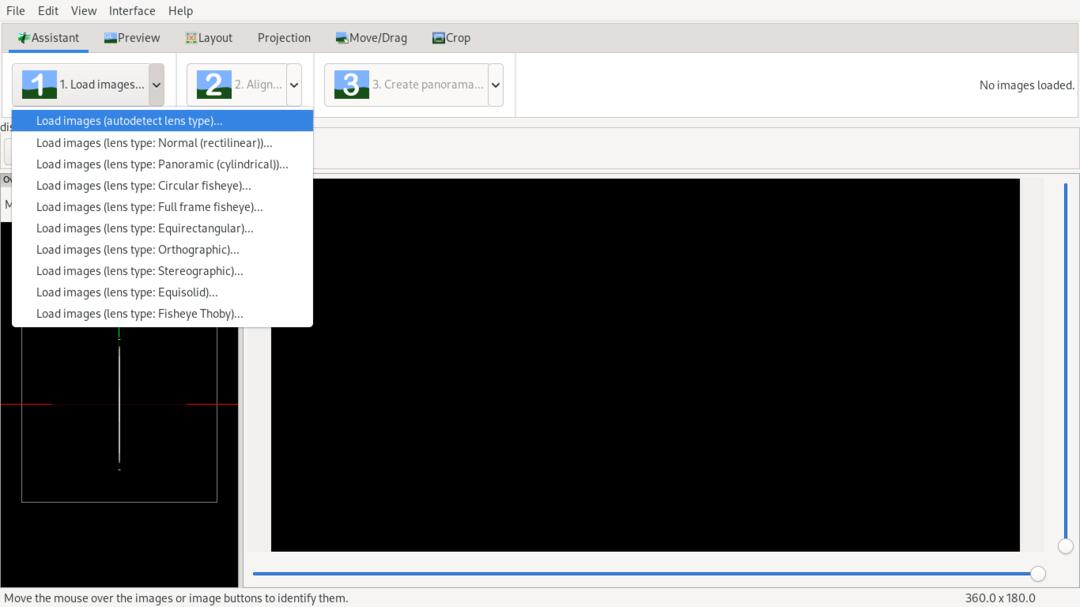
But if you notice now they are 'split buttons', where if you explore the little drop-down arrows there are some options, different ways of using the buttons.
The first lets you declare the lens type of your photos (if it can't be detected):
The second lets you run different alignment strategies. This functionality has existed for a long time, but hasn't been so easy to find, each one of these 'strategies' is an 'assistant' script, you can create your own custom scripts and they will appear here:

The third split menu gives various ways of stitching the final panorama. These are all 'executor' scripts that were previously hard to find, you can create your own and they will appear here:

So I hope this is a major improvement, a lot of the frequently asked questions are about workflows that have long been available in these 'assistant' and 'executor' scripts, and now they should be discoverable.
Any comments? The graphics on the buttons themselves are simple numbers, are they just right or could they be more informative?
--
Bruno

David W. Jones
Jul 29, 2022, 8:46:03 PM7/29/22
to hugin-ptx
Hey, Thomas and Bruno!
On 7/29/22 09:17, Bruno Postle wrote:
> Thomas has made some changes to the Assistant tab in the Fast Preview
> that I hope are a big improvement.
>
> The Assistant is the first thing that new users see, it has a simplified
> 1. 2. 3. workflow that seems to work for most people. Though it has some
> quite scary empty fields for entering lens details that are usually not
> needed for normal photos.
>
> Now it is just three big simple buttons: Load images... Align... and
> Create panorama...
>
Hmm. It seems complicated for the Assistant, which I think of as the
"beginners" tool. Would a beginner even know what the different lens
types mean?
> The second lets you run different alignment strategies. This
> functionality has existed for a long time, but hasn't been so easy to
> find, each one of these 'strategies' is an 'assistant' script, you can
> create your own custom scripts and they will appear here:
>
> Screenshot 3.jpg
I like the wording of the options on the dropdown. They make functional
sense - user knows they have scanned images or have a dual-lens camera.
Although why are there two "Scanned images" entries - one plain, one
with TrXYZ? Would a beginner know what the difference is?
> The third split menu gives various ways of stitching the final panorama.
> These are all 'executor' scripts that were previously hard to find, you
> can create your own and they will appear here:
>
> Screenshot 4.jpg
This dropdown list definitely drops out of the beginner category!
What does the "Zero-noise output" do?
> So I hope this is a major improvement, a lot of the frequently asked
> questions are about workflows that have long been available in these
> 'assistant' and 'executor' scripts, and now they should be discoverable.
>
> Any comments? The graphics on the buttons themselves are simple
> numbers, are they just right or could they be more informative?
I think they're quite clear. Their graphic treatment and arrangement
tell me they're steps in a sequential process.
Does hovering over a number/button have a tooltip that explains things?
> --
> Bruno
Thanks for the design changes. I rarely use the Assistant at all, but I
think it would make Hugin easier for new or casual users.
--
David W. Jones
gnome...@gmail.com
wandering the landscape of god
http://dancingtreefrog.com
My password is the last 8 digits of π.
On 7/29/22 09:17, Bruno Postle wrote:
> Thomas has made some changes to the Assistant tab in the Fast Preview
> that I hope are a big improvement.
>
> The Assistant is the first thing that new users see, it has a simplified
> 1. 2. 3. workflow that seems to work for most people. Though it has some
> quite scary empty fields for entering lens details that are usually not
> needed for normal photos.
>
> Now it is just three big simple buttons: Load images... Align... and
> Create panorama...
>
> Screenshot 1.jpg
>
> You can click the three buttons in-turn to stitch a panorama as before,
> and I hope it is less scary.
>
> But if you notice now they are 'split buttons', where if you explore the
> little drop-down arrows there are some options, different ways of using
> the buttons.
>
> The first lets you declare the lens type of your photos (if it can't be
> detected):
>
> Screenshot 2.jpg
>
> You can click the three buttons in-turn to stitch a panorama as before,
> and I hope it is less scary.
>
> But if you notice now they are 'split buttons', where if you explore the
> little drop-down arrows there are some options, different ways of using
> the buttons.
>
> The first lets you declare the lens type of your photos (if it can't be
> detected):
>
Hmm. It seems complicated for the Assistant, which I think of as the
"beginners" tool. Would a beginner even know what the different lens
types mean?
> The second lets you run different alignment strategies. This
> functionality has existed for a long time, but hasn't been so easy to
> find, each one of these 'strategies' is an 'assistant' script, you can
> create your own custom scripts and they will appear here:
>
I like the wording of the options on the dropdown. They make functional
sense - user knows they have scanned images or have a dual-lens camera.
Although why are there two "Scanned images" entries - one plain, one
with TrXYZ? Would a beginner know what the difference is?
> The third split menu gives various ways of stitching the final panorama.
> These are all 'executor' scripts that were previously hard to find, you
> can create your own and they will appear here:
>
This dropdown list definitely drops out of the beginner category!
What does the "Zero-noise output" do?
> So I hope this is a major improvement, a lot of the frequently asked
> questions are about workflows that have long been available in these
> 'assistant' and 'executor' scripts, and now they should be discoverable.
>
> Any comments? The graphics on the buttons themselves are simple
> numbers, are they just right or could they be more informative?
tell me they're steps in a sequential process.
Does hovering over a number/button have a tooltip that explains things?
> --
> Bruno
Thanks for the design changes. I rarely use the Assistant at all, but I
think it would make Hugin easier for new or casual users.
--
David W. Jones
gnome...@gmail.com
wandering the landscape of god
http://dancingtreefrog.com
My password is the last 8 digits of π.
Bruno Postle
Jul 30, 2022, 5:06:43 AM7/30/22
to hugin and other free panoramic software
On Sat, 30 Jul 2022, 01:46 David W. Jones, wrote:
>
> Hey, Thomas and Bruno!
>
> On 7/29/22 09:17, Bruno Postle wrote:
>
> > The first lets you declare the lens type of your photos (if it can't be
> > detected):
>
>
> Hey, Thomas and Bruno!
>
> On 7/29/22 09:17, Bruno Postle wrote:
>
> > The first lets you declare the lens type of your photos (if it can't be
> > detected):
>
> Hmm. It seems complicated for the Assistant, which I think of as the
> "beginners" tool. Would a beginner even know what the different lens
> types mean?
The previous Assistant tab had a drop down for lens type, plus focal
> "beginners" tool. Would a beginner even know what the different lens
> types mean?
length and crop factor, all in the space next to the first button.
This was exposing deep photo techno stuff to first-time users that in
reality would be auto-detected (if the focal length can't be detected
in the EXIF metadata, you still get a pop-up asking for it as before).
With the split button, the lens type options appear only if you click
on the pull down arrow - and the first item is labelled as default, so
I *hope* anyone exploring these will be gently made aware only that
there are other possibilities.
> > The second lets you run different alignment strategies.
>
> I like the wording of the options on the dropdown. They make functional
> sense - user knows they have scanned images or have a dual-lens camera.
> Although why are there two "Scanned images" entries - one plain, one
> with TrXYZ? Would a beginner know what the difference is?
The problem is that: although using the XYZ mosaic parameters to
> sense - user knows they have scanned images or have a dual-lens camera.
> Although why are there two "Scanned images" entries - one plain, one
> with TrXYZ? Would a beginner know what the difference is?
stitch scans is conceptually the right way to do it (because sometimes
your 'scans' are from a mounted camera or microscope and need lens
correction); the simple way of doing it that abuses the lens d&e
parameters is more stable and works perfectly for flat-bed scanners.
You can read the labels as 'scanned images' and 'scanned images using
cryptic other stuff', which is about right.
What I like about this new framework is you can try it, undo, try
something else etc... Before, these assistant scripts were difficult
to find.
> > The third split menu gives various ways of stitching the final panorama.
>
> This dropdown list definitely drops out of the beginner category!
>
> What does the "Zero-noise output" do?
It is a photo technique where you shoot bracketed exposures and
>
> What does the "Zero-noise output" do?
reconstruct a normal (non HDR) image that uses the lowest noise data
for the dark areas of the image. It gives spookily high quality
results, especially if you are printing. You need a tripod and a
static scene, so it isn't an everyday technique:
http://www.guillermoluijk.com/article/nonoise/index_en.htm
> Does hovering over a number/button have a tooltip that explains things?
images"), there are no tooltips for the individual menu entries.
--
Bruno

smib
Jul 31, 2022, 2:06:17 AM7/31/22
to hugin and other free panoramic software
Hi,
Just tried to compile this latest version (win10 64 bit) using an older version of MSVC and get:
Error 56 error C2039: 'max' : is not a member of 'std' E:\PHOTOGRAPHIC\HuginDLL\Hugin\src\hugin1\hugin\SplitButton.cpp 213 1 hugin
and
Error 57 error C3861: 'max': identifier not found E:\PHOTOGRAPHIC\HuginDLL\Hugin\src\hugin1\hugin\SplitButton.cpp 213 1 hugin
Brian

T. Modes
Jul 31, 2022, 4:16:21 AM7/31/22
to hugin and other free panoramic software
Hi,
I added also the display of more help texts for the menu items in the status bar. This should give more information about the selected assistant/output.
@Brian
smib schrieb am Sonntag, 31. Juli 2022 um 08:06:17 UTC+2:
Hi,Just tried to compile this latest version (win10 64 bit) using an older version of MSVC and get:
How old is "older"? It compiles fine with MSVC2022.
Trying to fix in repository. But the support for older compilers will be limited because of my limited resources.
Thomas
smib
Jul 31, 2022, 6:55:49 AM7/31/22
to hugin and other free panoramic software
Thomas
Visual Studio 12 2013
Brian
T. Modes
Jul 31, 2022, 10:01:04 AM7/31/22
to hugin and other free panoramic software
smib schrieb am Sonntag, 31. Juli 2022 um 12:55:49 UTC+2:
ThomasVisual Studio 12 2013
That's really old. Sorry, but there is no official support for a nearly 10 year old compiler.
smib
Jul 31, 2022, 6:59:02 PM7/31/22
to hugin and other free panoramic software
What I suspected - thanks
Reply all
Reply to author
Forward
0 new messages