Manipulating masks on a Mac - bugs?
60 views
Skip to first unread message

John Muccigrosso
Oct 21, 2014, 9:34:11 AM10/21/14
to hugi...@googlegroups.com
Some of the mouse commands that are listed in the manual are difficult for Mac users, since we don't generally have 3-button mice and a control-click is the same as a right click (we'll leave the trackpad out of it).
That said, I was working on a mask and found some inconsistencies with what the manual says, and just some oddities. Are these actual bugs or has the manual simply not been updated? I'm happy to create a screencast to show them, if that would help.
- A right-drag inside a mask does what the manual says and moves it. (Control-click and drag acts the same, as expected.) So the hint about command being the same as control on the Mac is wrong here. The only issue I found is that sometimes it takes a second for Hugin to register the click and select the entire mask.
- OTOH, command-clicking on a line creates a new point there, just as control-clicking is said to for other OSes.
- When I click on an existing point, Hugin will sometimes select not just that point, but also an adjacent one or more. Why?
- When I click near the mask, Hugin will select 1 or more points. They look like the closest n points to where I'm clicking, but how is it deciding what n is? This looks like Hugin treats a click near the mask as if it were actually on the mask. Note that unlike #3, the points do not have to be adjacent to each other, but apparently near to the click location.
- Similar to #4, if I command-click somewhere off a line, Hugin will create a new point, but not necessarily in the nearest line segment. How is it deciding where to make the new point? I can actually get pretty far away from the mask and have this happen.
- Drawing a marquee around a point will sometimes select adjacent points as well, just like clicking does. This is somewhat dependent on the size of the marquee: a small one confined to an area just around a point will select only that point, but if the marquee is big and approaches other points - even if it doesn't include them - then more than one point will be selected.
- If I drag a point selection (of one or more points) a short distance away from its original location, it will snap back. But if I drag it further, it will stay where I put it. What's happening there? Is there some minimum change that Hugin needs? (If so, that's not very helpful for tweaking masks.)
Any help appreciated. I'm happy to file these as bugs, but not if I just need to RTFM (whatever manual that is).
Thanks.

David W. Jones
Oct 22, 2014, 1:47:07 AM10/22/14
to hugi...@googlegroups.com
On 10/21/2014 03:34 AM, John Muccigrosso wrote:
> Some of the mouse commands that are listed in the manual are difficult
> for Mac users, since we don't generally have 3-button mice and a
> control-click is the same as a right click (we'll leave the trackpad out
> of it).
>
> That said, I was working on a mask and found some inconsistencies with
> what the manual says, and just some oddities. Are these actual bugs or
> has the manual simply not been updated? I'm happy to create a screencast
> to show them, if that would help.
>
> 1. A right-drag inside a mask does what the manual says and moves it.
> Some of the mouse commands that are listed in the manual are difficult
> for Mac users, since we don't generally have 3-button mice and a
> control-click is the same as a right click (we'll leave the trackpad out
> of it).
>
> That said, I was working on a mask and found some inconsistencies with
> what the manual says, and just some oddities. Are these actual bugs or
> has the manual simply not been updated? I'm happy to create a screencast
> to show them, if that would help.
>
> (Control-click and drag acts the same, as expected.) So the hint
> about command being the same as control on the Mac is wrong here.
> The only issue I found is that sometimes it takes a second for Hugin
> to register the click and select the entire mask.
> 2. OTOH, command-clicking on a line creates a new point there, just as
> about command being the same as control on the Mac is wrong here.
> The only issue I found is that sometimes it takes a second for Hugin
> to register the click and select the entire mask.
> control-clicking is said to for other OSes.
> 3. When I click on an existing point, Hugin will sometimes select not
> just that point, but also an adjacent one or more. Why?
> 4. When I click *near* the mask, Hugin will select 1 or more points.
> They look like the closest n points to where I'm clicking, but how
> is it deciding what n is? This looks like Hugin treats a click
> *near* the mask as if it were actually *on* the mask. Note that
> is it deciding what n is? This looks like Hugin treats a click
> unlike #3, the points do not have to be adjacent to each other, but
> apparently near to the click location.
> 5. Similar to #4, if I command-click somewhere *off* a line, Hugin will
> apparently near to the click location.
> create a new point, but not necessarily in the nearest line segment.
> How is it deciding where to make the new point? I can actually get
> pretty far away from the mask and have this happen.
> 6. Drawing a marquee around a point will sometimes select adjacent
> How is it deciding where to make the new point? I can actually get
> pretty far away from the mask and have this happen.
> points as well, just like clicking does. This is somewhat dependent
> on the size of the marquee: a small one confined to an area just
> around a point will select only that point, but if the marquee is
> big and approaches other points - even if it doesn't include them -
> then more than one point will be selected.
> 7. If I drag a point selection (of one or more points) a short distance
> on the size of the marquee: a small one confined to an area just
> around a point will select only that point, but if the marquee is
> big and approaches other points - even if it doesn't include them -
> then more than one point will be selected.
> away from its original location, it will snap back. But if I drag it
> further, it will stay where I put it. What's happening there? Is
> there some minimum change that Hugin needs? (If so, that's not very
> helpful for tweaking masks.)
Yes, there is a minimum change Hugin needs. I just tweak mask points by
> further, it will stay where I put it. What's happening there? Is
> there some minimum change that Hugin needs? (If so, that's not very
> helpful for tweaking masks.)
dragging the point somewhere else far enough away, then click on it
again and drag it back to where I want it.
> Any help appreciated. I'm happy to file these as bugs, but not if I just
> need to RTFM (whatever manual that is).
>
> Thanks.
comfortable with multibutton mice and right-clicking. I've used Macs,
too, and really wish Apple's big name CEO hadn't been so convinced that
people were stupid klutzes with no eye-hand coordination. ;)
I've encountered issues #3 and #6.
My usual workflow regarding masks is:
1. With image zoomed to fit the window, drag a basic mask, not
necessarily with a lot of lot of points.
2. Do a test stitch, see how much it needs to be tweaked.
3. Zoom to 100% and start adding and moving points as needed.
4. Repeat test stitches and tweaking until happy with it.
While doing that, sometimes Hugin seems to get confused about where the
new points are to be created, multiple points start getting selected in
strange locations when you click on a point, etc. Eventually I have to
delete the mask and start over. I think sometimes a mask just gets too
complex, Hugin loses track of which point is connected to which other
point, and things disintegrate from there. (Haven't formally set out to
test this, sorry.)
One thing I miss in all the displays like masking, adding control
points, etc: either a Photoshop-style drag tool for dragging a zoomed in
image around in the viewing frame, or the GIMP style "Click on box in
lower right corner of image window, get a small version of the image
with a highlighted box showing the current window view, and drag the
highlighted box around to move the image." (Sorry for the wordiness, I
don't know what it's actually called.)
--
David W. Jones
gnome...@gmail.com
wandering the landscape of god
http://dancingtreefrog.com

Frederic Da Vitoria
Oct 22, 2014, 3:51:24 AM10/22/14
to hugi...@googlegroups.com
2014-10-22 7:47 GMT+02:00 David W. Jones <gnome...@gmail.com>:
One thing I miss in all the displays like masking, adding control points, etc: either a Photoshop-style drag tool for dragging a zoomed in image around in the viewing frame, or the GIMP style "Click on box in lower right corner of image window, get a small version of the image with a highlighted box showing the current window view, and drag the highlighted box around to move the image." (Sorry for the wordiness, I don't know what it's actually called.)
Navigation Preview http://docs.gimp.org/en/gimp-image-window.html / Navigation Dialog http://docs.gimp.org/en/gimp-navigation-dialog.html
--
Frederic Da Vitoria
(davitof)
Membre de l'April - « promouvoir et défendre le logiciel libre » - http://www.april.org
Frederic Da Vitoria
(davitof)
Membre de l'April - « promouvoir et défendre le logiciel libre » - http://www.april.org
John Muccigrosso
Oct 22, 2014, 8:49:54 AM10/22/14
to hugi...@googlegroups.com
Steve Jobs' mouse-buton issues aside, I think I can do everything I'm supposed to with the mouse. It just doesn't work as expected (or desired, for the most part).
It sounds to me like your workflow too is a big work-around for a buggy masking process.
Curious what others think.

T. Modes
Oct 22, 2014, 12:16:13 PM10/22/14
to hugi...@googlegroups.com
Am Mittwoch, 22. Oktober 2014 14:49:54 UTC+2 schrieb John Muccigrosso:
It sounds to me like your workflow too is a big work-around for a buggy masking process.
It sound for me that the issue is behind the keyboards and stems from a wrong assumption, and not from a buggy implementation
The mask tab is not a fully fledged vector editing program with sub pixel accuracy. And this is not needed.
The seams are finally placed by enblend at the end. The masks are a help for enblend for placing the seam.
So there is no need to place the mask exactly. Often a very rough mask (with 4-10 points) is sufficient. Complex masks with many points are not needed. So the mask tab was written with this background. And it works for this use case.
See for instance the tutorial on Hugins website: The example for the include mask shows a nice and easy mask. Such masks are sufficient for the most cases. The example with the exclude mask I would consider already as border case, this should be the finest mask needed by Hugin/Enblend. Handling more complex mask is not the task of the mask tab. You can try it, it may work or not. But this is not the task of the mask tab and it is a misuse of the feature.
John Muccigrosso
Oct 22, 2014, 12:59:07 PM10/22/14
to hugi...@googlegroups.com
On Wednesday, October 22, 2014 12:16:13 PM UTC-4, T. Modes wrote:
Am Mittwoch, 22. Oktober 2014 14:49:54 UTC+2 schrieb John Muccigrosso:It sounds to me like your workflow too is a big work-around for a buggy masking process.
It sound for me that the issue is behind the keyboards and stems from a wrong assumption, and not from a buggy implementation
Wow, that's a little harsh there.
The mask tab is not a fully fledged vector editing program with sub pixel accuracy. And this is not needed.
The seams are finally placed by enblend at the end. The masks are a help for enblend for placing the seam.
So there is no need to place the mask exactly. Often a very rough mask (with 4-10 points) is sufficient. Complex masks with many points are not needed. So the mask tab was written with this background. And it works for this use case.
See for instance the tutorial on Hugins website: The example for the include mask shows a nice and easy mask. Such masks are sufficient for the most cases. The example with the exclude mask I would consider already as border case, this should be the finest mask needed by Hugin/Enblend. Handling more complex mask is not the task of the mask tab. You can try it, it may work or not. But this is not the task of the mask tab and it is a misuse of the feature.
No one is asking for sub-pixel accuracy. We're trying to understand how the masking functionality works and noted that it behaves in unexpected ways and not as the manual (which is admittedly minimal) indicates. I'd go so far as to say that it behaves unlike any similar function I've used in other software.
I'll happily edit the manual to say, for example, that the mask feature is not meant to handle complex masks and that masks of only 4-10 points should be sufficient. Note however that the tutorial you like has a mask with over 30 points, and that it also includes the directions on how to manipulate masks that don't behave as described.
T. Modes
Oct 22, 2014, 1:45:36 PM10/22/14
to hugi...@googlegroups.com
Am Mittwoch, 22. Oktober 2014 18:59:07 UTC+2 schrieb John Muccigrosso:
No one is asking for sub-pixel accuracy. We're trying to understand how the masking functionality works and noted that it behaves in unexpected ways and not as the manual (which is admittedly minimal) indicates.
I can't reproduce the issues you mentioned. I can get only something similar as the mentioned issues if I use masks with very narrow points. And for this the mask tab is not indented.
Also the tutorial states this already:
cite: "Blend masks are not like your normal 'cut out' and 'paste in' masking. They are more like giving hints to the blender, so it isn't always necessary to carefully define a mask exactly on the boundary of an object. Often it sufficient to only roughly enclose the object to be included or excluded."
> I'd go so far as to say that it behaves unlike any similar function I've used in other software.
Then I have used other software than you.
Note however that the tutorial you like has a mask with over 30 points, and that it also includes the directions on how to manipulate masks that don't behave as described.
Where is this described? I don't see such text where issues like in your first post are mentioned.
PS: The selection tools use a little fuzzy distance, otherwise you would have to click exactly on the point or line, which would be nearly impossible for lines. Alternatively the selections points and lines would have to be drawn significant bigger and would hide parts of the image.
John Muccigrosso
Oct 22, 2014, 2:08:53 PM10/22/14
to hugi...@googlegroups.com
I just want to start by saying that I love this software and am trying to learn how it works and hopefully be able to contribute by improving the manual for others. My programming skills are not up to the task of helping out in other ways. I do however feel like I'm a pretty experienced user and have good expectations about how software should behave. (Others may disagree. :-) )
Am Mittwoch, 22. Oktober 2014 18:59:07 UTC+2 schrieb John Muccigrosso:No one is asking for sub-pixel accuracy. We're trying to understand how the masking functionality works and noted that it behaves in unexpected ways and not as the manual (which is admittedly minimal) indicates.
I can't reproduce the issues you mentioned. I can get only something similar as the mentioned issues if I use masks with very narrow points. And for this the mask tab is not indented.
I'm not sure how narrow my points are. Too narrow, it seems. That may be the whole problem I'm seeing: distances are so small compared with what Hugin expects, that the fuzzy-distance logic is kicking in. In my case, my mask is about 100 pixels high and about half that in width.
Also the tutorial states this already:
cite: "Blend masks are not like your normal 'cut out' and 'paste in' masking. They are more like giving hints to the blender, so it isn't always necessary to carefully define a mask exactly on the boundary of an object. Often it sufficient to only roughly enclose the object to be included or excluded."
Yes, that's in the tutorial, but not the manual. I'll add it in.
> I'd go so far as to say that it behaves unlike any similar function I've used in other software.
Then I have used other software than you.
That is likely. :-) However I'm far from a novice user.
Note however that the tutorial you like has a mask with over 30 points, and that it also includes the directions on how to manipulate masks that don't behave as described.
Where is this described? I don't see such text where issues like in your first post are mentioned.
At the bottom of the tutorial is a section explaining how to edit masks. It uses similar language to the manual, which is the language that I cited in my original post. It doesn't describe the problems that I mentioned; it just explains how the editing works.
PS: The selection tools use a little fuzzy distance, otherwise you would have to click exactly on the point or line, which would be nearly impossible for lines. Alternatively the selections points and lines would have to be drawn significant bigger and would hide parts of the image.
This is important to know (and not surprising). Again, I'll add it to the manual. From my perspective though, the distances can be quite large compared with my expectations. It's easy enough to click within, say, 10 screen pixels of a point, which may be more "actual" pixels depending on scaling, of course.
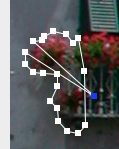
There may also be a bug in the way the "add point" clicking works. (My #5 above.) For me, if I command-click (control-click on non-Macs) near a line segment (or even on it, as far as I can see), Hugin will sometimes add a point in the middle of another segment. Even assuming some fuzziness, this seems very much a bug to me. See the first attachment where I clicked right where the new blue point is and you can see how that point was added to a segment all the way across the mask instead of the segment right next to it. Same thing happens if I click right on the line. This was the first thing I did after opening Hugin.
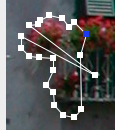
I just noticed something else as well: Hugin seems to remember previous new points even after they are undone, at least as long as I'm in the Masks tab and sometimes even when I move away and come back. Here's what I did: make a new point; undo it; make another new point. Result: my first new point returns, along with the second one. See the second attachment.
Does the algorithm also grab more than one point under certain circumstances? For me, that's not desirable. When I want more than one point, I'll either add them by shift-clicking (which is pretty standard in UIs) or use the marquee. And the marquee should never add points that are outside it.
T. Modes
Oct 22, 2014, 2:41:33 PM10/22/14
to hugi...@googlegroups.com
Am Mittwoch, 22. Oktober 2014 20:08:53 UTC+2 schrieb John Muccigrosso:
I'm not sure how narrow my points are. Too narrow, it seems. That may be the whole problem I'm seeing: distances are so small compared with what Hugin expects, that the fuzzy-distance logic is kicking in. In my case, my mask is about 100 pixels high and about half that in width.
The mask with 100 pixels size and about 20 points is more than complex (in Hugins mask point of view).
For this case a mask with 3 or 4 point is more than sufficient.
"Often it sufficient to only roughly enclose the object ..." for the last time
David W. Jones
Oct 22, 2014, 3:52:26 PM10/22/14
to hugi...@googlegroups.com
On 10/21/2014 09:51 PM, Frederic Da Vitoria wrote:
> 2014-10-22 7:47 GMT+02:00 David W. Jones <mailto:gnome...@gmail.com>>:
Yes, thanks.
> 2014-10-22 7:47 GMT+02:00 David W. Jones <mailto:gnome...@gmail.com>>:
David W. Jones
Oct 23, 2014, 2:24:15 AM10/23/14
to hugi...@googlegroups.com
wouldn't have included a mouse at all. ;)
> It sounds to me like your workflow too is a big work-around for a buggy
> masking process.
>
> Curious what others think.
belief that a mask in Hugin specified "include/exclude this specific
area". Apparently that's not how Hugin uses masks; apparently it's more
of suggestion to the *blender* to include/exclude the area if possible.
My bad, thinking in terms of graphics software layers.
With my typical photos, I go for many-pointed detailed masks because
less detailed masks sometimes include stuff I don't want included, like
an out-of-focus fringe around an included sharply-focused object, where
what I want included is the sharply-focused background of the object
drawn from a different frame. Yeah, I shoot handheld with lenses where
the options are either "set aperture for depth of field and shoot at 1
sec exposure" or "set aperture for little or no depth of field and shoot
at a reasonable exposure." Someday, new camera with faster new lenses ... :)
I guess if a mask is getting to be too complicated, using more than one
mask over the desired area might work?
John Muccigrosso
Oct 23, 2014, 9:12:18 AM10/23/14
to hugi...@googlegroups.com
On Thursday, October 23, 2014 2:24:15 AM UTC-4, GnomeNomad wrote:
My workflow is more based on suppressed-perfectionism combined with a
belief that a mask in Hugin specified "include/exclude this specific
area". Apparently that's not how Hugin uses masks; apparently it's more
of suggestion to the *blender* to include/exclude the area if possible.
My bad, thinking in terms of graphics software layers.
Well, you can be forgiven for this, I think, because the manual says:
By excluding an area with a mask (an ""exclude"" mask), you are telling the blender to exclude that region from consideration both when placing the seam and when blending. The result is that you can remove a person or object from the final stitch. You should only exclude a part of one photo if some other photo shows the same part of the scene without that object, otherwise you will get a black empty area in your final panorama.


When you include an object with a mask (""include"" mask) the opposite happens, and that part of the scene is removed from all other photos. The blender has no choice but to use the region in the photo you selected.
That last bit about the blender having no choice seems a bit strong in light of Tmodes' explanation.
The tutorial on masking is more accurate, as noted already.
Reply all
Reply to author
Forward
0 new messages