Hi friends here u learn about interior design and how to make in AutoCAD u want any details please comments have a nice day enjoy and Learn...............
0 views
Skip to first unread message

rajani sivaji
Feb 23, 2008, 11:37:49 AM2/23/08
to A-different-...@googlegroups.com, Adobe-P...@googlegroups.com, adult-ph...@googlegroups.com, alb-consultanc...@googlegroups.com, alb-consultanc...@googlegroups.com, albcons...@googlegroups.com, allulu...@googlegroups.com, Aut...@googlegroups.com, Bald...@googlegroups.com, besup...@googlegroups.com, CAD_CAM_UG_C...@googlegroups.com, CADE...@googlegroups.com, CAD...@googlegroups.com, can-an...@googlegroups.com, Chinese...@googlegroups.com, csh...@googlegroups.com, csmacc...@googlegroups.com, desarro...@googlegroups.com, DotNetDe...@googlegroups.com, eli...@googlegroups.com, exfo...@googlegroups.com, GayOlderY...@googlegroups.com, geot...@googlegroups.com, gimpsh...@googlegroups.com, hackth...@googlegroups.com, HRM...@googlegroups.com, ilaka-ye...@googlegroups.com, it_hel...@googlegroups.com, Makina-Teknik-...@googlegroups.com, man-SI...@googlegroups.com, man-...@googlegroups.com, Managemen...@googlegroups.com, Myspace...@googlegroups.com, news4li...@googlegroups.com, Outs...@googlegroups.com, philosoph...@googlegroups.com, photos...@googlegroups.com, PM...@googlegroups.com, Prox...@googlegroups.com, sa-events...@googlegroups.com, scholarsh...@googlegroups.com, Seed-Infot...@googlegroups.com, summit-suppo...@googlegroups.com, veda-sh...@googlegroups.com, Web-desig...@googlegroups.com
Interior Design Ideas Episode
This site provides great tutorials / lessons for the student of AutoCAD. These lessons are designed to be as compatible with as many versions of AutoCAD as possible. They are based on AutoCAD 2007, but can be easily adapted to other versions. The lesson format was used in my CAD classes I have been teaching previously. Any feedback would be used to make these as useful as possible. Please note that these lessons are for private, individual use as well as public schools.
Introduction
AutoCAD drawings are rarely completed simply by drawing lines, circles etc. Most likely you will need to Modify these basic drawing objects in some way in order to create the image you need. AutoCAD provides a whole range of modify tools such as Move, Copy, Rotate and Mirror. As you can see, the command names are easily understandable. However, the way these commands work is not always obvious. This tutorial is designed to show you how all of the Modify commands work. If you just need information quickly, use the QuickFind toolbar below to go straight to the information you need or select a topic from the contents list above.

As is usual with AutoCAD, the Modify tools can be accessed in one of three ways, from the keyboard, from the pull-down menu and from the toolbar. All of the Modify tools are available from the Modify pull-down and the Modify toolbar. In each section below, the toolbar, pull-down and keyboard options are given. The method you choose is entirely up to you. Ultimately you will use the method that you feel most comfortable with or the one you find most efficient. AutoCAD allows great flexibility and there aren't any right or wrong ways of working. That said, it should be pointed out that the use of toolbars in AutoCAD is almost always quicker than any other method.

The Modify toolbar is usually displayed by default but if it is not already displayed, you can display it using the TOOLBAR command, ViewToolbars… from the pull-down menu. When the Toolbar dialogue box (shown above) appears, simply check the box next to "Modify" in the toolbars list. Many AutoCAD users work with the Modify toolbar permanently docked on their screen because it gives one-click access to all of the commands, making the drawing process much more efficient.
1. The Erase Command
2. The Copy Command
3. The Mirror Command
4. The Offset Command
5. The Array Command
6. The Move Command
7. The Rotate Command
8. The Scale Command
9. The Stretch Command
10. Stretching with Grips
11. The Lengthen Command
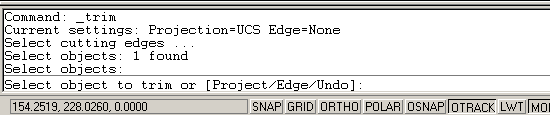
12. The Trim Command
13. The Extend Command
14. The Break Command
15. The Chamfer Command
16. The Fillet Command
17.Tips & Tricks Tips
AutoCAD drawings are rarely completed simply by drawing lines, circles etc. Most likely you will need to Modify these basic drawing objects in some way in order to create the image you need. AutoCAD provides a whole range of modify tools such as Move, Copy, Rotate and Mirror. As you can see, the command names are easily understandable. However, the way these commands work is not always obvious. This tutorial is designed to show you how all of the Modify commands work. If you just need information quickly, use the QuickFind toolbar below to go straight to the information you need or select a topic from the contents list above.

As is usual with AutoCAD, the Modify tools can be accessed in one of three ways, from the keyboard, from the pull-down menu and from the toolbar. All of the Modify tools are available from the Modify pull-down and the Modify toolbar. In each section below, the toolbar, pull-down and keyboard options are given. The method you choose is entirely up to you. Ultimately you will use the method that you feel most comfortable with or the one you find most efficient. AutoCAD allows great flexibility and there aren't any right or wrong ways of working. That said, it should be pointed out that the use of toolbars in AutoCAD is almost always quicker than any other method.

The Modify toolbar is usually displayed by default but if it is not already displayed, you can display it using the TOOLBAR command, ViewToolbars… from the pull-down menu. When the Toolbar dialogue box (shown above) appears, simply check the box next to "Modify" in the toolbars list. Many AutoCAD users work with the Modify toolbar permanently docked on their screen because it gives one-click access to all of the commands, making the drawing process much more efficient.
1. The Erase Command
2. The Copy Command
3. The Mirror Command
4. The Offset Command
5. The Array Command
6. The Move Command
7. The Rotate Command
8. The Scale Command
9. The Stretch Command
10. Stretching with Grips
11. The Lengthen Command
12. The Trim Command
13. The Extend Command
14. The Break Command
15. The Chamfer Command
16. The Fillet Command
17.Tips & Tricks Tips
Tips & TricksHot Tips
Tips & Tricks![]()
* The command line window displays 3 lines of text by default. You can change this by clicking and dragging the top of the window frame. When you are starting with AutoCAD you may like to see more than 3 lines. The illustration below shows the command line window increased in size to 6 lines.
* The command line can also be displayed as a floating text window. The AutoCAD text window is displayed by pressing the F2 key on the keyboard. See Function Keys on the Drawing Aids tutorial for more details.
* You can control the way text is mirrored using the MIRRTEXT variable.
* Fillet 0You can use the Fillet command with a radius of zero to trim intersecting lines back to their intersection. Of course, you could also achieve this effect with the Tri
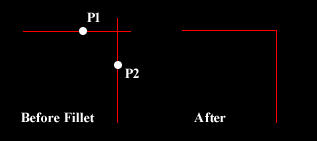 m command but if you have a number of operations to complete, the Fillet method is much quicker.
* When using the Trim and Extend commands, hitting Return when prompted to "Select cutting edges" and "Select boundary edges" respectively will automatically select all valid cutting or boundary edges on the screen. This can be a real time saver if you have a complicated set of edges to select.
Reply all
Reply to author
Forward
0 new messages