need
28 views
Skip to first unread message

Marcia Wilke
Nov 17, 2017, 3:48:12 PM11/17/17
to Handbell-l
Plastic on two wheels on the Porta-a-Bell cases have broken off. I would like to replace the wheels. Can someone give me the email address for Thomas of Porta-a-Bell?
Thanks.
Marcia Wilke
Walla Walla WA

Stephanie Shealey
Nov 17, 2017, 4:40:45 PM11/17/17
to handb...@googlegroups.com
There is a form on the website. I've had to replace the wheels on 3 cases this year, and I've just filled out the form (and then they've been sent a few months later). He is having to replace a lot of wheels due to a manufacturing defect they found this year.
Stephanie
--
Post: handb...@googlegroups.com
Subscribe: handbell-l...@googlegroups.com
Unsubscribe: handbell-l+...@googlegroups.com
Digest: e-mail mdp...@gmail.com with subject line "Digest-L"
---
You received this message because you are subscribed to the Google Groups "Handbell-l" group.
To unsubscribe from this group and stop receiving emails from it, send an email to handbell-l+...@googlegroups.com.
For more options, visit https://groups.google.com/d/optout.

Risë Kagan
Nov 17, 2017, 4:47:18 PM11/17/17
to handb...@googlegroups.com
--
Post: handb...@googlegroups.com
Subscribe: handbell-l+subscribe@googlegroups.com
Unsubscribe: handbell-l+unsubscribe@googlegroups.com
Digest: e-mail mdp...@gmail.com with subject line "Digest-L"
---
You received this message because you are subscribed to the Google Groups "Handbell-l" group.
To unsubscribe from this group and stop receiving emails from it, send an email to handbell-l+unsubscribe@googlegroups.com.

Isenbergs
Nov 17, 2017, 7:22:58 PM11/17/17
to handb...@googlegroups.com
I normally just lurk on HB-L, but my husband wanted to explain how we/he solved our similar issue. Here’s his very detailed explanation.
Debbie
We had to replace a wheel last year and contacted Port-a-Bell. Their wheels seemed a bit pricey, and a little research revealed that the wheels are same kind as are used on inline skates, scooters, luggage, etc. You can find a pair of equivalent wheels for less than $5 on Ebay. Simply search for “replacement skate wheels” — one reputable seller is “mkmsolutions”. (Link: https://www.ebay.com/usr/mkmsolutions).
There are numerous sizes available, so make sure you order the right ones. I think I ordered 68mm (outside diameter). Find a metric ruler and measure an existing Port-a-Bell wheel.
Obtaining the replacement wheel was the easy part - installing it was a pain! The metal wheel housing is attached to the case with 4 gold old “pop rivets” - easy to install and aggravating to remove! Furthermore, each wheel is held in place with a long rivet as an axle, and as is typical for a rivet, you must destroy the old rivet to remove the broken wheel. I used a Dremel tool with an abrasive cutting wheel to grind off one end of each rivet. You can replace the axle rivet with a 1/4” bolt, but as I recall, the fit of the metal wheel housing was tight enough to make this a real pain; as I recall, I removed some plastic from the case itself (again using my handy Dremel tool) in order to get it all to fit back together.
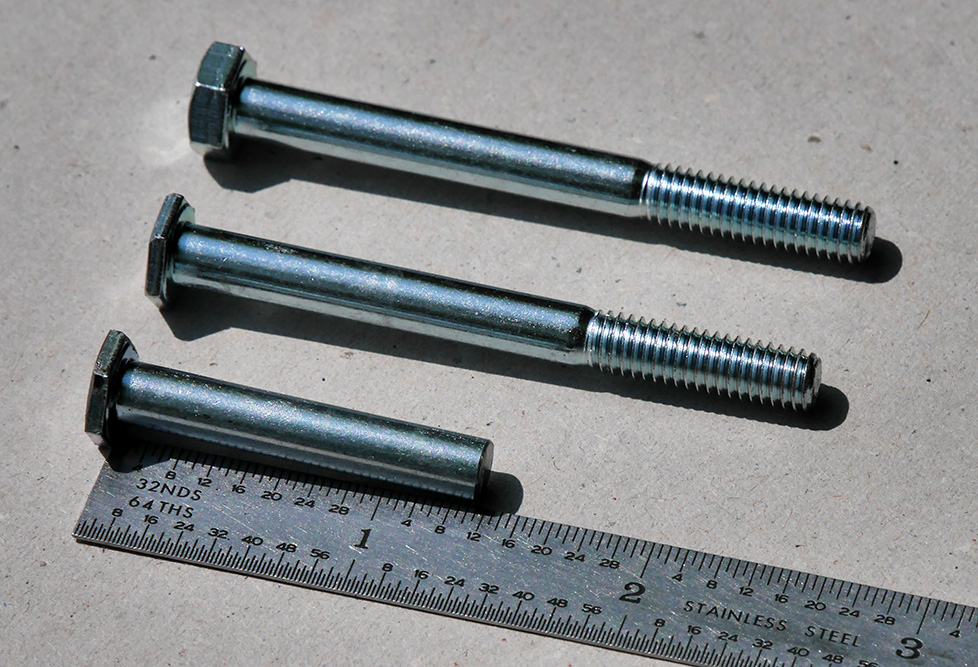
Instead of using a regular bolt for the axle, I suppose you could use one of those 2-piece threaded binding posts that are sometimes used for semi-permanent binding of a book of 3-hole-punched pages. These have very thin and nearly flat heads on both ends. I think a 1 1/4” length would do, though the post diameter appears to be somewhat less than the necessary 1/4”. (See photo below.) Good luck finding these, and they’re often made of aluminum that just might be too flimsy for this application anyway!
With a regular 1/4” bolt for the axle, a pan head or “truss head” (low-profile round head) bolt would be a good choice, and if you can find the thinner hex nuts that are often called “jam nuts,” that’d be good, too. The hub of the wheel does not rotate on the rivet or bolt axle, so you don’t really need to worry about whether or not the bolt is threaded all the way up to its head.
To replace the 4 pop rivets, I used #10-32 pan-head machine screws with nylon-insert lock nuts (a.k.a. aircraft nuts).
Clearly you need some handyman skills to manage all this. IMHO, this is a great example of maintenance-resistant manufacturing.
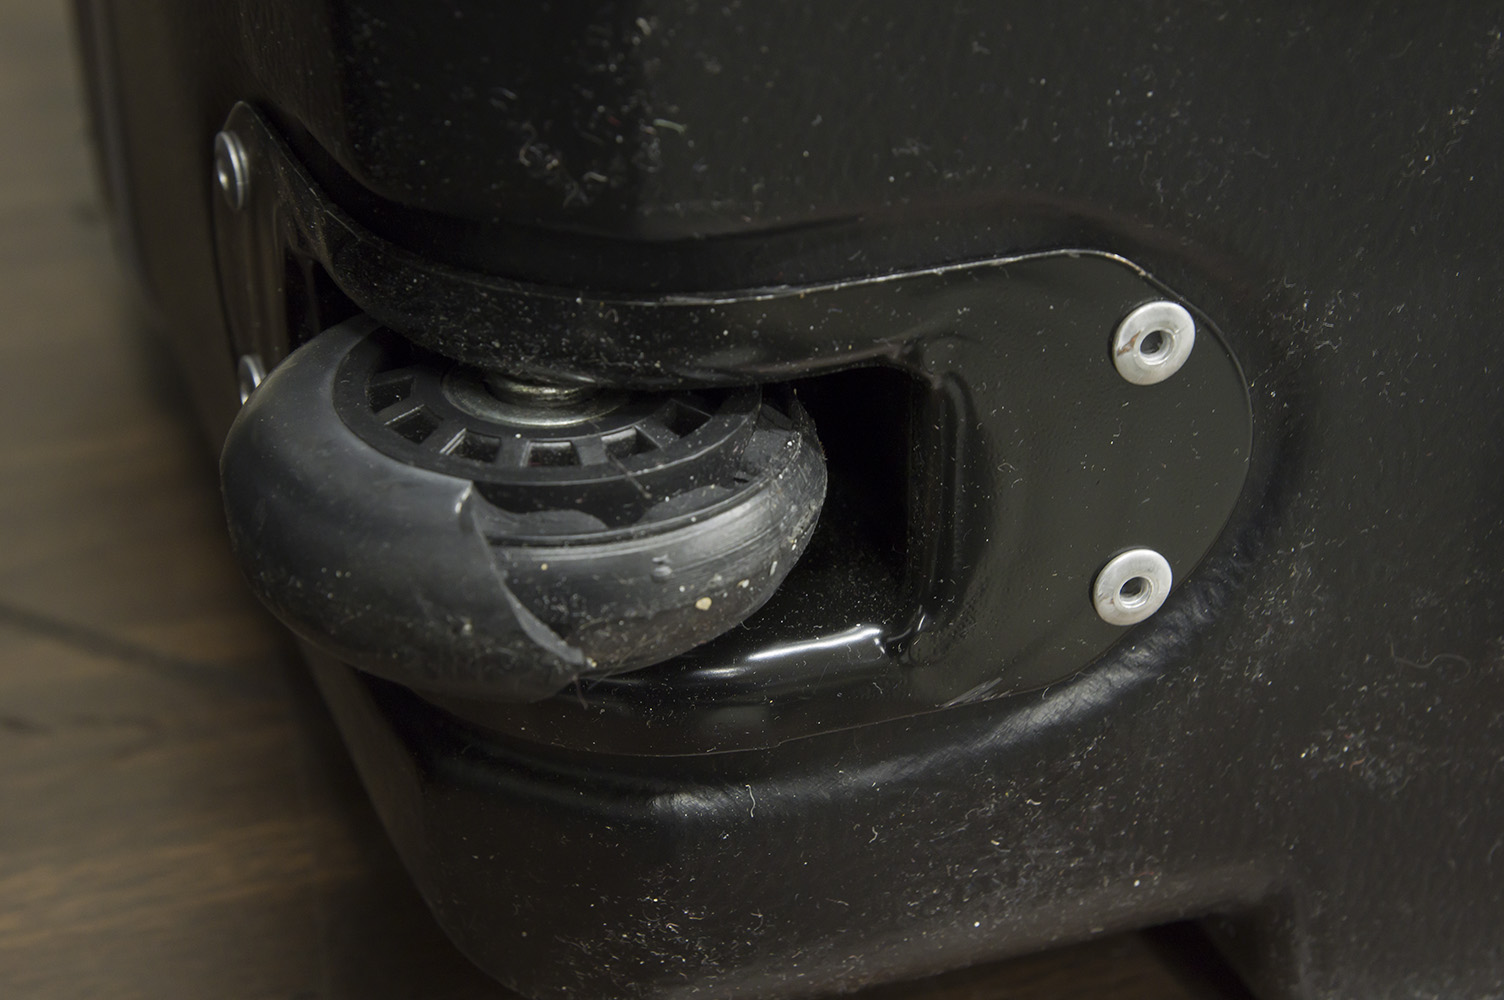
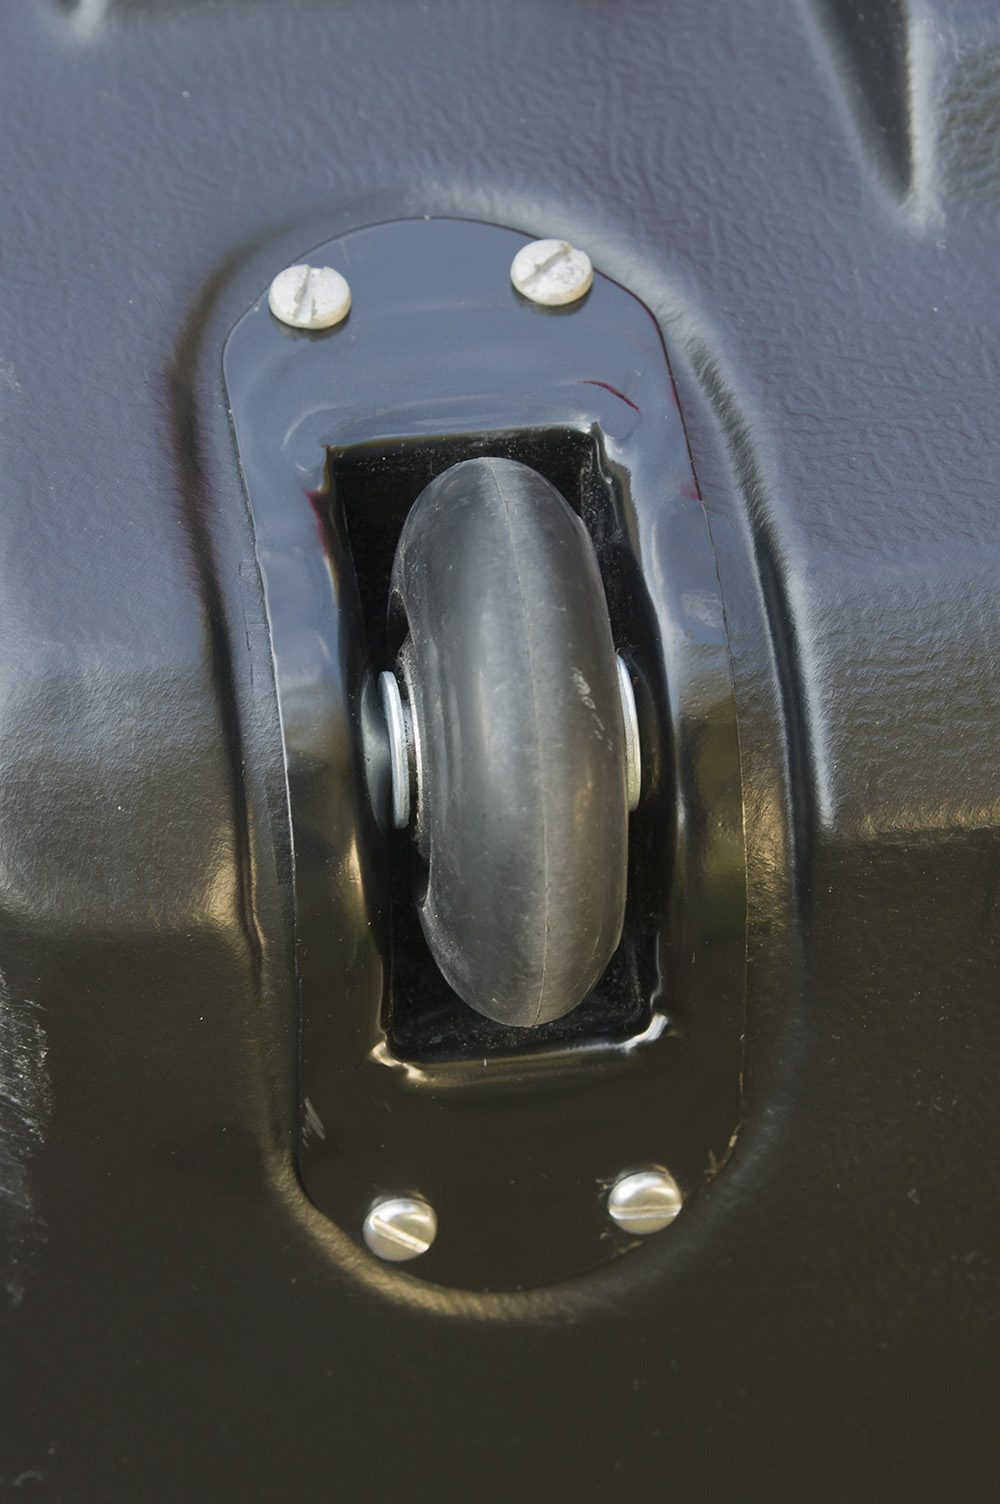
The photos below show the before and after results of my efforts. Note that there’s a protective plastic cover over the wheel assembly on the inside of the case. The arrow points to where I removed plastic to accommodate the bolt head and nut. If you routinely roll your bell cases through puddles, consider applying a dollop of silicone caulk to these potentially leaky spots.


--
Post: handb...@googlegroups.com
Subscribe: handbell-l...@googlegroups.com
Unsubscribe: handbell-l+...@googlegroups.com
Digest: e-mail mdp...@gmail.com with subject line "Digest-L"
---
You received this message because you are subscribed to the Google Groups "Handbell-l" group.
To unsubscribe from this group and stop receiving emails from it, send an email to handbell-l+...@googlegroups.com.

Michele Sharik - TGD
Nov 17, 2017, 10:26:53 PM11/17/17
to handb...@googlegroups.com
We've replaced port a bell wheels with in line skate wheels too. Be sure to get wheels suitable for OUTDOOR use, not indoor!!
-Michèle
Sent from my iPhone
Sent from my iPhone
I normally just lurk on HB-L, but my husband wanted to explain how we/he solved our similar issue. Here’s his very detailed explanation.DebbieWe had to replace a wheel last year and contacted Port-a-Bell. Their wheels seemed a bit pricey, and a little research revealed that the wheels are same kind as are used on inline skates, scooters, luggage, etc. You can find a pair of equivalent wheels for less than $5 on Ebay. Simply search for “replacement skate wheels” — one reputable seller is “mkmsolutions”. (Link: https://www.ebay.com/usr/mkmsolutions).There are numerous sizes available, so make sure you order the right ones. I think I ordered 68mm (outside diameter). Find a metric ruler and measure an existing Port-a-Bell wheel.Obtaining the replacement wheel was the easy part - installing it was a pain! The metal wheel housing is attached to the case with 4 gold old “pop rivets” - easy to install and aggravating to remove! Furthermore, each wheel is held in place with a long rivet as an axle, and as is typical for a rivet, you must destroy the old rivet to remove the broken wheel. I used a Dremel tool with an abrasive cutting wheel to grind off one end of each rivet. You can replace the axle rivet with a 1/4” bolt, but as I recall, the fit of the metal wheel housing was tight enough to make this a real pain; as I recall, I removed some plastic from the case itself (again using my handy Dremel tool) in order to get it all to fit back together.Instead of using a regular bolt for the axle, I suppose you could use one of those 2-piece threaded binding posts that are sometimes used for semi-permanent binding of a book of 3-hole-punched pages. These have very thin and nearly flat heads on both ends. I think a 1 1/4” length would do, though the post diameter appears to be somewhat less than the necessary 1/4”. (See photo below.) Good luck finding these, and they’re often made of aluminum that just might be too flimsy for this application anyway!With a regular 1/4” bolt for the axle, a pan head or “truss head” (low-profile round head) bolt would be a good choice, and if you can find the thinner hex nuts that are often called “jam nuts,” that’d be good, too. The hub of the wheel does not rotate on the rivet or bolt axle, so you don’t really need to worry about whether or not the bolt is threaded all the way up to its head.To replace the 4 pop rivets, I used #10-32 pan-head machine screws with nylon-insert lock nuts (a.k.a. aircraft nuts).Clearly you need some handyman skills to manage all this. IMHO, this is a great example of maintenance-resistant manufacturing.The photos below show the before and after results of my efforts. Note that there’s a protective plastic cover over the wheel assembly on the inside of the case. The arrow points to where I removed plastic to accommodate the bolt head and nut. If you routinely roll your bell cases through puddles, consider applying a dollop of silicone caulk to these potentially leaky spots.
<IMK34423aq.jpg><IMK36770aq.jpg><IMK36767aqLab.jpg>
Isenbergs
Oct 27, 2021, 6:31:12 PM10/27/21
to handb...@googlegroups.com, Debbie Isenberg
Having replaced several wheels on our Port-a-Bell cases, and changed my method a little since the previous report (text below), I figured it’s time for an update.
- Wheels. The wheels on our cases (purchased in 2010 or thereabouts) are 68mm diameter and fit a 6mm axle. You can find replacement wheels on Ebay and Amazon. (Search for replacement luggage wheels or inline skate wheels.) Kits that include axle sets and a hex wrench and 4 wheels are available for as little as $12. You might as well buy 4 wheels — you’ll need them eventually. I believe that all such wheels these days are sold by metric dimensions.
- Axles. The factory-supplied axle is a long rivet with a diameter of 0.226 inch = 5.74mm. Most recently, I’ve been replacing it with a 6mm hex-head bolt that’s at least 60mm long, so that it has enough unthreaded shank. My local Ace Hardware has these, and I suppose Home Depot, Lowe’s, Tru-Value, or any other decent hardware store would as well. A 1/4-inch bolt will be too large to fit through the wheel bearings, so you do need the metric size. You don’t need a Grade 5, Grade 8, or stainless steel bolt. I cut the bolt with a hacksaw so that about 1 5/16 inch (33.3mm) of unthreaded shank remains. Then I grind down the hex head to about 1/3 of its original thickness. I use a hand-held Makita “angle grinder” for this, but you could conceivably use a hacksaw and hand files. Clean up the rough edges with a hand file or bench grinder. Note that if you purchase a wheel kit that includes axles, you might be able to use them instead of buying a metric bolt, though you might need to cut the longer portion to the appropriate length. My main discovery since my initial report is that you don’t need a nut on the bolt at all, and you don’t need to modify or cut the plastic case. Since the stamped metal wheel housing fits snuggly into the plastic case, the bolt simply cannot fall out. The bolt head merely needs to be thin enough for the housing to fit in place. Conceivably, a 6mm shaft with no head would also work as an axle. It would need to be about 1 3/8” (35mm) long and could be cut from a longer bolt. I haven’t tried this.
- Rivets. The Pop rivets that hold the housing into the plastic case can be drilled out easily from the outside. I think I used a #9 drill, but the diameter isn’t too critical. Although I chose to replace those rivets with #10 screws, you could certainly use Pop rivets again if you have the equipment. Overall, I found the most difficult part of the whole job was carefully grinding off the head or “tail” of the axle rivet without damaging the metal wheel housing. I used my Dremel tool with an abrasive grindstone or cutting wheel to remove enough material that the rivet could be pushed out.
See attached photos of the 6mm bolt in process, and the original axle rivet after removal.
— John Isenberg

On Mar 24, 2018, at 12:33 PM, Isenbergs <isen...@sbcglobal.net> wrote:From: Isenbergs <isen...@sbcglobal.net>Subject: Re: [HB-L] needDate: November 17, 2017 at 4:22:37 PM PSTWe had to replace a wheel last year and contacted Port-a-Bell. Their wheels seemed a bit pricey, and a little research revealed that the wheels are same kind as are used on inline skates, scooters, luggage, etc. You can find a pair of equivalent wheels for as little as $5 on Ebay. Simply search for “replacement skate wheels” — one reputable seller is “mkmsolutions”. (Link: https://www.ebay.com/usr/mkmsolutions). There are also Chinese sellers that include “binding post” axle parts (as described below) with the wheel — you just have to wait 2 weeks for a delivery from China. On Ebay these are listed as replacement luggage wheels, not skate wheels.There are numerous sizes available, so make sure you order the right ones. I ordered 68mm (outside diameter). But if in doubt, find a metric ruler and measure an existing Port-a-Bell wheel. If ordering skate wheels, take note of the axle diameter, as original wheels fit a 1/4" (0.25") axle, whereas some skate wheels are for an 8mm (0.315" ≈ 5/16” ) axle.
Obtaining the replacement wheel was the easy part - installing it was a pain! The metal wheel housing is attached to the case with 4 gold old “pop rivets” - easy to install and aggravating to remove! Furthermore, each wheel is held in place with a long rivet as an axle, and as is typical for a rivet, you must destroy the old rivet to remove the broken wheel. I used a Dremel tool with an abrasive cutting wheel to grind off one end of each rivet. You can replace the axle rivet with a 1/4” bolt, but as I recall, the fit of the metal wheel housing was tight enough to make this a real pain; as I recall, I removed some plastic from the case itself (again using my handy Dremel tool) in order to get it all to fit back together.Instead of using a regular bolt for the axle, I suppose you could use one of those 2-piece threaded binding posts that are sometimes used for semi-permanent binding of a book of 3-hole-punched pages. These have very thin and nearly flat heads on both ends. I think a 1 1/4” length would do, though the post diameter appears to be somewhat less than the necessary 1/4”. (See photo below.) Good luck finding these, and they’re often made of aluminum that just might be too flimsy for this application anyway!With a regular 1/4” bolt for the axle, a pan head or “truss head” (low-profile round head) bolt would be a good choice, and if you can find the thinner hex nuts that are often called “jam nuts,” that’d be good, too. The hub of the wheel does not rotate on the rivet or bolt axle, so you don’t really need to worry about whether or not the bolt is threaded all the way up to its head.To replace the 4 pop rivets, I used #10-32 pan-head machine screws with nylon-insert lock nuts (a.k.a. aircraft nuts).Clearly you need some handyman skills to manage all this. IMHO, this is a great example of maintenance-resistant manufacturing.
The photos below show the before and after results of my efforts. Note that there’s a protective plastic cover over the wheel assembly on the inside of the case. (It’s actually not a separate part.) The arrow points to where I removed plastic to accommodate the bolt head and nut. If you routinely roll your bell cases through puddles, consider applying a dollop of silicone caulk to these potentially leaky spots.


Reply all
Reply to author
Forward
0 new messages