Winterizing the 355
586 views
Skip to first unread message

dworfel
Sep 10, 2014, 6:15:57 PM9/10/14
to catal...@googlegroups.com
Winterizing and pulling the boat for the season is rapidly approaching. This will be my first winterizing effort with the 355. I'm putting together lists of what needs to be done to winterized the boat. I'd appreciate comments/steps you're going through to winterized your boat's systems.
Thanks.
Dave Worfel
S/V Amadeus

John Salley
Sep 11, 2014, 1:03:14 AM9/11/14
to catal...@googlegroups.com
I've added a winterizing port to the engine raw water intake to make it easier to "suck" antifreeze into the raw water side of the cooling system. Also added a Camco hot water heater bypass kit and installed Jon Vez's water system bilge drain, which can also be used as a port for antifreeze intake into the fresh water system without putting pink stuff into the tanks. Finally, I installed T fittings to connect the head sink drain and the toilet sea water intake line (also "borrowed" from Jon), which allows using fresh water to flush the toilet in addition to simplifying its winterization. Still trying to figure out a good way to do the air conditioning intake.....
dworfel
Sep 12, 2014, 4:28:38 PM9/12/14
to catal...@googlegroups.com
John, thanks. Really helped me sort what needs to be done on my boat. I ordered the Camco bypass kit and the kit to allow me to suck anti-freeze into the water system. The kits arrived from Amazon today. I'll be doing the installation this coming week.
John Salley
Sep 12, 2014, 7:04:37 PM9/12/14
to catal...@googlegroups.com
Dave - be aware that the Camco kit changes the gender of the hose connection at the water heater from female to male. You can either replace the hoses with ones having female fittings on both ends, or do what I did (since the local hardware store didn't have the correct hose) and use a brass or bronze female-female adapter (if you do this, reverse the hose end-for-end so the adapter is at the tank end in order to fit). Easier to see than describe. Overall, a pretty simple mod.

Jon Vez
Sep 12, 2014, 7:13:10 PM9/12/14
to catal...@googlegroups.com
John is correct. I initially installed the Camco bypass, but had a leaking problem with the plastic adapter that came with the kit. I also found that if I don't disconnect the water hoses from the heater I still had a partial vacuum and it took forever to drain the tank. Instead of running to the store and getting the fitting John is talking about, I simply took 2 6" pieces of whale hose and an elbow to bypass. Took 5 minutes and I've been doing it this way ever since.
John Salley
Sep 12, 2014, 8:35:34 PM9/12/14
to catal...@googlegroups.com
Jon - Do you need to be concerned with eventual leaks from the Whale tubing or fittings wearing from numerous connects/disconnects?
Jon Vez
Sep 12, 2014, 9:14:37 PM9/12/14
to catal...@googlegroups.com
John,
Definitely, which is why I came up with adding the shutoff valve for the main tanks. For the bypass I am using two pieces of scrap hose and the elbows are dedicated for that purpose, so none of the boat's permanent hoses or fittings are being worn. If the scrap bypass hoses wear I can simply pick up another foot of the hose at WM or Defender. Since I'm disconnecting at the braided water hoses, which are brass I don't have to worry about leaks from connecting and disconnecting each fall/Spring.
I would have used the Camco bypass if I didn't have the initial problem and this solution turned out to be so easy. A week or so before hauling I disconnect the braided hoses from the system (not at the water heater) and let the rocking of the boat empty any residual water in the HW tank. I leave the braided hoses disconnected and just tie the hot and cold together with this setup.
One additional step I take is to blow out the antifreeze that I put in. PS just did a piece on AF being a source of bacterial growth if it's under 40% glycol (diluted). Unfortunately we don't have inspection ports in our water tanks so I'm pretty anal about keeping them pristine.
Sent from my iPad
> On Sep 12, 2014, at 8:35 PM, John Salley <jsalley%wildbl...@gtempaccount.com> wrote:
>
> Jon - Do you need to be concerned with eventual leaks from the Whale tubing or fittings wearing from numerous connects/disconnects?
>
> --
> You received this message because you are subscribed to the Google Groups Catalina355 group. To post to this group, send email to catal...@googlegroups.com. To unsubscribe from this group, send email to catalina355...@googlegroups.com. For more options, visit this group at https://groups.google.com/d/forum/catalina355?hl=en
>
> If changing the topic, please start a new message and send to catal...@googlegroups.com, rather than clicking "reply" to an existing message.
> ---
> You received this message because you are subscribed to the Google Groups "Catalina355" group.
> To unsubscribe from this group and stop receiving emails from it, send an email to catalina355...@googlegroups.com.
> To post to this group, send email to catal...@googlegroups.com.
> To view this discussion on the web visit https://groups.google.com/d/msgid/catalina355/901e74a8-9471-4481-9a74-625500855c12%40googlegroups.com.
> For more options, visit https://groups.google.com/d/optout.
Definitely, which is why I came up with adding the shutoff valve for the main tanks. For the bypass I am using two pieces of scrap hose and the elbows are dedicated for that purpose, so none of the boat's permanent hoses or fittings are being worn. If the scrap bypass hoses wear I can simply pick up another foot of the hose at WM or Defender. Since I'm disconnecting at the braided water hoses, which are brass I don't have to worry about leaks from connecting and disconnecting each fall/Spring.
I would have used the Camco bypass if I didn't have the initial problem and this solution turned out to be so easy. A week or so before hauling I disconnect the braided hoses from the system (not at the water heater) and let the rocking of the boat empty any residual water in the HW tank. I leave the braided hoses disconnected and just tie the hot and cold together with this setup.
One additional step I take is to blow out the antifreeze that I put in. PS just did a piece on AF being a source of bacterial growth if it's under 40% glycol (diluted). Unfortunately we don't have inspection ports in our water tanks so I'm pretty anal about keeping them pristine.
Sent from my iPad
> On Sep 12, 2014, at 8:35 PM, John Salley <jsalley%wildbl...@gtempaccount.com> wrote:
>
> Jon - Do you need to be concerned with eventual leaks from the Whale tubing or fittings wearing from numerous connects/disconnects?
>
> You received this message because you are subscribed to the Google Groups Catalina355 group. To post to this group, send email to catal...@googlegroups.com. To unsubscribe from this group, send email to catalina355...@googlegroups.com. For more options, visit this group at https://groups.google.com/d/forum/catalina355?hl=en
>
> If changing the topic, please start a new message and send to catal...@googlegroups.com, rather than clicking "reply" to an existing message.
> ---
> You received this message because you are subscribed to the Google Groups "Catalina355" group.
> To unsubscribe from this group and stop receiving emails from it, send an email to catalina355...@googlegroups.com.
> To post to this group, send email to catal...@googlegroups.com.
> To view this discussion on the web visit https://groups.google.com/d/msgid/catalina355/901e74a8-9471-4481-9a74-625500855c12%40googlegroups.com.
> For more options, visit https://groups.google.com/d/optout.
John Salley
Sep 13, 2014, 6:15:28 PM9/13/14
to catal...@googlegroups.com
Jon - Just got back prepping the boat for an upcoming cruise, and had the first opportunity to fill the water tanks since installing the Camco bypass kit. Damn if I didn't have the same problem as you - that cheap plastic T fitting leaked, and I couldn't get it to seal. Eventually stripped the threads on it. I like the simplicity of the single valve in the kit, so will look for a brass T fitting to replace the plastic one. Might as well find some braided hoses with 1/2" female fittings as well, which will eliminate the adapters I used to cobble the kit together.
Dave - be forewarned!
John Salley
Nancy Ann III, hull #20
dworfel
Sep 13, 2014, 8:01:36 PM9/13/14
to catal...@googlegroups.com
Thanks. Appreciate the feedback and heads up. I'm planning to put the bypass kit in this week but will be standing by with a plan B.
Jon Vez
Sep 14, 2014, 8:18:26 AM9/14/14
to catal...@googlegroups.com
Hi Dave,
If you end up with a leaking Camco fitting and choose to bypass the heater manually, the specifics of my method are as follows:
--Empty the hotwater heater by opening the drain faucet and releasing the pressure valve.
--Disconnect each of the braided hoses at the end that is opposite where they connect to the heater
--Connect the two spots that the braided hoses were connected to each other. To do this, you need two Whale elbow fittings and about a foot of Whale hose. Do not purchase from a big box unless the hose they carry is 15mm (metric). The big box hose is typically not metric and therefore will not fit properly.
--Leave the braided hoses disconnected and the drain valve open for the winter. As I mentioned, if you can do this while in the water, the rocking of the boat will get all of the residual water out of the tank.
Here is what I do for the rest of the boat: (I use 6 Gallons of -60 PG and 1.5 Gallons of -100 (for the engine)
--Potable water:
Drain as much water from all the tanks as possible. If you haven't added the manifold setup you will need to disconnect each water tank from the shutoff valves. You will leave these disconnected until spring. There will be residual water in the tanks so if you can, let the boat's motion evacuate as much as possible. You can also attach a small shop vac to each of the tank hoses and try to suck additional water out, but inevitably you will not be able to remove all of it.
--I put .75 Gallons of the -60 in each of the two forward tanks and .5 in the Aft tank. The idea is to make sure any low spots in the hoses are either free of water or sufficiently diluted. I take the extra step of using the Shop Vac to try and remove as much AF at this point and just leave the hoses detached for the winter. This is for the Tank side.
--For the water pump and faucet side: Open all the faucets including the stern shower. Open the two manifolds under the Galley. It is very helpful to attach a couple of vinyl hoses to these manifolds and lead them to the bilge so you don't have to worry about water finding its way into the nooks and crannies under the galley sink.
--I then attach the Shop Vac to each of those manifolds and blow out the water by closing all the faucets, and then opening them one at a time.
--For the fresh water pump. Again if you haven't added the manifold (you can start to see why this is helpful), disconnect the hose at the whale fitting on the side of the Water shutoffs that is closest to the water pump. It's the hose that enters the 3 shutoff valves. Attach a 4 foot piece of flexible vinyl hose 1/2" ID) to the one you just disconnected. Place a Gallon of -60 on top of the water heater (you want it above the pump so it will prime).
--Close ALL of the faucets and the manifolds under the sink.
--It's easiest to take a small funnel and pour some AF into the vinyl hose to prime the water pump. Put your thumb over it and place it in the Gallon of AF. Keeping the hose submerged, turn the water pump on and pressurize.
--Open each faucet from Stern to galley (farthest from the pump first). You just need enough to fill the hoses so as soon as you see color coming from the faucet, close it.
--Turn off the pressure and open all of the faucets and the manifolds under the sink. Again you can take the extra step of blowing the AF out of the hoses with the Shop Vac, but not necessary.
This all sounds like it's very time consuming because I tried to provide detailed steps, but it usually takes me about an hour for this step and that’s mostly due to the Shop Vac steps which is really not necessary.
Holding Tank:
--I fill the tank roughly 3/4 with fresh water a week or so before hauling and let it slosh around. I do this via my head sink since I modified for Fresh and Salt flushing. If you haven't done this, you can use the pump out fitting to put water in the tank.
--Get a pump out
--Again because I can use fresh water to flush, I simply pour 1/2 Gallon in the sink and 1/2 gallon in the head and flush. When I'm on the hard, I open the seacock and leave it that way for the winter. Finally REMOVE the strainer in the medicine cabinet. The nylon tends to deteriorate when sitting in PG. I stuff a rag in the opening and put a plastic cup underneath to capture any AF that may drip out. I clean and dry the strainer and don't put it back until Spring.
--You will need advice from others as to the best way to winterize the head if you didn't modify for fresh water flushing.
Finally, I dry out the shower sump and pour AF into the drain in the head and run the sump.
I plug the limber hole in the forward most part of the bilge (where the bilge pump is) and pour enough AF to get through the bilge hose. The first season I also did this for the manual bilge pump, but skip this step going forward since I haven't had to use that pump (thankfully).
I then clean up the bilge so it is dry and remove the plug for the limber hole.
Engine:
--I change the coolant every other year as well as the Transmission oil.
--Change the oil and filter and the fuel filters every other year.
--I drain the muffler (a small screw at the bottom of the muffler and capture the drain water with a plastic cup. If you like you can drain the water from the engine block via the pet cocks, but I usually skip this step and use the -100 so it is more concentrated.
I disconnect the hose AT the strainer end of the raw water intake. I believe John Salley has installed an inline drain so you don't have to remove any hoses. I have one in my spares but have never bothered to install it. You can pick one up at any Autozone for a few bucks if you want to install one.
--I put my thumb over the hose and insert it into a 5 Gallon bucket with 2 Gallons of -100 and run the engine until the bucket is empty and then an additional 5 seconds (almost like running the engine dry)
--I loosen the belts.
--Clean the engine body.
-- DONE
I leave all the seacocks open once on the hard and replace the impeller in the spring. Its small insurance to replace yearly, but if you choose not to do so, it's a good idea to remove the impeller so it doesn't sit in Antifreeze all winter.
Sounds like a lot, but it really is quite straightforward....Hope this helps and I'm sure others have ideas that will make all this easier...
Regards,
Jon
Solstice #17
--
You received this message because you are subscribed to the Google Groups Catalina355 group. To post to this group, send email to catal...@googlegroups.com. To unsubscribe from this group, send email to catalina355...@googlegroups.com. For more options, visit this group at https://groups.google.com/d/forum/catalina355?hl=en
If changing the topic, please start a new message and send to catal...@googlegroups.com, rather than clicking "reply" to an existing message.
---
You received this message because you are subscribed to the Google Groups "Catalina355" group.
To unsubscribe from this group and stop receiving emails from it, send an email to catalina355...@googlegroups.com.
To post to this group, send email to catal...@googlegroups.com.
To view this discussion on the web visit https://groups.google.com/d/msgid/catalina355/afc616ab-33fa-4dca-89f1-516b65774633%40googlegroups.com.
You received this message because you are subscribed to the Google Groups Catalina355 group. To post to this group, send email to catal...@googlegroups.com. To unsubscribe from this group, send email to catalina355...@googlegroups.com. For more options, visit this group at https://groups.google.com/d/forum/catalina355?hl=en
If changing the topic, please start a new message and send to catal...@googlegroups.com, rather than clicking "reply" to an existing message.
---
You received this message because you are subscribed to the Google Groups "Catalina355" group.
To unsubscribe from this group and stop receiving emails from it, send an email to catalina355...@googlegroups.com.
To post to this group, send email to catal...@googlegroups.com.
dworfel
Sep 14, 2014, 6:28:32 PM9/14/14
to catal...@googlegroups.com
Jon,
Thanks for the list. I'm planning on installing your water valve manifold this week. The parts are on order and should be here mid week. Your bypass method is my plan B if I run into problems with the bypass kit. This is another nice-to-have that I wish the factory would install.
Thanks for the list. I'm planning on installing your water valve manifold this week. The parts are on order and should be here mid week. Your bypass method is my plan B if I run into problems with the bypass kit. This is another nice-to-have that I wish the factory would install.
Engine wise not much of an effort For me. The engine's water jacket if filled with an antifreeze mix already. Kind of necessary up here. When the boat is pulled the marina flushes antifreeze through the raw water system so that's taken care of.
I'll add your comments regarding the head to the list I've been developing.
The 355 is definitely a bigger winterizing effort than our Catalina 30 was. I'm sure, though, next time 'round with winterizing will be easier.
dworfel
Sep 18, 2014, 6:31:51 PM9/18/14
to catal...@googlegroups.com
Jon, thanks again for all the info you passed on. I popped in the water tank manifold mod last night. Worked great for draining the tanks and as a port to suck antifreeze into the water system. Also wound up using your quick snap in water heater bypass. It was so easy to pop in I''m not sure I'll install the Camco fittings!
Jon Vez
Sep 18, 2014, 7:16:19 PM9/18/14
to catal...@googlegroups.com
Glad to help and sounds like it went well. I don't trust the Camco setup since it would be installed permanently unless you make the modifications that John Salley made. In the end using the Whale setup is so easy that it isn't worth it for me...
Sent from my iPad
> On Sep 18, 2014, at 6:31 PM, dworfel <dwo...@charter.net> wrote:
>
> Jon, thanks again for all the info you passed on. I popped in the water tank manifold mod last night. Worked great for draining the tanks and as a port to suck antifreeze into the water system. Also wound up using your quick snap in water heater bypass. It was so easy to pop in I''m not sure I'll install the Camco fittings!
>
> --
> You received this message because you are subscribed to the Google Groups Catalina355 group. To post to this group, send email to catal...@googlegroups.com. To unsubscribe from this group, send email to catalina355...@googlegroups.com. For more options, visit this group at https://groups.google.com/d/forum/catalina355?hl=en
>
> If changing the topic, please start a new message and send to catal...@googlegroups.com, rather than clicking "reply" to an existing message.
> ---
> You received this message because you are subscribed to the Google Groups "Catalina355" group.
> To unsubscribe from this group and stop receiving emails from it, send an email to catalina355...@googlegroups.com.
> To post to this group, send email to catal...@googlegroups.com.
> To view this discussion on the web visit https://groups.google.com/d/msgid/catalina355/be52dcf8-ea98-4d69-9084-c7d58327a236%40googlegroups.com.
> You received this message because you are subscribed to the Google Groups Catalina355 group. To post to this group, send email to catal...@googlegroups.com. To unsubscribe from this group, send email to catalina355...@googlegroups.com. For more options, visit this group at https://groups.google.com/d/forum/catalina355?hl=en
>
> If changing the topic, please start a new message and send to catal...@googlegroups.com, rather than clicking "reply" to an existing message.
> ---
> You received this message because you are subscribed to the Google Groups "Catalina355" group.
> To unsubscribe from this group and stop receiving emails from it, send an email to catalina355...@googlegroups.com.
> To post to this group, send email to catal...@googlegroups.com.
dworfel
Sep 21, 2014, 12:06:59 PM9/21/14
to catal...@googlegroups.com
Jon,
I was going over your winterizing list again and noticed your comment under "Holding Tank" where you reference "remove the strainer in the medicine cabinet." I had the cabinets torn apart when I was running Sea Talk cable through that area. I didn't notice a strainer. Where is the strainer located?
Dave W.

Kirport
Sep 21, 2014, 1:03:45 PM9/21/14
to catal...@googlegroups.com
It's on the upper right
Sent from my iPhone
Sent from my iPhone
To view this discussion on the web visit https://groups.google.com/d/msgid/catalina355/3b210264-17ff-4676-bc5f-b9bf2fda8c96%40googlegroups.com.
John Salley
Sep 21, 2014, 2:46:11 PM9/21/14
to catal...@googlegroups.com
There's a panel perpendicular to the hull in the forward part of the cabinet that you have to remove. You can then see the pump and adjacent strainer.
Jon Vez
Sep 21, 2014, 4:37:14 PM9/21/14
to catal...@googlegroups.com
Dave,
As others have said, there is a wood panel in the forward most mirrored cabinet (the small one). Remove the 4 screws and you will see the pump and strainer...
Sent from my iPad
Sent from my iPad
To view this discussion on the web visit https://groups.google.com/d/msgid/catalina355/3b210264-17ff-4676-bc5f-b9bf2fda8c96%40googlegroups.com.
Marvin Isgur
Sep 21, 2014, 4:51:31 PM9/21/14
to catal...@googlegroups.com
Interesting. I do not have the wood panel. The strainer and pump are visible.
Sent from my iPad
Sent from my iPad
To view this discussion on the web visit https://groups.google.com/d/msgid/catalina355/8D4BFF44-F715-4258-BE3F-C2F558DD9537%40comcast.net.
dworfel
Sep 21, 2014, 8:18:52 PM9/21/14
to catal...@googlegroups.com
Thanks...I'll find it.
John Salley
Sep 24, 2014, 7:35:45 PM9/24/14
to catal...@googlegroups.com
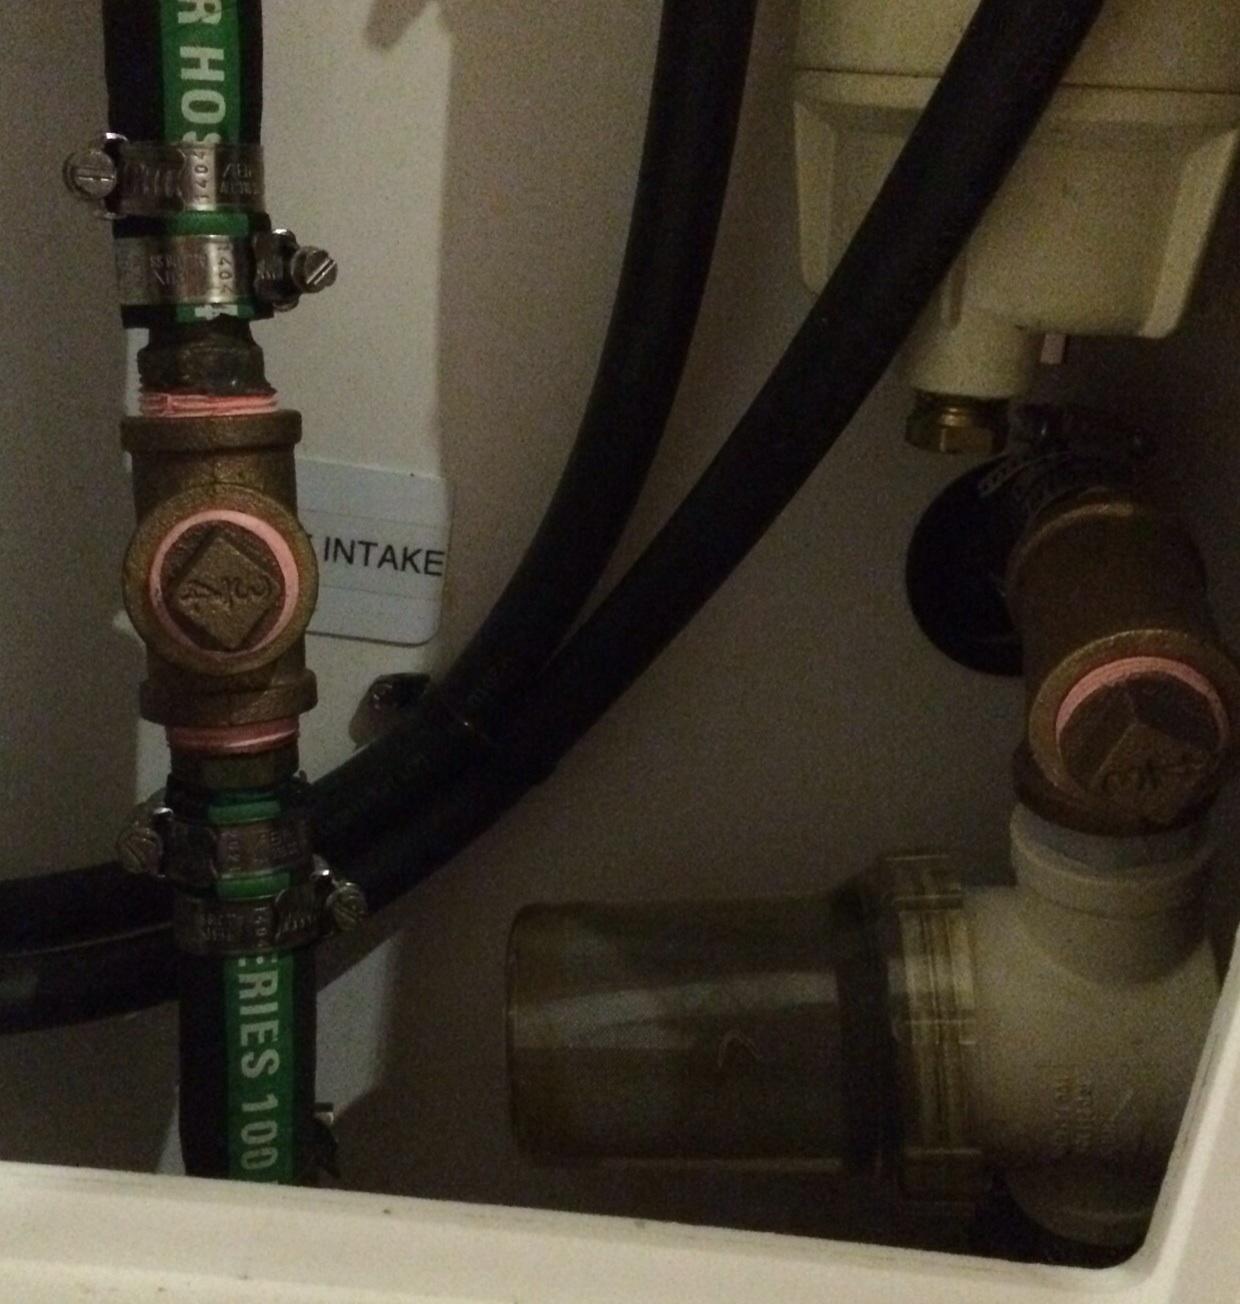
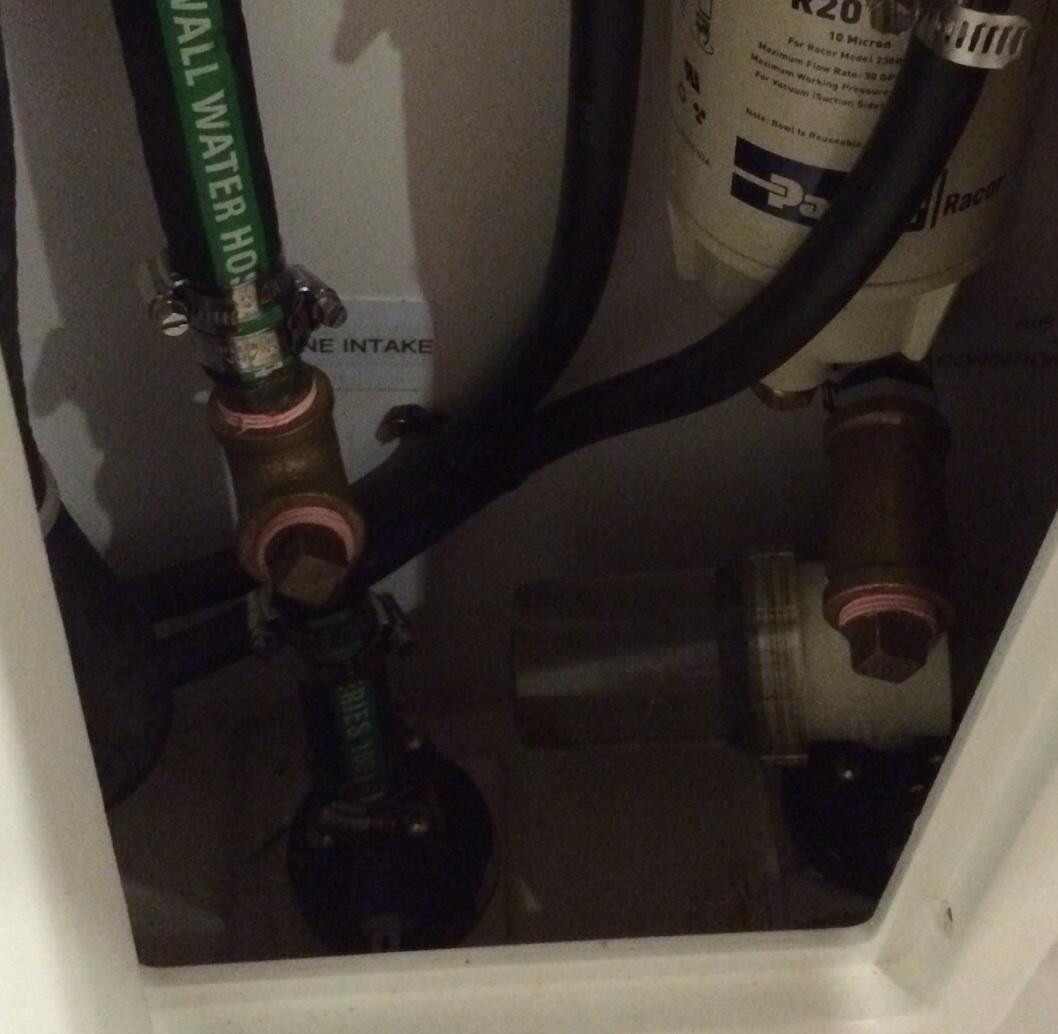
Here are photos of the ports I added to the engine raw water intake and the AC intake. After removing the square-head plugs, I can connect a 5 gallon tank with an appropriate hose, valve, and connector that I put together for my old boat, with the tank filled with pink stuff. I also made an adapter to connect it to the fresh water system through the newly-installed drain valve. Don't have to fool with dripping or spilling antifreeze from the separate jugs.

Ken Kloeber
Sep 24, 2014, 8:20:36 PM9/24/14
to catal...@googlegroups.com
John,
They all look look to me like all-bronze fittings?
Ken K
-----Original Message-----
From: catal...@googlegroups.com [mailto:catal...@googlegroups.com] On
Behalf Of John Salley
Sent: Wed Sep 24, 2014 7:36 PM
To: catal...@googlegroups.com
They all look look to me like all-bronze fittings?
Ken K
-----Original Message-----
From: catal...@googlegroups.com [mailto:catal...@googlegroups.com] On
Behalf Of John Salley
Sent: Wed Sep 24, 2014 7:36 PM
To: catal...@googlegroups.com
John Salley
Sep 24, 2014, 11:40:58 PM9/24/14
to catal...@googlegroups.com
They are. The bronze T's are more compact (and more robust) than the equivalent plastic fittings. Plus, I had a couple lying around from a project on my previous boat!

bill pittore
Oct 14, 2020, 4:13:35 PM10/14/20
to Catalina355
Hi Jon,
Following these excellent directions and I have a question about the adapter you used to bypass the water heater. Did you get something like this:
I think they have a similar one in all plastic.
Thanks,
Bill

Jon Vez
Oct 14, 2020, 5:01:11 PM10/14/20
to catal...@googlegroups.com
Hi Bill,
Those are whale fittings, but you only need a couple of elbows and a couple of 1 foot hose pieces cut to size. Once you remove the heater sheathed hoses, you connect the hot and cold together (blue to red). Here’s a photo and if this is confusing contact me offline. I simply keep setup together and remove in spring...
To view this discussion on the web visit https://groups.google.com/d/msgid/catalina355/ca7a98ec-5f70-4153-bdda-187df8776d10n%40googlegroups.com.
Ken Kloeber
Oct 14, 2020, 5:10:19 PM10/14/20
to catal...@googlegroups.com
Jon
Just noticed your adapter-doodle. Of course I’m not schooled on the OEM WH plumbing but Whale has shut offs also, why not make a manifold type bypass arrangement that’s permanently left in place there?
Sent from my phone
Ken
On Oct 14, 2020, at 5:01 PM, Jon Vez <jonve...@gmail.com> wrote:
Hi Bill,
Those are whale fittings, but you only need a couple of elbows and a couple of 1 foot hose pieces cut to size. Once you remove the heater sheathed hoses, you connect the hot and cold together (blue to red). Here’s a photo and if this is confusing contact me offline. I simply keep setup together and remove in spring...
<image0.jpeg>
To view this discussion on the web visit https://groups.google.com/d/msgid/catalina355/302DB9DB-EF65-4076-91B7-B1472933E115%40gmail.com.
bill pittore
Oct 14, 2020, 7:21:45 PM10/14/20
to catal...@googlegroups.com
Now I get it. I thought you disconnected the braided hose from the brass adapter. You remove the brass adapter from the Whale fitting and insert your bypass into the whale fitting.
Bill
To view this discussion on the web visit https://groups.google.com/d/msgid/catalina355/302DB9DB-EF65-4076-91B7-B1472933E115%40gmail.com.
Jon Vez
Oct 14, 2020, 7:47:21 PM10/14/20
to catal...@googlegroups.com
That’s right Bill. You leave the braided hose connected to the heater. There is no clearance for a bypass manifold and this procedure takes less than 5 minutes once you initially set up the elbows. I’ve been using this method for 10 seasons now.
Sent from my iPad
On Oct 14, 2020, at 7:21 PM, bill pittore <bill.p...@gmail.com> wrote:
To view this discussion on the web visit https://groups.google.com/d/msgid/catalina355/CAFi%3DF1LVf725b7RRPa3-GAZYFgiK4mBD0yr0yz5mngvwUB%3DTCQ%40mail.gmail.com.
<image0.jpeg>

PM
Oct 14, 2020, 9:15:46 PM10/14/20
to Catalina355
Question to one of the points that was mentioned earlier
Fresh water tanks, has anyone added inspection ports? I installed one on my 310 and found it much better than pouring AF in the tanks only to the have the chore of removing the AF taste out of the tanks in the spring
Fresh water tanks, has anyone added inspection ports? I installed one on my 310 and found it much better than pouring AF in the tanks only to the have the chore of removing the AF taste out of the tanks in the spring
ken magida
Oct 14, 2020, 10:57:49 PM10/14/20
to catal...@googlegroups.com
I just installed inspection ports in the two forward tanks and they both leak. I believe it is because the tanks flex and the silicone sealant doesn’t bond well to the tanks. I used machine screws and nuts rather than self tapping screws. I was thinking of
mounting the ports on cork to provide a more solid base for the ports. Does anyone know what adhesive/sealant will adhere to the tank material?
Ken Magida
Forever young #46
On Oct 14, 2020, at 21:15, PM <paulbw...@bell.net> wrote:
Question to one of the points that was mentioned earlier
To view this discussion on the web visit https://groups.google.com/d/msgid/catalina355/13053d68-e972-40d7-9a43-ac4ec6fa8d49n%40googlegroups.com.
Jon Vez
Oct 15, 2020, 6:57:06 AM10/15/20
to catal...@googlegroups.com
As much as I would like to, I haven’t because I’m concerned with leaking given the size of the tanks. To properly attach an opening port to a molded tank I believe you need to use a special welding process. My primary reason for wanting inspection ports is to clean them. Currently I’m as obsessed with water filling as I am with clean diesel. I double filter the water before it goes in.
As for winterizing, I only need a 1/2 gallon in each tank mostly to get to low spots in the hoses and any residual water in the tanks.
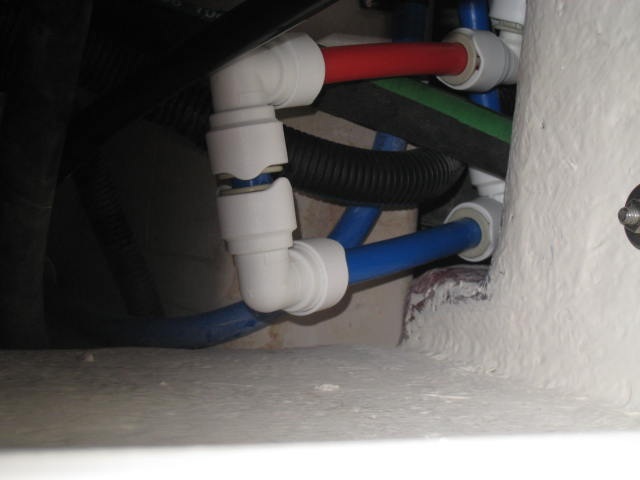
Here’s what I do (I added a manifold to make this easier and not have to remove the Whale connections at the main manifolds):
-a few days before hauling I open the manifolds and drain, letting the rocking of the boat in my slip do most of the work.
-I use a Shop Vac to suck what more I can.
-I then open the manifolds and let the antifreeze drain out. This way any residual liquid is antifreeze, not water.
In the Spring, with manifolds open I put a hose in the tank and let it run through for a while as a pass through.
-I then sanitize and commission.
Here’s a pic of my added manifold..
Sent from my iPad
On Oct 14, 2020, at 9:15 PM, PM <paulbw...@bell.net> wrote:
Question to one of the points that was mentioned earlier
To view this discussion on the web visit https://groups.google.com/d/msgid/catalina355/13053d68-e972-40d7-9a43-ac4ec6fa8d49n%40googlegroups.com.

Bob Story
Oct 15, 2020, 11:59:42 AM10/15/20
to Catalina355
I use Jon's manifold idea which works great. However, I turn off the tanks and only pump antifreeze through the pipes.
-Bob.
PM
Oct 15, 2020, 9:20:12 PM10/15/20
to Catalina355
Thanks all for the great input, Ken that is what I was afraid of maybe corkwill do the trick.The tanks on the 355 seem to be made of a lot thinner plastic than the one on the 310 which i never had any leaks with. and Jon thats basically the proceedure that i have been doing, but i will add your idea of a manifold. I believe your right Jon the only way to ensure no leaks is to have the inspection ports plastic welded in. I may investigate finding someone locally who can weld plastic.
cheers Paul
Ken Kloeber
Oct 16, 2020, 12:50:17 PM10/16/20
to catal...@googlegroups.com
The way to add a port to a poly tank where you can’t rely on adhesive to affix and seal it, is to sandwich the port. You need a beefy back up ring inside, like 1/8” stainless so that the tank top becomes part of that structure when it’s all thru bolted.
The poly needs a quick flame treatment before sealing and adding the ring and port. I’d use 4200 or 5200 to seal both the port and ring or a rubber gasket if you’re tentative about flame treating it. I’d also double the number of thru fasteners, drilling additional holes between the ones that come on the port. The key to using a sealant rather than rubber is the flame treatment so it adheres.
K
On Oct 15, 2020, at 9:20 PM, PM <paulbw...@bell.net> wrote:
Thanks all for the great input, Ken that is what I was afraid of maybe corkwill do the trick.The tanks on the 355 seem to be made of a lot thinner plastic than the one on the 310 which i never had any leaks with. and Jon thats basically the proceedure that i have been doing, but i will add your idea of a manifold. I believe your right Jon the only way to ensure no leaks is to have the inspection ports plastic welded in. I may investigate finding someone locally who can weld plastic.
To view this discussion on the web visit https://groups.google.com/d/msgid/catalina355/e8ab13f6-29d3-4a0e-9833-a46bb29ba8f0n%40googlegroups.com.
ken magida
Oct 16, 2020, 4:49:22 PM10/16/20
to catal...@googlegroups.com
Ken
Thank you for your comment. However, I was under the impression that the 4200 or 5200 would not adhere to the tank material. I will follow up with Catalina Parts to see if they can offer some insight.
I like your idea of doubling the number of fasteners - I thought using nuts and bolts rather than self- tapping screws would be sufficient. I also like the idea of the backup ring but have 2 questions. The first is I assume that you mean the ring goes outside
the tank and backs up the port to give it greater stability since it won't fit through the hole in the tank. Second, where do you get such a ring fabricated? I will have to do some shopping but since I am on the hard until at least April, I have time.
From: 'Ken Kloeber' via Catalina355 <catal...@googlegroups.com>
Sent: Friday, October 16, 2020 12:50
To: catal...@googlegroups.com <catal...@googlegroups.com>
Subject: Re: [Catalina 355:3890] Winterizing the 355
Sent: Friday, October 16, 2020 12:50
To: catal...@googlegroups.com <catal...@googlegroups.com>
Subject: Re: [Catalina 355:3890] Winterizing the 355
To view this discussion on the web visit
https://groups.google.com/d/msgid/catalina355/F431A7CD-128A-4FCA-91C7-3CACFD746C8C%40aol.com.
Ken Kloeber
Oct 17, 2020, 1:14:04 AM10/17/20
to catal...@googlegroups.com
Hey Ken
To get any sticky to adhere to poly you need to change its
surface. The polar characteristic can be modified by a few methods but for
the DIY-er the viable two are to (flash) flame treat it and roughen the
surface. It rearranges/modifies the molecules on the slick surface.
I have successively adhered paint, epoxy and other materials (they make
paint specifically for plastics that chemically modifies the surface.) But
poly doesn't become a magical transformation like adhering to fiberglass,
so you'd want to use a very aggressive adhesive. And you don't want to
rely on that alone (hence what I mean by the need to sandwich the port, not
rely on simply an adhesive and a few fasteners.
I
would fabricate a backer plate (not just rely on fender washers -- you want a
"continuous squeeze" to the sandwich.) Have a fabrication shop make a
stainless steel ring. Make one cut thru the ring in order to work it into
the tank. Alternately if made heavy enough you can cut it from poly.
Say like a 1/2" thick cutting board. Cut the ring in half to make the
backer plates -- if you want belt/suspenders use two thinner rings rotated 90
deg to each other.
The seal can be the adhesive-sealant (if you flame treat) but if
skittish about doing that, use rubber rings for the top/bottom sandwiched seals
and don't use an adhesive-sealant. I haven't checked out the properties of
795 to see if it would adhere to flame-treated poly but if so, that might be a
better alternative to 4200/5200.
-K
From: catal...@googlegroups.com [mailto:catal...@googlegroups.com] On Behalf Of ken magida
Sent: Fri Oct 16, 2020 4:49 PM
To: catal...@googlegroups.com
Subject: Re: [Catalina 355:3891] Winterizing the 355
To view this discussion on the web visit https://groups.google.com/d/msgid/catalina355/BLAPR03MB53967B6AD50BBBD169201048BB030%40BLAPR03MB5396.namprd03.prod.outlook.com.
ken magida
Oct 17, 2020, 6:37:28 PM10/17/20
to catal...@googlegroups.com
Ken
Great thoughts
I tend to like the idea of the half-rings doubled from thinner sheets of material. I will investigate the adhesive issue in determining what material and what adhesive to use.
From: 'Ken Kloeber' via Catalina355 <catal...@googlegroups.com>
Sent: Saturday, October 17, 2020 1:13
To: catal...@googlegroups.com <catal...@googlegroups.com>
Subject: RE: [Catalina 355:3892] Winterizing the 355
To: catal...@googlegroups.com <catal...@googlegroups.com>
Subject: RE: [Catalina 355:3892] Winterizing the 355
To view this discussion on the web visit
https://groups.google.com/d/msgid/catalina355/!%26!AAAAAAAAAAAYAAAAAAAAAHzE8wOhJtBHvg90dmBbF9DCgAAAEAAAALBxx2bhpahNjWRXf95Ny6cBAAAAAA%3D%3D%40aol.com.

Dan Gilch
Sep 4, 2023, 9:51:01 AM9/4/23
to Catalina355
 This email trail is great info on winterizing and bypassing the hot water heater.
Will do this myself for first time this fall.
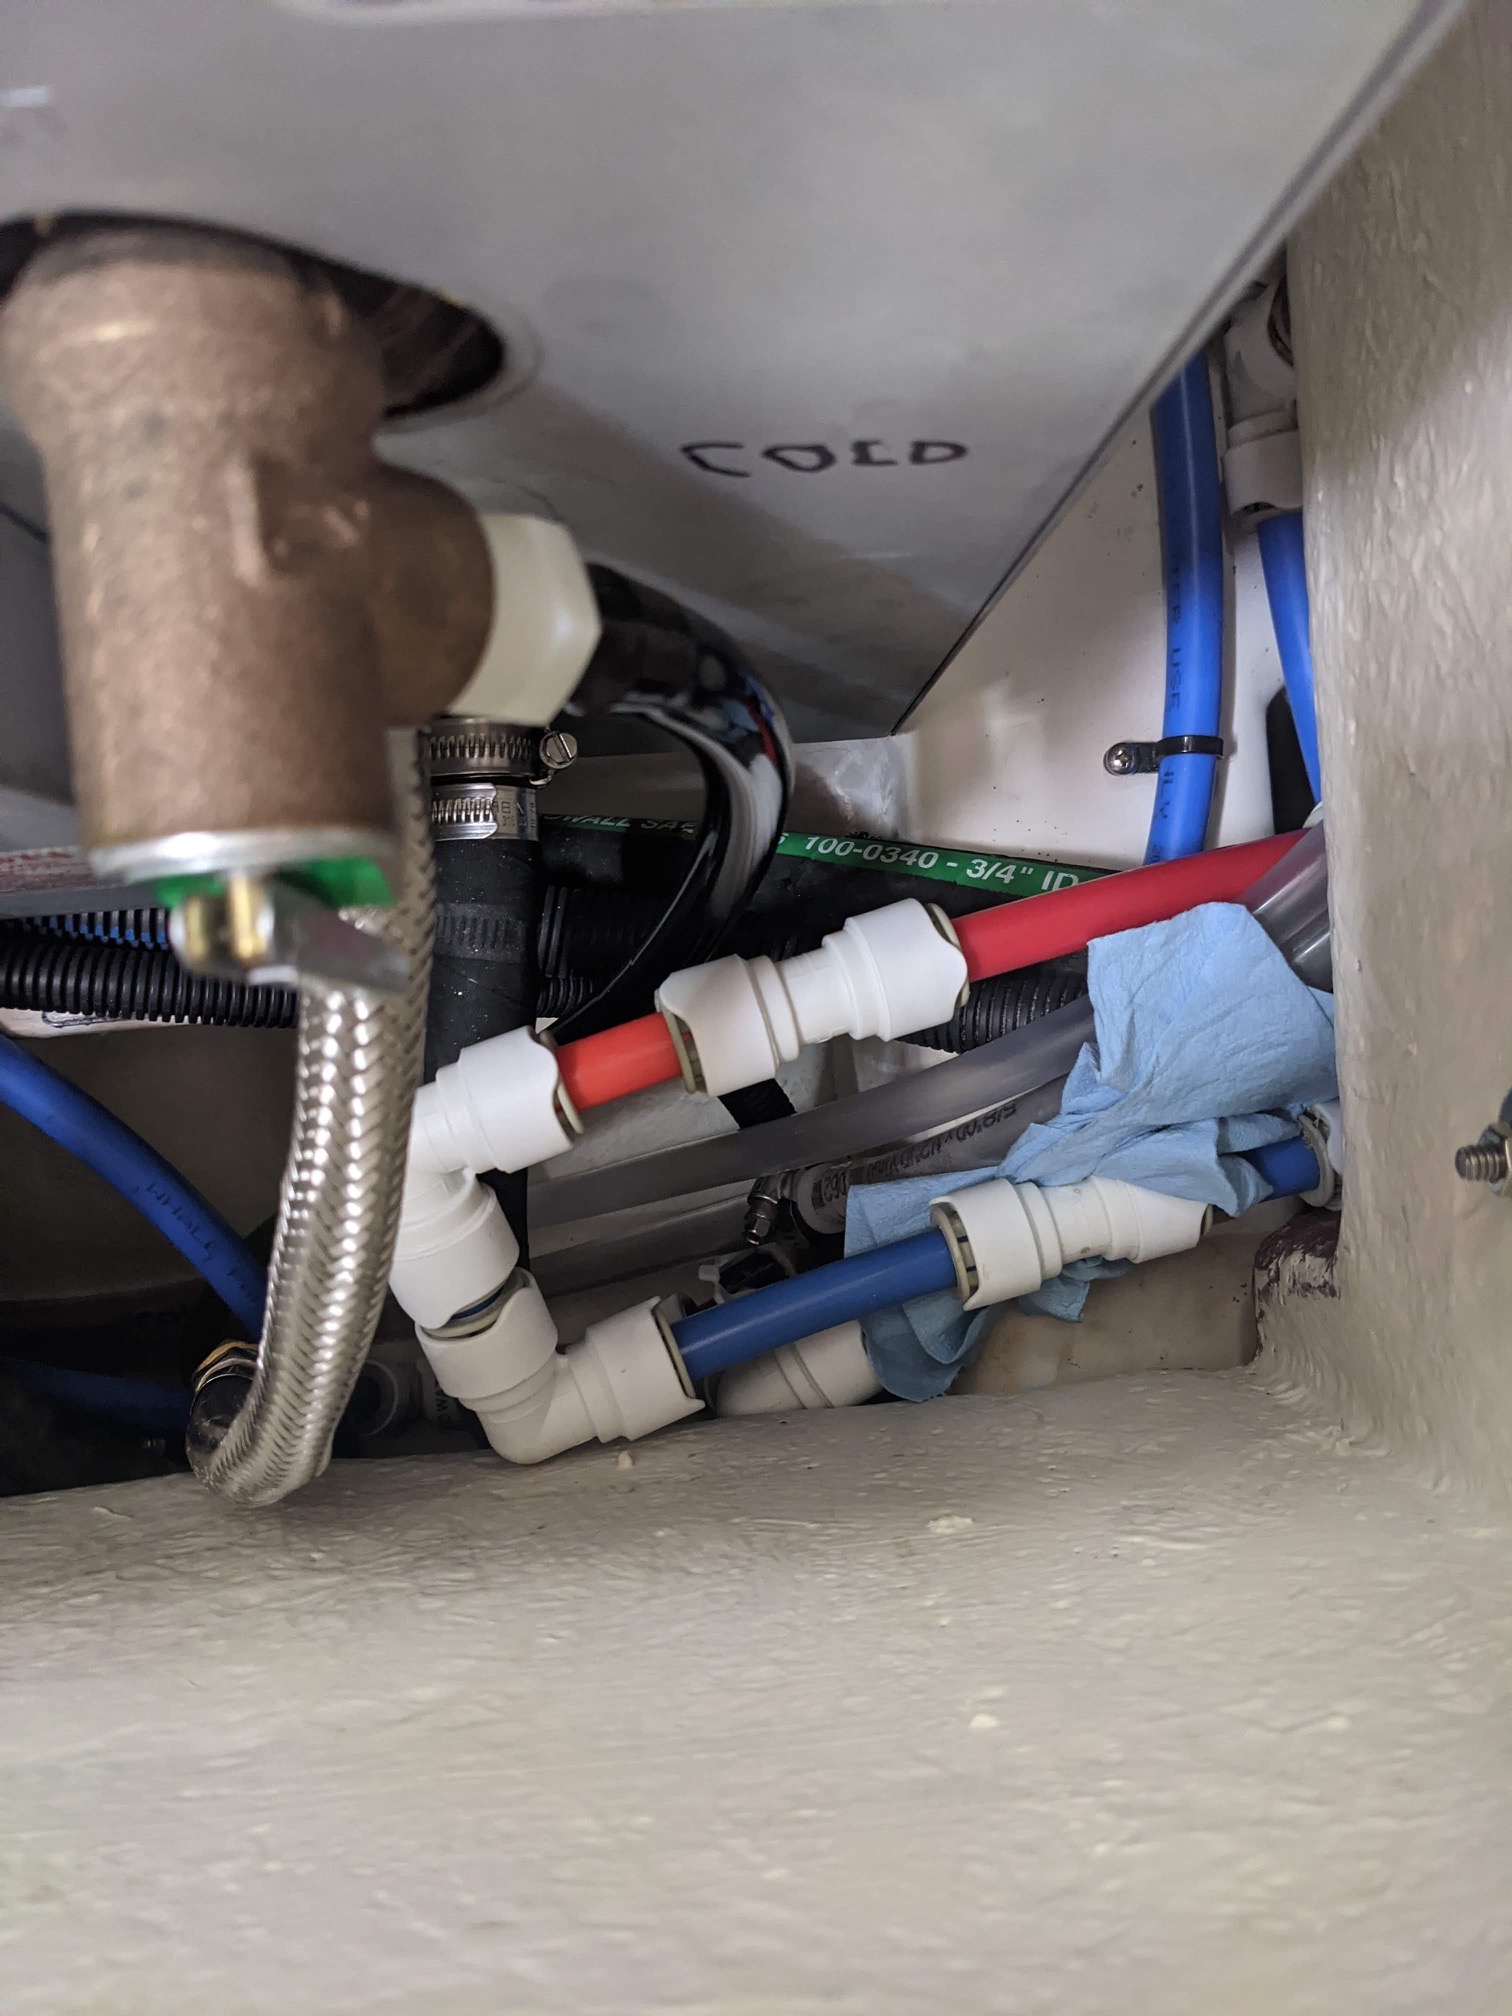
My current hot water connection seems a little different in the attached photo….I think I get how to connect the hot and cold hoses to bypass but am confused what the “extra” seatech connections are between the braided hose and the elbow.
Sure appreciate any clarification or info on this.
Thanks
Dan
Slip Away #144
On Friday, September 12, 2014 at 7:13:10 PM UTC-4 Jon Vez wrote:
John is correct. I initially installed the Camco bypass, but had a leaking problem with the plastic adapter that came with the kit. I also found that if I don't disconnect the water hoses from the heater I still had a partial vacuum and it took forever to drain the tank. Instead of running to the store and getting the fitting John is talking about, I simply took 2 6" pieces of whale hose and an elbow to bypass. Took 5 minutes and I've been doing it this way ever since.
bill pittore
Sep 4, 2023, 10:05:59 AM9/4/23
to catal...@googlegroups.com
Hi Dan,
You have a mixing valve which can reduce the absolutely scalding hot water temp to a safe level. In your case, you will disconnect the red pipe (circled in your photo) and the blue pipe in the center of the pic that goes into the T connector (also in the circle). Now the tank is isolated from the water system. You can open the tank drain to empty it. Connect the red pipe and blue pipe together. Now the downstream hot water faucets are connected to the cold.
Bill
--
You received this message because you are subscribed to the Google Groups Catalina355 group. To post to this group, send email to catal...@googlegroups.com. To unsubscribe from this group, send email to catalina355...@googlegroups.com. For more options, visit this group at https://groups.google.com/d/forum/catalina355?hl=en
If changing the topic, please start a new message and send to catal...@googlegroups.com, rather than clicking "reply" to an existing message.
---
You received this message because you are subscribed to the Google Groups "Catalina355" group.
To unsubscribe from this group and stop receiving emails from it, send an email to catalina355...@googlegroups.com.
To view this discussion on the web visit https://groups.google.com/d/msgid/catalina355/33c781ba-7d40-49c1-b2b7-898f1d2d02acn%40googlegroups.com.
<IMG_1689.jpeg>
bill pittore
Sep 4, 2023, 10:12:52 AM9/4/23
to catal...@googlegroups.com
I didn’t see the green text in the picture, but yes connect hot and cold at that point.
Bill
On Sep 4, 2023, at 9:51 AM, Dan Gilch <dangi...@gmail.com> wrote:
Dan Gilch
Sep 4, 2023, 10:14:27 AM9/4/23
to Catalina355
Thanks Bill. I guess the extra Seatech fittings are related to the mixing valve…kinda confused me.
Appreciate your help.
Dan

william beveridge
Nov 17, 2024, 4:57:56 PM11/17/24
to Catalina355
I am resurrecting this thread for those of us with "newer" versions of the 355. Earlier posts refer to 15mm whale fittings.
2019 Hull #146, has Seatech brand fittings. Recently, Seatech changed its' name to AquaLock. The size is 1/2", not 15mm. The 15mm ID is too small.
None of the hoses (fresh water system) on board show markings regarding size or brand and the factory installed Seatech fittings do not state what size they are, whether metric or imperial. AquaLock (fka, SeaTech) fittings for fresh, potable and hot water are now black, not white. They do come in white, but not apparently when proper for potable hot water.
Bill Beveridge
Perfectly Imperfect, Hull #146
Middle River, MD
Reply all
Reply to author
Forward
0 new messages