PID installation
60 views
Skip to first unread message

Andrey Sychev
Apr 2, 2022, 7:26:56 PM4/2/22
to via Brewtus
Hi group, I am in the process of PID kit installation into my Brewtus 2. You need to drill holes for static relay and I wonder if I need a special kind of drill bit for the thick steel bottom of the machine? Any issues and tips with that part? Not exactly sure what diameter too. Thanks.
Sent from my iPhone
Sent from my iPhone

Brian
Apr 3, 2022, 1:58:52 AM4/3/22
to Brewtus
The bottom of my machine is stainless steel, if yours is the same here Are some tips you should abide by:
- Regular HSS drill bits will work, but ones designed for hard metals are easier and more likely to work. For budget hard metal bits I find the Milwaukee hard metal bits to be very good, they can be gotten at many hardware or trade supply stores, and you will likely find a suitable size for sale as a single bit saving the need to buy a pack. If you aren’t very good at drilling, buy a second bit.
- If you do buy a set it is recommended to start with a small hole then work up to the actual required size giving the metal, and the bit, time to cool in between drilling. But since you shouldn’t need a very big hole to mount a solid state relay, you can probably just go right to the correct size.
- Stainless steel hardens if it gets hot, so lubricate the bit and the metal where you are drilling from time to time, stop if it starts to smoke, this is a good indication that things are getting too hot. Motor oil works well, WD-40 works okay, but even a high temp cooking oil like vegetable oil will work if you’re concerned about non food safe oil. A little bit of smoke is normal, especially if it looks like it is actually coming from the metal being removed.
- Make sure when drilling to apply moderate to high pressure, and keep the drill speed low. Like really low. Like you’re gonna think “surely this is too slow, slower than he meant”, and that’s probably about right.. I promise with stainless steel, slow is actually fast. If the stainless gets hot it will work harden, and then even the best bits will just get chewed up trying to get through the work piece.
- Make sure when drilling you maintain good straight contact with the work piece. Do you’re best to keep the drill bit perpendicular to the piece being drilled, but most importantly once you start drilling, do your best to keep the drill straight. The hard metal bits like to chip if you change the angle while drilling.
- Before you begin drilling, use a screw or a center punch with a good sharp point, and place the tip where you want the center of the hole to be, give it one good whack with a good size hammer. This should give you a little indent, this will make getting the hole started much easier, and prevent the bit from walking.
- You’ll know you’re doing everything right when the full surface of cutting edge of the drill bit makes contact with the work piece, you should see strands of metal coming out, not small chips. If you do it all really well you’ll get long continuous ribbons of stainless steel.
- When the drill bit breaks through to the other side it is VERY likely to bind up, be ready for this, you can usually hear it about to happen. The drill will jerk and try to twist when this happens. If you start small and work you’re way up in size it reduces the severity of this.
- Placing/attaching a piece of wood behind the back of the work piece will help to prevent the case from bending as you apply pressure, it will also likely give you a cleaner exit hole, and reduce the chance of the drill binding up.
It really isn’t that hard to drill stainless, just a little care is required for good results, don’t be dissuaded by all of my notes above, you can totally do it. I am the operations/maintenance manager at a brewery so I drill a lot of stainless.
Don’t forget to apply thermal grease between the SSR and base of the machine. Without it the SSR will fail prematurely, as it will generate enough heat to cook itself.
Best of luck!
Brian

Mike Endacott
Apr 3, 2022, 5:58:50 AM4/3/22
to bre...@googlegroups.com
Nice set of instructions Brian.
--
You received this message because you are subscribed to the Google Groups "Brewtus" group.
To unsubscribe from this group and stop receiving emails from it, send an email to brewtus+u...@googlegroups.com.
To view this discussion on the web visit https://groups.google.com/d/msgid/brewtus/18729bf9-1e2a-4630-b671-8c74686b9cb1n%40googlegroups.com.
Mike
Andrey Sychev
Apr 3, 2022, 3:28:09 PM4/3/22
to bre...@googlegroups.com
Thanks for the instructions Brian.
Sent from my iPhone
On Apr 3, 2022, at 5:58 AM, Mike Endacott <michael....@gmail.com> wrote:
To view this discussion on the web visit https://groups.google.com/d/msgid/brewtus/CAOUszRaggRW4KtPeT13dNOLVykBk07D7ZsSZ2qrx5yP7S%2Bx_4g%40mail.gmail.com.
Andrey Sychev
Apr 3, 2022, 4:18:00 PM4/3/22
to 'Andrey Sychev' via Brewtus
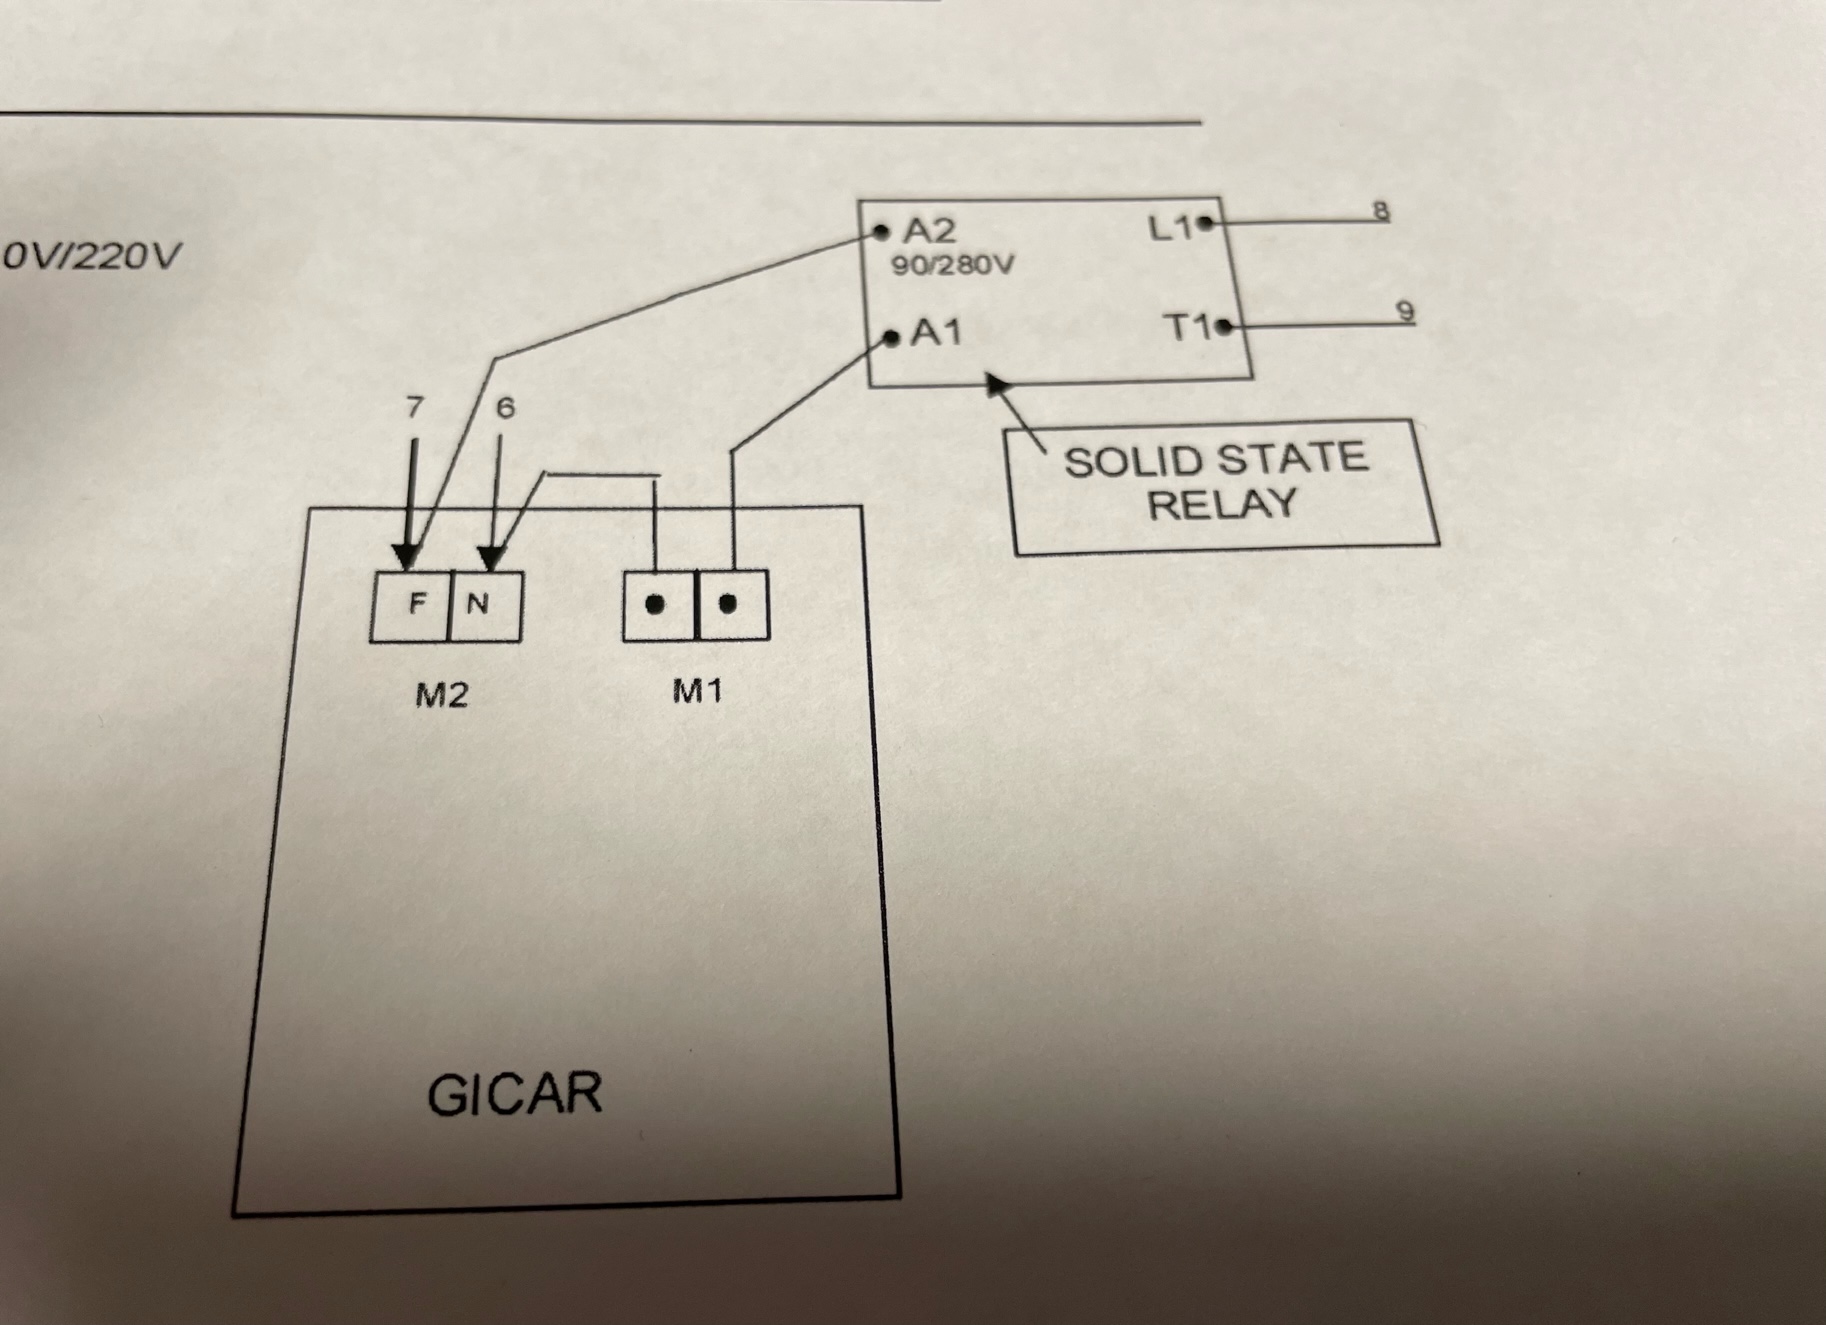
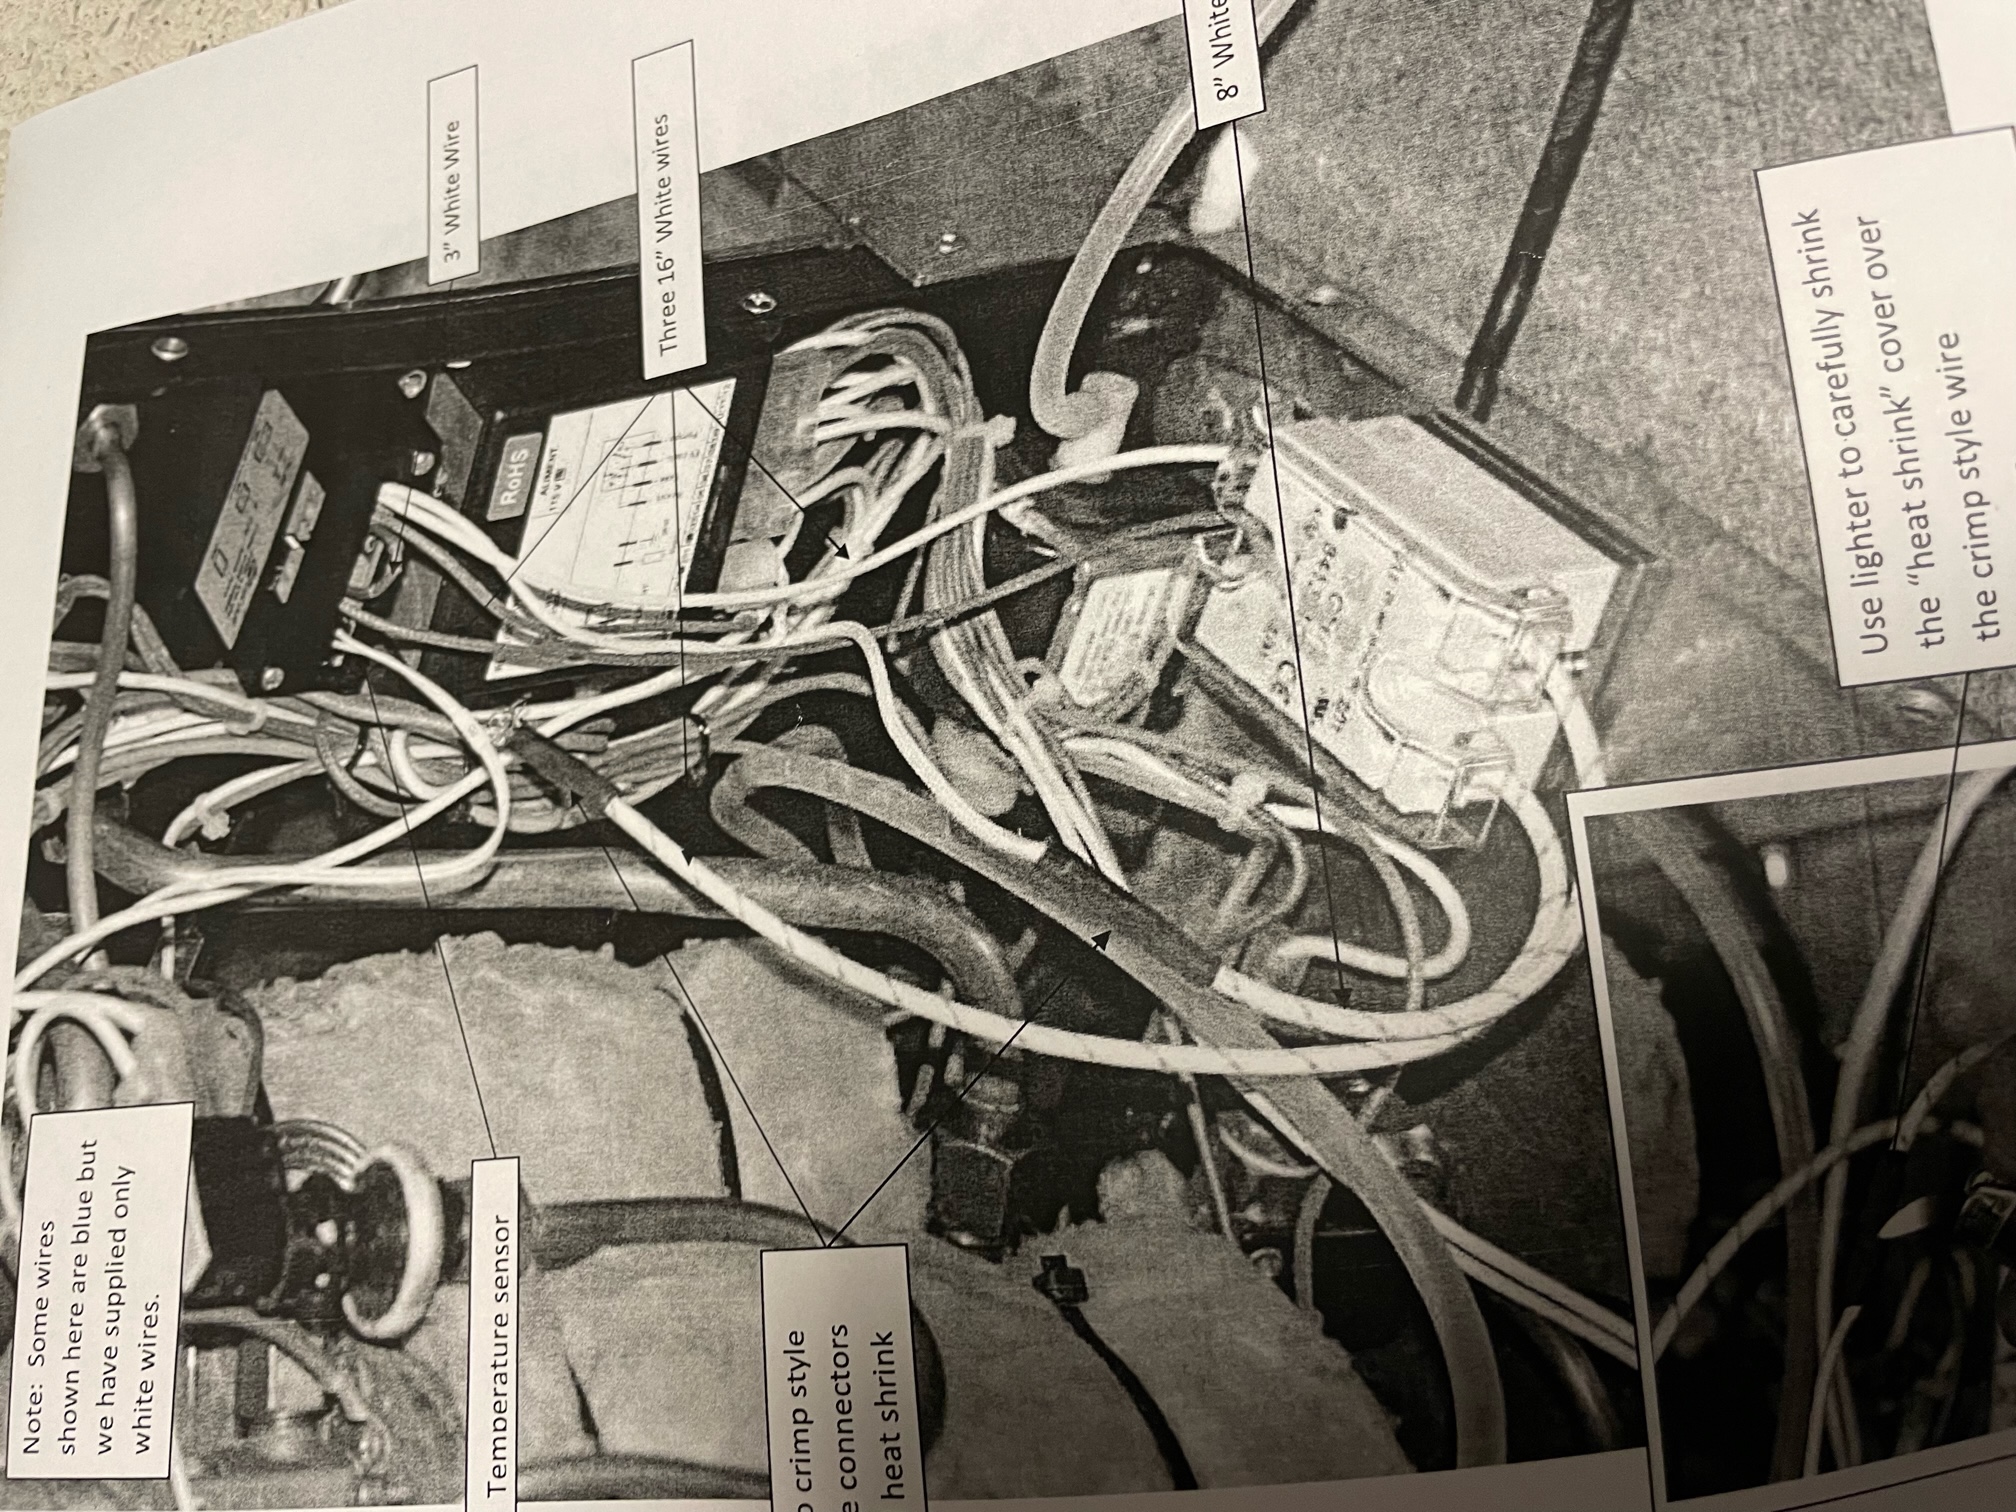
Also, I don’t know how to read this wiring diagram for wire 8 and 9 - it seems that existing wires go to L1 and T1 connectors in SSR but in the included picture at least one of the wires connects to the Gicar controller (2 white wires on the right). Perhaps a better question for WLL but perhaps the photo is for a different setup or I am misunderstanding the diagram.
Diagram:
Diagram:
Reply all
Reply to author
Forward
0 new messages