ESP32 Release candidate RC4

cicciocb
The VL53L0X is a new generation Time-of-Flight (ToF) laser-ranging module providing accurate distance measurement whatever the target reflectances unlike conventional technologies. It can measure absolute distances up to 2m, setting a new benchmark in ranging performance levels, opening the door to various new applications.
It must connected using I2C using the wiring as shown below :


To start to use, it must be initialised using the VL53L0X.INIT function.
The syntax is:
Ret = VL53L0X.INIT
It returns 1 if the initialisation was successful or 0 if not OK.
Then, the following commands are available :
VL53L0X.SETRANGE range
Set the distance range (sensitivity); by default the value is 0 for a max range of 600 mm
VL53L0X.SETACCURACY accuracy
Set the accuracy of the readout modifying the time required for the measurement.
By default the value is 0 for a Measurement time of 33 msec.
Finally it is possible to read the distance using the function
Dist = VL53L0X.DISTANCE
The value returned is the distance measured in millimeters.
If the measurement is not valid, for example if the distance is out of range, this function returns 8190.
This is a “blocking” function meaning that the program will stop the time required for the measurement, i.e. 400 ms when using the accuracy at 2.
For this reason the function VL53L0X.DISTANCE_N returns the same information but without blocking the execution of the code.
Obviously, the distance measured will be “refreshed” only at the rate defined with the function VL53L0X.SETACCURACY
Example:

Lizby

Bugs
Display a BMP or JPG file on the TFT display.
The file format must be ".bmp" with 24 or 32 bits or “.jpg”
(followed by)
‘filename$’ is the name of the bmp file
Display a JPG file on the TFT display.
The file format must be “.jpg”
(but later)
‘filename$’ is the name of the bmp file

PeterN
cicciocb
Display a BMP or JPG file on the TFT display.
The file format must be ".bmp" with 24 or 32 bits or “.jpg”
(followed by)
‘filename$’ is the name of the image file
Display a JPG file on the TFT display.
The file format must be “.jpg”
(but later)
‘filename$’ is the name of the jpg file
PeterN
PeterN
AudioFileSourceFile REOPEN 0 50700 162AudioFileSourceFile read 0 avail 162 pos 50700
Bugs
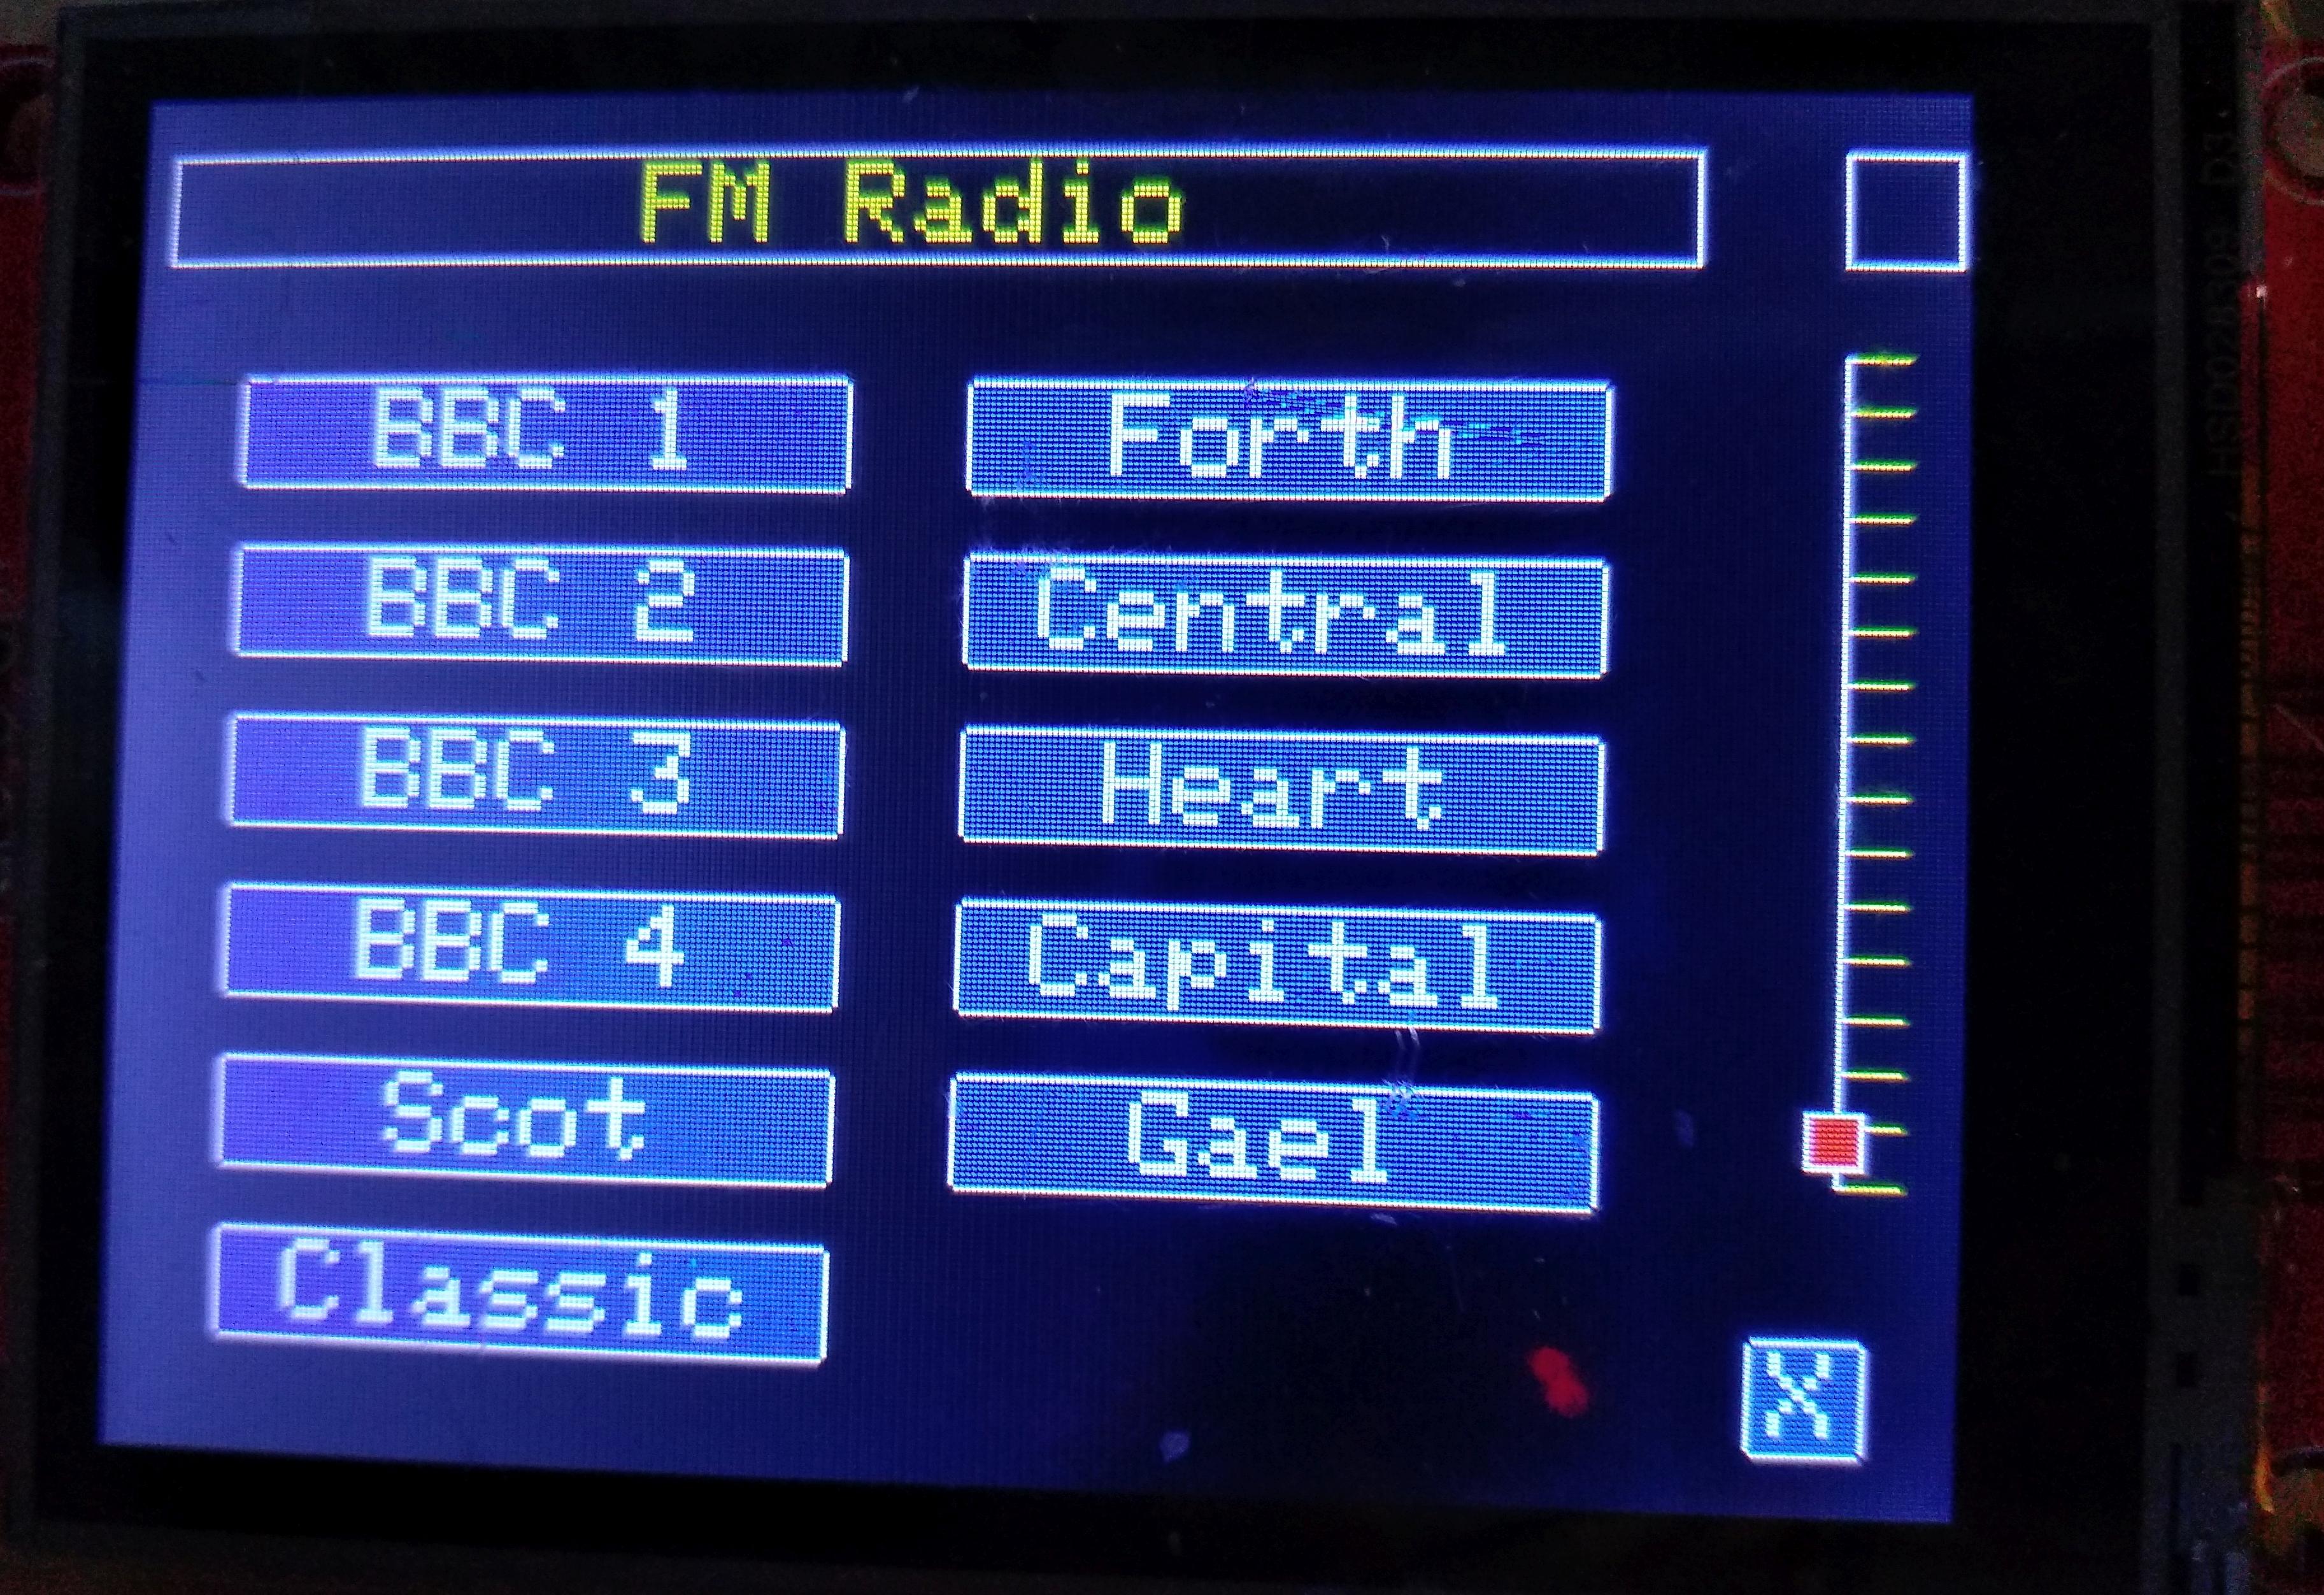
'displays up to 12 station names, a volume slider, mute button and signal strength.
'Needs a text file with local FM station names and frequencies
'see local station file "stations.txt" as example
RDAaddr = &h11
RDActrlreg = &h02
RDAfreqreg = &h03
RDAvolreg = &h05
RDAssireg = &h0b
freq = 0
freqB = 0
freqH = 0
freqL = 0
muted = 0
rssi = 0
'TOUCH.CALIB 'only need once
' read in text file of station names (8 chars max) and frequencies
fl$="/stations.txt"
maxstn=val(file.read$(fl$,1)) 'first line sets number of stations in the file
if maxstn>12 then maxstn=12 ' a maximum of 12 to fit a single screen
dim station$(maxstn)
dim stnfreq(maxstn)
dim but(maxstn) 'the buttons
For i=1 to maxstn
a$=file.read$(fl$,i+1)
n=instr(a$,",")
b$=left$(trim$(left$(a$,n-1)),8) 'truncate long station names
c$=trim$(mid$(a$,n+1))
station$(i)=b$
stnfreq(i)=int(val(c$)*10)
Next i
I2C.SETUP 21,22 'usual I2C pins
RDAinit 'initialise the RDA5807 to Europe/USA FM band 100khz spacing etc
'draw the screen
gui.init maxstn+5, 0 'reserve memory for GUI objects. clear screen to black
txt = GUI.Textline(5,10,270,20, "FM Radio", 2)
gui.setstyle txt, 4,1
' create the station buttons
for i=1 to maxstn
stn$= station$(i)
if i>6 then
x = 150: y = 20+30*(i-6) 'need second column
else
x = 20: y = 20+30*i
endif
but(i) = GUI.Button(x,y, 110, 20,stn$,2,1,1,1 )
gui.setevent but(i),1,buttonclick 'set button clicked event, jump to buttonclick
next i
' add the other screen items
mutebut = GUI.Button(285,210, 20, 20,"X",2,1,1 )
gui.setevent mutebut,3,muteclick
sldvol = gui.slider(290, 40, 20, 150, 5,1) ' vertical volume control
gui.setstyle sldvol, 5,15,10
Gui.setevent sldvol,1,setvol
txtssi = GUI.Textline(299,10,20,20, " ", 1) 'text box for signal strength (about 30+ for good signal)
gui.autorefresh 30, 1 'display gui items automatically each 30ms including touch
wait
dorssi: 'routine called by timer to update signal strength display value
RDAssi
gui.settext txtssi, str$( rssi)
return
setvol:
'RDA5807 volume is 0 to 15 so convert from slider (0 to 100)
v = int(gui.getvalue(sldvol)*15/100)
RDAvol v
return
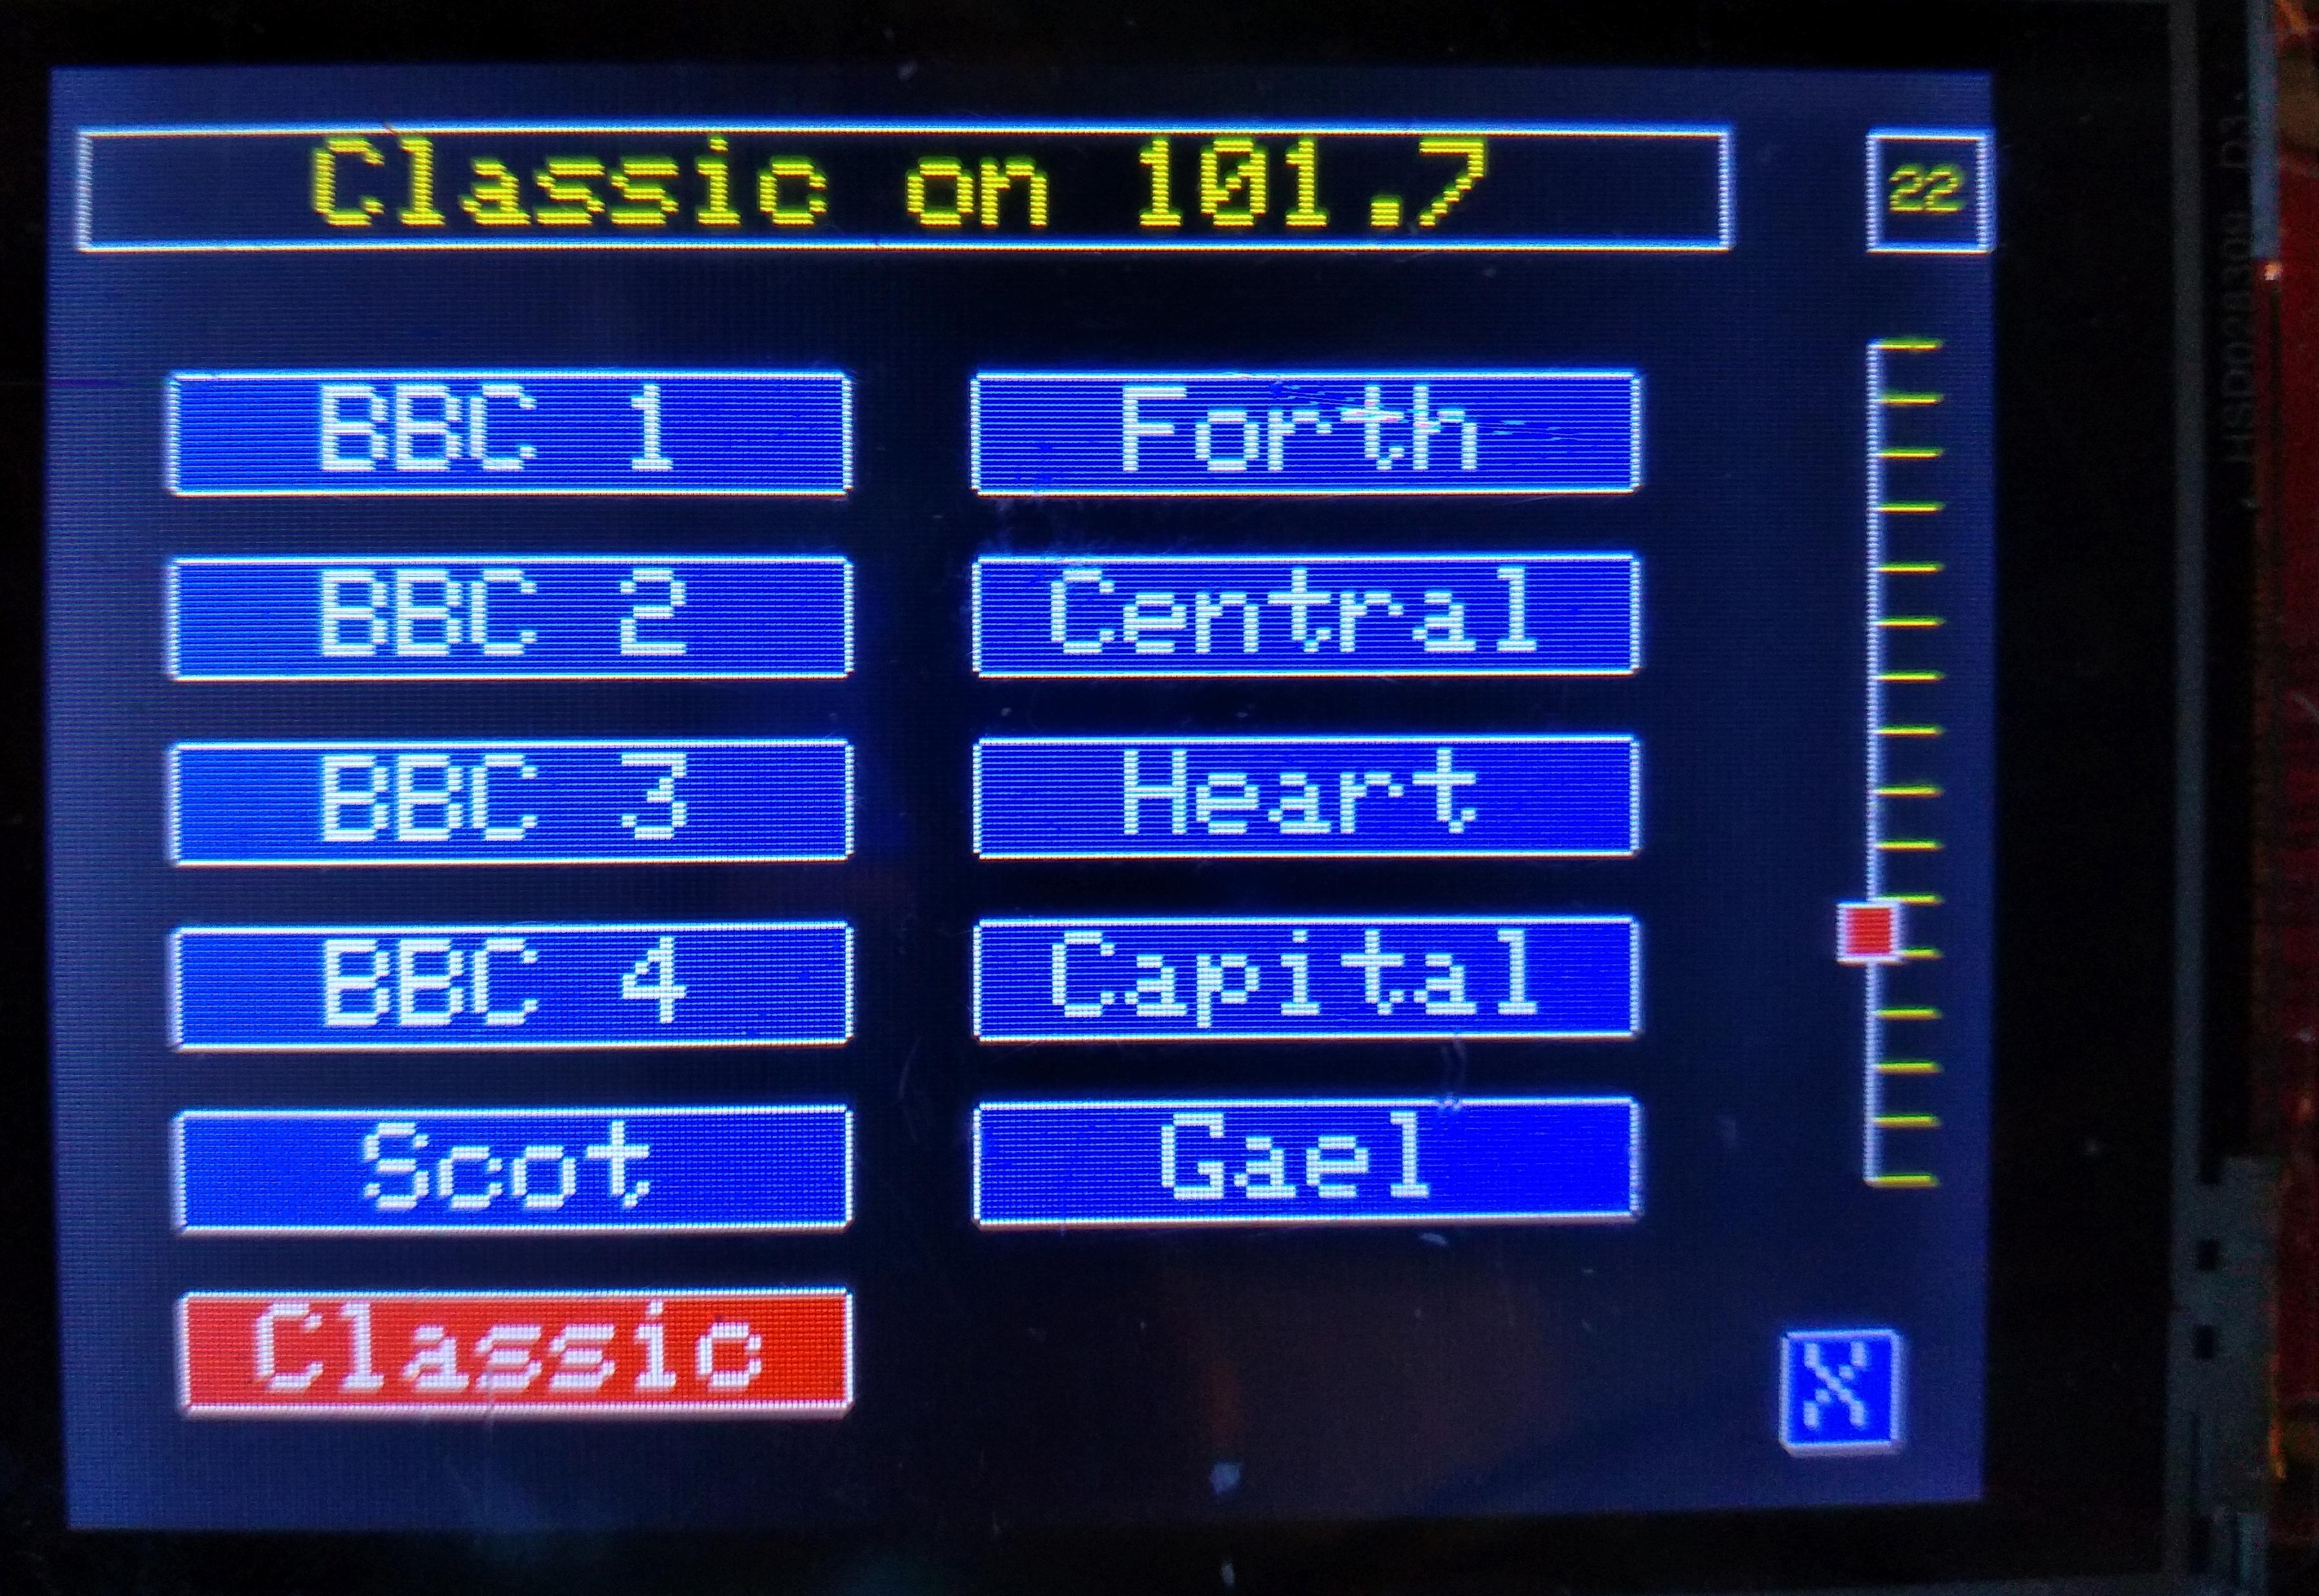
buttonclick:
id = gui.target
f$ = str$(stnfreq(id)/10)
t$ = station$(id) & " on " & f$
gui.settext txt,t$ 'change text line to show station and frequency
freq = stnfreq(id)
RDAfreq freq
timer0 200, dorssi 'start the timer for signal strength display
return
muteclick:
if muted = 0 then muted = 1 else muted = 0
RDAmute muted
return
'_________________________________________________
'RDA5807 routines
sub RDAinit
' Initialize the RDA5807M chip with a soft reset for 500ms
I2C.BEGIN RDAaddr
I2C.WRITE RDActrlreg ' Register address &h02
I2C.WRITE &hD0 'normal audio, no mute, stereo, bass boost
I2C.WRITE &h03 ' soft reset bit 1
stat = I2C.END
if stat<>0 then wlog "I2C error ";stat
pause 500 ' wait 500ms
I2C.BEGIN RDAaddr
I2C.WRITE RDActrlreg
I2C.WRITE &hD0
I2C.WRITE &h0D ' Setup the radio for communications
stat = I2C.END
if stat<>0 then wlog "I2C error ";stat
pause(500)
end sub
sub RDAfreq(f)
freqB = f - 870 ' chip needs to have freq offset from lowest freq (870)
freqH = freqB>>2 ' need to break the offset freq into 2 parts (hi/low)
freqL = (freqB AND 3) <<6 ' Shift channel selection for matching register &h03
I2C.BEGIN RDAaddr
I2C.WRITE RDAfreqreg
I2C.WRITE freqH ' write High freq byte
I2C.WRITE (freqL + &h10) ' write Low freq byte
stat = I2C.END
if stat<>0 then wlog "I2C error ";stat
RDAssi
end sub
sub RDAvol(v)
' The volume is from 0-F, leave all the other bitss (&h84D0 - &h84DF)
v = v and &h0f
v = v + &hD0
I2C.BEGIN RDAaddr
I2C.WRITE RDAvolreg
I2C.WRITE &h84 ' reserved bits - don't change
I2C.WRITE v ' set volume to v
stat = I2C.END
if stat<>0 then wlog "I2C error ";stat
end sub
sub RDAmute(m)
if m = 1 then reg = &hA0 else reg = &HD0
I2C.BEGIN RDAaddr
I2C.WRITE RDActrlreg
I2C.WRITE reg
I2C.WRITE &h0D ' leave other bits
stat = I2C.END
if stat<>0 then wlog "I2C error ";stat
end sub
sub RDAssi
rssi = I2C.ReadRegByte( RDAaddr, RDAssireg)
rssi = rssi and &hfe
rssi = rssi >>2
end sub
PeterN
I was immediately tempted to order the cheap FM-Radio-IC.
So far I had searched in vain for a cheap DAB module.
cicciocb
Bugs
txt = GUI.Textline(10,50,190,20, "Try mute", 2)
but = gui.buttonImage(100,100, 20, 20, "/volume2.bmp", "/volume1.bmp",1 )
gui.setevent but,1,buttonclick
gui.autorefresh 30, 1
wait
buttonclick:
wlog "button pressed"
gui.settext txt,"Muted=" & str$(gui.getvalue(1))
wlog
return
Lizby
cicciocb
On Wednesday, 11 December 2019 16:39:06 UTC+1, Bugs wrote:
Hmm - almost got it - but with an imagebutton (toggle style) the image changes but the event is only called at one of the changes.
SETEVENT [20]
Gui.setevent object, event_type, label | OFF
Define an event for any object.
Event | Meaning |
0 (NONE) | Disable the event |
1 (CLICK) | Triggered when touching on the object |
2 (LEAVE) | Triggered when leaving the touch from the object |
3 (CHANGE) | Triggered when the value of the object change |
Label is the place where it will jump. OFF disable the event.
The events can be defined for button, checkbox, slider, image and imagebutton.
Bugs

Tinine
PeterN
PeterN
cicciocb
Tinine
PeterN
PeterN

Charles
cicciocb
cicciocb
I have an M5stack and have tried using arduino and micropython environments to do something as simple as an https request. Time to give Annex32 a shot. Any advice for use with the M5? LCD and buttons working?
PeterN
PeterN
cicciocb
PeterN
Charles
Charles
PeterN
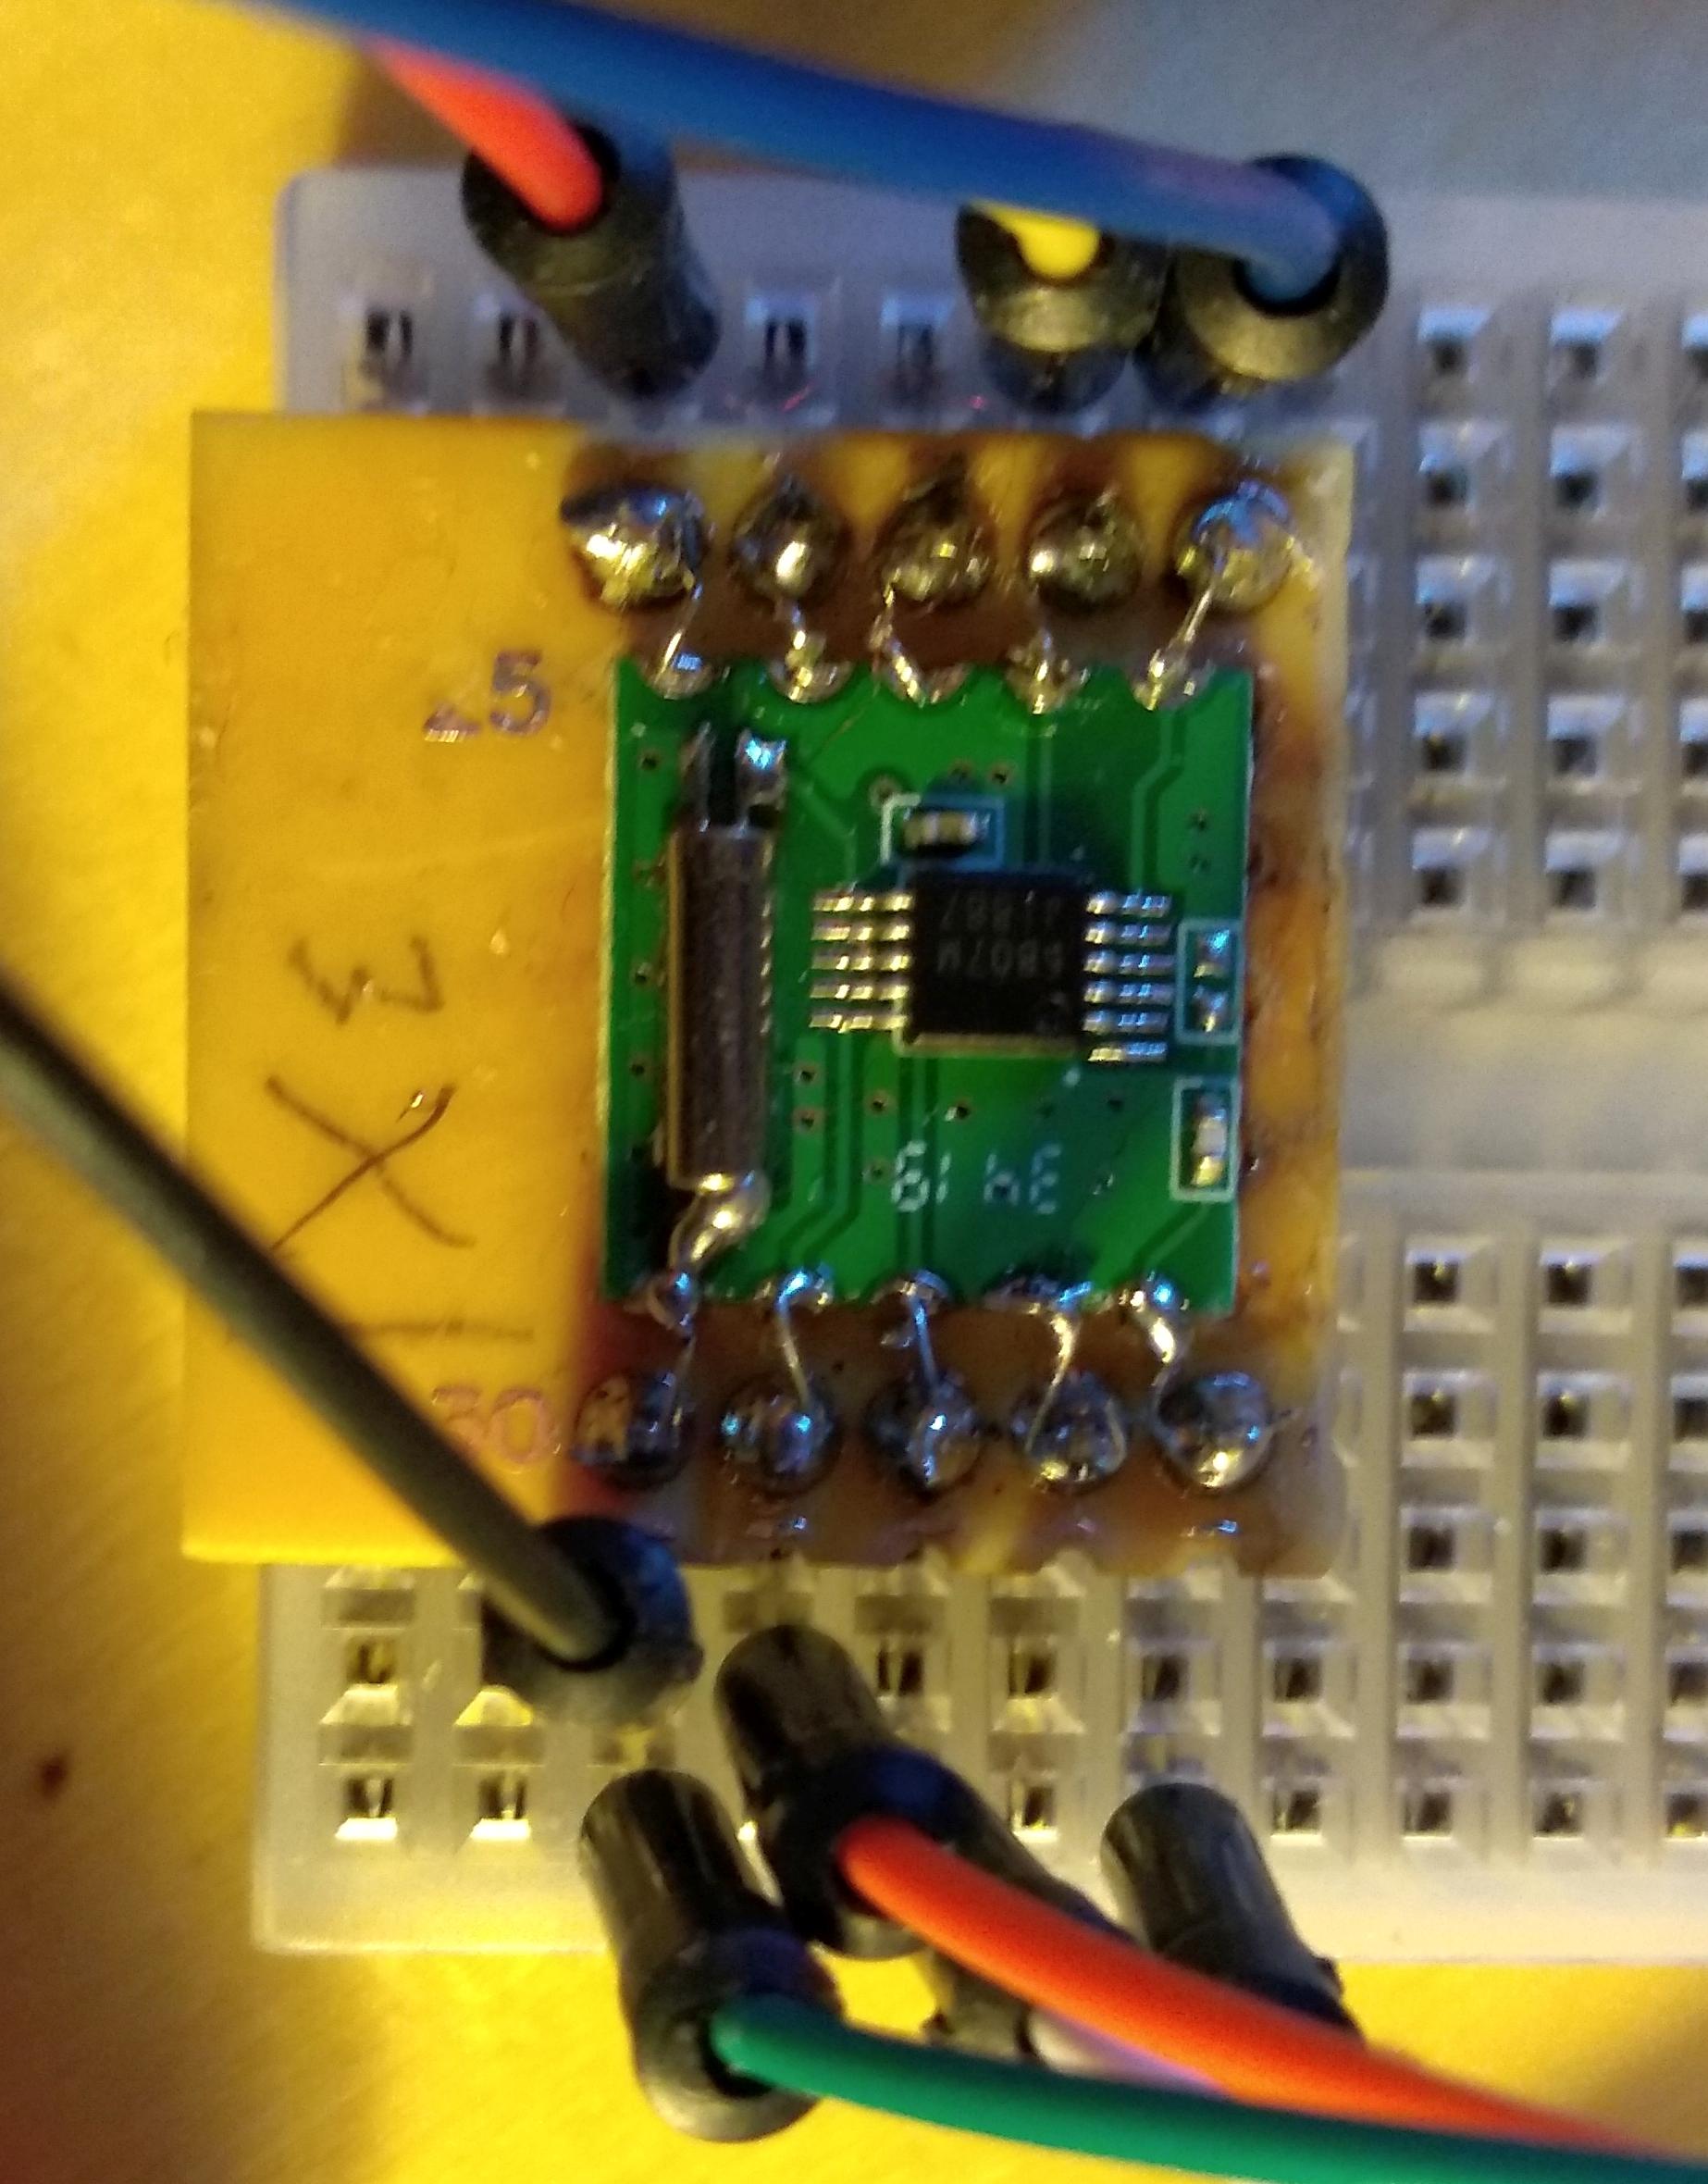
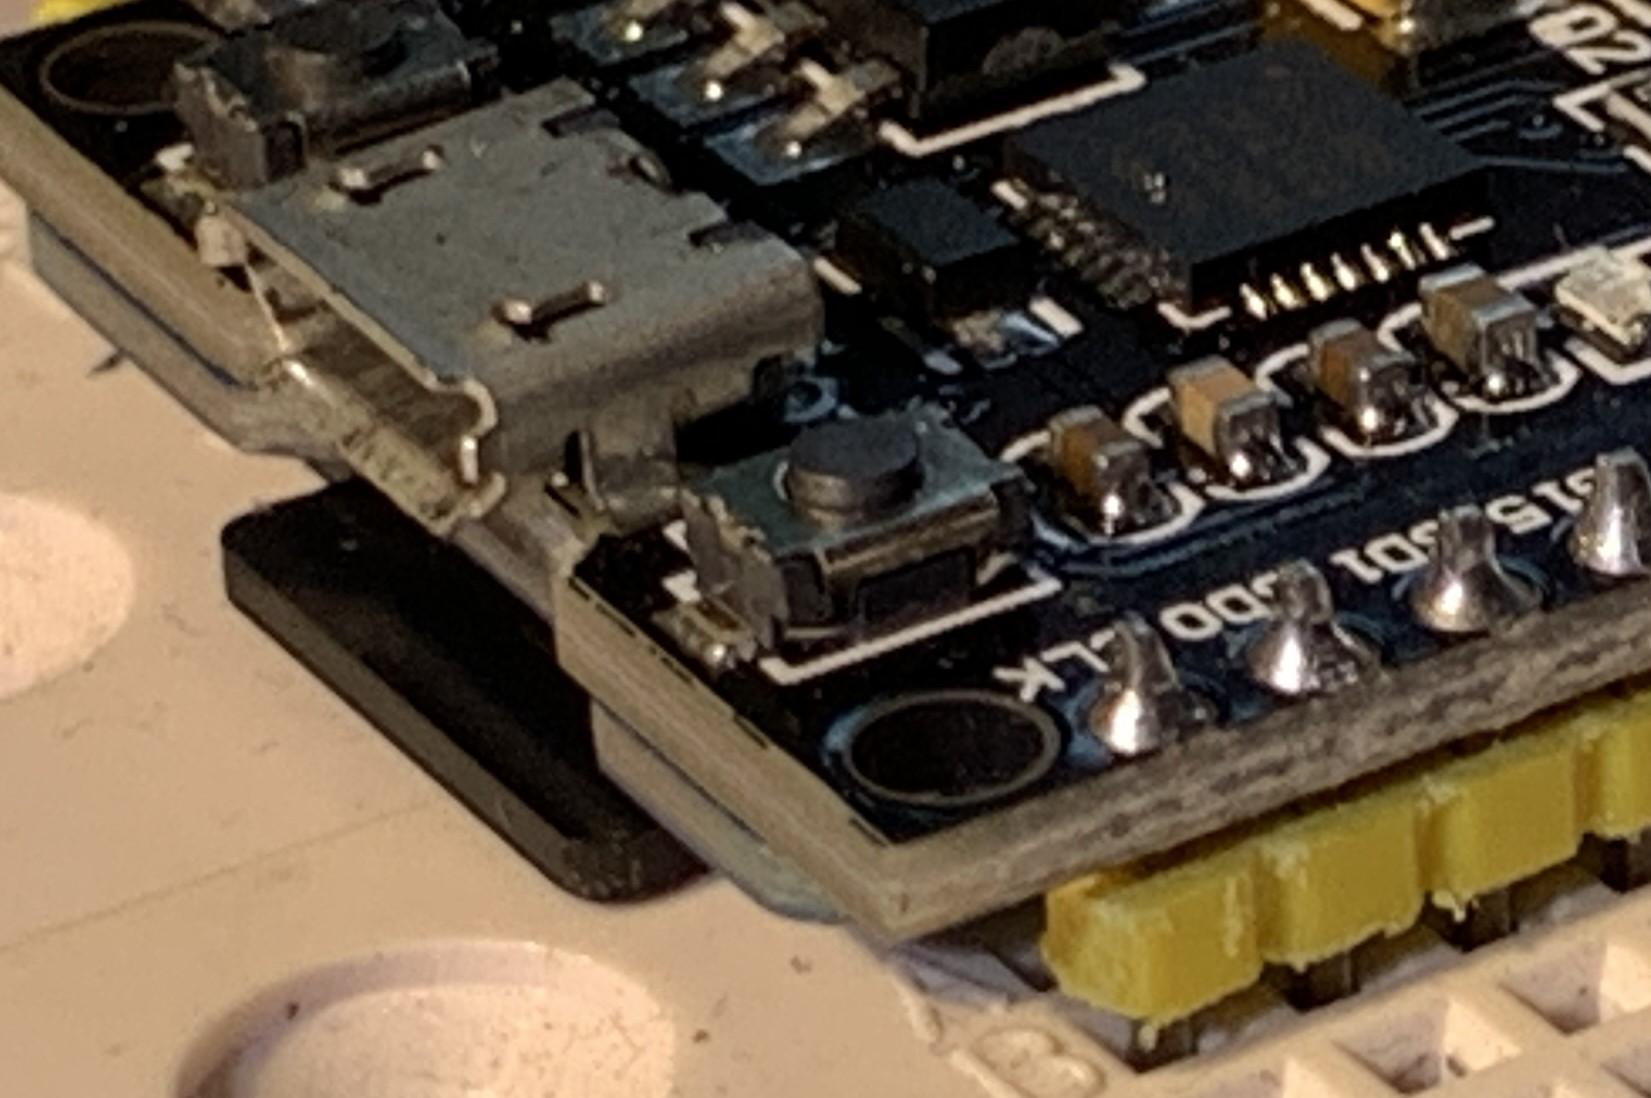
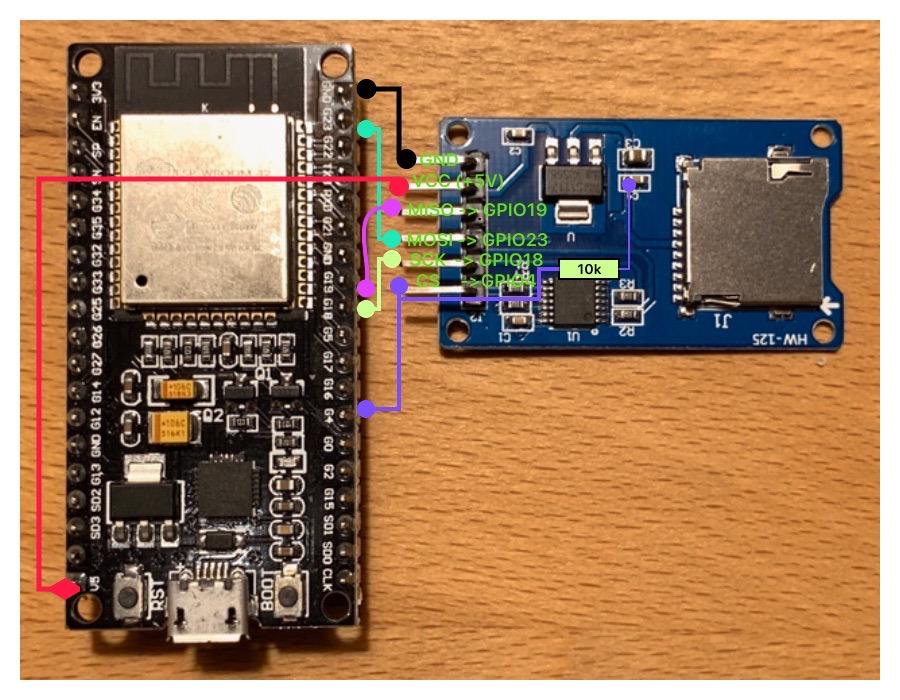
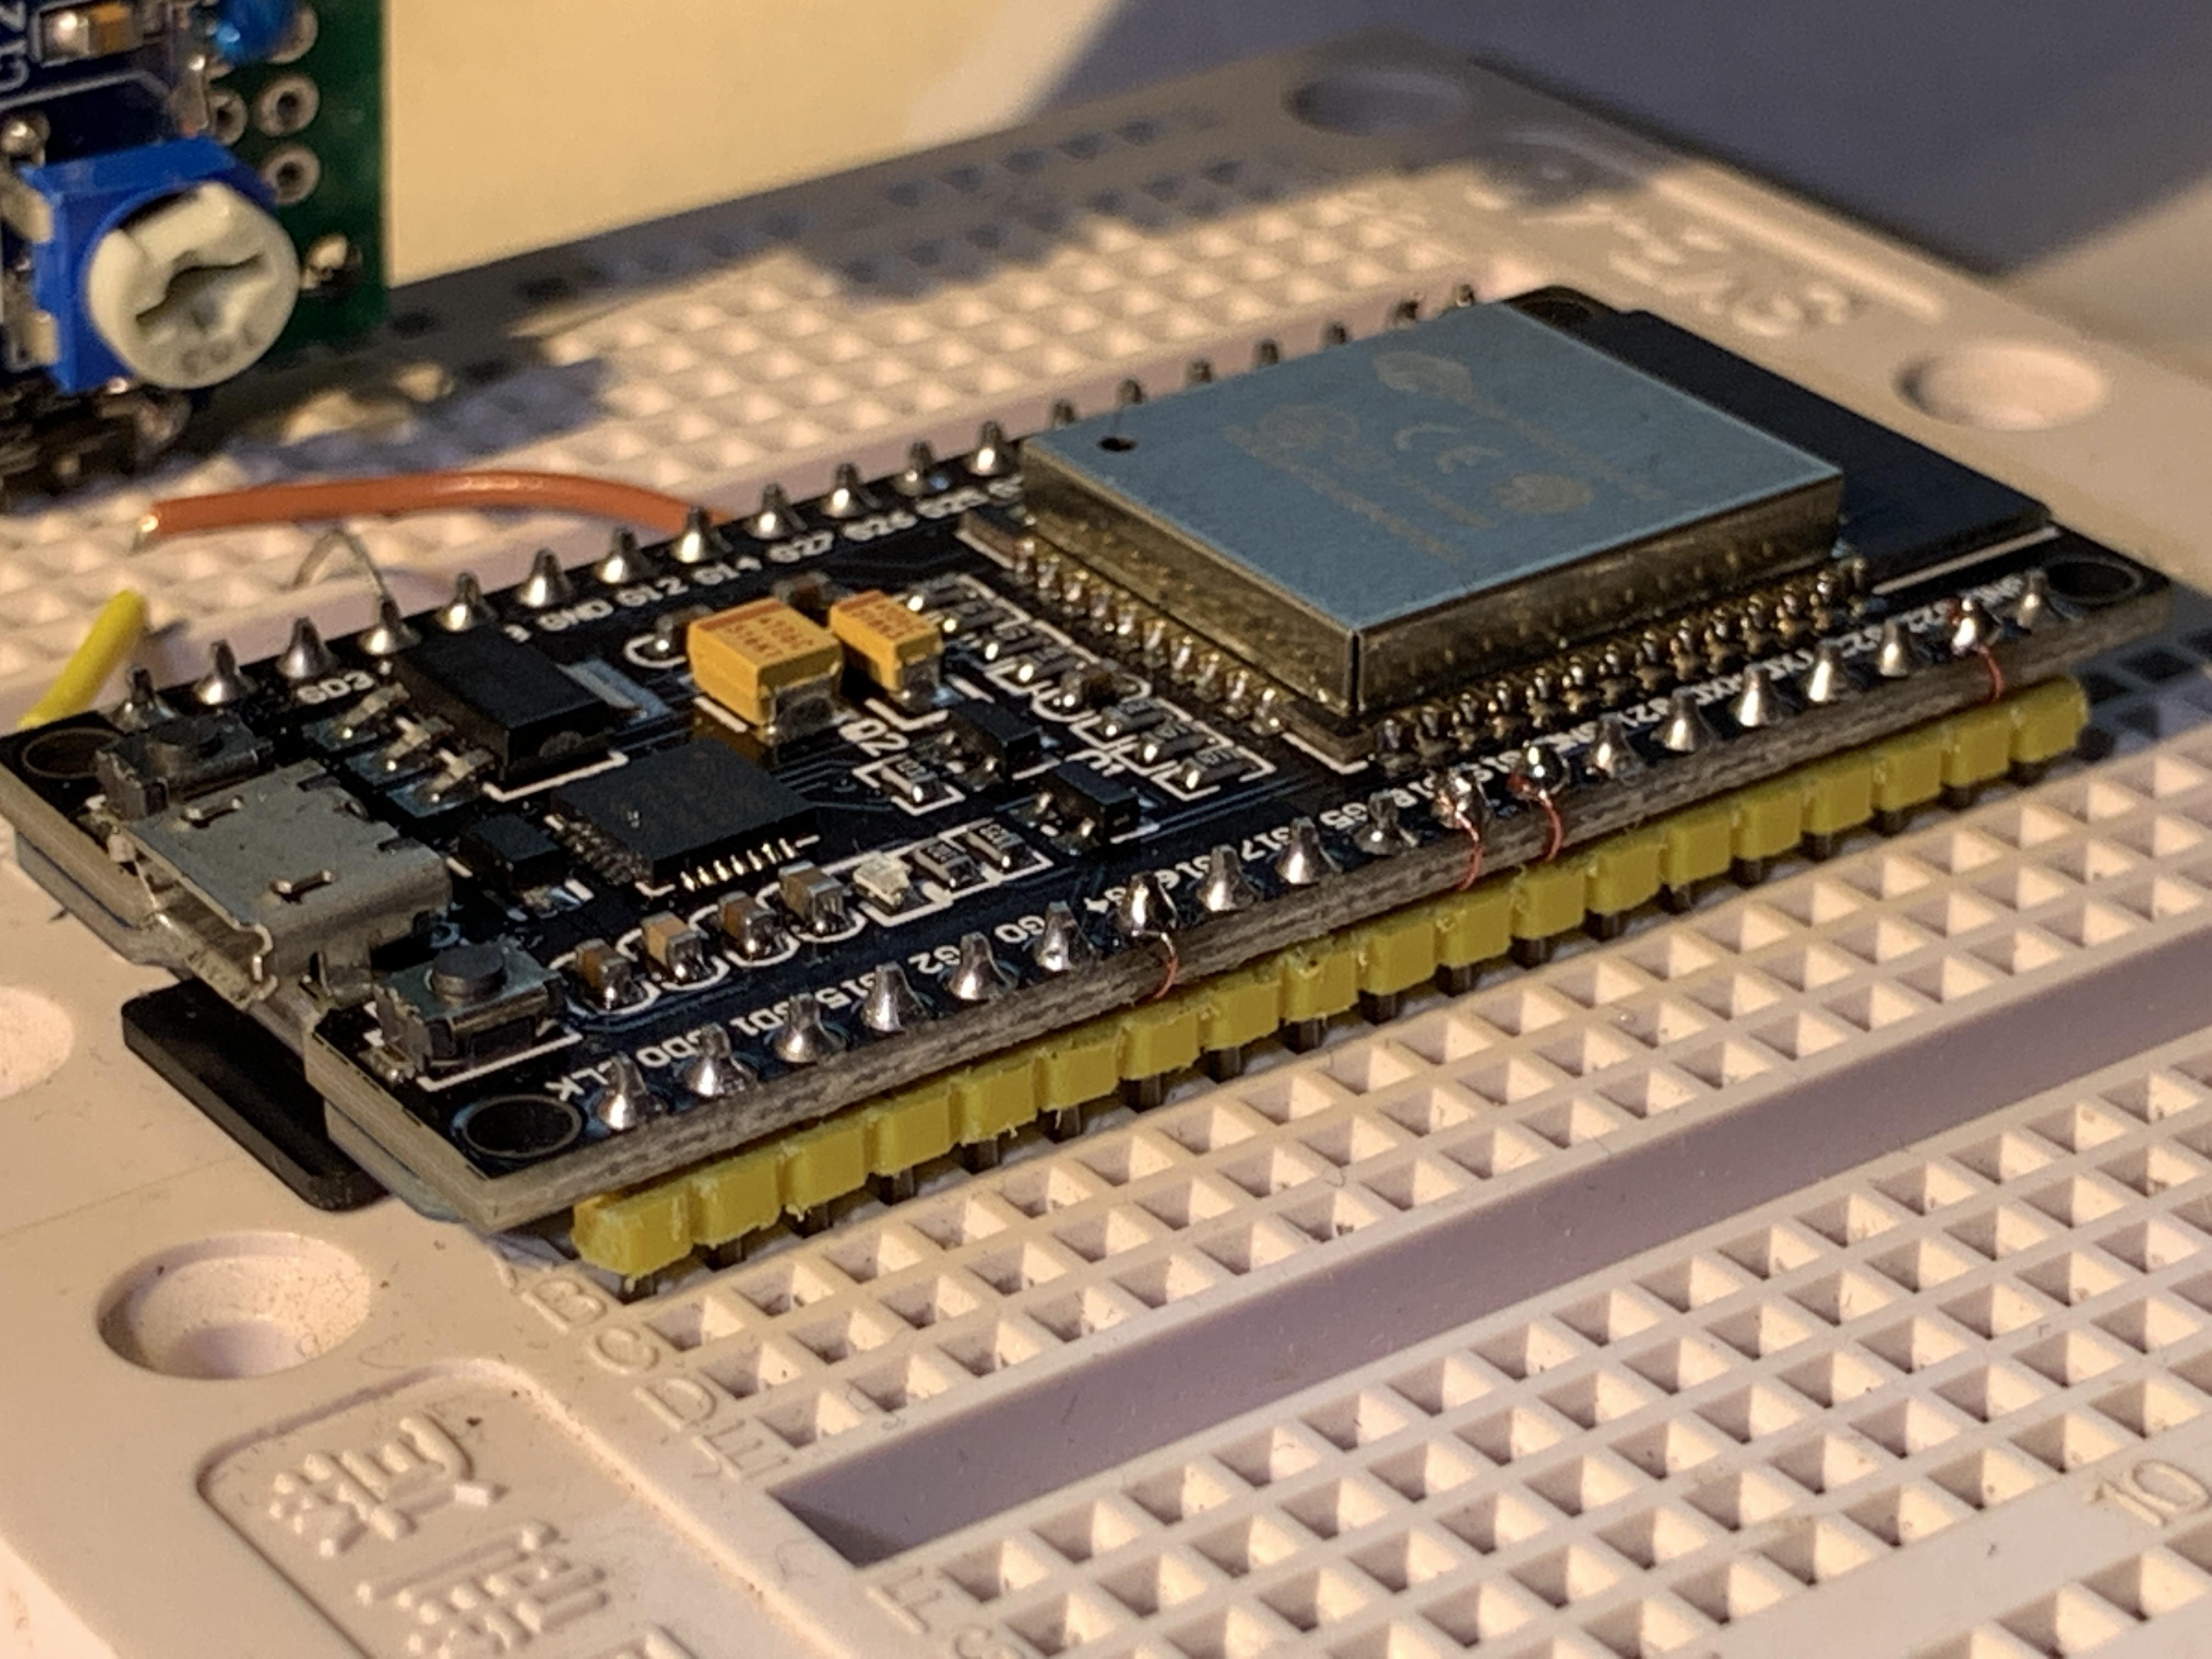
So I tried to integrate the MicroSD-board in the NodeMCU in a way that it needs no additional space on the breadboard. The PCB now sits unter the NodeMCU-board and the board pins still have very good contact to the breadboard.
I reduced the height of the yellow spacers with sandpaper (original board at the top).
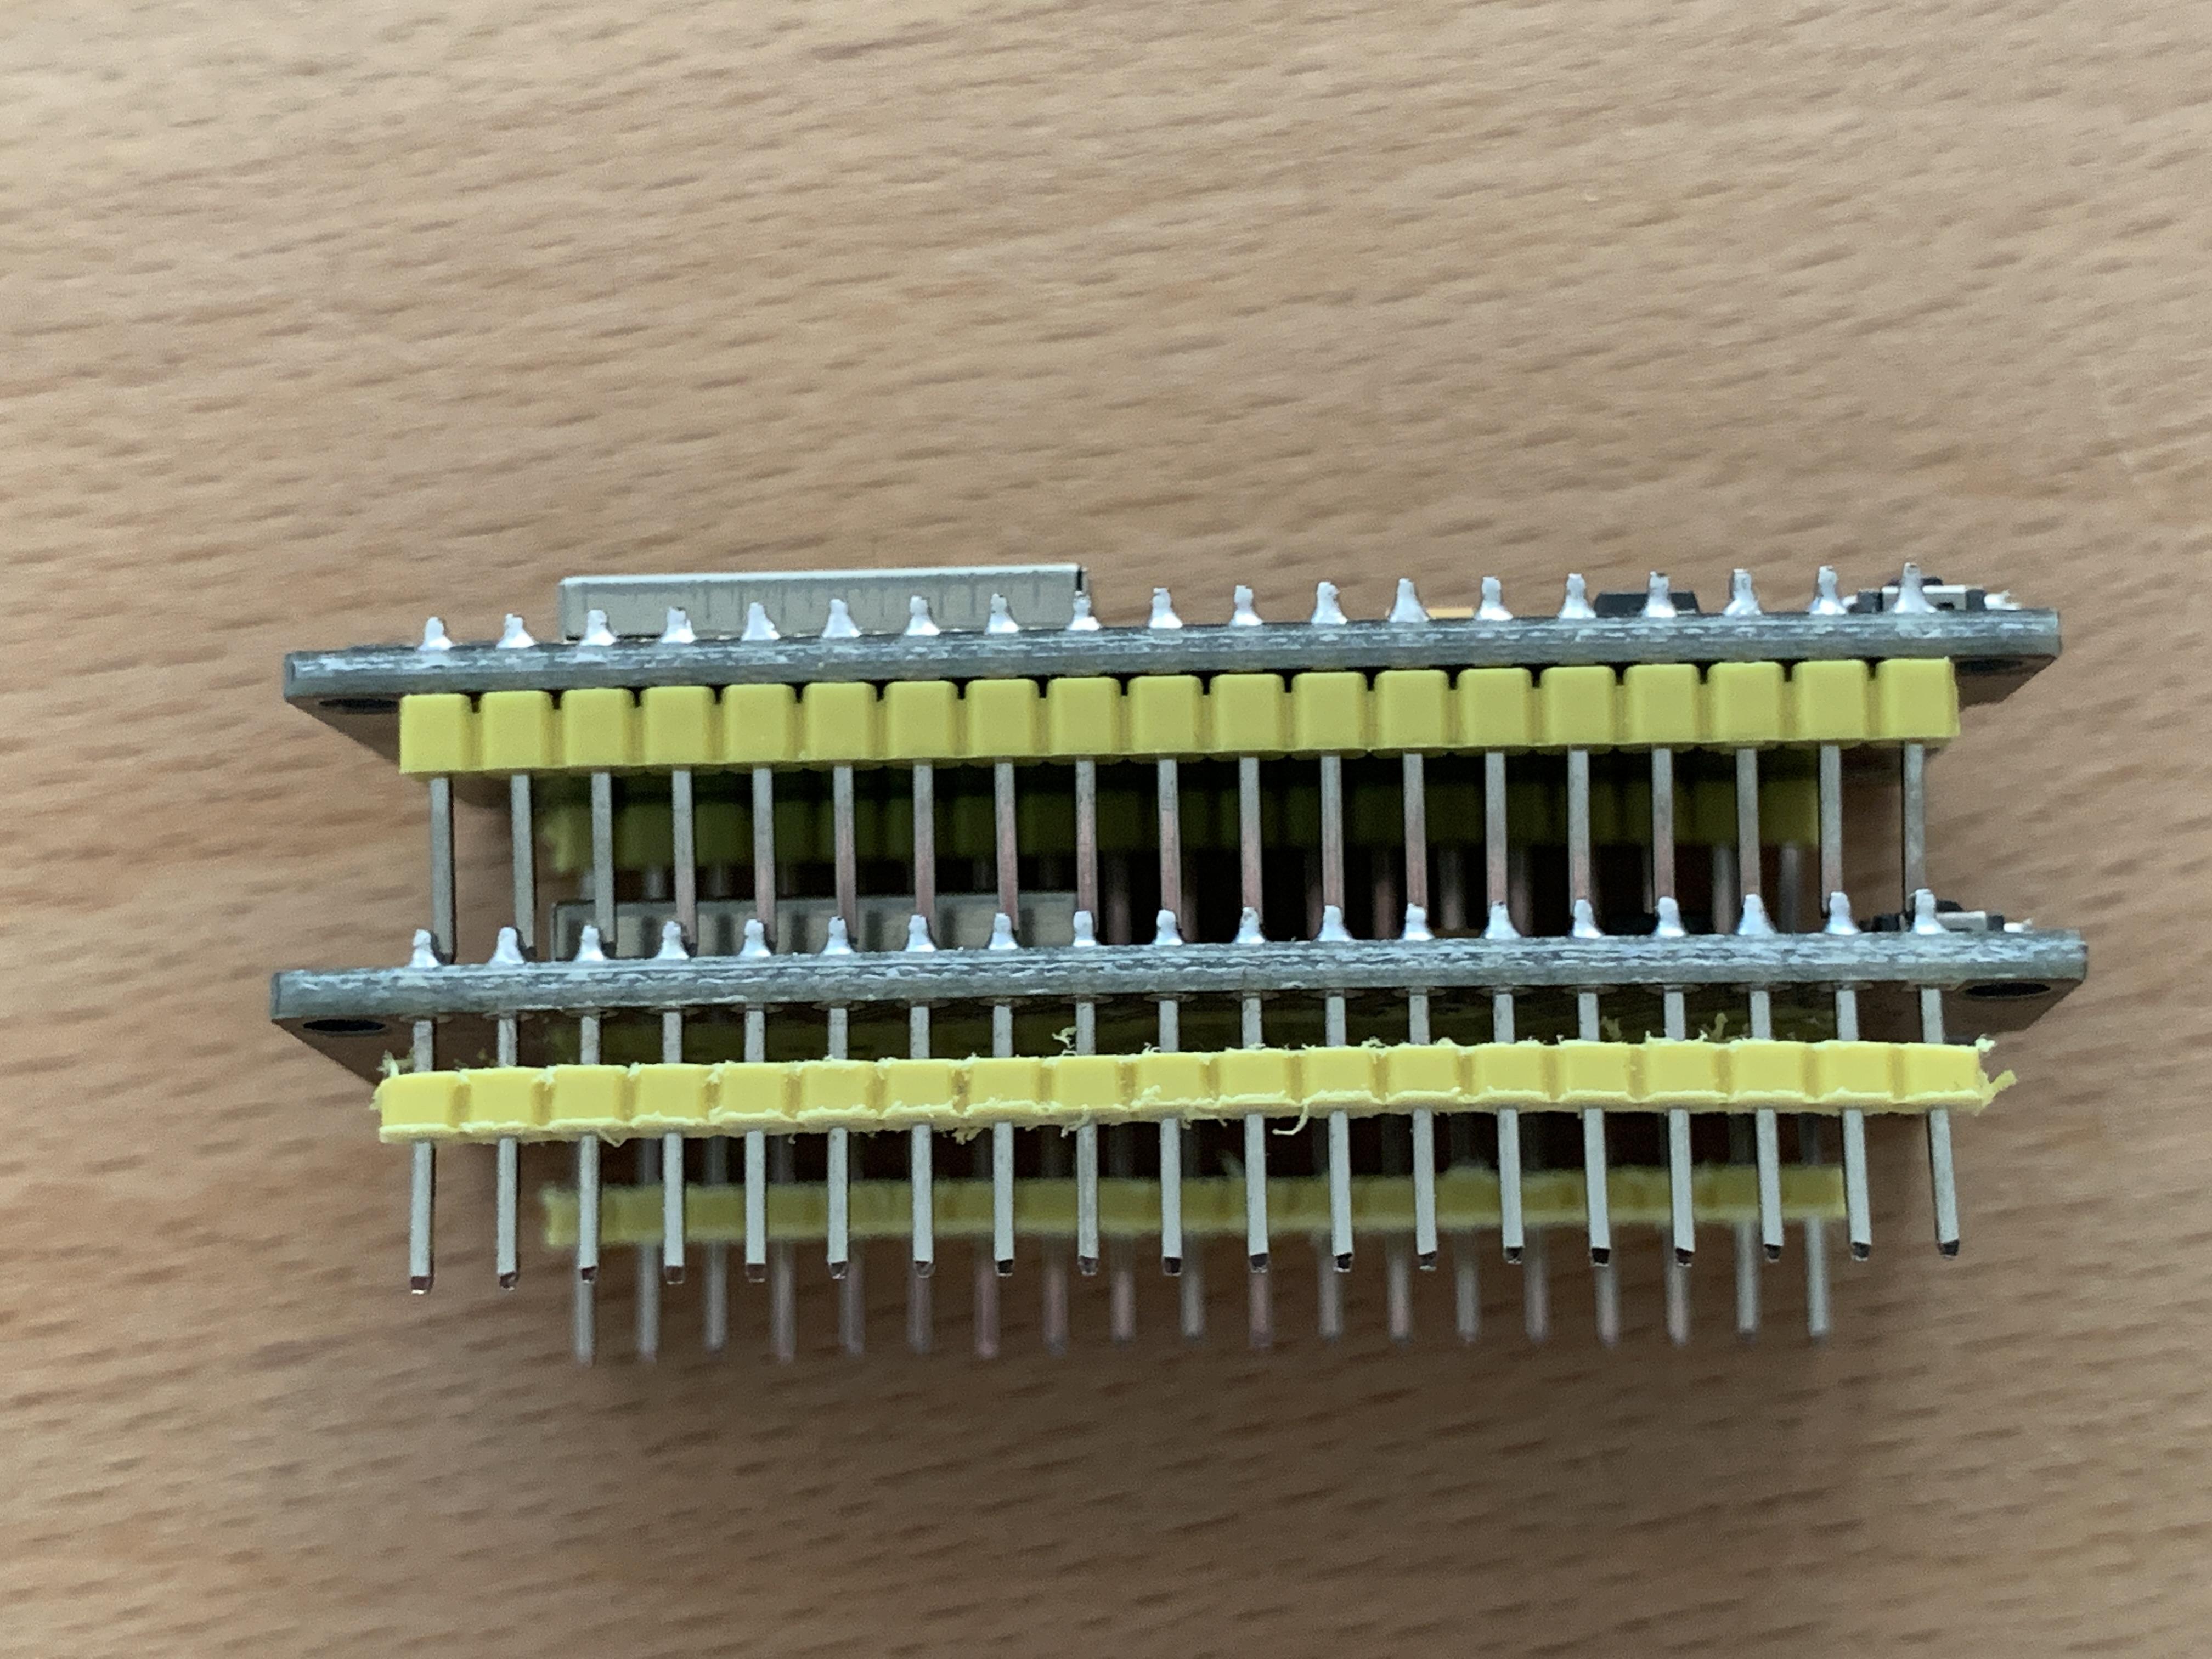
Made necessary distance for the Micro-SD board.
Replaced the Pins by vero-wires, added a 10k pullup-resistor on CS and
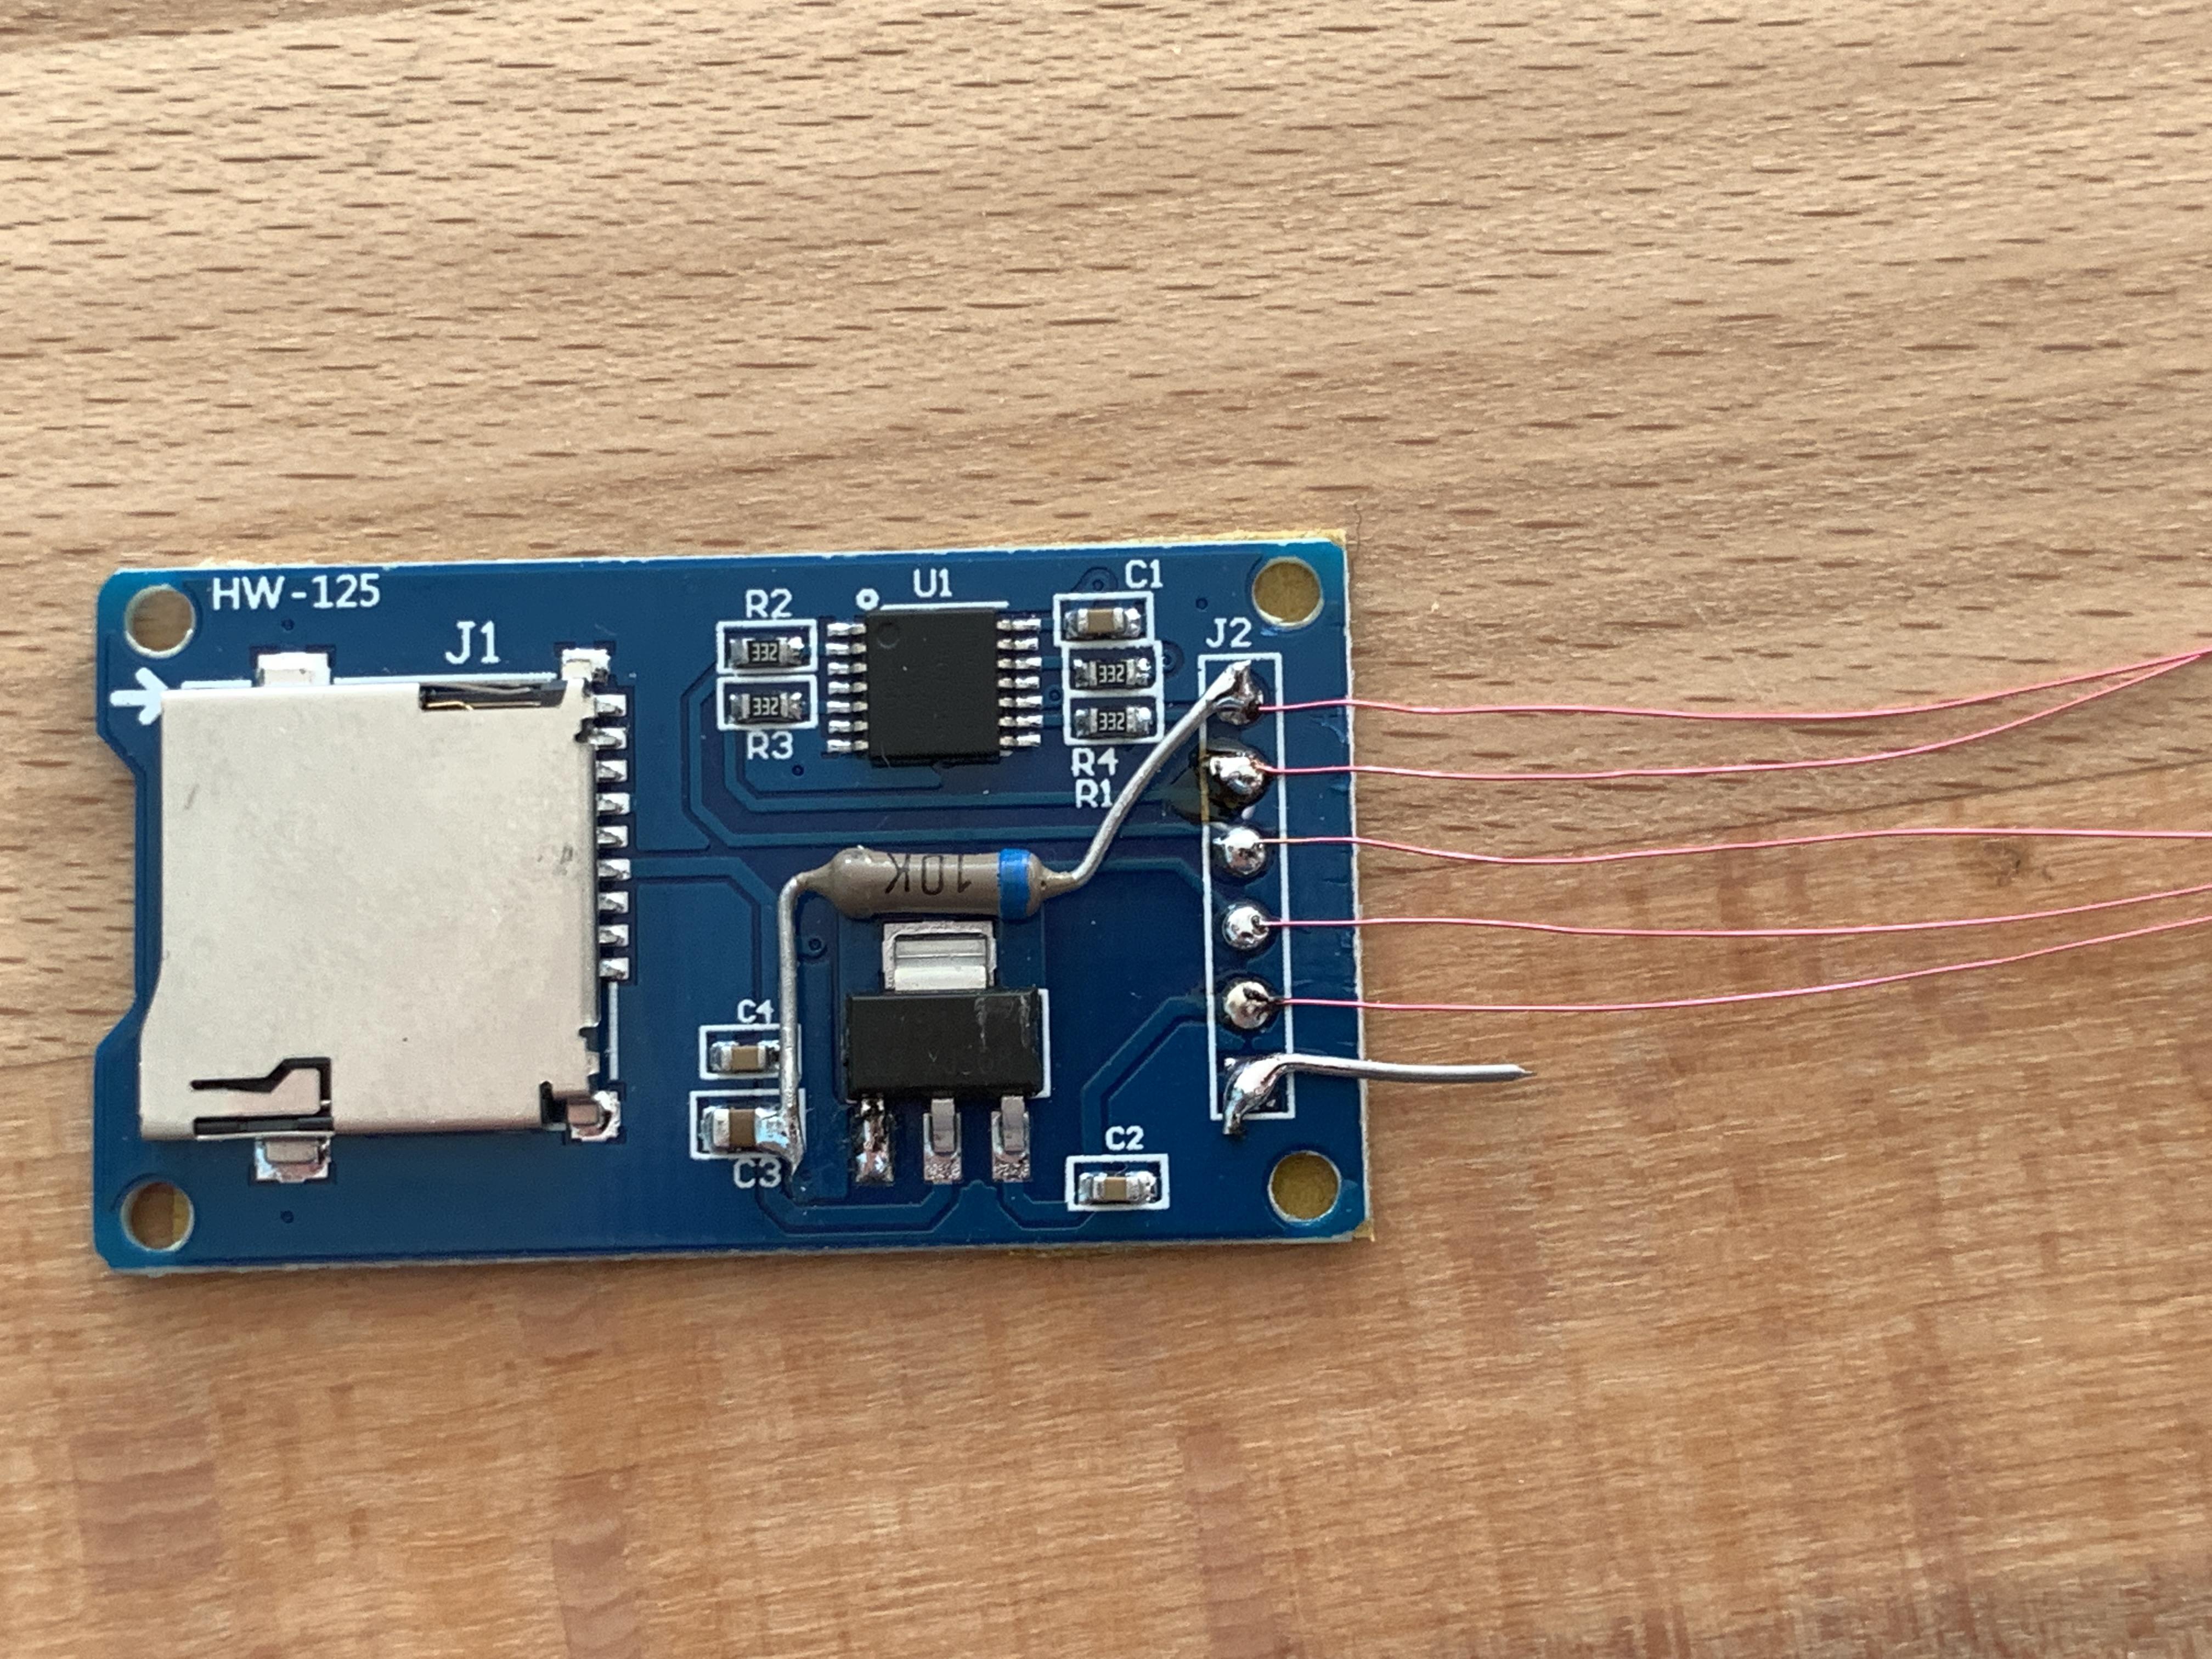
isolated the solder pads on the backside with double-sided adhesive tape
I placed the board under the spacers
and threaded the wires through the rows of pins to the upside where i soldered them to the top of the pins.
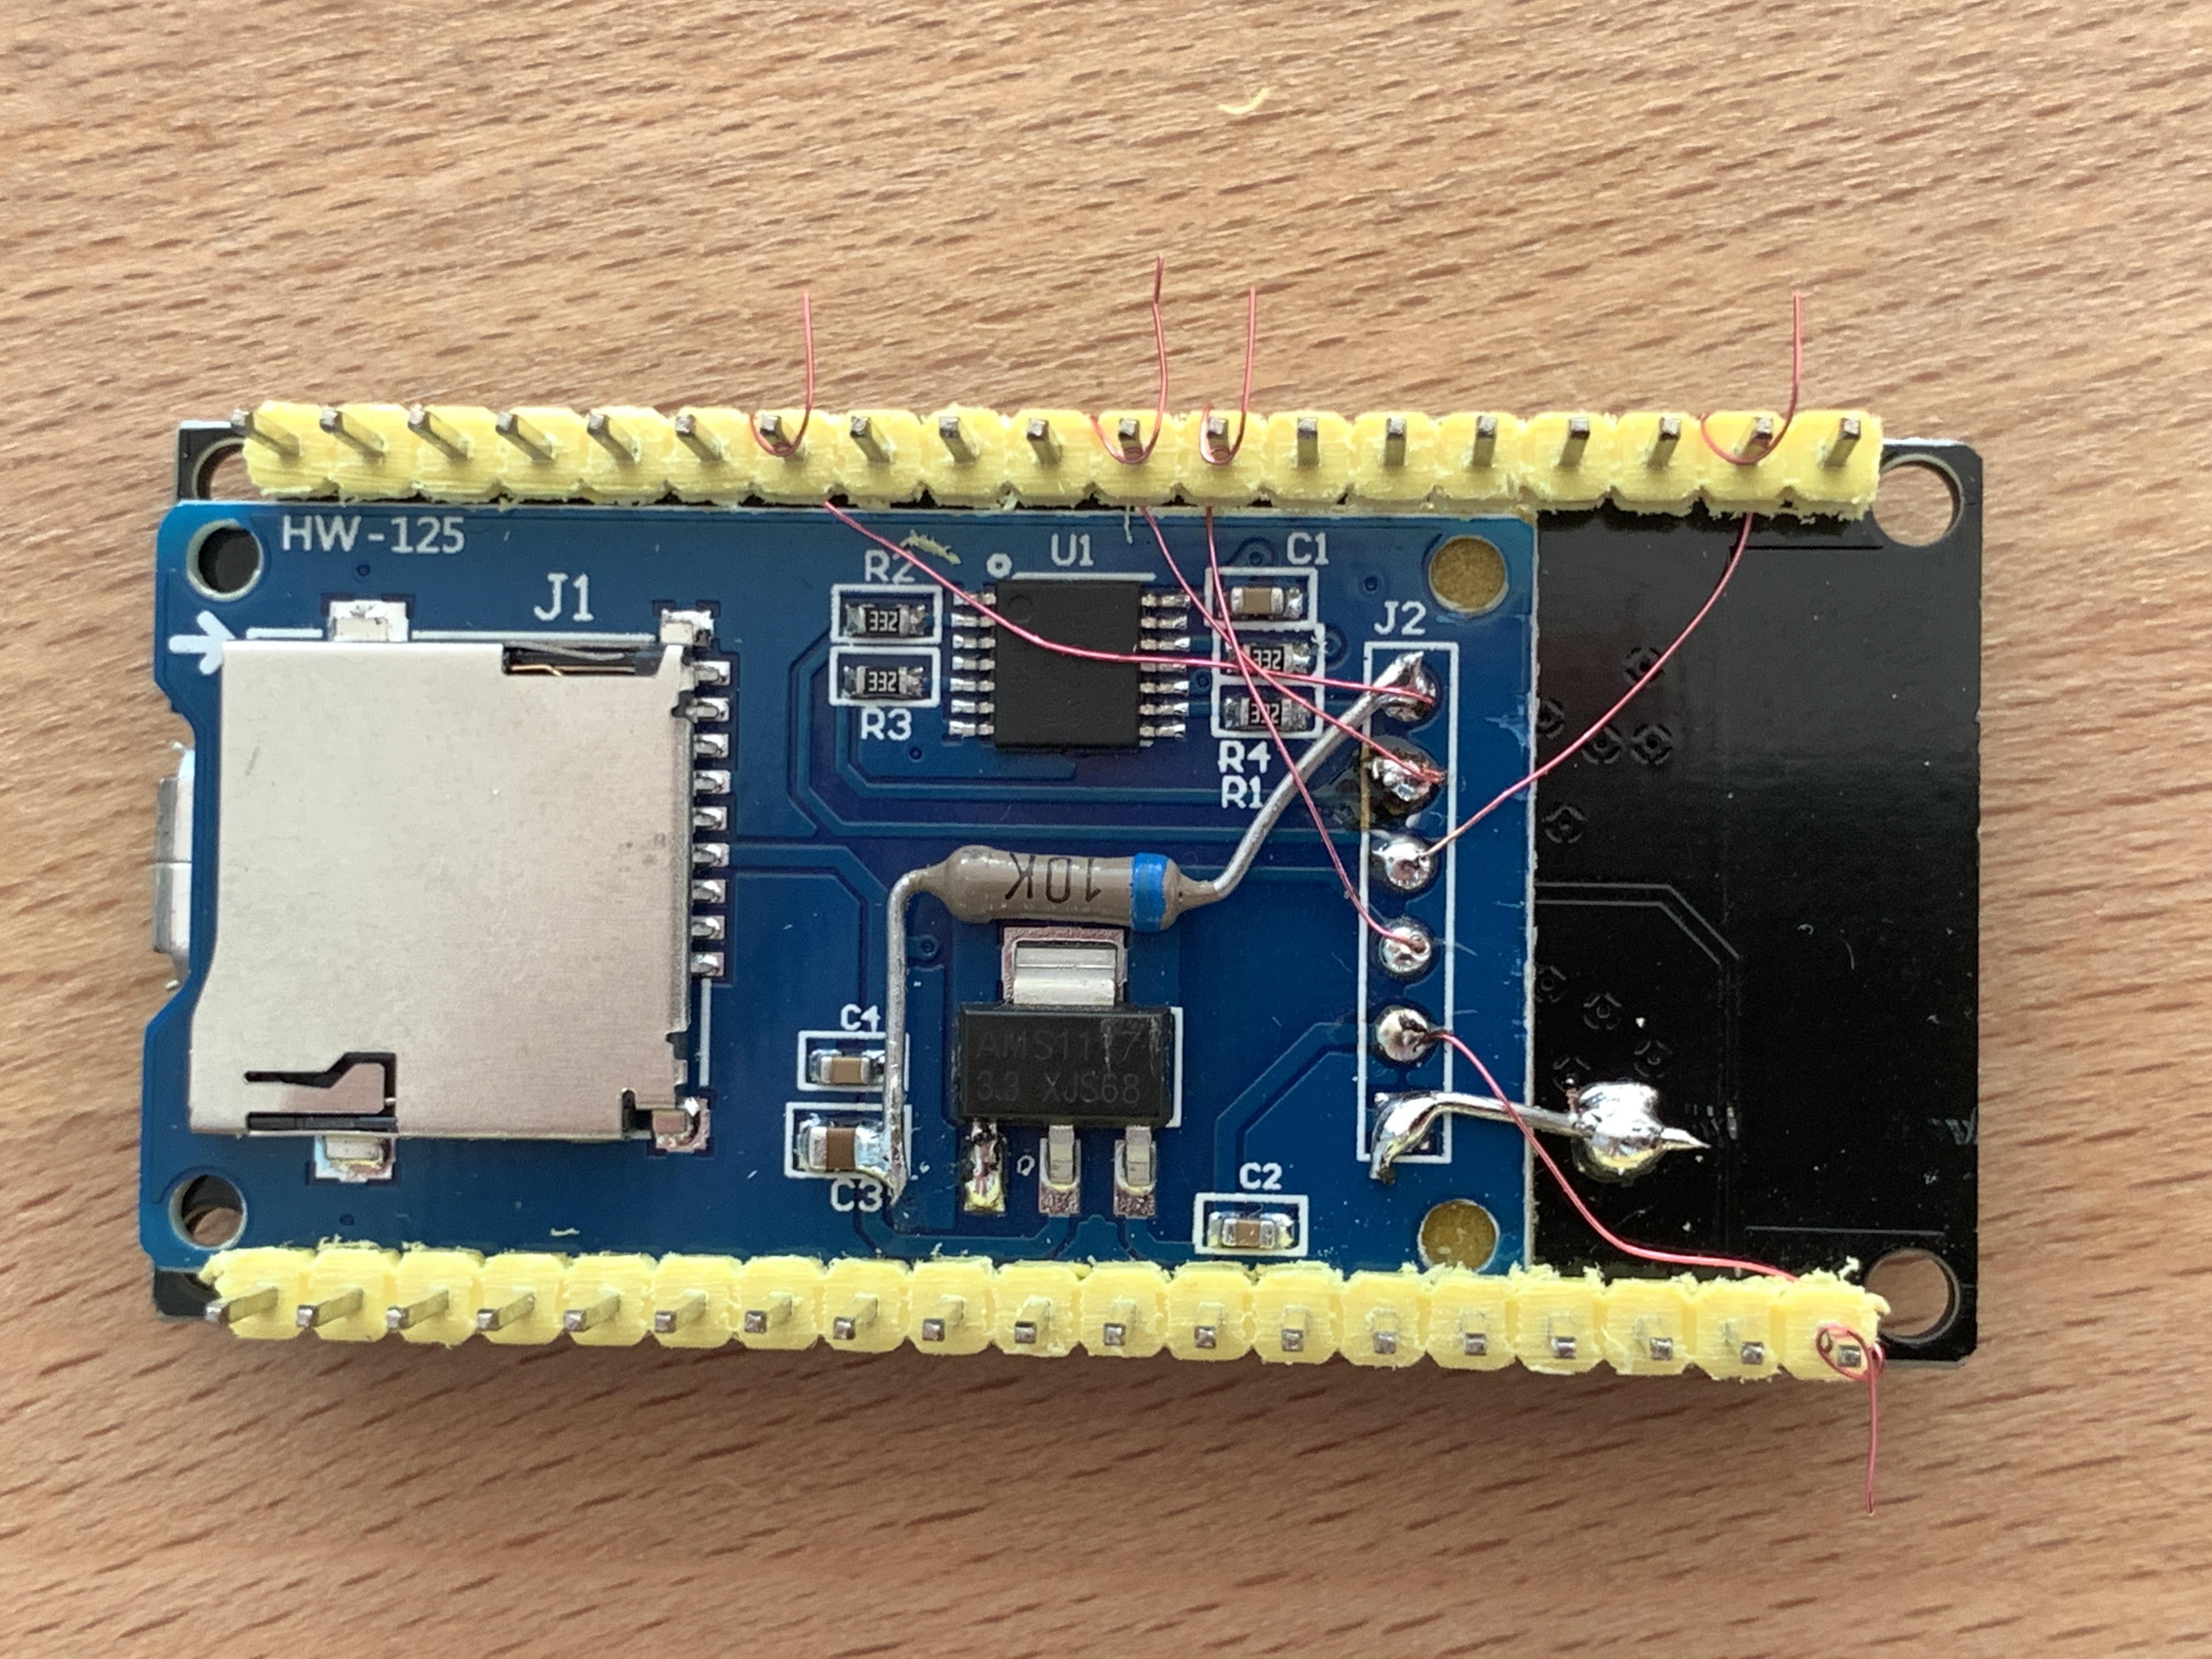
The MicroSD-Card sits now under the MicroUSB-connector.
The card can easily be changed.
The combination needs no additional space on the (test) board.

cicciocb
PeterN
cicciocb
On Sunday, 15 December 2019 19:00:58 UTC+1, PeterN wrote:
Thanks,but I made a wiring mistake with VCC of the MicroSD-Modul that is not 3V3 but 5V.
