Praise of Velo Routier
1,067 views
Skip to first unread message

Whatcha Oughtter
Jan 11, 2021, 1:50:17 AM1/11/21
to 650b
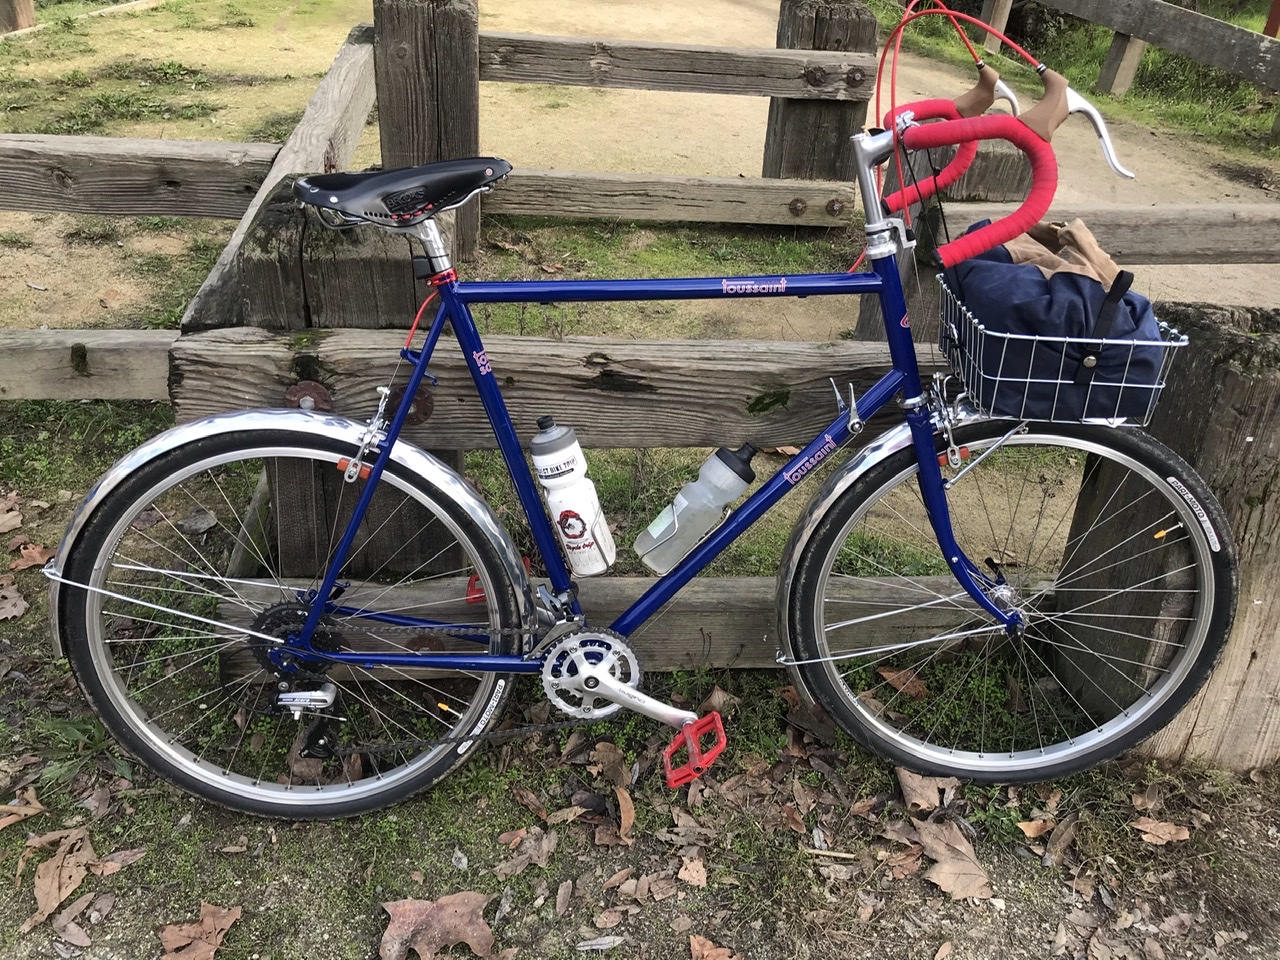
 I recently completed the assembly of a 60cm Velo Routier by Cycles Toussaint and I’m quite happy with how it rides. There’s no apparent drama with the low trail on this bike and the geometry is very stable, responsive, and good with weight in the basket.
I chose cheap components with the exception of a Nitto chrome moly stem (I set my handlebars high and the steel stem is stiffer than aluminum, making the quill 1” stem feel planted). I also went with the steel lugged Nitto seat post for more setback.
Other highlights are 32mm Alex rims with 42mm perimoto tires, dia compe down tube shifters on 2x8 gearing, non aero brake levers, basket on rack and bag instead of a box bag (cheap and flexible).
Fenders are 58mm Velo Orange wavy. They are too big and I squeezed them to fit at the brake bridge and it ruins the fender line. I’ll get 52mm wide fenders after I put some miles on these.
Front rack is a Rene Herse. I had to bend the rack together to about 5-10mm to fit the brake post mounts and the struts had to bend down a tad. No drama for either and it was a pretty easy install.
The bike passes the test of concept for me as a do-everything, all road, some trail, exploring, commuting and shopping steed, and, best of all, is a load of fun!
Oh, and cheap enough to lock up and not worry too much.
John Haynes from Felton, CA

Brett Callahan
Jan 12, 2021, 12:14:41 PM1/12/21
to 650b
I'm a big fan of these bikes and you've put together a lovely build that looks fun and practical.
What centerpulls are you using? Do you find they compare favorably with cantilevers? You might be able to re-radius the fenders by gently bending them along their whole length, not just at points where they're too wide for the frame. You'd have to take them off the frame to try it, but might save buying new fenders!
VO themselves have a helpful explainer, here: https://velo-orange.com/pages/re-radiusing-fenders I was successful in molding 700c fenders to a pretty good fender line on 650b tires with a lot of patience and trial and error.
Enjoy the new bike!
Cheers,
Brett in PDX
Whatcha Oughtter
Jan 13, 2021, 10:07:46 AM1/13/21
to 650b
I’m using dia compe brakes. They feel about like cantilever brakes but we’re easier to set up. I think my favorite is mini v brakes, tho.
The metal fenders have been a good exercise in metal forming. I read the velo-orange article and it definitely helped. When you squeeze the fender to make them fit at the fork or under the brakes it opens up the radius which you have to bring back down to the wheel by widening on either side of the fork. There’s only so far you can go, it seems, before the aluminum wants to crease. Once it creases, the metal is stretched and you can’t get a clean curve back. I ended up going too slow over a railroad tie and came down on my front fender after my original post so my fenders wouldn’t have been pristine anymore even if I they started out perfect! I was able to message everything back in order but I’m glad the wavy pattern hides the imperfections!

pcb....@gmail.com
Jan 13, 2021, 3:24:51 PM1/13/21
to 650b
The trick to narrow metal fenders at stays/blades without changing the radius is to "form" (= "dent") them for clearance. The fancy guys who know what they're doing have radiused wood blocks and stuff to do this artfully. I have chunks of cut-off seatposts, steerer tubes and other chunks of round-profile metal, and a mallet. I mark the spot, rest the fender edge on one open side of my bench vise, which has a plastic jaw cover installed to cushion the blow, and...take out any aggressions I might have. Little love taps go a long way, usually not a lot of wailing needed.
Sometimes that needs to be done both on the sides and top, especially at the seatstay bridge, to get the fender high enough over the tire, while also getting the necessary side clearance. Forming the sides can/does cut down on side clearance for the tire, but not more than just squeezing the fender would. I usually gently pound the rounded/rolled bottom edge flatter where the fender is formed, which can get you an extra mm or so per side.
Another method is to potato-chip section the fender, basically cut out circular sections from the side. The advantage is it doesn't limit side tire clearance at all, and it's also a little easier to control. You have more control over cutting than Hulk Smash With Mallet. Better control of forming comes from using the radiused wood blocks. But potato-chipping isn't reversible, and you are also potentially weakening the fender somewhat, depending on the size of the removed potato chips. A dent can always be pounded back out. Not necessarily pretty, but possible.
I generally have a couple pair of old, battered, pounded & chopped metal fenders around that are sometimes used as first-try installs. Once I get the holes drilled and dents properly placed, I'll live with them for a little bit, then use them as a guide for installing a clean set.
I think I have a couple of photos from a chainstay chipper job I did on my Weigle. That removed enough metal that I'll probably add a reinforcement tang at the bridge. This particular Weigle is an '81, and wasn't designed with easy fender installation in mind, so Things Had To Be Done. Just denting the fender sides at the chainstay really limited tire width. You can see some scratching on the left chainstay from the first installation, when I just dented the sides, and didn't put any protective tape underneath. Protective tape underneath is a good idea.
And you definitely want to smash down the rolled edge at the cuts, and file off any rough edges so there's no chance of finger-cutting.
I could have (should have?) radiused the cuts a little tighter, so the top/bottom edges were closer to the stay tops/bottoms. But it was the first time I tried this, and I ain't Peter Weigle. That extra space does leave some room for water to splash outside a little bit, and doesn't look as elegant as, well, as if Weigle-sensei did it himself.
FWIW, one of my New Year's Resolutions was to stop worrying about perfect fender lines. In my shop, "close" counts for horseshoes, grenades _and_ fender line.

Paul Brodek
Hillsdale, NJ USA

Nick Merrell
Jan 14, 2021, 12:06:07 PM1/14/21
to 650b
There's some good info in this thread. Glad to see the Velo Routier get some more exposure. I am thinking of ordering one but am not sure if the 57 with a longer stem and lower bars or if a 60 set up like yours would be better.

somervillebikes
Jan 15, 2021, 8:35:34 AM1/15/21
to 650b
Paul,
Those are some of the nicest radiused fender cuts I've seen. Another advantage over forming (denting) is that if done right (as it looks like you've done) it doesn't rub against the paint.
Anton
pcb....@gmail.com
Jan 17, 2021, 1:19:47 AM1/17/21
to 650b
Thanks, Anton----that means a lot coming from you! I wish at the time I had the confidence and patience to start them with a smaller radius, so they'd hug the stays a little closer. But fenders are such a love-hate thing for me, I avoid them for as long as possible, then they kinda consume me.
I do have to remember to install one of your fender reinforcement plates at the chainstay bridge next time I have the bike in the stand, rear wheel out, and some patience...
Paul Brodek
Hillsdale, NJ USA
Hillsdale, NJ USA

E Lee
Jan 17, 2021, 10:33:20 AM1/17/21
to 650b
Glad to see some feedback. Their wheelset is very tempting, but an unanswered email has postponed the purchase.
Whatcha Oughtter
Jan 20, 2021, 2:01:21 PM1/20/21
to 650b
Thank you Paul for the fender info and inspiration! I wacked my fender a couple more times on curbs and ruts (bad technique- going to have to stop doing that) so I decided to take off the fender to bend it back to a starting baseline. After that I made a plug so that I could hammer dents for fork and brake clearance. The plug is made from a chunk of wood from the woodpile- I used a hatchet and knife to match the inside curve of the fender and then carved away the dent shapes. I zip-tied the fender to the plug so that the fender would retain the correct curve when I hammered the dents. The zip ties cause the hammering to stretch the metal at the dents instead of just closing the radius of the fender-line. The dents turned out pretty good for how rough I was with the plug and hammering and the installation was much easier with the fender-line falling naturally into place with very minimal squeezing or widening the fender to pull the fender-line fair. 


Reply all
Reply to author
Forward
0 new messages