Building a Prusa i3 now....

TheMakerGuy

James Armstrong
TheMakerGuy
TheMakerGuy
Mark Cohen
--
You received this message because you are subscribed to the Google Groups "3D Printer Tips, Tricks and Reviews" group.
To post to this group, send email to 3dprintertips...@googlegroups.com.

JohnA.
Mark Cohen
--
Mark Cohen
TheMakerGuy
JohnA.
JohnA.
On Monday, May 20, 2013 4:40:47 PM UTC-4, TheMakerGuy wrote:
Mark Cohen

Joseph Chiu
Just an idea to open your market... Amtrak station to station shipping is not terribly expensive, and the bot will not get tossed around much if you are going on a single route with continuous service.
To post to this group, send email to 3dprintertips...@googlegroups.com.
Mark Cohen
JohnA.
Mark Cohen
Mark Cohen
JohnA.
JohnA.
JohnA.
JohnA.
James Armstrong
Mark Cohen
Jetguy will be getting the frame and heaterboard
Ya'll are making me want to build one now. Love my ToM. Have mixed feeling on my Rostock but will keep playing with it. I can help jetguy with yours if you decide to ship it to him.
--
You received this message because you are subscribed to the Google Groups "3D Printer Tips, Tricks and Reviews" group.
To unsubscribe from this group and stop receiving emails from it, send an email to 3dprintertipstricks...@googlegroups.com.
JohnA.
On Tuesday, May 28, 2013 8:32:49 PM UTC-4, TheMakerGuy wrote:
So some parts came today.
Does anyone know how I can make the aluminum shiney? Should I tap the holes or just drill if needed and put the bolts through?
Thanks
On May 26, 2013 8:19 PM, "Mark Cohen" <markc...@gmail.com> wrote:
Jetguy will be getting the frame and heaterboard
On May 26, 2013 7:45 PM, "James Armstrong" <armstro...@gmail.com> wrote:
Ya'll are making me want to build one now. Love my ToM. Have mixed feeling on my Rostock but will keep playing with it. I can help jetguy with yours if you decide to ship it to him.
--
You received this message because you are subscribed to the Google Groups "3D Printer Tips, Tricks and Reviews" group.
To unsubscribe from this group and stop receiving emails from it, send an email to 3dprintertipstricksreviews+unsub...@googlegroups.com.
Mark Cohen
I think I am going to drill through and just buff the al a bit.
To unsubscribe from this group and stop receiving emails from it, send an email to 3dprintertipstricks...@googlegroups.com.
JohnA.
JohnA.
On Wednesday, May 29, 2013 10:23:16 AM UTC-4, TheMakerGuy wrote:
I think I am going to drill through and just buff the al a bit.
On May 28, 2013 9:29 PM, "JohnA." <john....@gmail.com> wrote:
Polishing aluminum is easiest with a benchtop grinding wheel and progressively finer polishes - it's pretty easy on a big flat item like this, but when the edge catches it's a little dangerous.My holes are tapped for m3 and if you use m3x10 bolts, they are completely flush when screwed in - nothing sticks through the frame. I've seen others just bolted with nuts on the back.My HBP and pulleys showed up today - but I'm still waiting on belts / PSU / hot end / glass.JohnA.
On Tuesday, May 28, 2013 8:32:49 PM UTC-4, TheMakerGuy wrote:
So some parts came today.
Does anyone know how I can make the aluminum shiney? Should I tap the holes or just drill if needed and put the bolts through?
Thanks
On May 26, 2013 8:19 PM, "Mark Cohen" <markc...@gmail.com> wrote:
Jetguy will be getting the frame and heaterboard
On May 26, 2013 7:45 PM, "James Armstrong" <armstro...@gmail.com> wrote:
Ya'll are making me want to build one now. Love my ToM. Have mixed feeling on my Rostock but will keep playing with it. I can help jetguy with yours if you decide to ship it to him.
--
You received this message because you are subscribed to the Google Groups "3D Printer Tips, Tricks and Reviews" group.
To unsubscribe from this group and stop receiving emails from it, send an email to 3dprintertipstricksreviews+unsubsc...@googlegroups.com.
To post to this group, send email to 3dprintertips...@googlegroups.com.
James Armstrong
On Tuesday, May 28, 2013 8:32:49 PM UTC-4, TheMakerGuy wrote:
Mark Cohen
Ebay
Search for prusa i3
There sb only one US source
--
JohnA.
On Wednesday, May 29, 2013 3:31:14 PM UTC-4, TheMakerGuy wrote:
Ebay
Search for prusa i3
There sb only one US source
On May 29, 2013 3:28 PM, "James Armstrong" <armstro...@gmail.com> wrote:
What source did you use for the kit? I was trying to get the minimum parts such as aluminum and beams since I have a lot of the other parts.--
On Tuesday, May 28, 2013 8:32:49 PM UTC-4, TheMakerGuy wrote:So some parts came today.
Does anyone know how I can make the aluminum shiney? Should I tap the holes or just drill if needed and put the bolts through?
Thanks
You received this message because you are subscribed to the Google Groups "3D Printer Tips, Tricks and Reviews" group.
To unsubscribe from this group and stop receiving emails from it, send an email to 3dprintertipstricksreviews+unsub...@googlegroups.com.
JohnA.
http://i.imgur.com/TbzR4qS.jpg
Shopping list so far:
- Prusa i3 frame
- smooth rods / threaded rods
- Printed parts (PLA for everything except extruder) - self-printed
- Rambo / steppers / nuts / bolts / bearings: Ultimachine
- Glass / PSU / Belts / fan: Lulzbot
- HBP / Pulleys / J-Head: eBay
- Thermistors: Amazon
JohnA.
Mark Cohen
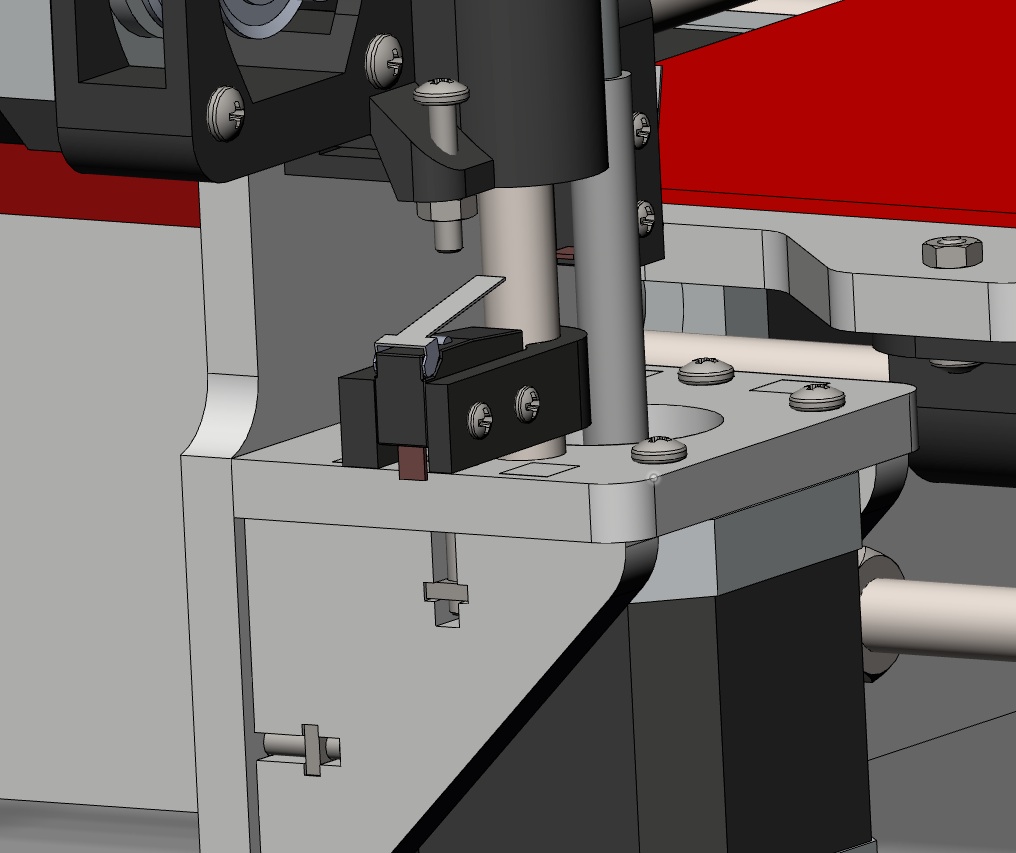
Is the extruder piece upside down?
I am going to drill through my metal as the m3 holes currently can accept an m3 bolt so that means they are to large to tap m3
To unsubscribe from this group and stop receiving emails from it, send an email to 3dprintertipstricks...@googlegroups.com.

Jetguy
Mark Cohen
No braces
I think the y boltd on with a nut on each side
The wood ones have the brace
To unsubscribe from this group and stop receiving emails from it, send an email to 3dprintertipstricks...@googlegroups.com.
JohnA.
Jetguy: I don't have the 'improved' frame with the big 'wings' - which I kind of wish I did have. My Z-axis main frame stands on it's own (the steppers are like feet) and then it's also held up by the mounts on the bottom of the Y axis rods - but that's still sorta dicey. We'll see how it operates like this?
I whipped up a 90 degree mount for the Rambo that'll mount it to the stock Arduino bolt holes - and then realized that the rambo mounting is 95mm x 96mm, and I had it spun the wrong way. Will print another tonight...
JohnA.
JohnA.
http://shop.seemecnc.com/images/1358004341668186270148.jpeg
Best thing about it in my mind: more places to mount power supply and electronics.
JohnA.
To unsubscribe from this group and stop receiving emails from it, send an email to 3dprintertipstricksreviews+unsubsc...@googlegroups.com.
To post to this group, send email to 3dprintertips...@googlegroups.com.
Mark Cohen
Depending on your extruder their is a dainty back in the mini folder that goes along with the printed platform piece if you know the part i am talking about. It could be in the box frame folder. I am not home so I cant check it out
To unsubscribe from this group and stop receiving emails from it, send an email to 3dprintertipstricks...@googlegroups.com.
Jetguy
Mark Cohen
To unsubscribe from this group and stop receiving emails from it, send an email to 3dprintertipstricks...@googlegroups.com.

Kurt Wendt
Like JetGuy – I also appreciate you guys showing us your progress on building your new Bots. Its great to see W.I.P. stuff, different Bot designs – and also keep the Pics coming!
-K-
To unsubscribe from this group and stop receiving emails from it, send an email to 3dprintertipstricks...@googlegroups.com.
Jetguy
On Thursday, May 30, 2013 3:40:10 PM UTC-4, Kurt Wendt wrote:
Like JetGuy – I also appreciate you guys showing us your progress on building your new Bots. Its great to see W.I.P. stuff, different Bot designs – and also keep the Pics coming!
-K-
Kurt Wendt
OK – JetGuy – that IS Funny!
To unsubscribe from this group and stop receiving emails from it, send an email to 3dprintertipstricks...@googlegroups.com.
Mark Cohen
Oh alright.....
Someone wants to show me his laser-fu I think!
Your ultimaker parts are on the way now.
To unsubscribe from this group and stop receiving emails from it, send an email to 3dprintertipstricks...@googlegroups.com.
JohnA.
JohnA.
JohnA.
Mine's been great...
JohnA.
To unsubscribe from this group and stop receiving emails from it, send an email to 3dprintertipstricksreviews+unsubsc...@googlegroups.com.
To post to this group, send email to 3dprintertips...@googlegroups.com.
--
You received this message because you are subscribed to the Google Groups "3D Printer Tips, Tricks and Reviews" group.
To unsubscribe from this group and stop receiving emails from it, send an email to 3dprintertipstricksreviews+unsubsc...@googlegroups.com.
To post to this group, send email to 3dprintertips...@googlegroups.com.
Jetguy
Mark Cohen
It was too complicated for me to explain....
To unsubscribe from this group and stop receiving emails from it, send an email to 3dprintertipstricks...@googlegroups.com.
JohnA.
Joseph Chiu
To unsubscribe from this group and stop receiving emails from it, send an email to 3dprintertipstricks...@googlegroups.com.
Mark Cohen
Doing this for 4 years I have seen this come up once in a while. Many people like to use an even number because it just makes sense. But really less works out better to be less constraining. The two are there to drive and guide and it is 2 because you want it to be as long as the part. You want one at each end so it does not wobble. You want the single just to hold it in position and as such it gives an element of play that makes the whole thing moves smoother than having 2. If your part was narrower you might just want one bearing to drive and two round bearings to pinch it on the rods. This is also done on the heated bed.
As for two much play the trick was to put the bearings on the rods first and then zip tie them on to the parts so that everything was lined up nicely and tight. If you just reversed the part without rezip tying it wont be right I am thinking.
TheMakerGuy
--
You received this message because you are subscribed to the Google Groups "3D Printer Tips, Tricks and Reviews" group.
To unsubscribe from this group and stop receiving emails from it, send an email to 3dprintertipstricksreviews+unsub...@googlegroups.com.
To post to this group, send email to 3dprintertipstricksreviews@googlegroups.com.
TheMakerGuy
TheMakerGuy
JohnA.
http://www.ebay.com/itm/321125865983?var=510117151920&ssPageName=STRK:MEWNX:IT&_trksid=p3984.m1497.l2649
JohnA.
To post to this group, send email to 3dprintertips...@googlegroups.com.
Mark Cohen
He was my first choice but he didn't include the thermistor and I wanted 14 Guage wire not 16. I have 16 on hand.
To unsubscribe from this group and stop receiving emails from it, send an email to 3dprintertipstricks...@googlegroups.com.
James Armstrong
Joseph Chiu
Oh I forgot the most important thing. The main reason people do this is that they can't get the rods perfectly alighned. They are always a small bit off and thats why you need a bit of play or they will bind.
Mark Cohen
--
You received this message because you are subscribed to the Google Groups "3D Printer Tips, Tricks and Reviews" group.
To unsubscribe from this group and stop receiving emails from it, send an email to 3dprintertipstricks...@googlegroups.com.
Jetguy
To unsubscribe from this group and stop receiving emails from it, send an email to 3dprintertipstricksreviews+unsub...@googlegroups.com.
JohnA.
I think people were also curious why they do 3 bearings on things like the extruder mount and bed sliders - instead of 2 or 4.
JohnA.
Jetguy
JohnA.
JohnA.

Wingcommander (whpthomas)
Jetguy


Jetguy

Mark Cohen
That worked out nice
I figured out my my wire problems I think
Works out the bowden tube slips up from the front where it connects to the head leaving an inch gap
The wires are ziptied to the bowden
So I guess it pulls on the wires
I cut off the zip ties now
Sorry for hijacking but I have to thank Mark. Next pics will be some Prusa I3 frames/braces for you both!
--
You received this message because you are subscribed to the Google Groups "3D Printer Tips, Tricks and Reviews" group.
To unsubscribe from this group and stop receiving emails from it, send an email to 3dprintertipstricks...@googlegroups.com.
Mark Cohen
Mark Cohen
Joseph Chiu
I help with the bukobot that is at the LA Makerspace. We recently had a problem where it went out of whack. . Turned out the two z steppers got turned out of sync (most likely by some unknowing person) causing prints to get way out of whack.
I don't think the z loading is too much when the machine is in normal operation, but my own experience is that if the z screwleads are accessible, it could potentially lead to the z being way off kilter.
To unsubscribe from this group and stop receiving emails from it, send an email to 3dprintertipstricks...@googlegroups.com.
Jetguy
To unsubscribe from this group and stop receiving emails from it, send an email to 3dprintertipstricksreviews+unsub...@googlegroups.com.
JohnA.
Jetguy
Jetguy


Joseph Chiu
--
You received this message because you are subscribed to the Google Groups "3D Printer Tips, Tricks and Reviews" group.
To unsubscribe from this group and stop receiving emails from it, send an email to 3dprintertipstricks...@googlegroups.com.
Jetguy
To unsubscribe from this group and stop receiving emails from it, send an email to 3dprintertipstricksreviews+unsub...@googlegroups.com.
Joseph Chiu
Good point on the constraint thing, James and I were talking about that and I said, I always like to put the constraint at the top (nuts or the pulleys on the top side of the top bearings) and less the mass (the X gantry) hang below. Now that you say this, with only 5mm diameter screws, it's even more important than the days when I used 8mm screws. That then brings up an interesting and new question as well.
The stock design then does it all wrong IMO. They use tubing as the coupler, which actually is a very good idea, but then that was the only connection to the threaded rod or constraint in most of the pictures I saw. They didn't specify using flanged bearings and the top bearings were just press in and hope is stays. This meant the threaded rods where in compression, the support was at the motors and through the tubing coupling. Even if during assembly you pushed the the threaded rod agaisnt the motor shaft, depending on the shape of the ends of the shaft and the threaded rod could attempt to push the rod out of being concentric. The devil is in the tiny details like this.
So basically, I have always though of the thread rod like a wire and always tried to keep it in tension rather than compression. So that means I actually disagree just a tiny bitm in that constraining both ends of the rod is OK, but its how you do it that matter. The constrating needs to be on the outside edges of the frame, so extreme top and bottom of the threaded rods.
Which then turns into the corrrect way to use these http://www.adafruit.com/products/1175 . You still want to ensure those are ONLY used in tension with the constraint at the far end of the rod (AKA the top in this case) and when tighten the stetscrew at the motor half, just barely pull down on the botom half of the coupler collar to put tension on the threaded rod when locked down.Consider this just Jetguy's thoughts on mechanics.
On Sunday, June 2, 2013 9:20:42 AM UTC-4, Joseph Chiu wrote:
To unsubscribe from this group and stop receiving emails from it, send an email to 3dprintertipstricksreviews+unsub...@googlegroups.com.
Mark Cohen
Hi,
Could you send me the file for the mount? The one on thingiverse isnt as cool as yours.
Also I am ordering a cubd extruder as jetguy is going to try and make me an aluminum angle iron adapter.
Thanks
--
You received this message because you are subscribed to the Google Groups "3D Printer Tips, Tricks and Reviews" group.
To unsubscribe from this group and stop receiving emails from it, send an email to 3dprintertipstricksreviews+unsubsc...@googlegroups.com.
To post to this group, send email to 3dprintertips...@googlegroups.com.
--
You received this message because you are subscribed to the Google Groups "3D Printer Tips, Tricks and Reviews" group.
To unsubscribe from this group and stop receiving emails from it, send an email to 3dprintertipstricksreviews+unsub...@googlegroups.com.
To post to this group, send email to 3dprintertips...@googlegroups.com.
TheMakerGuy
To post to this group, send email to 3dprintertipstricksreviews@googlegroups.com.
TheMakerGuy
|
Re: Prusa i3 Extruder? January 21, 2013 11:57AM |
Registered: 5 months ago Posts: 6 |
Here are some pics of my build
Prusa I3 Pic 1
Prusa I3 Pic 2
James Armstrong
Mark Cohen
I was talking about my ultimaker
Mark Cohen
I still have an extra steves extruder and hot end parts lying around
Jetguy
To unsubscribe from this group and stop receiving emails from it, send an email to 3dprintertipstricksreviews+unsub...@googlegroups.com.
Jetguy
To post to this group, send email to 3dprintertips...@googlegroups.com.
Mark Cohen
To unsubscribe from this group and stop receiving emails from it, send an email to 3dprintertipstricks...@googlegroups.com.
Jetguy
Jetguy
Jetguy
Mark Cohen
To unsubscribe from this group and stop receiving emails from it, send an email to 3dprintertipstricks...@googlegroups.com.
Mark Cohen
Actually 30mm is from the center of each hole
JohnA.
Mark Cohen
Thanks!
To unsubscribe from this group and stop receiving emails from it, send an email to 3dprintertipstricks...@googlegroups.com.
Mark Cohen
I didnt realize adafruit had the 5mm to 5mm spring couplers so I ordered from ebay in Hong Kong.
Oh well
I did buy by mistake 5mm to 8mm
Jetguy


TheMakerGuy
JohnA.
JohnA.
Mark Cohen
James Armstrong
To unsubscribe from this group and stop receiving emails from it, send an email to 3dprintertipstricksreviews+unsub...@googlegroups.com.
Mark Cohen
Oh i think I saw that mod on thingiverse but I did not see it in the joes git. Maybe I missed it
To unsubscribe from this group and stop receiving emails from it, send an email to 3dprintertipstricks...@googlegroups.com.