Jarvis Operated Printer Farms

SD3D

Ryan Carlyle
Can you comment on how you are getting around Makerbot/Stratasys patents on:
- Automatic print removal
- Build chamber temp control
- Print farm job splitting / load-leveling
Not to mention potential Marvel IP around the name Jarvis for automated fabrication systems.
(I'm not saying you're infringing, just asking your opinion/justification why you don't think you're infringing.)
How do you see the value of one stand-alone unit versus a networked farm? To me, that seems like the big issue here. Many of your (awesome-sounding) features are low-value/no-value for hobbyists. Most of the low-cost 3DP market (for now) is single unit hobbyists/consumer purchasers or very small bot farms (below the "one tech can run it" threshold). That could change, of course, but the scaling component seems like a big part of your value proposition.

Kurt @ VR-FX
Sent from my iPhone
Hey everyone, I'm new here but not new to 3D printing. I have had some rather lengthy discussions with vrfx via email who suggested I post here to gather feedback from the 3D printing gods and gurus of the world.At SD3D we mainly do low volume production 3D printing to compete with conventional injection molding and other thermoplastic manufacturing methods. For something the size of an apple, we can typically beat injection molding prices out of China or Mexico for the first ~5000 units. This service has been heavily utilized by crowd-funding campaigns to achieve fulfillment of several hundred orders while maintaining profit margins that can eventually be rolled over to invest in molds once the market has been validated. This means that a Kickstarter campaign can lower their target goal at least five fold while still making a profit. We see this as the true disruptive nature of 3D printing; allowing new ideas to come to market that would have otherwise never made it due to lack of investment.Now the unique aspect about our offering is it is not your typical Printer Farm model where you just stick a bunch of printers in a room and run them 24/7. It is much more similar to that of a time-share arrangement, as the client actually purchases and owns the printer that will be used for their production. We then host that printer for them in our facility, providing their prints at the cost to us while we make our profit on level-loading the excess capacity of the printer while not being used for production by the owner. We offer one and two year contract terms which can lower the owners printing costs to under $0.05/cc (as opposed to the $0.25/cc outsourcing standard set by directories such as MakeXYZ and 3D hubs). If your printer goes down for maintenance during production, we seamlessly continue producing your parts on another printer in the farm until your printer is back on-line.When we originally began offering this service, we actually accepted any open source 3D printer on the market, as well as Makerbots, into the Printer Farm. Within a few months we realized that was a big mistake. The reason for this is that we had absolutely no control over the design of the printers and supply of parts, which meant if a printer went down, it could stay down for weeks while we attempted to source parts from the original supplier. We also found it extremely difficult to scale up and keep up with the new contracts since we found the printer handling limit of a single full time technician to be a meager 10 printers when dealing with hobbiest level desktop 3D printers with questionable reliability and a multitude of required manual operations to get the perfect print. Dozens of industrial level printers from Stratysis or 3D Systems can be handled by a single technician, but the capital and material costs for these printers are prohibitively expensive for most of the clients that use our service.
This lead us to developing our own 3D printers; something we wanted to avoid at all cost, but our service model required a class of 3D printer that simply does not exist on the market today. We are now offering our printers, which we call Jarvis, exclusively through the Printer Farm. We no longer provide production off of hobbiest level desktop printers, but we will take them as a "trade-in" for a Jarvis. Jarvis is the first of it's kind (to our knowledge) completely cloud based industrial 3D printer. It connects to a web based operating system called Layer3Dcloud where the data from over a dozen feedback sensors inside the printer are analyzed and compared to data from historically successful prints network-wide. Layer3Dcloud then triggers events handled by the printer's patent pending Adaptive Build Environment (ABE) which is our version of a heated chamber with five zone gradient neutralizing temperature control. ABE also includes a fully mechanical precision calibration system which automatically calibrates the system with 10 micron resolution. This is done mechanically as opposed to through software in order to reduce the processing power required during the print, allowing the printer to move faster. Jarvis includes a patent pending gradient free heated bed with auto-ejection capabilities so that a technician is not required to clear the plate between prints. Layer3Dcloud also monitors all of the filament in our facility and can automatically load and unload filaments from Jarvis without a technician present. This means that you can assign a seemingly unlimited number of colors and materials to each print based off a specific layer or line trigger in the gcode. Since we can queue up prints for weeks at end, Jarvis publishes the estimated queued material and actual material remaining to Layer3Dcloud which can trigger automatic reorder when a minimum level is met. All of our filament is tagged by RFID which identifies the particular material in Layer3Dcloud. Auto material calibration can be performed on Jarvis to derive optimal print settings for that particular material. Environmental factors are then recorded with the material settings to Layer3Dcloud so that ABE can duplicate the exact environment the next time the material is used. All of these new features have been shown to reduce printer failure rate from ~30% to <1% which drastically lowers the labor cost involved with providing production.
--
You received this message because you are subscribed to the Google Groups "3D Printer Tips, Tricks and Reviews" group.
To unsubscribe from this group and stop receiving emails from it, send an email to 3dprintertipstricks...@googlegroups.com.
To post to this group, send email to 3dprintertips...@googlegroups.com.

Jetguy
Kurt @ VR-FX
It's why David contacted me.
Really - it's about the hobbyist who has his own printer - like the Bot-Guy - and is prototyping a design. But - after producing original prototype & perfecting - now wants to test out the market w/his/her design in a limited run production for Public distribution - and that's where his system comes in.
Makes sense now???
-K-
Sent from my iPhone
Kurt @ VR-FX
Sent from my iPhone
--
SD3D
SD3D
Jetguy
Jetguy

James Le
SD3D
Ryan Carlyle
Here's a very broad Stratasys patent that everyone who prints with an amorphous thermoplastic (ABS, PLA, PET, etc) and uses any kind of thermal control to prevent warping (HBC, HBP, heat lamp, whatever) infringes on: https://www.google.com/patents/US5866058
Could you talk a little more about your "gradient free build plate" and ABE and that stuff? I'm very interested in your methods there.

Chris P
Kurt @ VR-FX
checking it all out - it was like a Kid in a Candy Store! Yup - that's
how it works - a card board type of flexible accordian structure at top
of chamber helps keep heat away from the parts that may get affect - and
only the Tip of print head goes into the chamber - whilst the motor and
Chip are basically above and outside the chamber - although the motor,
extruder and Chip are ALL One unit that's attached to the plastic Cartridge!
Kurt @ VR-FX
--
Kurt @ VR-FX
speaking of. right? If so - it puts a smile on my face to know its been
added to a Fleet - which sounds kinda cool!
On 1/13/2015 10:57 PM, Jetguy wrote:
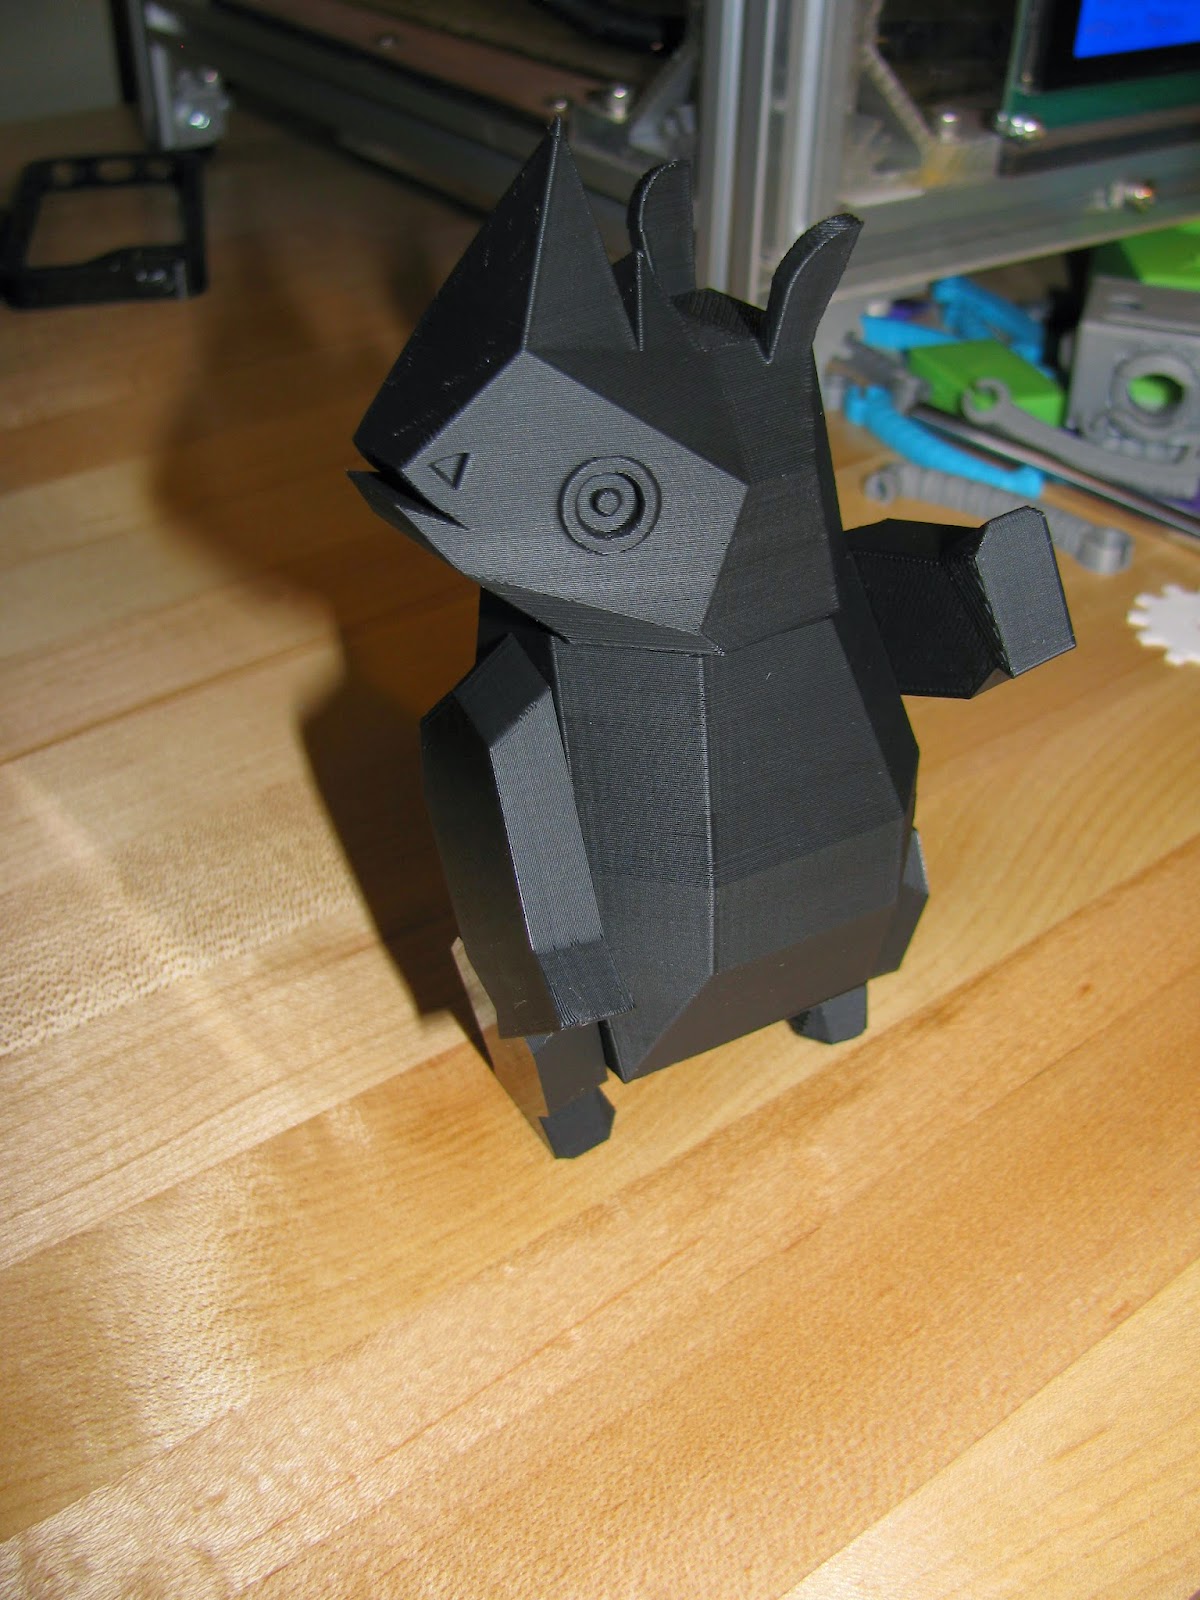
> Regular Wooden Cupcake.
Kurt @ VR-FX
Thanks,
Kurt
The Bot-GUy!
SD3D
SD3D
Chris P
Ryan Carlyle
SD3D

Joseph Chiu
I actually think that this "fractional ownership" model is a growing trend in what a friend of mine has called 'the rental economy'. In a sense, its somewhat like the purchased server model of Rackspace, or more like the long-term committed but leased by the hour model of Amazon EC2 (where you pay a monthly fee for a term in exchange for a lower per-hour price over their standard hourly rate).
The excess capacity can then be sold on the spot market. I once lost my servers running on a spot market rate on Amazon when (presumably a financial institution) a large spot demand for a few hours ate up all free machines and then started to gobble up other machines that were already deployed. (The spot price actually spiked to 3x standard non-spot rate...)
Ryan Carlyle
We have decided to take some "under the hood" pictures tomorrow since the panels are taking so long and release them in the next few days. Some sneak peak images on their way for those who appreciate the look of a "naked" printer :)
SD3D
Joseph Chiu
Marry her!
No dice. On the crazy - to - hot scale Jarvis is a unicorn. All hot, no crazy :)
SD3D
Here are the first few sneak peak pictures of Jarvis. Still plenty of cable management to do, but some of that needs to wait until we have the ABE panels ready. The panels are currently held up due to a design change where we expanded the x-axis to ensure both nozzles could travel the full 12" and still have space to do a prime/head clean outside the build platform. Replacing the smooth rods, extrusions and belts were easy but redesigning and fabricating new temperature controlling enclosure panels takes some time. We expect the paneling to be completed and installed in about two weeks.
Between now and the panels coming in I will post a few more pictures of the naked build explaining more of the design; including our 12:1 geared NEMA 11 belt driven extruder (direct) drive.
Some quick things to point out from these images.. there are two cooling fans for each nozzle which provide balanced cooling to the front and back of the extruded thread allowing you to acheive some pretty extreme overhangs. The extruders themselves are also actively cooled with a third fan to achieve operational temps up to 400C without allowing too much thermal creep up the filament. You should also notice that the bed tilts independently of the elevating platform, which accommodates our mechanical auto-calibration sequence.


On Tuesday, January 13, 2015 at 2:24:48 PM UTC-8, SD3D wrote:
Hey everyone, I'm new here but not new to 3D printing. I have had some rather lengthy discussions with vrfx via email who suggested I post here to gather feedback from the 3D printing gods and gurus of the world.At SD3D we mainly do low volume production 3D printing to compete with conventional injection molding and other thermoplastic manufacturing methods. For something the size of an apple, we can typically beat injection molding prices out of China or Mexico for the first ~5000 units. This service has been heavily utilized by crowd-funding campaigns to achieve fulfillment of several hundred orders while maintaining profit margins that can eventually be rolled over to invest in molds once the market has been validated. This means that a Kickstarter campaign can lower their target goal at least five fold while still making a profit. We see this as the true disruptive nature of 3D printing; allowing new ideas to come to market that would have otherwise never made it due to lack of investment.Now the unique aspect about our offering is it is not your typical Printer Farm model where you just stick a bunch of printers in a room and run them 24/7. It is much more similar to that of a time-share arrangement, as the client actually purchases and owns the printer that will be used for their production. We then host that printer for them in our facility, providing their prints at the cost to us while we make our profit on level-loading the excess capacity of the printer while not being used for production by the owner. We offer one and two year contract terms which can lower the owners printing costs to under $0.05/cc (as opposed to the $0.25/cc outsourcing standard set by directories such as MakeXYZ and 3D hubs). If your printer goes down for maintenance during production, we seamlessly continue producing your parts on another printer in the farm until your printer is back on-line.When we originally began offering this service, we actually accepted any open source 3D printer on the market, as well as Makerbots, into the Printer Farm. Within a few months we realized that was a big mistake. The reason for this is that we had absolutely no control over the design of the printers and supply of parts, which meant if a printer went down, it could stay down for weeks while we attempted to source parts from the original supplier. We also found it extremely difficult to scale up and keep up with the new contracts since we found the printer handling limit of a single full time technician to be a meager 10 printers when dealing with hobbiest level desktop 3D printers with questionable reliability and a multitude of required manual operations to get the perfect print. Dozens of industrial level printers from Stratysis or 3D Systems can be handled by a single technician, but the capital and material costs for these printers are prohibitively expensive for most of the clients that use our service.
This lead us to begin developing our own 3D printers; something we wanted to avoid at all cost, but our service model required a class of 3D printer that simply does not exist on the market today. We are now offering our printers, which we call Jarvis, exclusively through the Printer Farm. We no longer provide production off of hobbiest level desktop printers, but we will take them as a "trade-in" for a Jarvis. Jarvis is the first of it's kind (to our knowledge) completely cloud based industrial 3D printer. It connects to a web based operating system called Layer3Dcloud where the data from over a dozen feedback sensors inside the printer are analyzed and compared to data from historically successful prints network-wide. Layer3Dcloud then triggers events handled by the printer's patent pending Adaptive Build Environment (ABE) which is our version of a heated chamber with five zone gradient neutralizing temperature control. ABE also includes a fully mechanical precision calibration system which automatically calibrates the system with 10 micron resolution. This is done mechanically as opposed to through software in order to reduce the processing power required during the print, allowing the printer to move faster. Jarvis includes a patent pending gradient free heated bed with auto-ejection capabilities so that a technician is not required to clear the plate between prints. Layer3Dcloud also monitors all of the filament in our facility and can automatically load and unload filaments from Jarvis without a technician present. This means that you can assign a seemingly unlimited number of colors and materials to each print based off a specific layer or line trigger in the gcode. Since we can queue up prints for weeks at end, Jarvis publishes the estimated queued material and actual material remaining to Layer3Dcloud which can trigger automatic reorder when a minimum level is met. All of our filament is tagged by RFID which identifies the particular material in Layer3Dcloud. Auto material calibration can be performed on Jarvis to derive optimal print settings for that particular material. Environmental factors are then recorded with the material settings to Layer3Dcloud so that ABE can duplicate the exact environment the next time the material is used. All of these new features have been shown to reduce printer failure rate from ~30% to <1% which drastically lowers the labor cost involved with providing production.
Chris P
SD3D
Chris P
SD3D
SD3D

Dan Newman
> The main reason for us running dual extrusion is to limit the amount of
> labor that goes into removing support material. When you are dealing with
> just a few printers, manually removing support with simplify 3D is fine,
> but it starts to take up a lot of time when you are doing continuous
> production off dozens of printers.
(Sorry, couldn't resist.)
Dan
SD3D
Kurt @ VR-FX
Kurt,Negative, we never did a kickstarter campaign. Not sure who you're thinking of but it's not us :-)
All of our growth has been organic and primarily driven by our extremely satisfied customers.
The whole 3D printer-on-kickstarter dynamic is really toxic right now, and the trend was discernible early last year so we steered clear.
I don't see how anyone on there is going to build a sustainable business at the price points they're forced to advertise in order to generate any buzz (looking at you, Cobblebot, pirate3d, etc etc).
David - thanks for the clarification on the business model. Like Jetguy and others, I'd be very interested in seeing pictures of your setup when you're able to share them.
You're describing a quite a few very interesting concepts! Your heated bed is quite different than our approach to the same problem, to name one :-)
-K-
On Wednesday, January 14, 2015 at 8:58:40 PM UTC-5, vrfx wrote:Chris - honestly - I think David will appreciate your Honest opinion. You are raising a Number of Valid points - which does make sense. Have you told him Your company - and your machines - which have been discussed here in other Threads. Might be an interesting thing to share with David - especially since I believe you also did a KickStarter - but, for VERY Different reasons. Am I right?
Thanks,
Kurt
The Bot-GUy!
Kurt @ VR-FX
Kurt @ VR-FX
Maybe SD3D Could use some of Willy's Trained Squirrel's to do the job -
but, Willy ain't sellin'!!!
:-)
-K-
Kurt @ VR-FX
KS Projects you are speaking about - if that's OK w/you.
-K-
On 1/14/2015 9:25 PM, SD3D wrote:
> Hi Chris,
>
> Your feedback is very much appreciated; I came here to hear the hard
> questions because that is what the investors are asking.
>
> Your point about us selling 3D printing capacity through the Printer
> Farm is exactly on target. Just about every client we have signed (and
> we have already done some rather large Kickstarter campaign

Darrell jan
Dan Newman
> ahhhh - poor little Girl - didn't get her Squirrel!
>
> Maybe SD3D Could use some of Willy's Trained Squirrel's to do the job - but, Willy ain't sellin'!!!
a more structured life,
http://www.dailymail.co.uk/news/article-2432371/Louis-Gelinas-Matthew-Wright-dressed-Oompa-Loompas-caught-camera-attacking-men.html
http://www.theguardian.com/uk/2013/jan/28/men-arrested-oompa-loompa-attack
http://www.inquisitr.com/462568/oompa-loompas-attack-man-in-norwich-uk/
http://www.themarysue.com/oompa-loompa-assult/
Dan
Dan Newman
> There's a superhero named Squirrel Girl who might be willing to consult.
>
> http://en.wikipedia.org/wiki/Squirrel_Girl
Dan
Chris P
"You" - you mean ME? With my KS project??
SD3D
SD3D
Darrell jan
Dan Newman
> Are all of us invited, or just Kurt?
Dan
SD3D
Dan Newman
> Upon approaching our facility you will be asked to present to me your
> finest 3D printed object. Your access will be granted or denied based on
> it's quality and difficulty :)
quality... and that box
difficulty... and that box too
So, if a buddy from nanoscribe is in town, maybe at least he can gain admittance,
http://www.nanoscribe.de/en/
Dan
SD3D
Kurt @ VR-FX
:-)
-K-
"You" - you mean ME? With my KS project??
Kurt - sorry, it's a figure of speech. I wasn't referring to your KS.
Kurt @ VR-FX
No problem, I'm glad you asked.
The first campaign we did fulfillment for was Cleverpet back in April of 2014: https://www.kickstarter.com/projects/1453211280/cleverpet-a-console-that-teaches-and-feeds-your-do
An example of an active campaign we are doing fulfillment for is Ruku: https://www.kickstarter.com/projects/1772835819/ruku-a-rubiks-cube-solving-robot-for-stem-educatio
Unfortunately it does not look like Ruku is going to make their goal (any last minute push from the community would be much appreciated!) Their decision to launch their campaign, marketed towards educational institutions, during the winter break was probably a mistake.
The story behind Cleverpet is pretty interesting and worth writing about. Back in April Leo from Cleverpet found us through MakeXYZ and we did a few sample parts for them. After they were satisfied with the samples they had us quote out their FEU units. Without getting into NDA covered detail, at our standard one-off rate of $0.25/cc they could buy a printer for each prototype they had made. They decided to purchase their own printers to try to do the production themselves. Two weeks later I get a call from Leo asking if there was something we could work out to lower their quote, as they had been spending every waking moment since we had last spoke tending to their printer instead of their Kickstarter campaign. The idea and terms for the Printer Farm service were originated during that conversation and we were able to offer them an 80% discount off our standard pricing structure by signing them up for a dedicated hosting contract.
An example of a non Kickstarter client is Braincorp and the eyeRover robot: http://www.braincorporation.com/products/We do continual production of the eyeRover robot allowing Braincorp to focus on R&D marketing and sales.
Thanks again for sharing.
-K-
On Saturday, January 17, 2015 at 10:29:57 AM UTC-8, vrfx wrote:Hey David - if its not too much of a Bother - I would love to see what
KS Projects you are speaking about - if that's OK w/you.
-K-
On 1/14/2015 9:25 PM, SD3D wrote:
> Hi Chris,
>
> Your feedback is very much appreciated; I came here to hear the hard
> questions because that is what the investors are asking.
>
> Your point about us selling 3D printing capacity through the Printer
> Farm is exactly on target. Just about every client we have signed (and
> we have already done some rather large Kickstarter campaign
> fulfillment...
Kurt @ VR-FX
Gosh - we should have a 3D Printer Party at his place - that would be FUN!
-K-
Kurt @ VR-FX
this Forum!!!
:-)
-K-
SD3D


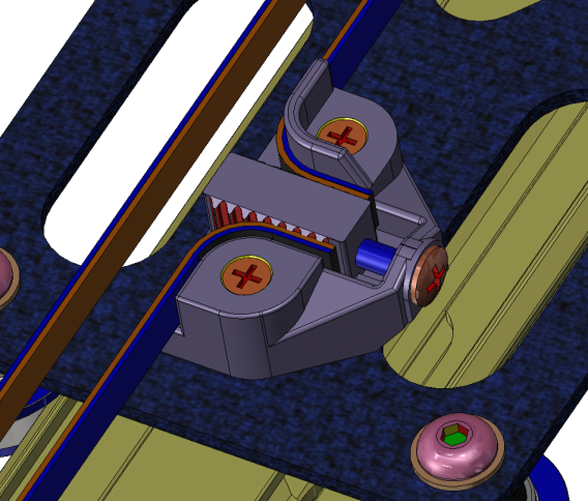
The geared steppers shown here are for the Z-stage and both extruders. All steppers include an encoder as shown installed here. The Z stage will also have redundant encoders on each support rod to monitor for belt slippage. The belt shown used for the Z stage torque transmission is simply for fit up purposes. We took this from existing open loop gt2 supply stock and just sewed it together to get the required length when properly tensioned on the pulley. We are now waiting for the 15mm GT3 replacement close loop belt which will be able to drive much more torque. Surprisingly, we can still print with the temporary sewed together GT2 belt, but we wouldn't leave it unattended at the moment.
To unsubscribe from this group and stop receiving emails from it, send an email to 3dprintertipstricksreviews+unsub...@googlegroups.com.
Ryan Carlyle
SD3D
Ryan Carlyle
On Saturday, January 17, 2015 at 7:13:08 PM UTC-6, SD3D wrote:
Don't mind at all...Our Z-stage is heavier than a normal heated bed due to the material stack we use to neutralize gradients on the print surface. In order to deal with the extra weight we added the support rods and reduced micro-stepping on the Z motor (since we didn't have any geared motors lying around at the time) to get some preliminary testing done. Because we needed to reduce the microstepping to get the extra torque, the pitch of a proper lead screw ended up being much too large for the z resolution we needed for testing.Now that we have changed the design to a geared stepper driving the Z stage, we will revert back to proper lead screws for those three support rods. The move to the GT3 belt is based off of testing and the sheer fact that a closed loop GT2 belt of the required length is basically impossible to find off-the-shelf. We will have the new Z lead screws installed once the GT3 belt and pulleys arrive in a week or so.
On Saturday, January 17, 2015 at 4:52:39 PM UTC-8, Ryan Carlyle wrote:
Chris P
SD3D
Kurt @ VR-FX
-K-
Don't mind at all...
Our Z-stage is heavier than a normal heated bed due to the material stack we use to neutralize gradients on the print surface. In order to deal with the extra weight we added the support rods and reduced micro-stepping on the Z motor (since we didn't have any geared motors lying around at the time) to get some preliminary testing done. Because we needed to reduce the microstepping to get the extra torque, the pitch of a proper lead screw ended up being much too large for the z resolution we needed for testing.
Now that we have changed the design to a geared stepper driving the Z stage, we will revert back to proper lead screws for those three support rods. The move to the GT3 belt is based off of testing and the sheer fact that a closed loop GT2 belt of the required length is basically impossible to find off-the-shelf.
On Saturday, January 17, 2015 at 4:52:39 PM UTC-8, Ryan Carlyle wrote:
To unsubscribe from this group and stop receiving emails from it, send an email to 3dprintertipstricks...@googlegroups.com.

David (SD3D)


The beauty of the filament monitor is that we no longer have to worry about running out of filament during a print. The used filament is continuously logged via an RFID tracking system and will let us know definitively if the spool has enough material to finish the upcoming print. It's also incredibly helpful at dialing in slicing settings for any new materials being added to our network.
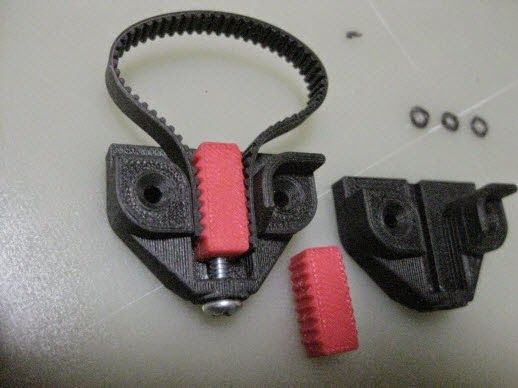
This dual hobb system (which has already been discussed elsewhere in the forum) is also very exciting for us. It doubles the surface area contact on the filament while reducing overall carriage weight and increasing available torque compared to the standard Greg's Wade extruder we were running before:

- Extremely space efficient
- Modular design
- Low cost belt based transmission
- Time consuming assembly
- Tensioning and maintaining belts can be difficult
- It will allow us to completely eliminate belt slippage from the gamut of possible failure modes
- We believe the assembly and maintanance will be simpler than maintaining the belt system of the CoreXY platform
- Elastic tension backlash from high acceleration moves on a belt based motion platform
- Material based instability; inducing accelerations to a material while in an amorphous, semi-liquid state
On Tuesday, January 13, 2015 at 2:24:48 PM UTC-8, SD3D wrote:
Hey everyone, I'm new here but not new to 3D printing. I have had some rather lengthy discussions with vrfx via email who suggested I post here to gather feedback from the 3D printing gods and gurus of the world.At SD3D we mainly do low volume production 3D printing to compete with conventional injection molding and other thermoplastic manufacturing methods. For something the size of an apple, we can typically beat injection molding prices out of China or Mexico for the first ~5000 units. This service has been heavily utilized by crowd-funding campaigns to achieve fulfillment of several hundred orders while maintaining profit margins that can eventually be rolled over to invest in molds once the market has been validated. This means that a Kickstarter campaign can lower their target goal at least five fold while still making a profit. We see this as the true disruptive nature of 3D printing; allowing new ideas to come to market that would have otherwise never made it due to lack of investment.Now the unique aspect about our offering is it is not your typical Printer Farm model where you just stick a bunch of printers in a room and run them 24/7. It is much more similar to that of a time-share arrangement, as the client actually purchases and owns the printer that will be used for their production. We then host that printer for them in our facility, providing their prints at the cost to us while we make our profit on level-loading the excess capacity of the printer while not being used for production by the owner. We offer one and two year contract terms which can lower the owners printing costs to under $0.05/cc (as opposed to the $0.25/cc outsourcing standard set by directories such as MakeXYZ and 3D hubs). If your printer goes down for maintenance during production, we seamlessly continue producing your parts on another printer in the farm until your printer is back on-line.When we originally began offering this service, we actually accepted any open source 3D printer on the market, as well as Makerbots, into the Printer Farm. Within a few months we realized that was a big mistake. The reason for this is that we had absolutely no control over the design of the printers and supply of parts, which meant if a printer went down, it could stay down for weeks while we attempted to source parts from the original supplier. We also found it extremely difficult to scale up and keep up with the new contracts since we found the printer handling limit of a single full time technician to be a meager 10 printers when dealing with hobbiest level desktop 3D printers with questionable reliability and a multitude of required manual operations to get the perfect print. Dozens of industrial level printers from Stratysis or 3D Systems can be handled by a single technician, but the capital and material costs for these printers are prohibitively expensive for most of the clients that use our service.This lead us to begin developing our own 3D printers; something we wanted to avoid at all cost, but our service model required a class of 3D printer that simply does not exist on the market today. We are now offering our printers, which we call Jarvis, exclusively through the Printer Farm. We no longer provide production off of hobbiest level desktop printers, but we will take them as a "trade-in" for a Jarvis. Jarvis is the first of it's kind (to our knowledge) completely cloud based industrial 3D printer. It connects to a web based operating system called Layer3Dcloud where the data from over a dozen feedback sensors inside the printer are analyzed and compared to data from historically successful prints network-wide. Layer3Dcloud then triggers events handled by the printer's patent pending Adaptive Build Environment (ABE) which is our version of a heated chamber with five zone gradient neutralizing temperature control. ABE also includes a fully mechanical precision calibration system which automatically calibrates the system with 10 micron resolution. This is done mechanically as opposed to through software in order to reduce the processing power required during the print, allowing the printer to move faster. Jarvis includes a patent pending gradient free heated bed with auto-ejection capabilities so that a technician is not required to clear the plate between prints. Layer3Dcloud also monitors all of the filament in our facility and can automatically load and unload filaments from Jarvis without a technician present. This means that you can assign a seemingly unlimited number of colors and materials to each print based off a specific layer or line trigger in the gcode. Since we can queue up prints for weeks at end, Jarvis publishes the estimated queued material and actual material remaining to Layer3Dcloud which can trigger automatic reorder when a minimum level is met. All of our filament is tagged by RFID which identifies the particular material in Layer3Dcloud. Auto material calibration can be performed on Jarvis to derive optimal print settings for that particular material. Environmental factors are then recorded with the material settings to Layer3Dcloud so that ABE can duplicate the exact environment the next time the material is used. All of these new features have been shown to reduce printer failure rate from ~30% to <1% which drastically lowers the labor cost involved with providing production.I'm posting additional technical features below. Looking for any feedback regarding if we should continue selling these exclusively through the Printer Farm service for internal usage or if we should attempt to raise money to commercialize these units outside of the farm. Are there other applications that can use such sophisticated yet relatively affordable 3D printers or have we just made a Printer Farm specific printer (which was the original goal anyway)? Any other feedback regarding our general business model and other plausible usages for this kind of service would be greatly appreciated.Full Jarvis feature list:Extrusion: Dual all-metal hotends with nozzle diameter options ranging from 0.25mm-0.8mmPrint Surface: 24V gradient free heated bed with auto-ejection capabilitiesPrint Area: configurable from 300mm x 300mm x 300mm (12in x 12in x 12in) up to 900mm x 900mm x 900mm (36in x 36in x36in)Print Volume: 1-27 cubic feet of usable spaceTop Print Speed: 200mm/sec (7.9in/sec)Print Tolerance: 0.04mm (0.0016in) in X and Y axes. Z axis is dependent on layer thickness selectedLayer Thickness: 0.04mm to 0.6mm (0.0016in - 0.024in) limits dependent on nozzle selectionSupported Materials: ABS, PLA, HIPS, PVA, PC, TPE, and composite materialsDisplay: 5" full color LCD touchscreen display (800x480)Usable Filament Sizes: standard 3mm (0.1in)Cooling: liquid cooling of all components, two sets of independent nozzle cooling fans and automatic gradient neutralizing climate controlAuto-calibration: bed level within 0.008° (~10 microns)Filtration: true HEPA internal cabin filtration with pre-filterElectricalPower Requirements: 100 - 240 VAC; <750WTemperature: Maximum operating temperature (Extruder), 400C (752F)Temperature: Maximum operating temperature (Heated Bed), 150C (248F)Temperature: Maximum operating temperature (Build Environment), 60C (140F)Software & ConnectivityDedicated on-board computer for instant remote printing and alerts from the cloudLayer3Dcloud operating system with 32Gb local file storage (expandable)3D Printing Pro Suite including : cloud slicing, filament monitoring, project management & moreLAN Connectivity: Wifi, bluetooth, USBBrowser compatibility: Internet Explorer, Chrome, FirefoxPhone compatibility: Android, AppleSecurity: 4kbit RSA encryptionWarrantyFull protection plan for the duration of the Printer Farm Contract4-6 week lead timePrice $3,499 - 12"x12" Jarvis with dual all metal hotends
Ryan Carlyle
Personally, I dislike screw-based XY stages, for a number of reasons:
- High inertia to spin the screws up and down
- Even with long-pitch screws, the drivetrain steps/mm values are usually too high for good results with 8bit controllers
- The stage compliance and overhauling/back-driving friction is dramatically higher than with belts, meaning abrupt stops/turns due to motion planner shortcomings are more likely to cause machine damage due to high impulse forces (since the stepper rotor's spring-like torque/error behavior and belt's stretch isn't able to cushion the impulse -- the forces go prinarily to the thread flank)
- More expensive and harder to source than belts
- At high speeds/forces, screw buckling/whipping is a possibility
- Either significant backlash, or significant friction due to backlash nuts, or significant cost to go to ball screws
- More maintenance required for periodic lubrication and cleaning
- Practically impossible to build into a parallel motion stage, so you're forced to use high-moving-mass RepRap or Replicator 1/2 style serial Cartesian gantries, with all the associated acceleration limits and wire flex issues.
One nice thing about CoreXY belts is that tensioning is the same thing as squaring the gantry. If your frame is square and rigid, proper tensioning is accomplished by tightening the belts until the slop is out and the X bridge is parallel with the frame. Personally, I find this quite easy. It's more or less a one-time setup activity, maybe twice after some run-in stretch. There shouldn't be any significant long-term maintenance component.
David (SD3D)
David (SD3D)
Ryan Carlyle
All the GRBL-based 3DP controllers (eg everything but MachineKit) let you traverse segment vertices (corners) at non-zero speed. This is good for reducing corner blobbing and improving print speed, but obviously any instantaneous velocity vector change will require a (theoretically infinite) spike in acceleration force. That should break things, but it doesn't. Stepper+belt systems easily handle this apparent abuse because the rotor torque/error characteristic acts like a spring and the belt acts like a spring and together they greatly smooth out the force impulse at the corner, below the peak torque for the motor. But it's still a mechanical system subjected to an impulse disturbance, so it's going to experience some oscillation at its natural frequency until the disturbance energy dissipates and the ringing settles out.
The biggest contributors to ringing appear to be the rotor's error/torque characteristic, and rod flex. These are very springy components with minimal hysteresis losses so they tend to keep oscillating. Belt stretch is a highly viscously-damped form of compliance so I believe it actually tends to reduce the visual effect of ringing more than it increases it. Likewise, stepper motor dampers (eg Astrosyns) increase motion stage compliance but typically decrease corner ringing because they damp the oscillations.
Yes, if you make the motion stage stiff enough with screws and giant linear rails, you'll more or less eliminate corner ringing, but at vastly greater cost. My experience is that CoreXY is one of the better options for reducing ringing. Specifically, the fact that the rotor position oscillation mode is 45 degrees out of alignment with the rod flex oscillation mode seems to greatly improve print quality.
Why do you see belt slip as a significant issue? I've never seen a belt slip on printer that was tensioned properly and had 180 degrees of pulley contact. A properly-tensioned 6mm GT2 belt can provide way more line pull than I'd ever want to apply. If you're exerting THAT much force on the motion stage, I'm pretty sure that means something catastrophic is happening, and you WANT it to slip or skip steps to prevent structural damage to the machcine.

TRAMMALOT
David (SD3D)
TRAMMALOT
David (SD3D)
Ryan Carlyle
- Moving mass
- Motion stage stiffness along the "old" direction of motion before the corner (because position error perpendicular to the new direction of motion is the most visible)
- Firmware corner dynamics -- what matters most isn't so much acceleration as the corner speed. Changing velocity "instantly" at the corner is the largest force the mechanism has to withstand, so it should also be the largest contributor to ringing. In Marlin this is called "jerk," Sailfish it's "max speed change," Smoothie does something a bit different but the equivalent parameter to adjust is "junction deviation." If you drop this corner speed change parameter to a very small number, ringing should disappear. (But you might get more flow lag blobbing on the corner.)
Jetguy
David (SD3D)
Ryan Carlyle
Doesn't sound like there is anything you can really do on the mechanical side to reduce those surface effects without compromising on at least one other major factor.
(make sure you zoom in, the picture compression creates some apparent moire patterns)

New3dGuy
- Nothing
- Cork
- Steel/Rubber
Jetguy
Ryan Carlyle

Alex Borro
What about the spring effect these Astrosyn dampers induce in the system? I mean, when the motor applies torque to the belt it should flex a little bit since the dampers are quite flexible, doesn't it?
@Ryan, you told something about CoreXY bot I'm thinking about. The correctly tensioning of both belts. If one is more tight than the other, the X bridge get off square, I mean, not more perpendicular to Y axis. Any hint or do available for how to get it properly tightened? My main concern is long therm operation where the belts stretch (maybe one more than other).
Cheers
Alex
--
David (SD3D)
Dan Newman
> What about the spring effect these Astrosyn dampers induce in the system? I
> mean, when the motor applies torque to the belt it should flex a little bit
> since the dampers are quite flexible, doesn't it?
>
> @Ryan, you told something about CoreXY bot I'm thinking about. The
> correctly tensioning of both belts. If one is more tight than the other,
> the X bridge get off square, I mean, not more perpendicular to Y axis. Any
> hint or do available for how to get it properly tightened? My main concern
> is long therm operation where the belts stretch (maybe one more than
> other).
The technique I use on a Core-XY is to move the carriage system all the way
to the front of the bot and see how close each end is to the inside of the frame.
When I first set things up, usually one end comes closer. (Actually hits the
inside front of the frame hardware). The other end still has a gap between
it and the frame. I then push the other end forward till it touches the frame
AND while holding it there, I identify which belt section now has a little slack.
That's the belt section which needs to be tightened. The clamps I use (courtesy
of Ryan) allow me to tighten an individual belt section in 2mm increments (by
advancing/retarding the belt section by one full tooth in the cleat).
The above works well for getting the belts "balanced".
Then there's the overall tightening. That I don't have good advice for. I've
done about 11 or 12 Core-XY's now and I just know what's approx. correct for
the design I've been using: not too tight, not too loose, just in the "goldilocks"
region. No good way to communicate it. (I suppose I could take my spectral
analyzer, twang them, and tell you the pitch.)
Dan
Alex Borro
Thanks Dan. I have used similar procedure. Using something on the frame as reference and make the Y carriages aligned.
By the way, any pictures of this clamps provided by Ryan?
Cheers.
Alex.
Dan Newman
> Thanks Dan. I have used similar procedure. Using something on the frame as
> reference and make the Y carriages aligned.
>
> By the way, any pictures of this clamps provided by Ryan?
See
http://www.thingiverse.com/thing:393155/#files
Look for "Belt_Clip_right_tensioning.stl" and a similar STL but "left".
Ciao,
Dan
Ryan Carlyle
Adjust belt positions in the clip notches to get it square, then push the clips inward for tensioning and tighten screws. Repeat as needed until the gantry is square to the frame.
Ryan Carlyle
I don't think I'd use them in a CNC mill where forces are high, but eh, maybe they'd work there too if you get the gear reduction right. Gotta remember, the rotor itself has springiness, probably just as much as the damper if not more. It takes 0.2mm of error or so (one full step) before a stepper develops full torque. Nobody runs their 3D printers that hard.

CLine
New3dGuy
Ryan Carlyle

Robert Bilbrey