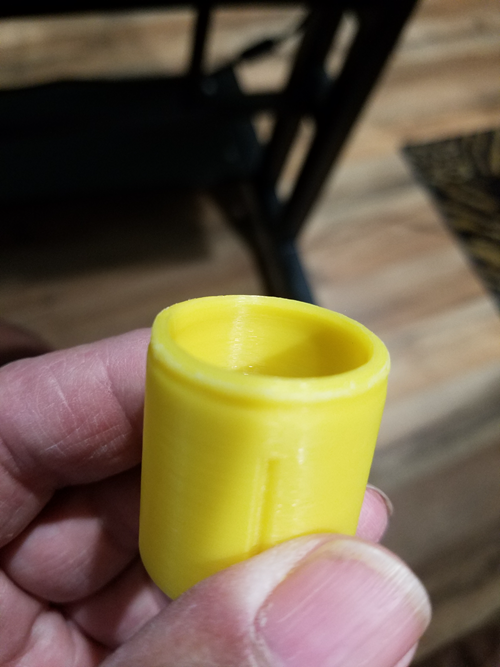
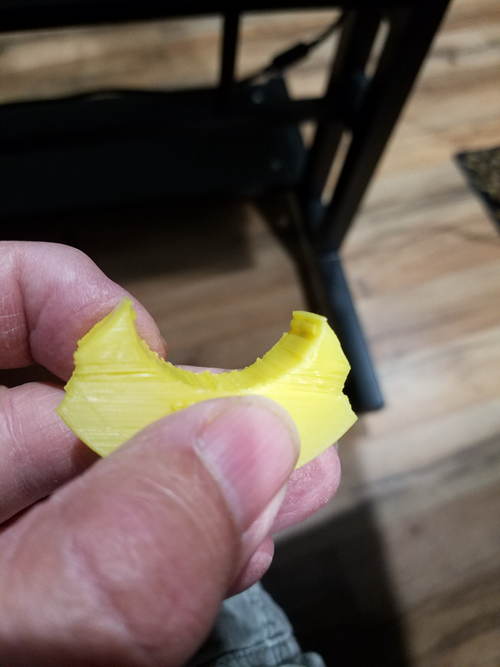
Printing problem at 10mm

213 views
Skip to first unread message

Dan Flemming

unread,
Jun 6, 2022, 9:19:17 AM6/6/22
to 3D Printing Tips and Tricks
   My Ender 3 pro was dialed in as good as it gets.
Then I quit printing for about 2+ months, but when I started back my prints had a BAD section about 10mm up for the bed (1st 3, 1+ hour prints).
I haven't printed in 2 weeks.

  I checked the bed, frame, rollers, belt tensions, even changed the filament (thinking it might be bad), but everything checks out so far.

  Do you think the "print head" might be the problem?
I haven't torn the head apart yet, it could be loose...
But that would make other places with skips, like it was too hot and flowing too flat (not a controlled bead)

I also haven't checked the in-feed drive wheel.

  Now that I wrote it out,
Sounds like a software or control board problem.
I use OctoPrint but didn't bother to check the temps where the problems occur.

Thanks,
D

Dan Flemming

unread,
Jun 6, 2022, 9:21:26 AM6/6/22
to 3D Printing Tips and Tricks
Also the support areas seem to be screwed up like the temp is too hot...
But these temps have ALWAYS produced very fine prints (almost where the layers were invisible).

Kurt at VRFX

unread,
Jun 6, 2022, 12:39:23 PM6/6/22
to 3d-printing-...@googlegroups.com

Hey there Dan,

Sorry to hear of your problem. Yeah, its a bummer - you come back after several months to print - and things are FUBAR - and it didn't make sense since your printer was working great before the 2 months.

This brings to mind a recent Podcast of Andy's and what he was discussing - like is a 3DP problem HW vs. SW related. And, Andy spoke about how he started ripping his printer apart. Then, after doing that - he found that the problem have been SW related (if I remember right).

So, before you start ripping the printer apart - its best to try Easier options.

Now, my suggestion may sound Stupid - and maybe it is. But, its a kinda Stab-in-the-Dark! I would re-orient the part - like rotate it 90 degrees in one axis, then also shift its location on the bed - then ReSlice and Print. See if that helps at all.

Cause - in the end - it may Simply be a problem in the GCode. Like, when Andy ReSliced - the new slice was a Bigger file - and prior slice was corrupted and a smaller file size!

-Kurt

--
You received this message because you are subscribed to the Google Groups "3D Printing Tips and Tricks" group.
To unsubscribe from this group and stop receiving emails from it, send an email to 3d-printing-tips--...@googlegroups.com.
To view this discussion on the web visit https://groups.google.com/d/msgid/3d-printing-tips--tricks/7cf79259-362c-42f9-a738-cf9d03e6c144n%40googlegroups.com.

TobyCWood

unread,
Jun 6, 2022, 1:43:12 PM6/6/22
to 3D Printing Tips and Tricks
Pictures help.
Usually if everything was working great and then after months of non-use there's problems they are typically due to the filament I left in the extruder. PLA goes brittle very quickly.

Dan Flemming

unread,
Jun 6, 2022, 3:18:19 PM6/6/22
to 3D Printing Tips and Tricks
I will try rotating, moving & re-slicing.

Funny though, I've printed many, many objects from the same file.

Dan Flemming

unread,
Jun 6, 2022, 3:23:11 PM6/6/22
to 3D Printing Tips and Tricks
In this case pictures are "secret" (proprietary inventions I don't want others to see til I open my website shopping cart to the world).

I thought of bad PLA and changed filament, same results.
The next filament I tried was old, but vacuum sealed, best filament I every used, always got great results from it...
I haven't tried any of my other filament yet.

Vishal Pai

unread,
Jun 6, 2022, 3:25:19 PM6/6/22
to Dan Flemming, 3D Printing Tips and Tricks
Three things that could go wrong:
1. Filament got old and was exposed. Try with new filament.
2. Enders are notorious for having the Z axis frame warped (top distance<>bottom distance between Z beams). This causes binding on the idler side wheels at certain height where the tramming fails. Nozzle stays at the height till the Z screw overcomes the binding and is able to push the whole X beam up. 

One alternative is to add a dual Z kit. 
Others have found luck in replacing the top beam. Each case is different.

3. Heat creep because the fan is not throwing enough air flow on the Hotend cooling fins. See if the fan needs replacement. Occasionally dust and pet hair can jam it. Stocks fans are the poorest quality.

All the best
-Vishal


--

Kurt at VRFX

unread,
Jun 6, 2022, 3:38:36 PM6/6/22
to 3d-printing-...@googlegroups.com

OK - I didn't realize it was GCode that you've been using over and over, to print the same item. In that case - my input would NOT Be helpful. However, in regards to your other reply...

Kurt at VRFX

unread,
Jun 6, 2022, 3:46:20 PM6/6/22
to 3d-printing-...@googlegroups.com

...so, this time around - this suggestion of mine I think is a GOOD ONE!

Now, I know you stated in your reply to Andy that you can't share pics of the object - I totally get it. But, in that case - do something different. Is your object more angular - or more circular? Depending on that answer - I would suggest printing a hollow box - or hollow cylinder - no top and bottom, but, maybe 3 shells for the walls. Make the object around same width/diameter of your current object - and maybe 20mm high - since it fails at 10mm high.

This way, if the same problems occur - you CAN Post pics of your test object back to the forum here.

More in a second...

-K


Kurt at VRFX

unread,
Jun 6, 2022, 3:55:45 PM6/6/22
to 3d-printing-...@googlegroups.com

...so, I had a further thought based upon your specific problem.

Where are you located? In SoCal?? I only ask, since the pollution here is ABYSMAL!

If I clean my car, then its parked outside - within like THREE days of giving it a wash - there is a film/coating of dirt covering the car.

Also, remember speaking to someone recently within the LA area - and they told me how that have to keep cleaning inside - like once a week - as they notice a thin coating of dirt appear on things. I suggested its because they leave Windows open - and the dirt from outside - the Disgusting dirty air - gets INSIDE and lays down a layer of dirt on things. And, yeah - I've lived in NY, on Long Island - and it was NEVER This bad!

So - is it possible that there is a dirt build up - maybe on your Z-axis? Seems like it - since, as you stated - the problem begins to occur at 10mm into the printing process.

Of course, you mentioned what you checked already - and it seems like you MUST have already checked your Z-axis for an issue like this. But, figured it wouldn't hurt to make the suggestion.

-K

On 6/6/2022 12:23 PM, Dan Flemming wrote:

Dan Flemming

unread,
Jun 11, 2022, 10:54:09 AM6/11/22
to 3D Printing Tips and Tricks
I'm in North Florida, where the humidity is 100% most of the time.
(lawn never dries, even in 90 degree weather!)
Inside is around 60%-65% humidity.

Ok,
I finally got a little time to model & print a NEW object (#3).

#1 - This Picture shows how "bad" the prints had become.
The layers that were jagged and poor were all the way through this model.

#2 - This was the same PLA as #1.
The error was "Only near the outside", the inside was good (inside just looks bad because the error was thinner than the other surfaces).

#3 - Changed to NEW PLA (same brand as #1,#2).
Definitely better layering other than the error.
The bottom has a small error right off the bed, got better, then the OUTSIDE ONLY error (inside was good).

Note:
I did notice the extrusion was a little sideways (not straight down like they use to be, pointing off to the side, then the weight dropping it downward).

1st I will change the Brand New nozzle (only 4-5 prints on it).
I'll let you know if that helps...

Thanks for the help,
D

Print-error3.png
Print-error2.png
Print-error1.png

Dan Flemming

unread,
Jun 11, 2022, 10:56:50 AM6/11/22
to 3D Printing Tips and Tricks
I forgot,
I did notice my fan had some dust on it.
I'll clean it when I change the nozzle.

Dan Flemming

unread,
Jun 15, 2022, 10:07:57 AM6/15/22
to 3D Printing Tips and Tricks
I just found time to post this update:

I cleaned, re-leveled & created a new mesh and created a new tube to check the prints with (20x10x2)
As this photo shows, the problem is clearing up... somewhat.
The sidewall is just enough to add my zig-zag pattern.

The very bottom has a bulge starting right off (but I know my magnetic bed is warped, center is low).
This I can fix with "tin-foil".

The bulge @ 6mm is still present but has cleared up on the inside surface.
Still can't find a reason for it.

Thanks,
D

Print-error4.png

Dan Flemming

unread,
Jun 16, 2022, 11:20:11 AM6/16/22
to 3D Printing Tips and Tricks
After manual bed leveling, then creating a new mesh with the last photo model I posted, I realized I forgot to SAVE the configuration!
And the bed was a bit low.

I folded a 4" square piece of aluminum foil (6 folds) and placed it under the center of the bed.
A little high, removed 2 folds, now almost perfect.

Re-leveled, re-meshed and saved (with the printing temps).

1st tube looks good (20x10x2 mm).
2nd tube (40x10x2) still printing, but it looks great so far.

Not sure how the bed got out of alignment, but that seems to have fixed it!

Thanks!
D

Dan Flemming

unread,
Jun 18, 2022, 1:17:56 PM6/18/22
to 3D Printing Tips and Tricks
I spoke too soon!

There is still a couple of problems.
1) The circle (40x10x2 mm) is not a circle, but a series of straight lines, around 10+ mm (this can be seen in the attached photos).
This is the 1st time I've noticed anything other than a perfect circle printed (although I never really noticed before).
2) The starting layer has a big bulge (see photos).
3) That bugle around 4-5 mm is faint but still present on both in & outside.

I did find something strange.
The bottom wheel on each side of the horizontal gantry (that the hot end slides on) can be spun with my finger (right side has some resistance).
I didn't check to see if the wheels were touching/binding before.
And it slides up/down by hand without binding (does require a little force to move though, but not much).
I'll take it apart and re-tighten/align to make sure it's working properly.

The verticals are spaced parallel to each other (measured).

Thanks,
D

Print-error5.png
Print-error6.png
Message has been deleted

TobyCWood

unread,
Jun 19, 2022, 1:16:21 AM6/19/22
to 3D Printing Tips and Tricks
Always check all the ways of the gantry for each axis! If the wheels are not riding evenly neither is your bed/Y axis!

Dan Flemming

unread,
Jun 23, 2022, 3:42:11 PM6/23/22
to 3D Printing Tips and Tricks
Thanks everyone I got it fixed.

I had forgot to check the z-offset distance, that was the problem.
After I got the z offset distance dialed in & re-meshed, it started printing great again.

Reply all
Reply to author
Forward
0 new messages