Carbon fiber PLA
85 views
Skip to first unread message

Dan Laskowski
Oct 23, 2015, 11:26:02 AM10/23/15
to Vintage Makerbot
I bought some carbon fiber PLA from Proto-Pasta and it works quite well in a friends Flashforge printer. It is brittle going in and rock hard coming out -- really strong parts.
But, it won't print at all in my Cupcake with a QU-BD extruder. After a minute or so, it forms a hard plug at the beginning of the melt zone and quits printing.
I can use the control panel in Replicatorg to reverse the filament out of the extruder, break off the hard end and be right back to trying to print again, but each time it forms the plug and stops feeding. No amount of helping by hand will make the filament go forward.
After inserting fresh filament I can hand push the filament forward with very little resistance. I can extrude forward the filament a minute at a time for more than 10 minutes with no problems. Print a part and within a minute or so, it clogs up.
The hard plug is always about 22mm from where the pinch roller feeds the filament meaning that it is right at the bottom of the mounting bar and just above the heater block.
I have tried lots of settings and tried to match the profile that works on Flashforge printers and so far nothing seems to make a difference.
Thoughts?

James McCracken
Oct 23, 2015, 11:27:58 AM10/23/15
to vintage-...@googlegroups.com
try a slower feed rate, start around 1/3 maybe? My guess is the filament isn't getting preheated properly as it moves through and the carbon fiber is getting stripped out and forming the plug.
Inverse could be true too, so try a faster feed rate.
--
You received this message because you are subscribed to the Google Groups "Vintage Makerbot" group.
To unsubscribe from this group and stop receiving emails from it, send an email to vintage-makerb...@googlegroups.com.
For more options, visit https://groups.google.com/d/optout.
Dan Laskowski
Oct 23, 2015, 2:45:27 PM10/23/15
to Vintage Makerbot
I have tried fast and slow settings and will try them again. In the Replicatorg control panel, I can forward at speeds of 1 or 2 for minutes at a time which is much faster than it is extruding while printing, so enough heat does not seem to be the problem. I hand push the filament through even faster and feel no resistance. I can leave it sitting, extrude a bit, wait some more and extrude some more and no problems. It only clogs when I start printing and usually within a couple of minutes of starting. I have tried to "air print" with the nozzle 10mm above the build plate and get the same results. It is not a pressure in the extruder problem. Besides -- the clog is always at the entrance to the heater block. Not in the nozzle.
Note: I have been printing ABS on this printer for years and all last week printed regular PLA with no troubles using faster speeds, so I know it can print PLA. It is just this carbon fiber stuff that is clogging and only while printing. Something is different about the Flashforge design that lets it print fine.
The part I need to print has a 13mm diameter circular foot print that narrows to 7mm and then opens up to 16mm which means a lot of quick changes at the start of printing the part. It fails about 5mm into the part pretty consistently. I tried printing other parts with larger footprints and they start nicely, but they all fail eventually.
I am researching differences between the QU-BD extruder and what is in the Flashforge in case they are somehow different. The QU-BD has a straight main tube with a center just under 2mm in diameter. I assume the Flashforge is similar.

Joseph Chiu
Oct 23, 2015, 2:49:43 PM10/23/15
to vintage-...@googlegroups.com
Try more aggressive cooling. A desk fan pointing into your cupcake as a start. A faster fan on the hotend if that works. I had a similar issue with my ToM.
Dan Laskowski
Oct 23, 2015, 7:42:51 PM10/23/15
to Vintage Makerbot, joe...@joechiu.com
Thanks Joseph -- I had a Dyson Cool aimed at the machine in the early testing and it did not help. The Flashforge is making good prints and NO cooling.
I even tried the other direction and turned off the extruder cooling fan to see if more warmth would help -- same problem with very little change in how it failed.
I will rebuild the QU-BD extruder soon and bring the heater block closer to the mounting / cooling bar like in the Flashforge extruder.
James McCracken
Oct 23, 2015, 8:01:56 PM10/23/15
to vintage-...@googlegroups.com
I remembered - I had similar problems on my cupcake at one point - it's retraction. Make sure retraction is turned off in the slicer and the firmware and try that.
--
Dan Laskowski
Oct 24, 2015, 10:15:04 AM10/24/15
to Vintage Makerbot
I tried it without retraction. I also tried the Simplify3d feature to coast before changes so that it reduces the pressure in the extruder before moving. Virtually no change in how it fails.
Still scratching my head...

Andrew Plumb
Oct 24, 2015, 10:45:53 AM10/24/15
to vintage-...@googlegroups.com
Could it be running too hot and/or not be temperature-calibrated as closely as you think? Maybe try dropping the temperature so the whole melt-zone doesn’t get too hot at the top of the melt-zone.
Andrew.
On Oct 24, 2015, at 10:15 AM, Dan Laskowski <dklas...@gmail.com> wrote:
I tried it without retraction. I also tried the Simplify3d feature to coast before changes so that it reduces the pressure in the extruder before moving. Virtually no change in how it fails.Still scratching my head...
Dan Laskowski
Oct 25, 2015, 8:38:32 AM10/25/15
to Vintage Makerbot
I will check again, but I have already tried 200 and 220. Maybe it is time to try 230?
James McCracken
Oct 25, 2015, 9:42:42 AM10/25/15
to vintage-...@googlegroups.com
Try 190 or even 180?
On Oct 25, 2015 8:38 AM, "Dan Laskowski" <dklas...@gmail.com> wrote:
I will check again, but I have already tried 200 and 220. Maybe it is time to try 230?
--
Dan Laskowski
Oct 25, 2015, 11:30:08 PM10/25/15
to Vintage Makerbot
Note: I keep saying QU-BD, but specifically, it is their MBE version of the extruder.
Specifically: the tube at the end where the filament comes in is about a #48 [smaller sized] drill bit in size and the exit end is around a #43. Just large enough for filament going in and swimming in space on the way out. The transition from small to large is positioned about where the clog has been forming, so this seems to be the problem.
I checked the second kit I bought but never assembled and that main tube is a #48 drill bit in size all the way through the tube, end to end.
I am also sensitive to the narrow section of the main tube just above the heater block. As I recall, it is there to block heat traveling up the tube and I am sure I had too much insulation on the heater block in that area which probably contributed to the problem as well..
So, I am now debating with myself on trying the freshly polished original tube with the larger exit and less insulation or just switch to the straight tube. The extruder has been working quite well in ABS for years, so the design hasn't been all that bad...

David Weier
Oct 26, 2015, 11:24:38 AM10/26/15
to Vintage Makerbot
I have a cupcake with a QU-BD MBE extruder and I have had a similar issue. It would print for a few minutes and then clog. If you are still running the original power supply, (They were known for not being the highest quality) or even a replacement under powered power supply, I would question it's ability to create the power that is needed. Especially, if you have a larger heated print area. (I upgraded mine to a 6" x 6" heat pad from QU-BD for my 7" x 5.5" print area.) I believe using it to much under these higher power demands eventually weakened the power supply and while printing the hot end would not stay hot enough and clog. It was a very frustrating problem to solve, hopefully you have it figured out.
Dave
Dan Laskowski
Oct 26, 2015, 9:11:02 PM10/26/15
to Vintage Makerbot
Thanks Dave -- I bought a new, high quality supply years ago and my table is as large as can be inside the original Cupcake case and still work -- about 120 x 110 using the original heated bed system under the slightly bigger table.
I rebuilt the MBE extruder with the second main tube that is a straight thru hole from end to end -- and it fails in pretty much the same place in the same way. After a minute or two of printing, the material stops flowing and no amount of helping will let it go forward.
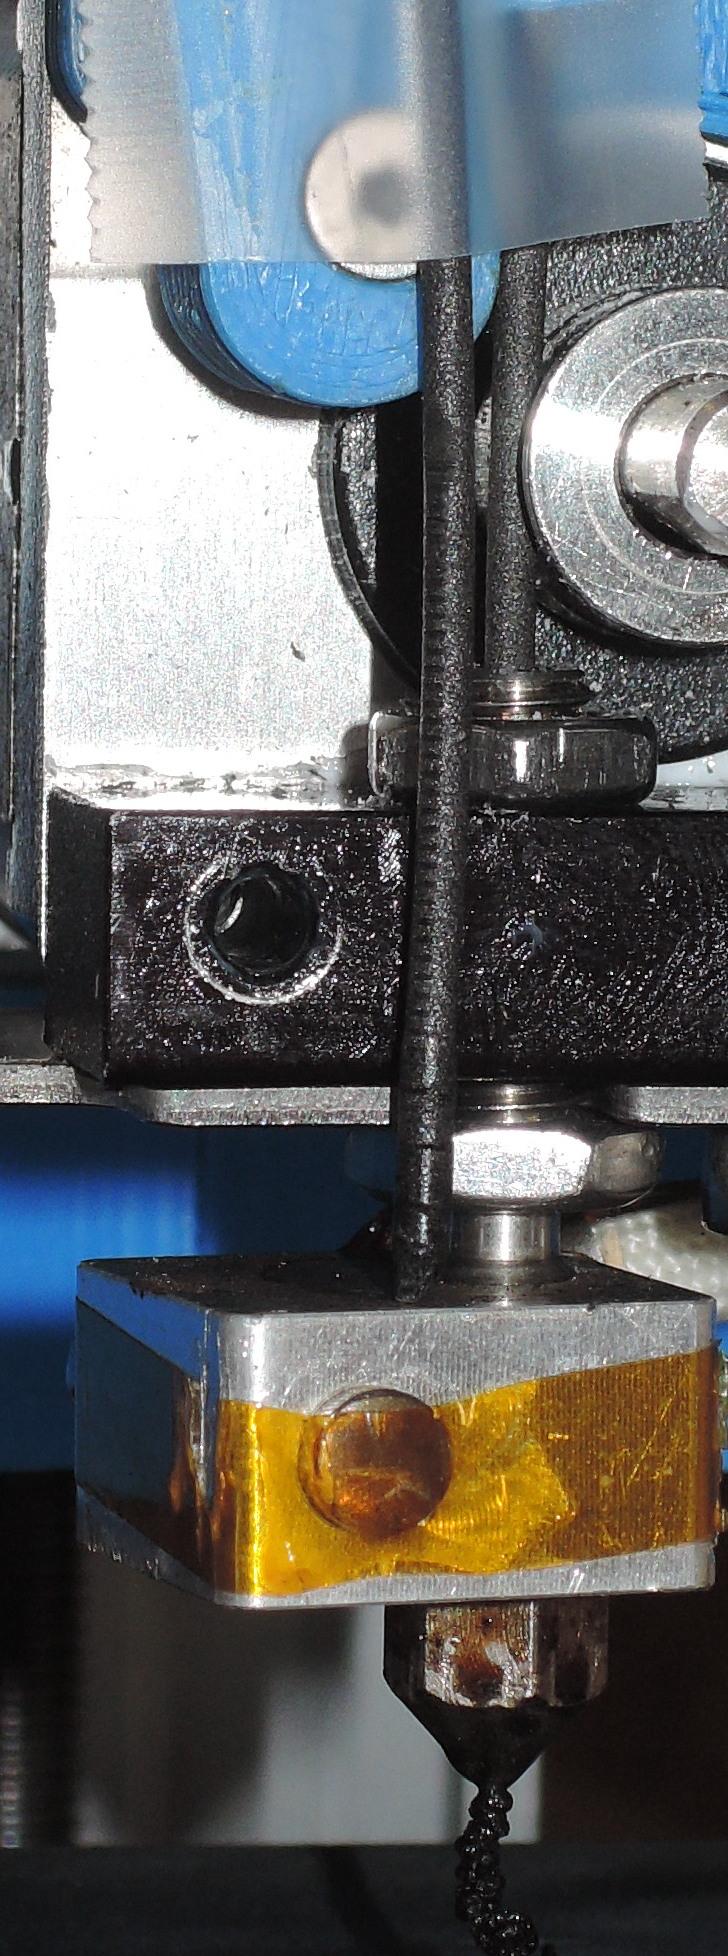
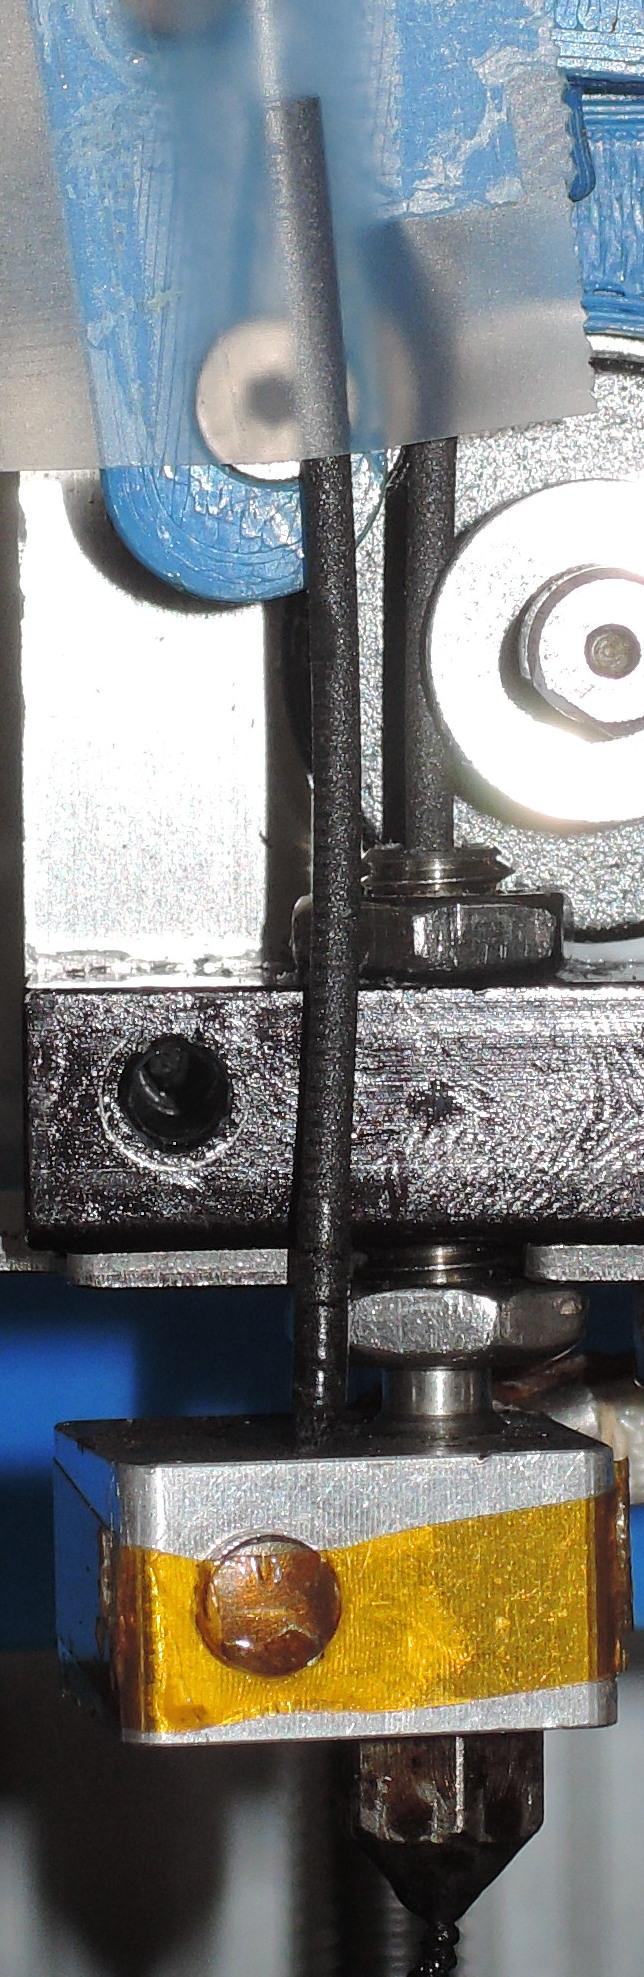
Here are two pictures of the extruder with the failed piece of filament positioned where it was when it failed. You can see the slight indent where the drive gear was starting to strip the filament. You can see the teeth marks and at the end, there is about .5mm of a shiny cylindrical plug and you can see about where that plug forms in the tube.
Notes:
- This is with the straight tube, hence the smooth, straight plug.
- I moved the fan out of the way to take this picture and under normal operation, the fan and heat sink are in place and working.
- When it fails, it won't go forward. You can easily pull it back, break of the .5mm plug at the end, insert the filament and go again for another couple of minutes.
Still scratching my head and I am stubborn enough to see this through to the end, Thanks in advance for any insights that come my way!
Andrew Plumb
Oct 26, 2015, 10:37:40 PM10/26/15
to vintage-...@googlegroups.com
Tossing another thought out there: When was the last time you “flossed” the drive gear? If there are any little pieces of filament stuck between the teeth, that could cause it to lose traction, permanently so depending on the properties of the filament.
Andrew.
--
You received this message because you are subscribed to the Google Groups "Vintage Makerbot" group.
To unsubscribe from this group and stop receiving emails from it, send an email to vintage-makerb...@googlegroups.com.
For more options, visit https://groups.google.com/d/optout.
<DSCN4729.JPG><DSCN4728.JPG>
David Weier
Oct 26, 2015, 11:17:43 PM10/26/15
to Vintage Makerbot
If retraction was not the problem, I would highly suspect a temperature droop while running. I would try to track the temperature of the extruder while printing. I had to sit and watch the temperature on the computer screen through replicatorG and eventually saw the dip in temperature. It was a borinng 20 minutes but I was glad I did it. Also, when I was troubleshooting my problem I reflashed the firmware on the extruder board, switched out the thermistor and checked the plugs that you plug the extruder into, as the power supply plugs have a tendency to get cooked with the amount of power being drawn through them. (A loose plug is a horrible problem as well but it typically happens to the heat bed not the extruder)
And If you get it working again and feel adventurous you could always get more print area with my Frankencaker.
Dave
Dan Laskowski
Oct 27, 2015, 9:12:50 AM10/27/15
to Vintage Makerbot
Thanks Andrew -- it is not the drive gear. It is clean and when the problem happens, if you try to hand push the filament through, it won't budge except for backward. It is locked in really tight in the forward direction, hence the stripping you see. Break off that little shiny plug, put the filament back in and you can hand push it through the extruder like a hot knife through warm butter...
I am going to rebuild it with the tube upside down today -- just to be crazy and try everything.
Dan Laskowski
Oct 27, 2015, 9:20:44 AM10/27/15
to Vintage Makerbot
Dave, regarding temperatures, I am noticing something weird on the heated bed temperature. For this carbon fiber PLA, I am trying 50c on the heated bed per Proto-Pasta recommendations. I normally don't monitor temperatures while building, but it appears that the heated bed takes off and zooms toward 110c during printing and leaves the foot of my part soft until everything cools down.
I tried monitoring temperatures while building, but the heated bed temperature did not seem to be moving at all and I could see it was heating. I stopped the print and still no change in heated bed temperature. I quickly turned the Cupcake off and on again and suddenly a much higher temperature showed up on the display in Replicatorg.
I am still investigating and for now have disconnected the heater totally while I continue my adventure with carbon fiber PLA on my Cupcake.
James McCracken
Oct 27, 2015, 10:14:38 AM10/27/15
to vintage-...@googlegroups.com
non contact thermometers are invaluable when 3d printing. Radio Shack has them for <$20.
--
Dan Laskowski
Oct 28, 2015, 7:58:19 PM10/28/15
to Vintage Makerbot
This is the closing chapter on this adventure. All my testing and experiments hint at the fact that the stainless tube is probably changing shape around the thin section designed to reduce heat flow up the tube. It is not a problem for ABS or regular PLA, but the carbon stuff does not like it.
I'll probably grab a Flashforge and dedicate it to this carbon PLA and leave my Cupcakes doing the ABS that they do so well...
Thanks for all the input!

Jetguy
Nov 4, 2015, 8:23:49 AM11/4/15
to Vintage Makerbot
NO, you have it 100% wrong.
The stepped bore is REQUIRED for an all metal thermal barrier to work.
You are clogging BECAUSE you are not cooling the cooling bar enough and/or the thermal barrier threads are not making maximum contact to cool the cold side of the junction.
Jetguy
Nov 4, 2015, 8:31:04 AM11/4/15
to Vintage Makerbot
There are 2 simple tricks to make this work.
#1 you MUST use a brass thin M6 nut available from McMaster Carr on the BOTTOM side of the cooling block.
The brass nut is more conductive than the steel stock units that came with your MBE extruder
Coat the threads of the thermal barrier with a thin layer of thermal gear before threading into the block.
#2 Ensure that when assembled, the cold side end where the threads just begin mate to the brass nut and then the cooling bar. This position is critical.
The theory is that if you use 2 nuts above and below the cooling bar, the threads in the middle float and are not tensioned against the threads of the block making thermal contact.
The highly conductive brass nut aids immediately after the necked portion of the thermal barrier to begin removing any heat conducted across the gap.
This created a VERY share transition from hot to cold within the thermal barrier in the correct location compared to the stepped bore you identified earlier.
The stepped bore is CRITICAL. It prevents the melted filament from pulling up stuck to the solid and smaller filament during a retract.
Where it goes wrong is NOT the shape- but the external cooling that ensures the proper temps are reached around that step in the bore.
Again, that stepped bore is REQUIRED and does work.
Jetguy
Nov 4, 2015, 8:38:25 AM11/4/15
to Vintage Makerbot
Also, I have all but stopped using the QU-BD MBE versions. Now you can get AMAZING CNC aluminum one piece systems that are 50 times better thermally.

Yes, they come with a PTFE lined thermal barrier. You can either use it or swap in your stepped all metal thermal barrier as i described above to ensure proper thermal contact and operation.
$9. I mean come on, to not use them is a sin....
Entire extruder and motor http://www.amazon.com/gp/product/B00OIH7ZM2
or
just the metal parts for about $10 http://www.amazon.com/gp/product/B014SB12Q2?psc=1&redirect=true&ref_=ox_sc_act_title_1&smid=A38N3TNH1N2LMX

Dan Newman
Nov 4, 2015, 10:29:56 AM11/4/15
to vintage-...@googlegroups.com
On 04/11/2015 5:23 AM, Jetguy wrote:
> NO, you have it 100% wrong.
>
> The stepped bore is REQUIRED for an all metal thermal barrier to work.
> You are clogging BECAUSE you are not cooling the cooling bar enough and/or
> the thermal barrier threads are not making maximum contact to cool the cold
> side of the junction.
Let us not forget that the "stock" QU-BD MBE knockoff works like crap for
> NO, you have it 100% wrong.
>
> The stepped bore is REQUIRED for an all metal thermal barrier to work.
> You are clogging BECAUSE you are not cooling the cooling bar enough and/or
> the thermal barrier threads are not making maximum contact to cool the cold
> side of the junction.
PLA....
They (poorly) imitated the Mk7 which worked well for ABS and never worked
well at all for PLA. When MBI came out with the Mk8 they made one significant
change which is not reflected in the QU-BD extrduer: they made the aluminum
heat spreader bar 50% thicker. That's 50% more thermal contact area with
the thermal barrier tube and thus more heat being drawn off from it. That's
critical to getting that design to work with PLA. (The original Mk8 also
had a drive block which didn't work well with PLA and, starting with
Whosawhatsis spring-arm drive block, people started replacing the drive
block with new designs which could better accomodate PLA.)
Dan
Dan Laskowski
Nov 5, 2015, 10:53:09 AM11/5/15
to Vintage Makerbot
Sir -- I believe you and that is why I persisted so long in trying to figure this out. What made me stop was the design of the tube used in the Flashforge printers -- it appears to be thicker in design and works, hence my thought that the MBE tube was the issue.
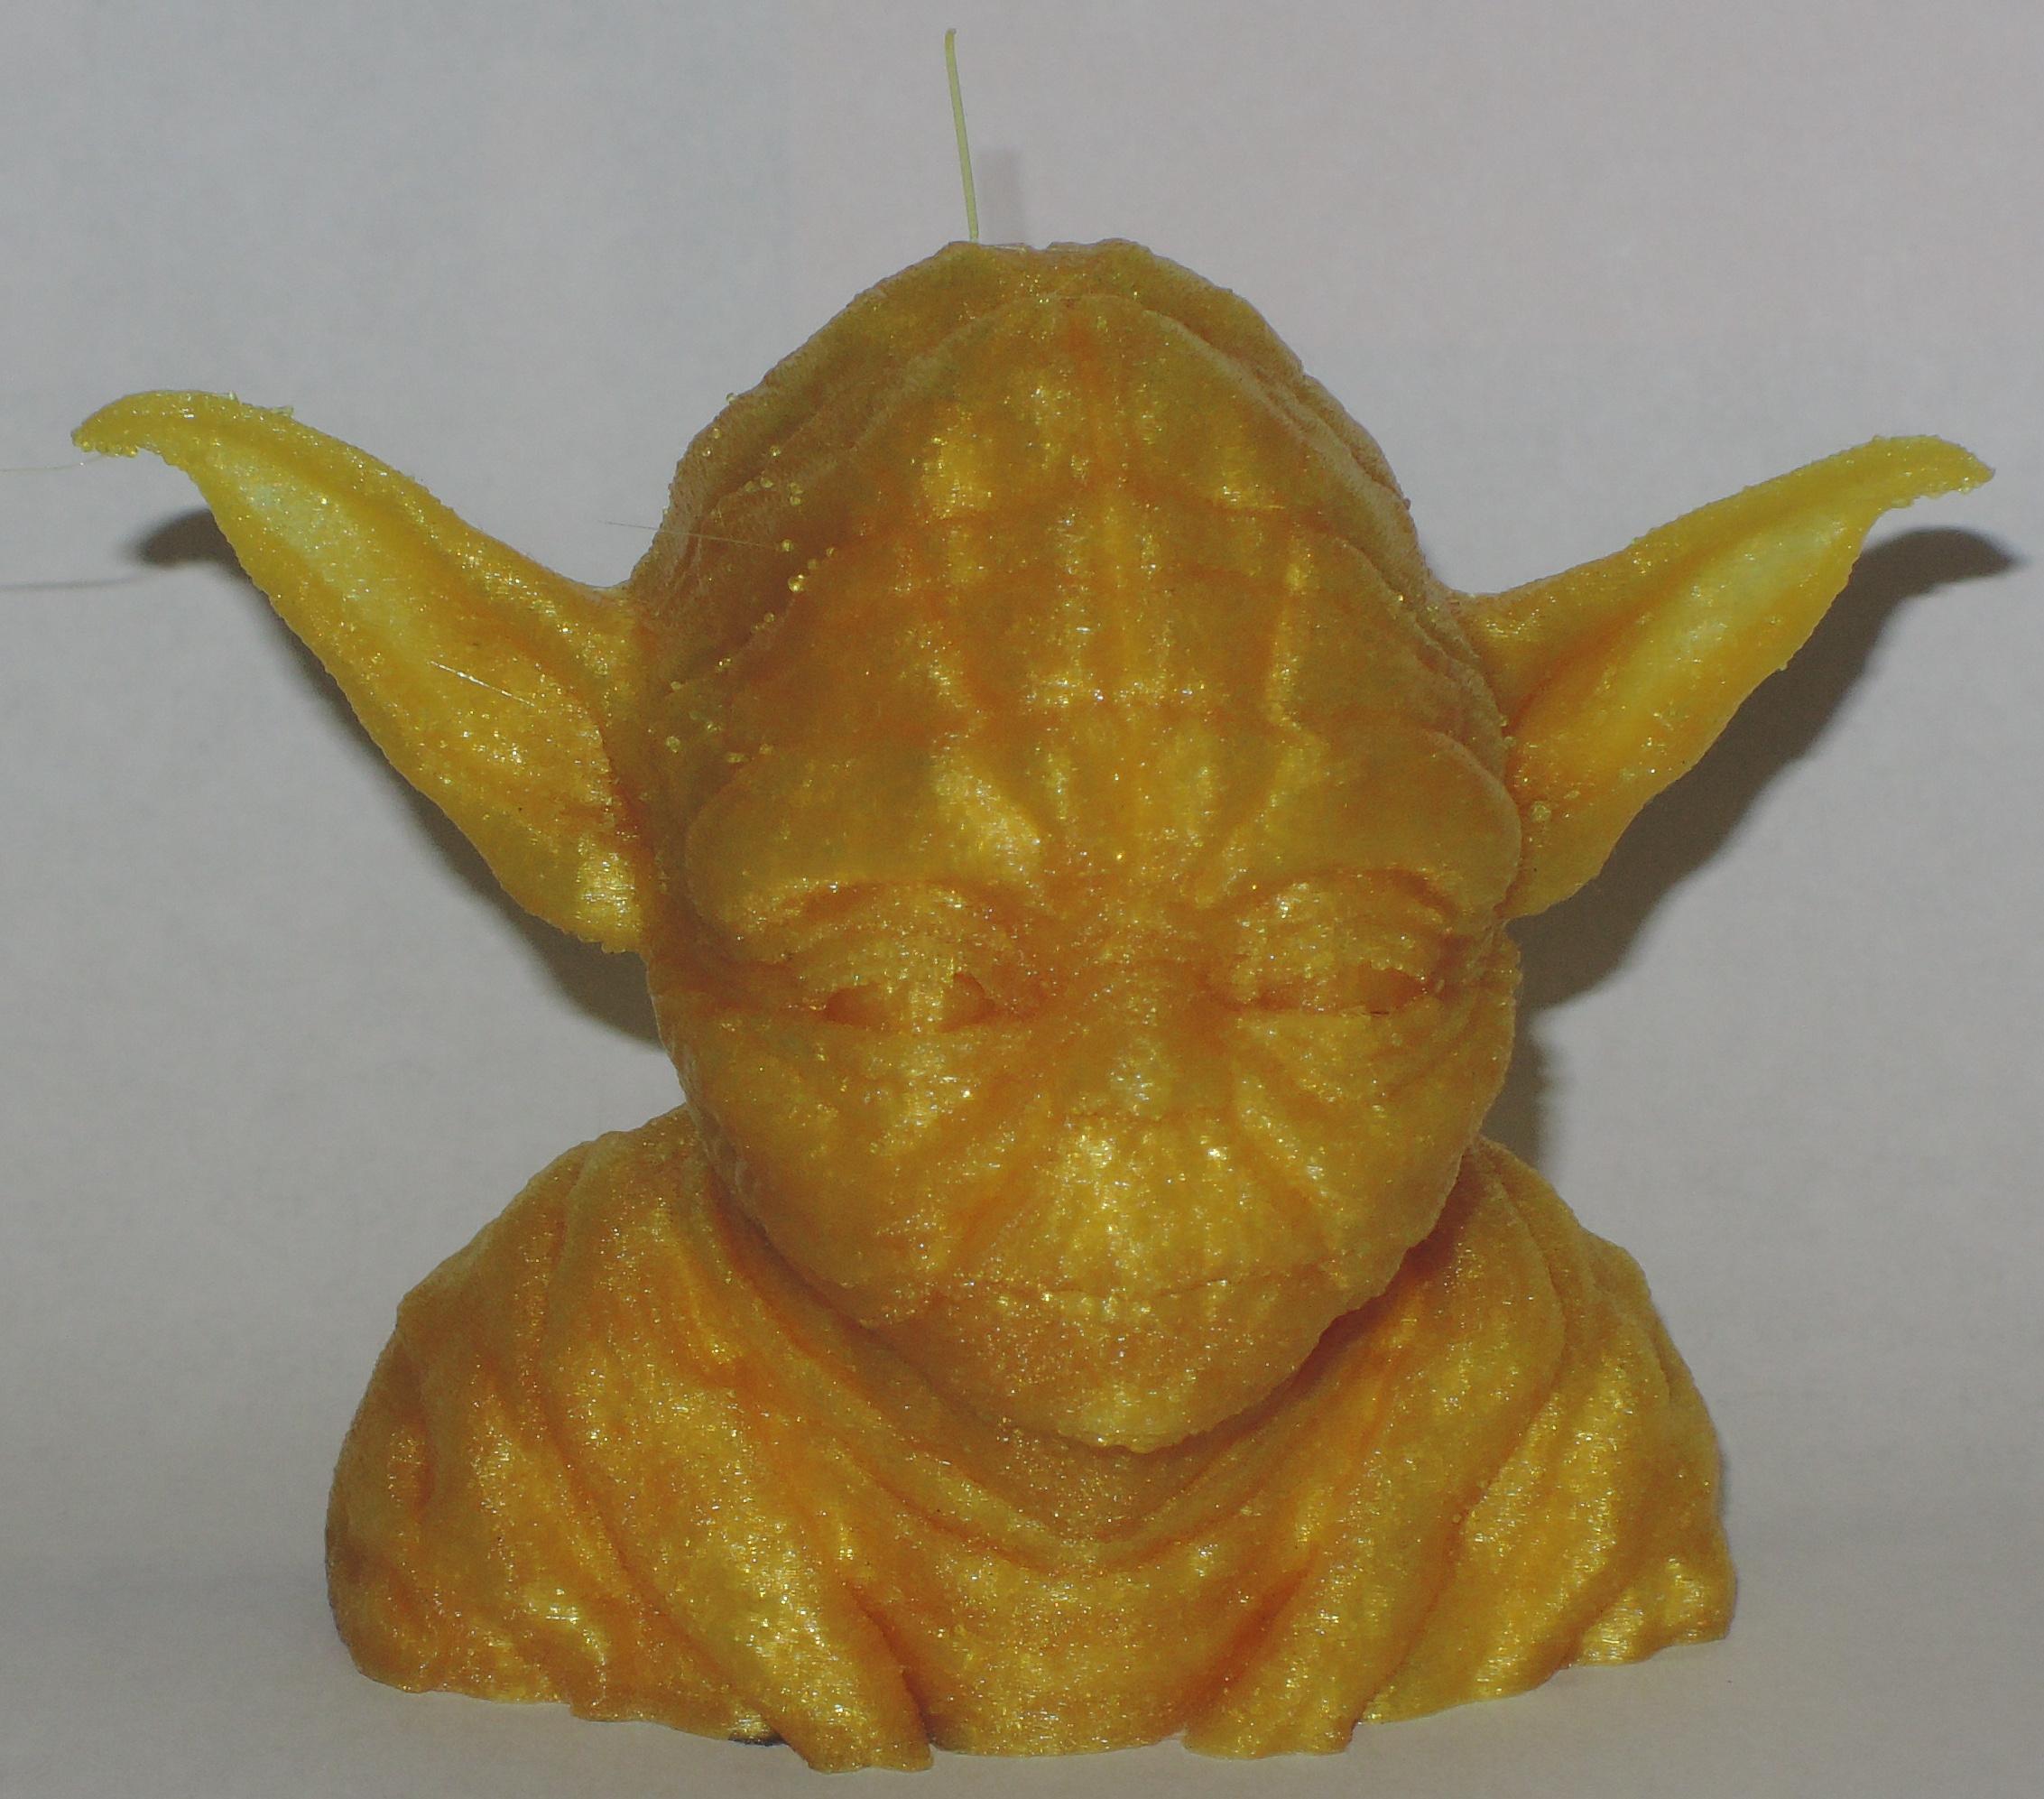
Regarding the MBE extruder and PLA: I got my setup to print regular PLA reasonably well. It was just the carbon fiber that did not work. I did not spend a lot of time tuning the profile, but the Yoda I printed was not so bad. The ears came out real nice. Surface texture needs some tuning...
Now I must make a decision: I bought a Dremel 3d printer to dedicate to the carbon fiber PLA -- I should receive it today. I also want my existing Cupcakes working at their best, so I will chase these new thoughts AND then try the carbon fiber again. Bottom line: I don't need the Dremel if I can get my Cupcakes to behave...
Question: does this Swiss AVN extruder tube have advantages over the stock MBE tube? I already have their hardened nozzle and could put one of these in when I rebuild everything if it is important. http://www.micro-swiss.com/#!product-page/cv9c/486618f3-3e55-0d63-e3b0-f94eb2277b58
Is there a 3mm version of this? I still have a bunch of 3mm filament and keep one of the Cupcakes loaded with 3mm for the bigger parts.
And, let me repeat what you said about assembly: you want the extruder tube as high up into the cooling block as possible and still have enough thread under the cooling block for a thin M6 brass nut with thermal grease for increased cooling. Basically, the thermal barrier is just below the brass nut and the whole assembly creates a really sharp thermal transition at the barrier. If so, the only difference between this and my setup is the brass screw with thermal grease.
Dan Laskowski
Nov 21, 2015, 11:16:09 AM11/21/15
to Vintage Makerbot
Update on printing with carbon fiber:

- I tried several combinations of extruder tubes with thin brass nuts and heat sink compound and nothing worked. A solid plug would form in about two minutes of printing that would lock up printing.
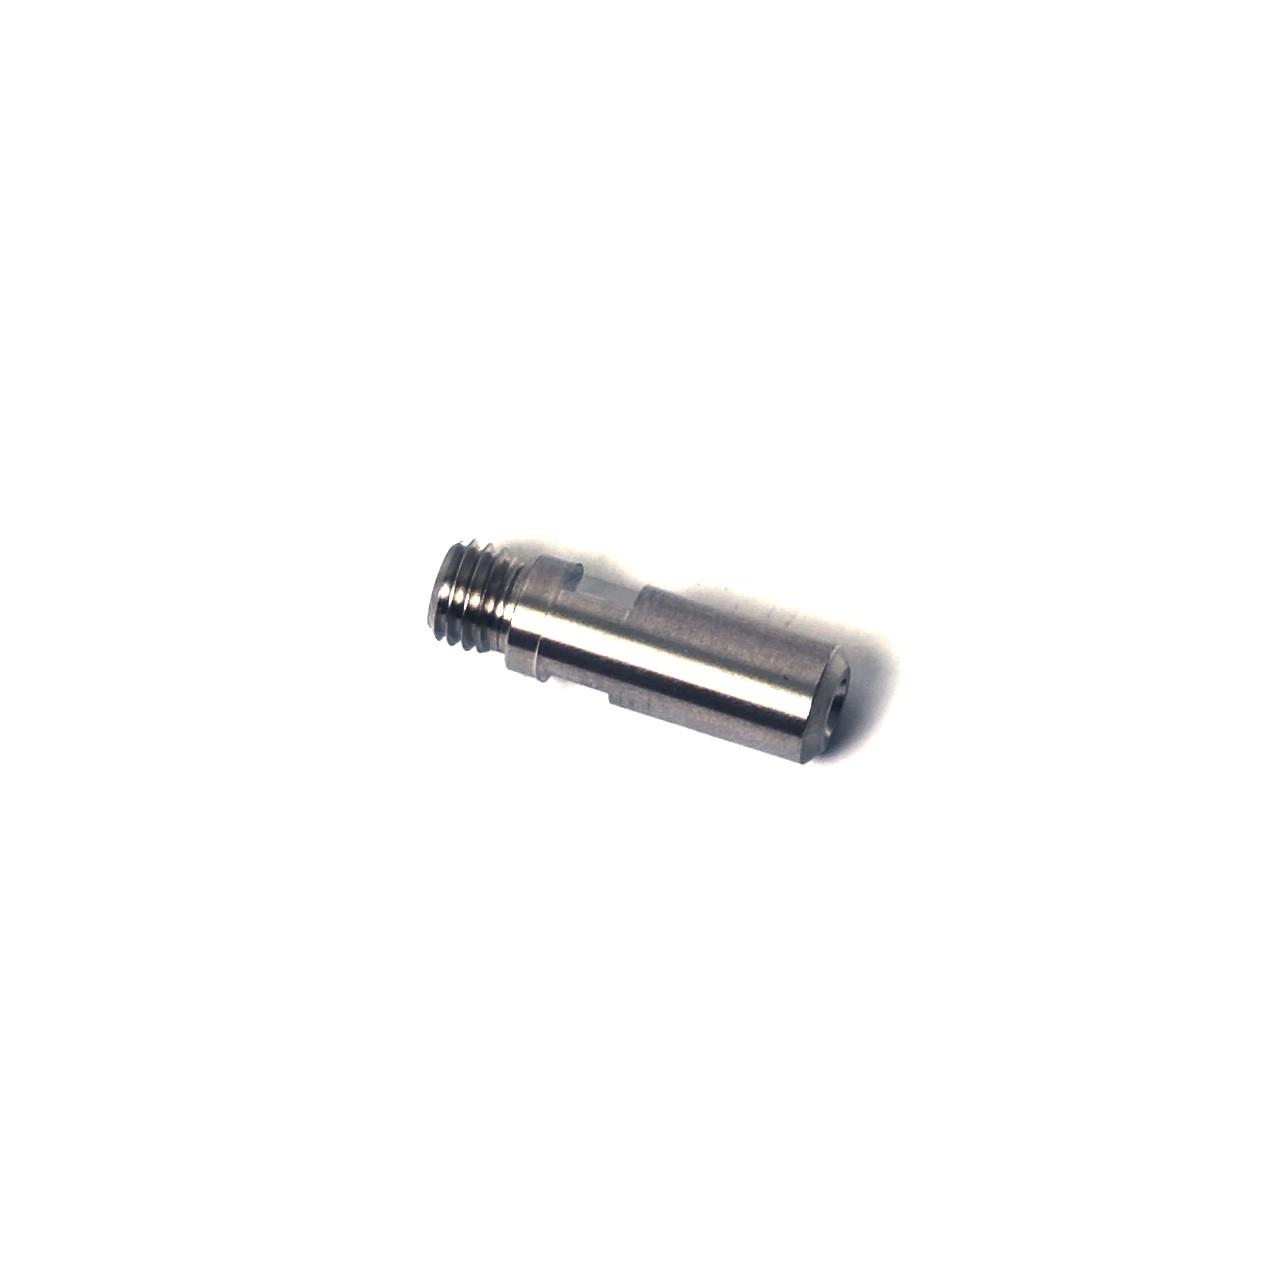
- I bought the extruder Jetguy recommended here http://www.amazon.com/gp/product/B00OIH7ZM2
- It came with an extra extruder tube as shown in the picture. You can't see it in the picture, but it has a plastic sleeve embedded inside that runs 99% of the length of the tube.
- Just for grins, I rebuilt my MBE V9 extruder with that tube and viola! Everything works fine.
- As a bonus, I had a couple of "problem" ABS spools that now work flawlessly, so apparently, the extruder tubes with the thermal barrier carved in were causing ABS printing problems that I attributed to bad filament.
- One more bonus: I used to be careful with Simplify3d and its cooling setting. If you turn that on, it slows down printing in places where you need extra time to cool the material before continuing. That would always lock up the print head, but not anymore!
Bottom line: I am happily up and running on everything I can throw at my old Cupcake with no troubles -- including carbon fiber PLA.

Perry Cain
Nov 22, 2015, 9:05:53 AM11/22/15
to Vintage Makerbot
Dan, I am going to screw around with getting my cupcake doing this just for fun.
But, I can't find anywhere the Simplify3d setttings for the cupcake. Can you point me to that, or upload your settings?
Thanks so much.
Also, how long did it take you to get the extruder you ordered? just curious.
Dan Laskowski
Nov 23, 2015, 9:47:05 AM11/23/15
to Vintage Makerbot
Sir,
A couple of things:
- The extruder came quickly and the extra tube was a pleasant surprise. I used just the extra tube to get my old MBE V9 working, so I still have the ready to go extruder waiting to be used.
- Making settings for Cupcakes in Simplify3d is easy. Pick something compatible, change the table sizes to fit and slice. I have never figured out how to make the resulting .x3g file work, so I always process the .gcode file from Simplify3d in Replicatorg to .x3g before printing.
- Simplify3d uses M140 for setting the temperature on the heated bed. If you really want to control the temperature, you have to change the M140 for M109 in the .gcode. You can change it in the firmware settings in Simplify3d, but it resets itself each time you restart Simplify3d.
Attached are a few factory files. The Kolobot factory files are set up for a .4mm nozzle with 1.75mm filament. The Indybot factory files use a .5mm nozzle and 3mm filament. The starting and ending scripts are stripped down and are very sparse. I am still tuning the PLA profiles because of very fine strings in some finished parts.
Perry Cain
Dec 26, 2015, 9:45:31 AM12/26/15
to Vintage Makerbot
wow. Thanks so much. I am going to dig the old cupcake out just for fun!!!
Reply all
Reply to author
Forward
0 new messages