Minix-3.2.1: couldn't read super block.
568 views
Skip to first unread message

g.nan...@gmail.com
Jul 28, 2016, 1:37:51 PM7/28/16
to minix3
Hi there,
I was building Minix-3.2.1 x86 32-bit on Arch Linux x86 64-bit.
The said commit reads:
972156d595e8a959a5204e158fa8f16b99e443d4
All went well until I tried to install it on the qemu VM with the command:
I tracked the code, which turned out that a check was done in function rw_super
located in file commands/fsck.mfs/fsck.c:576.
I wondered why the fsck should be done here for the first installation?
Isn't the disk supposed to be blank? Or the read is done against the ramdisk?
Besides, a read operation hardly failed, unless it runs out of the file?
I simply want my home-built Minix 3 to work, but it seems I am going after the code,
which needs a large amount time of debug, sry ; (
My major references to build it are as follows:
http://wiki.minix3.org/doku.php?id=developersguide:crosscompiling
http://wiki.minix3.org/doku.php?id=releases:3.2.1:developersguide:crosscompiling
Anyone can help me out? Thanks very much.
best regards,
Nand
I was building Minix-3.2.1 x86 32-bit on Arch Linux x86 64-bit.
The said commit reads:
972156d595e8a959a5204e158fa8f16b99e443d4
All went well until I tried to install it on the qemu VM with the command:
$ qemu -hda ~/path/to/disk/image -m 256 -kernel kernel -append rootdevname=c0d0p0s0 \Please see the attached snap for details.
-initrd mod01_ds,mod02_rs,mod03_pm,mod04_sched,mod05_vfs,mod06_memory,\
mod07_log,mod08_tty,mod09_mfs,mod10_vm,mod11_pfs,mod12_init
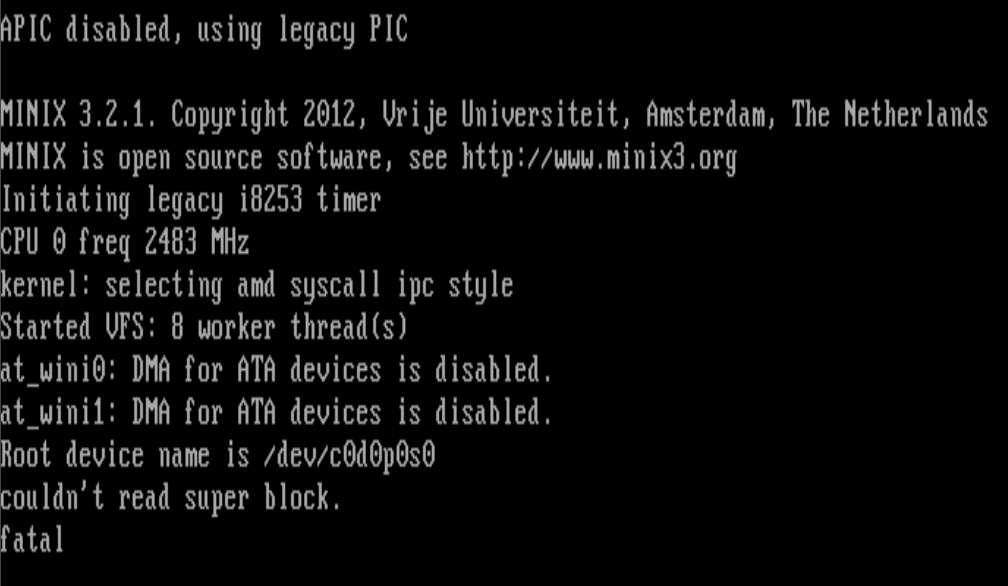
The installation hung with error:
couldn't read super block.
fatal
I tracked the code, which turned out that a check was done in function rw_super
located in file commands/fsck.mfs/fsck.c:576.
I wondered why the fsck should be done here for the first installation?
Isn't the disk supposed to be blank? Or the read is done against the ramdisk?
Besides, a read operation hardly failed, unless it runs out of the file?
I simply want my home-built Minix 3 to work, but it seems I am going after the code,
which needs a large amount time of debug, sry ; (
My major references to build it are as follows:
http://wiki.minix3.org/doku.php?id=developersguide:crosscompiling
http://wiki.minix3.org/doku.php?id=releases:3.2.1:developersguide:crosscompiling
Anyone can help me out? Thanks very much.
best regards,
Nand

Jean-Baptiste Boric
Jul 28, 2016, 3:14:41 PM7/28/16
to minix3
All went well until I tried to install it on the qemu VM with the command:$ qemu -hda ~/path/to/disk/image -m 256 -kernel kernel -append rootdevname=c0d0p0s0 \
-initrd mod01_ds,mod02_rs,mod03_pm,mod04_sched,mod05_vfs,mod06_memory,\
mod07_log,mod08_tty,mod09_mfs,mod10_vm,mod11_pfs,mod12_init
If you are trying to install MINIX, where's the installation CD in the QEMU command line ? This command line tries to book from the virtual HDD, unless there's already a MINIX installation in there it won't work.
(Technically, you can also boot using only the initial ramdisk by modifying the /etc/rc file in the ramdisk driver, but it's probably not what you want since the ramdisk is heavily stripped down compared to a MINIX installation).
Please see the attached snap for details.
Try to keep the file extension next time, not every operating system can easily guess this is a PNG image.
The logs suggests setting ata_no_dma=1 in the boot monitor and your QEMU command line doesn't mention it. Try -append "rootdevname=c0d0p0s0 ata_no_dma=1"
I tracked the code, which turned out that a check was done in function rw_super
located in file commands/fsck.mfs/fsck.c:576.
I wondered why the fsck should be done here for the first installation?
There's a panic because the disk driver itself can't read the superblock. It doesn't matter if it's fsck or the file system server, not being able to read the superblock prevents MINIX from using the block device in a useful way.
Isn't the disk supposed to be blank? Or the read is done against the ramdisk?
at_wini0 is indeed the ATA disk driver. A freshly created virtual HDD is also indeed blank, but the blankness isn't the issue here.
Besides, a read operation hardly failed, unless it runs out of the file?
It's not reading a file, it's reading the disk. There are lots of reasons why a read can fail besides hitting the end of a file, from a disk error to a borked file system.
I simply want my home-built Minix 3 to work, but it seems I am going after the code,
which needs a large amount time of debug, sry ; (
You are using an old version and old versions are not maintained for lack of manpower (unlike bigger operating systems, fixes are not back-ported to older, supported versions : once a version is released it is effectively frozen in time). Most people either stick to the latest release, the development branch (or the latest 3.1 version for those who want to study MINIX with the book).
If you want to tinker with MINIX without using the book as reference, I suggest keeping up with the development branch, otherwise you'll miss all the features and bugfixes that were committed in the mean time. It's also far more convenient for cross-development.
g.nan...@gmail.com
Jul 29, 2016, 10:21:16 AM7/29/16
to minix3
Hey,
first thanks for your help.
According to http://wiki.minix3.org/doku.php?id=developersguide:crosscompiling
I chose an old version 3.2.1, which is only supported on my system at the moment.
That’s why I gitted back quite a few commits ; (
Given that the kernel and all ramdisk files were provided and passed to Qemu as params,
a CD is really necessary for the installation?
Look at this link plz,
I quote the line that could argue for my assumption:
"The kernel and boot modules are stored in ../build/destdir.i386/multiboot. ...
or you can tell Qemu to use these to boot from instead of the files stored on the virtual hard disk."
Did I get it wrong?
In attachment is the snap taken after disabling the DMA, with an extension name this time.
I will next try several approaches to get it run, like
Thank you!
Nand
"The kernel and boot modules are stored in ../build/destdir.i386/multiboot. ...
or you can tell Qemu to use these to boot from instead of the files stored on the virtual hard disk."
Did I get it wrong?
In attachment is the snap taken after disabling the DMA, with an extension name this time.
I will next try several approaches to get it run, like
- build it under the latest version
- create a CD Image out of the files I already got
- debug this one for more details
Thank you!
Nand
Jean-Baptiste Boric
Jul 29, 2016, 11:29:46 AM7/29/16
to minix3
According to http://wiki.minix3.org/doku.php?id=developersguide:crosscompiling
I chose an old version 3.2.1, which is only supported on my system at the moment.
That’s why I gitted back quite a few commits ; (
I don't think the build compatibility table has been updated for quite some time. According to the table, the last time Arch was tested for cross-building was back in 2013 with MINIX 3.2.1.
I'm cross-compiling master from a Debian testing, but any reasonably recent Linux/BSD installation should work.
Given that the kernel and all ramdisk files were provided and passed to Qemu as params,
a CD is really necessary for the installation?
Look at this link plz,
http://wiki.minix3.org/doku.php?id=releases:3.2.1:developersguide:crosscompiling
I quote the line that could argue for my assumption:
"The kernel and boot modules are stored in ../build/destdir.i386/multiboot. ...
or you can tell Qemu to use these to boot from instead of the files stored on the virtual hard disk."
Did I get it wrong?
The ramdisk by default is just here to find, mount and continue booting from a root device. It only contains what is necessary to achieve this goal, so using it as a root device as-is isn't really possible (there's not even ls or cat). This line means that instead of using the boot monitor to load the boot modules you can directly give them to QEMU to boot from them, but it does not replace the need for a root device.
I improved the cross-build system so that MINIX can be run from a full-blown ramdisk, making among others PXE and USB booting possible. It was committed earlier this year so MINIX 3.2.1 doesn't have this ability.
In attachment is the snap taken after disabling the DMA, with an extension name this time.
I will next try several approaches to get it run, like
- build it under the latest version
- create a CD Image out of the files I already got
- debug this one for more details
Building using the latest version is definitively your best option. Cross-building was massively improved since MINIX 3.2.1, there are scripts that cross-build ready-to-use CD, HDD, USB and PXE/ramdisk images now.
Creating a CD or HDD image for MINIX 3.2.1 only by cross-building will be tricky since it looks like there's no releasetools/x86_hdimage.sh script which would create it for you. Back then, releases were crafted from within MINIX with releasetools/release.sh rather than by cross-compiling.
As for why MINIX doesn't boot with your current approach, what happens now is that the disk driver does work but there's no MINIX file system at /dev/c0d0p0s0 since the virtual HDD is blank, so MINIX can't continue booting.
g.nan...@gmail.com
Jul 30, 2016, 10:14:09 AM7/30/16
to minix3
Hey,
Yes, you are right.
The image should not be blank, it should carry the file system instead. And,
the building for Minix 3.4.0 (a7a79fa) was also successful on an ordinary Linux x86_64.
The first step has to be cleaning the source tree with:
git clean -dxf .
I ran the ./releasetools/x86_hdimage.sh, ending up with an image under the ./minixsrc/
and a huge number of files under ./obj.i386/.
This build script provides two options to start the minix with Qemu at the end:
The one is like
Another question about the obj folder, can I specifiy the obj folder when using ./releasetools/x86_hdimage.sh?
best regards,
Nand
Yes, you are right.
The image should not be blank, it should carry the file system instead. And,
the building for Minix 3.4.0 (a7a79fa) was also successful on an ordinary Linux x86_64.
The first step has to be cleaning the source tree with:
git clean -dxf .
I ran the ./releasetools/x86_hdimage.sh, ending up with an image under the ./minixsrc/
and a huge number of files under ./obj.i386/.
This build script provides two options to start the minix with Qemu at the end:
The one is like
qemu -m 256 -kernel kernel -append rootdevname=c0d0p0s0 \Both worked fine. but is there some kind of difference?
-initrd mod01_ds,mod02_rs,mod03_pm,mod04_sched,mod05_vfs,mod06_memory,\
mod07_log,mod08_tty,mod09_mfs,mod10_vm,mod11_pfs,mod12_init -hda minix_x86.img
The other is:
qemu -m 256 -hda minix_x86.img
Another question about the obj folder, can I specifiy the obj folder when using ./releasetools/x86_hdimage.sh?
best regards,
Nand
Jean-Baptiste Boric
Jul 30, 2016, 1:28:39 PM7/30/16
to minix3
This build script provides two options to start the minix with Qemu at the end:
The one is likeqemu -m 256 -kernel kernel -append rootdevname=c0d0p0s0 \Both worked fine. but is there some kind of difference?
-initrd mod01_ds,mod02_rs,mod03_pm,mod04_sched,mod05_vfs,mod06_memory,\
mod07_log,mod08_tty,mod09_mfs,mod10_vm,mod11_pfs,mod12_init -hda minix_x86.img
The other is:
qemu -m 256 -hda minix_x86.img
The first line will boot MINIX by telling QEMU to directly load the boot files from your host operating system. This is fast and allows easy manipulation of the kernel command line (the -append switch), which is especially useful when using the serial console. However, not every x86 emulator can act as a Multiboot bootloader.
The second line will boot MINIX by going through the BIOS and the boot loader, like on a real computer. It is slightly slower and modifying the kernel command line is less convenient, as it requires dropping into the boot loader command prompt. This booting method is supported by almost every x86 emulator.
With QEMU the first one is usually the best option.
Another question about the obj folder, can I specifiy the obj folder when using ./releasetools/x86_hdimage.sh?
You can specify its location by setting the environment variable OBJ, as in
OBJ="./where/you/want" ./releasetools/x86_hdimage.sh
There are several other switches and environment variables to control where stuff goes and how it gets built. You can get some documentation about them by calling ./releasetools/x86_hdimage.sh -h, but most of them are undocumented. The defaults are set in releasetools/image.defaults and at the top of each image script. You don't normally need to modify any of these files, as each environment variable will be set to the default value only if it wasn't previously set, like on the example above.
Reply all
Reply to author
Forward
0 new messages