bed level and first few layers
41 views
Skip to first unread message

Bill Schwanitz
Feb 22, 2014, 6:15:56 PM2/22/14
to central-ohio-reprap-a...@googlegroups.com
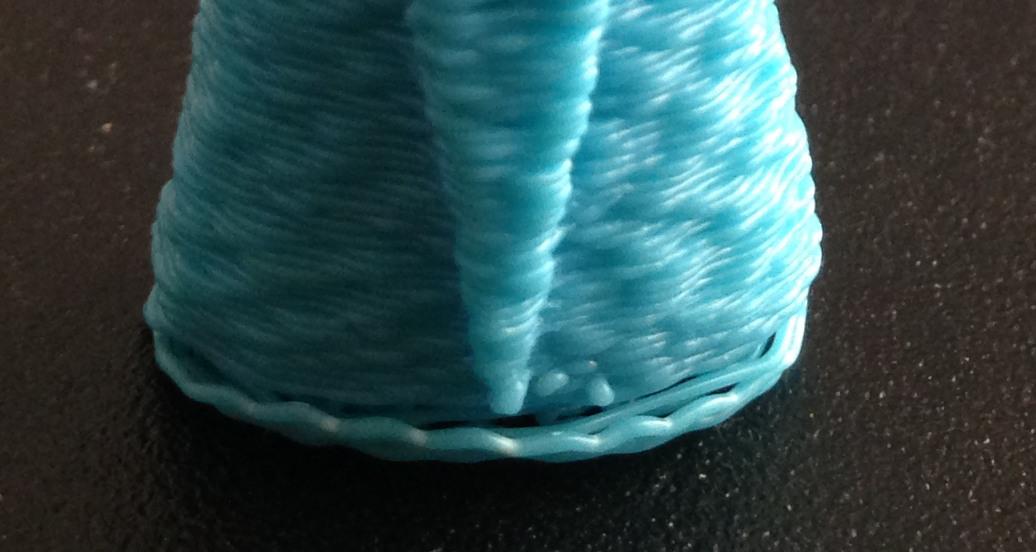
So, I'm finally up and printing. So far things are going fairly well. One thing I have noticed is that my first few layers and the perimeter of the outer edges is really squiggly lines.
I'm attaching an image of a chess piece I printed that should show it.
It almost looks like the filament is being dragged as it prints. I can't tell if I'm moving the x/y axis a little too fast or if the filament is going to quick, z height is off ( eg, it should just fall )
Any ideas?
Bill Schwanitz
Feb 24, 2014, 10:12:17 AM2/24/14
to central-ohio-reprap-a...@googlegroups.com
I re-leveled the bed and that seems to have cleared up the problem.

Larry Knopp
Feb 26, 2014, 11:44:30 AM2/26/14
to central-ohio-reprap-a...@googlegroups.com
New pics?
Your extrusion around the perimeter looks pretty "wavy" overall. Could have a wobble/alignment issue. Those perimeters *should* be nice smooth lines.--
You received this message because you are subscribed to the Google Groups "central-ohio-reprap-and-makerbot-operators" group.
To unsubscribe from this group and stop receiving emails from it, send an email to central-ohio-reprap-and-mak...@googlegroups.com.
For more options, visit https://groups.google.com/groups/opt_out.
Bill Schwanitz
Feb 26, 2014, 7:47:11 PM2/26/14
to central-ohio-reprap-a...@googlegroups.com
I had another print after the first one with the funky first few layers. That was a bed leveling issue, but there is one ( I think final actually ) issue. the lines have a bit of a wicker basket kind of effect.
I have a few theories:
1) the extruder motor pulses rather than running at a constant rate - should it be constant?
2) The temperature could be too high or low, right now I'm using 225c. Filament is https://www.matterhackers.com/store/3d-printer-filament/175mm-abs-filament-lightblue-1-kg
- Just noticed. they recommend 230 so I'm going to go change the slicer and try it with 230
3) The extrusion rate I was using is 30 which may be too low. I tried another print with the value a lot higher ( about 120 ;) go big or go home? ). It was pretty funny watching it print that fast but it was far too fast. It ended up stretching the extrusion but it did smooth things out
I'm guessing its a combination of all 3 above. I'm getting ready to fire up another test print in a few minutes with some additional changes. I'm also thinking my E rate is too low so that is bumped. I'm breaking away from my change one thing at a time motto
On Saturday, February 22, 2014 6:15:56 PM UTC-5, Bill Schwanitz wrote:
Larry Knopp
Feb 27, 2014, 8:33:11 AM2/27/14
to central-ohio-reprap-a...@googlegroups.com
"1) the extruder motor pulses rather than running at a constant rate - should it be constant?"
It's pulsing all the time? That doesn't sound right. What does "free air" extrusion look like? (raise the hotend up to like 100mm and just manually extrude about 20mm... is the diameter consistent... nice and smooth and even?)
"2) The temperature could be too high or low, right now I'm using 225c."
230 is the "standard" rec temp for ABS, but that always is variable from machine to machine, filament to filament, even color to color. You running at 225 would not produce the "wicker basket" effect; it would (should) only make the extruder work a bit harder 'cause the ABS isn't flowing as easily as it does at higher temp, and also the layers tend to have less inter-layer adhesion (are more prone to delaminate) at lower temps.
"3) The extrusion rate I was using is 30 which may be too low...."
Again, this in itself wouldn't produce the "wicker basket" effect. These things can print from 5mm/sec up to 300mm/sec (if all the bits are right and up to it...) I always recommend folks learn, tune and dial in their machines in the 30 - 50mm/sec range before pushing 'em faster. Those higher speeds will really highlight and multiply any "weaknesses" in the setup, and push the components to their limits. Going low and slow initially will give you better results."3) The extrusion rate I was using is 30 which may be too low...."
--
Bill Schwanitz
Feb 27, 2014, 10:50:22 AM2/27/14
to central-ohio-reprap-a...@googlegroups.com
My last print I noticed some play in the y movements. I have a spring to tighten the belt a bit, going to put that on and run another test print.
Could vibration do it? One thing I noticed when I sped things up with last nights print was that the wicker basket type feel is still there but the bumps are much more shallow. The speed was still way too fast - going to bring things down to 30mm or so with the next test and bump the temperature too.
Larry Knopp
Feb 28, 2014, 8:45:46 AM2/28/14
to central-ohio-reprap-a...@googlegroups.com
Any kind of "play" or wiggle in any axes travel will certainly impact print output. Even a 1/2mm shift during direction reversal will be magnified at the hotend tip...
Bill Schwanitz
Feb 28, 2014, 9:25:44 AM2/28/14
to central-ohio-reprap-a...@googlegroups.com
Yup, and I think that may be at least part of what is going on. I printed off the same set of parts last night with a 20mm/sec movement during print steps and the bumps got way smoother.
I think for now, the 20mm/sec is plenty fast. I'm going to take a look at the frame this weekend - I have a few idea. First thing I'm going to check is the belt alignment. I'm wondering if the belts are not quite lined up right. Other thing it might be is the infill type and the extrusion rate - basically I'm wondering if the nozzle is pushing the perimeter out.
The last set of parts turned out very well. I would actually say they are usable. I think I need to adjust the extruder flow just a little bit more.
If you or anyone else is curious I've got my repetier host and slic3r configs up on my github account, https://github.com/bilsch/3d_printer_configs
( yes, I version control my configs ;) )
To unsubscribe from this group and stop receiving emails from it, send an email to central-ohio-reprap-and-makerbot-operators+unsub...@googlegroups.com.
Bill Schwanitz
Mar 1, 2014, 11:24:51 AM3/1/14
to central-ohio-reprap-a...@googlegroups.com
So I think I have a better idea what is causing the bumps and squiggles. I think this is caused by vibration of the frame and extruder while printing.
Slowing things down reduced the vibration and resulted in a smoother print but its not quite perfect.
I think there are a few causes:
1) I'm using the rectilinear infill with slic3r
2) The z rods are not stable enough
going to work on a few things but I think that is my main issue - vibration and wobble so thats my next focus. I'm also noticing some small gaps between the perimeter and the infill. Looking at the slic3r help page and forum threads, slic3r itself may be to blame ( at least partially, not exclusively - could be fill rate but I think I have that about dialed in now )
Larry Knopp
Mar 1, 2014, 2:28:44 PM3/1/14
to central-ohio-reprap-a...@googlegroups.com
Aye.
Like I said... watch the hotend tip real closely during print... it should be stable and smooth through it's movements.--
You received this message because you are subscribed to the Google Groups "central-ohio-reprap-and-makerbot-operators" group.
To unsubscribe from this group and stop receiving emails from it, send an email to central-ohio-reprap-and-mak...@googlegroups.com.
Reply all
Reply to author
Forward
0 new messages