Introduction and Question

GARBOARD
Is the headliner all one piece or does it separate in sections as I
remove the horizontal teak bars holding it up ? In other words do I
need to start at one end of the boat and begin drilling the bungs out
and removing the screws and horizontal teak pieces to drop the whole
headliner to where I need to be,  or can I just remove the fore and aft
teak cross pieces under the area I wish to access ?

ron acierno
--
You received this message because you are subscribed to the Google Groups "caborico" group.
To unsubscribe from this group and stop receiving emails from it, send an email to caborico+u...@googlegroups.com.
To post to this group, send email to cabo...@googlegroups.com.
Visit this group at http://groups.google.com/group/caborico.
For more options, visit https://groups.google.com/groups/opt_out.
BRIAN GORTNEY
Thanks for the "Welcome" ! I have the boat at home on the hard and am not sure if I will be putting it in Lake Erie, or the Chesapeake when ready to splash ? Time will tell. I sent that question regarding the headliner to Fraser Smith last night but have not received a reply.
All The Best,
Brian
You received this message because you are subscribed to a topic in the Google Groups "caborico" group.
To unsubscribe from this topic, visit https://groups.google.com/d/topic/caborico/W-SPccEV2WU/unsubscribe.
To unsubscribe from this group and all its topics, send an email to caborico+u...@googlegroups.com.
To post to this group, send email to cabo...@googlegroups.com.
Visit this group at http://groups.google.com/group/caborico.
For more options, visit https://groups.google.com/groups/opt_out.
--
Brian Gortney CMAT,
Brian's Automotive
3049 11th. St.S.W.
Canton, Ohio 44710
(330) 453-0432
Since 1975
www.briansautomotive.com

Thierry Danz
BRIAN GORTNEY
Thanks for the input. I wish I had that set up. On my boat the bolts on deck for the mast pulpit bases just keep turning without loosening or moving up a bit. There has to be nuts under the headliner I'd bet, backing plates as well I hope, and if so its a shame they didn't use aviation type notched riv-nuts in the backing plates . I'm going to give Fraser a call in a few days if he doesn't respond to my email. I have the same situation on the larger hinge mounting screws on my Lewmar Roll Stop hatches. I don't want to "Blaze the Trail" on dropping the headliner without some knowledge of how to do so the fastest and easiest way without messing anything up. I'll report what I learn. Plates with riv-nuts can be fabricated easily. We will see what I find ?
Best,
Brian
You received this message because you are subscribed to a topic in the Google Groups "caborico" group.
To unsubscribe from this topic, visit https://groups.google.com/d/topic/caborico/W-SPccEV2WU/unsubscribe.
To unsubscribe from this group and all its topics, send an email to caborico+u...@googlegroups.com.
To post to this group, send email to cabo...@googlegroups.com.
Visit this group at http://groups.google.com/group/caborico.
For more options, visit https://groups.google.com/groups/opt_out.

N C

Alan Gluyas
Alan Gluyas
Director
Petrospection Pty Ltd
Marine & Cargo Surveyors, Petroleum Terminal Operators and Consultants, Tank Calibration & Hydrostatic Testing.
PO Box 216 Rockingham 6168
8 Edison Circuit Rockingham Western Australia 6168
Tel 61 (0)8 9528 1888
Fax 61(0)8 9528 1588
Mob: 0419 916 712
Business Email: alan....@petrospection.com.au
Personal email: alang...@iinet.net.au
----- Original Message -----From:cabo...@googlegroups.comTo:"cabo...@googlegroups.com" <cabo...@googlegroups.com>Cc:Sent:Tue, 6 Aug 2013 09:34:59 -0400Subject:Re: [caborico] Introduction and Question
go...@earthlink.net
Thanks for the info. I was hoping it was split under the teak bars. I will use monel staples if I end up dropping a section and will make backing plates with riv-nuts or nut plates installed to solve this issue in the future. I already have all 11 of the port lights out for re-glazing, new seal and re-bedding. If anyone needs info on the proper lid seal and Dow Corning recommended silicone to use to hold the glass in the frames email me. I spent a good deal of time locating this material for the original ABI stainless steel rectangular 5"x12" and 4"X10" port lights used on my vintage hull.
All The Best,
Brian
C/R 38 #150
go...@earthlink.net
Thanks for the "Welcome". I'll let you know what I find if I must drop a section of headliner. I may call Fraser if I don't hear from him in response to my email ?
All The Best,
Brian Gortney
C/R 38 #150
-----Original Message-----
From: N C
Sent: Aug 6, 2013 9:34 AM
To: "cabo...@googlegroups.com"
Subject: Re: [caborico] Introduction and Question

Tom
Tom
BRIAN GORTNEY
Mine are stainless for sure, no rust or corrosion after 20 + years at sea and a strong magnet has no attraction to them whatsoever. No carbon in the metal, looks like a 316L type alloy.
Best,
Brian

dennis williamson

Robert Benner
Dennis
Holy Mackerel. That is close to two months in Gouvia at high season. You travel with the high rollers my friend.
While you waited for American parts to cross the pond we sailed up Albania, Montenegro and Croatia, crossed to Venice for a week + , sailed back and now are anchored off Vulcano in the Aeolian Islands.
And I thought Italian service was poor. :)
Enjoy the Ionian. Are you going to use Marina Di Ragusa this winter?
Bob
ron acierno
>>>> Marine & Cargo Surveyors, Petroleum Terminal Operators and Consultants,
>>>> Tank Calibration & Hydrostatic Testing.
>>>>
>>>> PO Box 216 Rockingham 6168
>>>>
>>>> 8 Edison Circuit Rockingham Western Australia 6168
>>>>
>>>> Tel 61 (0)8 9528 1888
>>>>
>>>> Fax 61(0)8 9528 1588
>>>>
>>>> Mob: 0419 916 712
>>>>
>>>>> http://groups.google.com/**group/caborico<http://groups.google.com/group/caborico>
>>>>> .
>>>>> For more options, visit
>>>>> https://groups.google.com/**groups/opt_out<https://groups.google.com/groups/opt_out>
>>>>> .
>>>>>
>>>>>
>>>>
>>>> --
>>>> You received this message because you are subscribed to a topic in the
>>>> Google Groups "caborico" group.
>>>> topic/caborico/W-SPccEV2WU/**unsubscribe<https://groups.google.com/d/topic/caborico/W-SPccEV2WU/unsubscribe>
>>>> .
>>>> http://groups.google.com/**group/caborico<http://groups.google.com/group/caborico>
>>>> .
>>>> For more options, visit
>>>> https://groups.google.com/**groups/opt_out<https://groups.google.com/groups/opt_out>
>>>> .
>>>>
>>>>
>>>>
>>>> --
>>>> Brian Gortney CMAT,
>>>> Brian's Automotive
>>>> 3049 11th. St.S.W.
>>>> Canton, Ohio 44710(330) 453-0432
>>>> Since 1975www.briansautomotive.com
>>>>
>>>> You received this message because you are subscribed to the Google
>>>> Groups "caborico" group.
>>>> To unsubscribe from this group and stop receiving emails from it, send
>>>> http://groups.google.com/**group/caborico<http://groups.google.com/group/caborico>
>>>> .
>>>> For more options, visit
>>>> https://groups.google.com/**groups/opt_out<https://groups.google.com/groups/opt_out>
>>>> .
>>>>
>>>>
>>>> --
>>>> You received this message because you are subscribed to the Google
>>>> Groups "caborico" group.
>>>> To unsubscribe from this group and stop receiving emails from it, send
>>>> http://groups.google.com/**group/caborico<http://groups.google.com/group/caborico>
>>>> .
>>>> For more options, visit
>>>> https://groups.google.com/**groups/opt_out<https://groups.google.com/groups/opt_out>
>>>> .

Cab...@aol.com
Petrospection Pty Ltd
Marine & Cargo Surveyors, Petroleum Terminal Operators and Consultants, Tank Calibration & Hydrostatic Testing.
PO Box 216 Rockingham 6168
8 Edison Circuit Rockingham Western Australia 6168
Tel 61 (0)8 9528 1888
Fax 61(0)8 9528 1588
Mob: 0419 916 712
Business Email: alan....@petrospection.com.au
To unsubscribe from this group and stop receiving emails from it, send an email to caborico+u...@googlegroups.com.
To post to this group, send email to cabo...@googlegroups.com.
Visit this group at http://groups.google.com/group/caborico.
For more options, visit https://groups.google.com/groups/opt_out.
--
You received this message because you are subscribed to a topic in the Google Groups "caborico" group.
To unsubscribe from this topic, visit https://groups.google.com/d/topic/caborico/W-SPccEV2WU/unsubscribe.
To unsubscribe from this group and all its topics, send an email to caborico+u...@googlegroups.com.
To post to this group, send email to cabo...@googlegroups.com.
Visit this group at http://groups.google.com/group/caborico.
For more options, visit https://groups.google.com/groups/opt_out.
--
Brian Gortney CMAT,
Brian's Automotive
3049 11th. St.S.W.
Canton, Ohio 44710
(330) 453-0432
Since 1975
www.briansautomotive.com
--
BRIAN GORTNEY
Do you have 38' ? I am considering pulling my propshaft and replacing the cutlass bearing and replacing / rebuilding the stuffing box or just going with PSS dripless seal set up. I hadn't considered having to drop the rudder but my rudder is stiff anyway and I need to find out why ? I might just as well get on with it while boat is on the hard. How hard is it to change over to the PSS system ? Did you do anything with your shaft cutlass bearing or was it OK ? I spoke with Fraser Smith a couple weeks ago and he mentioned that the rudders were bult out of Corten steel, the stuff submarines are built of. I haven't checked mine, I always just assumed it was fiberglass with some kind of core. ?
Best,
Brian CR 38 #150
N C
BRIAN GORTNEY
Thanks. I was thinking along the same lines and hoping not to have to drop the rudder. I've never had my shaft out (yet) . Any pointers you can send along on the cutlass bearing replacement will be appreciated. Is the cutlass bearing housed in the double nutted bronze assembly the shaft comes out of ? I do want to take care of all of these items while hauled and working on the boat. I have about .060" slop in the cutlass bearing to the shaft and think its time has come.
Best,
Brian
N C
N C
I think removing the housing is more work than necessary. Most yards will simply remove the prop and shaft. Then using a reciprocating saw, place the blade inside the bearing and cut the full length of it, being careful not to cut into the bearing housing (if you nick the housing slightly it's not going to be an issue). It's easiest to cut it in two locations such as a 12 o'clock and 9 o'clock position. Then taking a chisel you can easily collapse the bearing so that it will slide out of the housing. Installing the new bearing is fairly simple. Put it in the boat freezer over night, it will cause the bearing to contract. Remove the bearing from the freezer and promptly start it into the bearing housing. Placing a hardwood board over the end of the bearing and hitting the board with a heavy mallet a few times will seat it. You have to work fast once taking it out of the freezer so that it doesn't warm up and expand. Some people recommend packing the bearing in dry ice, I wouldn't do it that way since dry ice is extremely cold and may cause too much contraction which may separate the rubber from the bronze as well as making it brittle. Putting it in a freezer isn't going to harm it (after all, many boats are hauled in cold climates and subjected to freezing temperatures. I've done a few bearings in this manner and have had no issues. It's often much easier than removing the housing.
The shaft can easily be removed with a slap hammer. When you reinstall the shaft into the new cutlass bearing the fit will be real tight so a little soapy water will help.
Make sure that the shaft is properly and squarely seated into the coupling. I would have the shaft checked for trueness while you have it out as well as having the shaft end checked for a proper fit to the inside of the coupling face. It should fit squarely to the coupler face. Any good prop shop should be able to provide this service and it shouldn't cost too much. This will contribute to the longevity of your cutlass bearing by ensuring that everything is within specs. Once the shaft is reinstalled you'll probably want to check the shaft alignment to insure that you won't have any vibration issues and premature wearing of the new bearing.
Good Luck,
Nick
Cab...@aol.com
Cab...@aol.com
N C
Begin forwarded message:
Cab...@aol.com
BRIAN GORTNEY
Brian
BRIAN GORTNEY
Brian
--
You received this message because you are subscribed to the Google Groups "caborico" group.
To unsubscribe from this group and stop receiving emails from it, send an email to caborico+u...@googlegroups.com.
To post to this group, send email to cabo...@googlegroups.com.
Visit this group at http://groups.google.com/group/caborico.
For more options, visit https://groups.google.com/groups/opt_out.
--
Brian Gortney CMAT,
Brian's Automotive
3049 11th. St.S.W.
Canton, Ohio 44710
BRIAN GORTNEY
Thank you much. I owe you one. I have never taken one of these apart and want to have all of this sort of thing done before while the boat is sitting on blocks and stands. I have a small machine shop here at my shop and planning on putting the shaft in the lathe and dial indicating it to check the run out etc. Can I just contact Algonquin and tell them I have a C/R 38 with an 1 1/4" shaft and they can send me the proper bearing based on that ? I've got so much to do and so many things on my plate that I don't know when I'll ever get it all done . No point in pulling that tailpiece if I don't have to, sounds like a real pain. Thanks for saving me all of that suffering. It will be a beautiful and great boat one I get her in order so will all be worth it. While apart do you suggest just rebuilding the factory stuffing box or going to the PSS system ? I have a new ZF trans with about 6 hours on it and it appears a new coupling flange, but will check it closely upon removal. The trans was just replaced before I bought the boat . What are your thoughts on a rubber disc damper between the trans and shaft flanges ? The W46 has 1600 hrs on the clock and a new injector pump and 4 new injectors, runs well and has 400psi compression cold on all 4 lungs. I did an oil analysis and it had 65 PPM sodium in it, all the other numbers were good. What do you suspect, raw water pump inner seal ( it was just rebuilt prior to purchase) exhaust elbow. head gasket ? I may pull the head and heat exchanger etc and go through it while its handy to do so. Thanks for your help !
Best,
Brian
NC
BRIAN GORTNEY
Once again thank you for your help. You are right on ! I just ordered a "BITE" bearing from Deep Blue Yacht Supply in Florida for $59.95 Now I will go shopping for a PSS seal, which one do I need Nick, if you remember or have the part # in your logs ? Don't know about cutting the shaft to accomodate the flex coupling, it would depend on how thick it was and how much prop clearance one had ?
Thanks You,
Brian
Good morning,
To the best of my knowledge, Cabo Rico did use our 00STBO125 which used the COD (1-1/4” x 2” x 5”) bearing. Please let me know if you need any further information or assistance. Thank you for the inquiry!
Best Regards,
Lee DeBaca
V.P. Sales & Marketing
410.643.7145 Ph
NC
Nick:
Once again thank you for your help. You are right on ! I just ordered a "BITE" bearing from Deep Blue Yacht Supply in Florida for $59.95 Now I will go shopping for a PSS seal, which one do I need Nick, if you remember or have the part # in your logs ? Don't know about cutting the shaft to accomodate the flex coupling, it would depend on how thick it was and how much prop clearance one had ?
Thanks You,
BrianGood morning,
To the best of my knowledge, Cabo Rico did use our 00STBO125 which used the COD (1-1/4” x 2” x 5”) bearing. Please let me know if you need any further information or assistance. Thank you for the inquiry!
Best Regards,
Lee DeBacaV.P. Sales & Marketing
410.643.7145 Ph
<Mail Attachment.jpeg>
BRIAN GORTNEY
Brian:The PSS goes by prop shaft size for the collars. �The size for the bellows is based on the outer o.d. of the stern tube, which if I remember right, �is 2 1/4". You'd really need to measure yours to be sure. �
They do make an insert for the bellows so you can neck it down, but you shouldn't need that if you take an accurate measurement. Unfortunately, I don't have a part #.
Cheers,
Nick
On Aug 9, 2013, at 2:26 PM, BRIAN GORTNEY wrote:
Nick:
Once again thank you for your help.� You are right on !�� I just ordered a "BITE" bearing from Deep Blue Yacht Supply in Florida for $59.95�� Now I will go shopping for a PSS seal, which one do I need Nick, if you remember or have the part # in your logs ?�� Don't know about cutting the shaft to accomodate the flex coupling, it would depend on how thick it was and how much prop clearance one had ?
Thanks You,
Brian
Good morning,
�To the best of my knowledge, Cabo Rico did use our 00STBO125 which used the COD (1-1/4� x 2� x 5�) bearing.� Please let me know if you need any further information or assistance.� Thank you for the inquiry!
�Best Regards,
�Lee DeBaca
Brian:If you have the oval flanged bearing housinng # OOstbo125 I think you need �the bearing called the "bite" made by Duramax (i.d. 1-1/4 in. o.d. 2 in. length 5 in.). There are other cutlass bearing manufacturers that fit the same dimensions as well. I haven't had any problems getting the Duramax from local marine suppliers. I think it cost somewhere between $65 and $80.00.�
I really can't speak for the traditional stuffing boxes since I never used one, although I have helped friends with there's. I'm partial to the PSS since they don't drip, so there is no water getting spun off of the shaft which seems to form into a little bit of a mist and get on surrounding parts. They are simple in design, so you can't knock that. I don't think you'll ever have to worry about scoring the shaft with a PSS which can happen more easily with a traditional box. I put a collar zinc on the shaft forward of the PSS collar to eliminate any possibility of it loosening and being pushed forward by the bellows which would allow water to get into the boat, but I ran it for years without the zinc and never had a problem. �
I've heard some positive things about the dampers but, I don't have any experience with them. I have an Aqua Drive unit on mine which isolates a lot of vibration. I'm also pretty mindful of avoiding gear shifts without pausing in neutral first. Do you have to cut the shaft to accommodate the rubber disc?�
I'm not familiar with Westerbekes but on some engines a�worn raw water pump inner seal will allow water to pass into the engine, as well as a crack in the oiler cooler, a bad exhaust elbow, a bad head gasket, or a sticking anti-siphon valve which is usually the first suspect. If an engine gets flooded with sea water and not flushed properly wouldn't some residual salt show up in the oil?�
Good Luck with it all,
Nick
On Aug 9, 2013, at 9:26 AM, BRIAN GORTNEY wrote:
Nick:
Thank you much.� I owe you one.� I have never taken one of these apart and want to have all of this sort of thing done before while the boat is sitting on blocks and stands.� I have a small machine shop here at my shop and planning on putting the shaft in the lathe and dial indicating it to check the run out etc.�� Can I just contact Algonquin and tell them I have a C/R 38� with an 1 1/4" shaft and they can send me the proper bearing based on that ?� I've got so much to do and so many things on my plate that I don't know when I'll ever get it all done . No point in pulling that tailpiece if I don't have to, sounds like a real pain. Thanks for saving me all of that suffering. � It will be a beautiful and great boat one I get her in order so will all be worth it.� While apart do you suggest just rebuilding the factory stuffing box or going to the PSS system ?�� I have a new ZF trans with about 6 hours on it and it appears a new coupling flange, but will check it closely upon removal. The trans was just replaced before I bought the boat . What are your thoughts on a rubber disc damper between the trans and shaft flanges ?�� The W46 has 1600 hrs on the clock and a new injector pump and 4 new injectors, runs well and has 400psi compression cold on all 4 lungs.� I did an oil analysis and it had 65 PPM sodium in it, all the other numbers were good.� What do you suspect, raw water pump inner seal ( it was just rebuilt prior to purchase) exhaust elbow. head gasket ?� I may pull the head and heat exchanger etc and go through it while its handy to do so.� Thanks for your help !
Best,
Brian
On 8/8/2013 10:50 PM, N C wrote:
Brian:
Here is the old post regarding the bearing removal.
You won't be able to remove the bearing�by leaving the prop shaft in place. The�bearing�once seated in the housing is extremely tight fitting and doesn't just slip out. Still the�bearing�isn't too difficult to remove. One method is to remove the prop, shaft and shaft log �(which I believe is a left handed thread) and then remove the�bearing�housing (there are probably 2 set screws in the housing that lock in the�bearing�that need to be removed before it is pressed or cut out). Once the housing is removed the old�bearing�can easily be pressed out and a new one pressed in. The�bearing�housing will have to be re-bedded and then re-installed etc. One potential problem is how the�bearing�housing is mounted Inside the boat. �If the bolt heads are imbedded in the glass and you can't place a wrench on them you risk spinning them when loosening the external nuts. If the heads are exposed then it will be easy to put a wrench on them to prevent the bolts from spinning. If the heads aren't exposed and you spin the bolts you will have some unnecessary work awaiting you.�
I think removing the housing is more work than necessary. Most yards will simply remove the prop and shaft. Then using a reciprocating saw, place the blade inside the�bearing�and cut the full length of it, being careful not to cut into the�bearing�housing (if you nick the housing slightly it's not going to be an issue). It's easiest to cut it in two locations such as a 12 o'clock and 9 o'clock position. Then taking a chisel you can easily collapse the�bearing�so that it will slide out of the housing. Installing the new�bearing�is fairly simple. Put it in the boat freezer over night, it will cause the�bearing�to contract. Remove the�bearing�from the freezer and promptly start it into the�bearing�housing. Placing a hardwood board over the end of the�bearing�and hitting the board with a heavy mallet a few times will seat it. You have to work fast once taking it out of the freezer so that it doesn't warm up and expand. Some people recommend packing the�bearing�in dry ice, I wouldn't do it that way since dry ice is extremely cold and may cause too much contraction which may separate the rubber from the bronze as well as making it brittle. Putting it in a freezer isn't going to harm it (after all, many boats are hauled in cold climates and subjected to freezing temperatures. I've done a few bearings in this manner and have had no issues. It's often much easier than removing the housing.�
The shaft can easily be removed with a slap hammer. When you reinstall the shaft into the new�cutlass�bearing�the fit will be real tight so a little soapy water will help.�
Make sure that the shaft is properly and squarely seated �into the coupling. I would have the shaft checked for trueness while you have it out as well as having the shaft end checked for a proper fit to the inside of the coupling face. It should fit squarely to the coupler face. Any good prop shop should be able to provide this service and it shouldn't cost too much. This will contribute to the longevity of your�cutlass�bearing�by ensuring that everything is within specs. Once the shaft is reinstalled you'll probably want to check the shaft alignment to insure that you won't have any vibration issues and premature wearing of the new�bearing.�
Good Luck,�
Nick �
Nick:
Thanks.� I was thinking along the same lines and hoping not to have to drop the rudder.� I've never had my shaft out (yet) .� Any pointers you can send along on the cutlass bearing replacement will be appreciated.� Is the cutlass bearing housed in the double nutted bronze assembly the shaft comes out of ?� I do want to take care of all of these items while hauled and working on the boat.� I have about .060" slop in the cutlass bearing to the shaft and think its time has come.
Best,
Brian
On 8/8/2013 8:57 PM, N C wrote:
Brian,I have the PSS and really like it. They are very low maintenance and easy to install.
I've had my shaft out twice to replace the cutlass bearing, but �I didn't have to drop the rudder to remove it. The cut-out on the leading edge of the rudder almost gave me enough room with the rudder turned hard to one side. I had to remove the rudder stops on the steering quadrant to give me the extra clearance.�
NickCR 38 #190
Dennis:
Do you have 38' ?� I am considering pulling my propshaft and replacing the cutlass bearing and replacing / rebuilding the stuffing box or just going with PSS dripless seal set up.� I hadn't considered having to drop the rudder but my rudder is stiff anyway and I need to find out why ?� I might just as well get on with it while boat is on the hard.�� How hard is it to change over to the PSS system ?�� Did you do anything with your shaft cutlass bearing or was it OK ?�� I spoke with Fraser Smith a couple weeks ago and he mentioned that the rudders were bult out of Corten steel, the stuff submarines are built of.� I haven't checked mine, I always just assumed it was fiberglass with some kind of core.� ?
Best,
Brian� CR 38 #150
On 8/8/2013 7:34 AM, dennis williamson wrote:
Anyone worried about their original rudder condition?
Had to drop mine in Greek boat yard last week to permit removal �of prop shaft for new PSS seal. �Was pleasantly surprised. �The shoe and ruder shaft were in excellent condition considering they were originals in 1982!
Can only conclude that quality of materials was high.
The nay problem we did have was removal of the prop shaft electrolysis made separation of shaft and coupling almost impossible, otherwise all went well. �Repacked the rudder gland and back on the water considerably better seal and ruder movement but also considerably worse off financially!
DennisPaloma de la Paz(Gouvia, Corfu Greece)
On 8 Aug 2013, at 04:20, BRIAN GORTNEY wrote:
Tom:
Mine are stainless for sure, no rust or corrosion after 20 + years at sea and a strong magnet has no attraction to them whatsoever.� No carbon in the metal, looks like a 316L type alloy.
Best,
Brian
On 8/7/2013 10:52 AM, Tom wrote:
On looking closer, I guess they are the original chromed bronze ABI ports. �The photo made them look like stainless. -Tom
On Wednesday, August 7, 2013 10:40:49 AM UTC-4, Tom wrote:
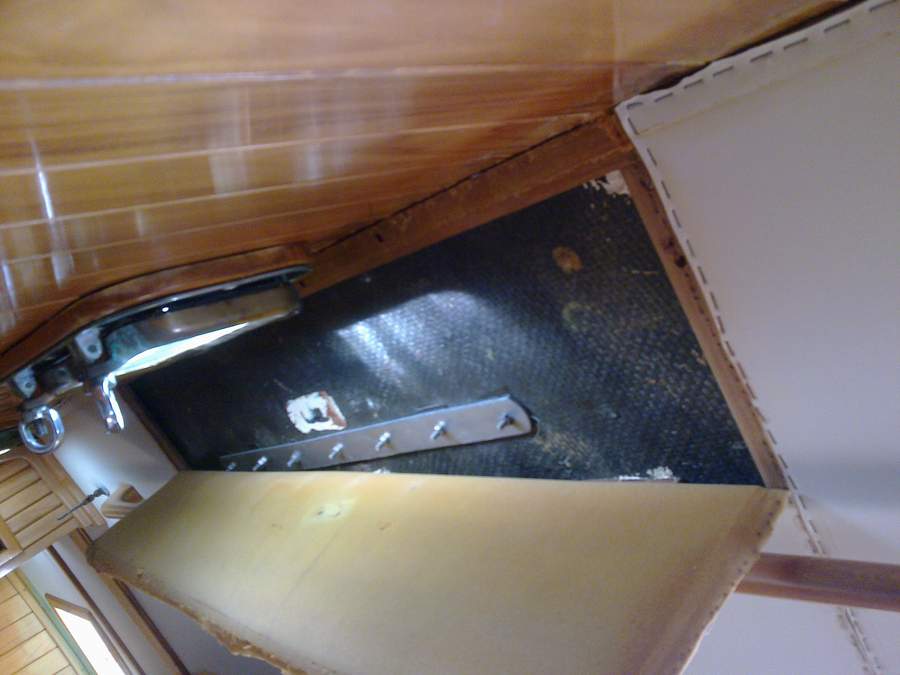
Thanks for that picture Alan. �Truly worth a thousand words. �It's a shame that the tracks on the coach roof didn't work for you. �I can tell you that tracks on the side decks are real toe killers. �WRT the headliner, �did you find that re-stapling the headliner brought it back to the original tautness? � I would really like to figure out a way to keep the deck hardware accessible and yet keep the same look of the headliner. �Pacific Seacraft has zippers in the headliner and I imagine if done well gives great access and looks good, but not great. �I'm thinking of replacing the bunged screws in the trim with screws and trim washers. �At least taking off the trim would then be easier. �BTW, when you said you had to remove the inner porthole hardware, I'm not sure what you meant. �Was it the hook that keeps the port open? �Also, looks like you replaced the ABI ports with Newfound Metals (I think). �Was that an easy switch-over?
Tom FuhsSV EclipseCR38 #115Rock Hall Md.
�
On Tuesday, August 6, 2013 6:47:47 PM UTC-4, Al wrote:
--TasmaniaKetteringBrite StarAlanCheersIt is a pain in the butt removing the teak and replacing and refinishing the bungs is another story, so as Thierry suggest, explore all alternatives before drilling anything out!I had to remove the inner porthole hardware as the teak trims that run fore and aft would not come out without doing so.I removed a section of my headling to fit backer plates for staysail tracks. It was a mistake as the tracks are too close to centreline but at least I did it properly!Hi BrianI have attached a picture of the headlining on Brite Star, which is a 1984 CR38 #82, showing the stapled joint under the athwartships teak trim.
Alan Gluyas
Director
Petrospection Pty Ltd
Marine & Cargo Surveyors, Petroleum Terminal Operators and Consultants, Tank Calibration & Hydrostatic Testing.
PO Box 216 Rockingham 6168
8 Edison Circuit Rockingham Western Australia 6168
Tel���������� 61 (0)8 9528 1888
Fax��������� 61(0)8 9528 1588
Mob:����� � 0419 916 712
Business Email:�� alan....@petrospection.com.au
Personal email:�� alang...@iinet.net.au
Web:������ www.petrospection.com.au
----- Original Message -----
From:cabo...@googlegroups.com
To:"cabo...@googlegroups.com" <cabo...@googlegroups.com>
Cc:
Sent:Tue, 6 Aug 2013 09:34:59 -0400
Subject:Re: [caborico] Introduction and Question
Brian:
Welcome to the group. There was an earlier post by one of the members who was planning on removing part of his headliner, but I don't recall �if he posted any follow up comments. If you do remove it let us know how it goes. Good luck.
Nick"RONIN" CR38 #190
Ron:
Thanks for the "Welcome" !� I have the boat at home on the hard and am not sure if I will be putting it in Lake Erie, or the Chesapeake when ready to splash ?� Time will tell.� I sent that question regarding the headliner to Fraser Smith last night but have not received a reply.�
All The Best,
Brian
On 8/5/2013 1:19 PM, ron acierno wrote:
i don't know the answer to your question, but welcome. where do you sail out of?
On Mon, Aug 5, 2013 at 12:06 PM, GARBOARD <go...@earthlink.net> wrote:
I've been a member of your board for over a year now and have yet to post anything.� I wanted to introduce myself and I'm sure in the future I will post�questions and also share what ever I can learn about these boats with the group.� I own�1991 C/R 38 Hull # 150, �it is a custom offshore model.� I am currently doing maintenance on the hard and need to drop at least a portion of the headliner to access the through bolts / nuts in order to replace a cracked mast pulpit mount.� I didn't find much in the threads regarding this.� My question is as follows:�
Is the headliner all one piece or does it separate in sections as I
remove the horizontal teak bars holding it up ? In other words do I
need to start at one end of the boat and begin drilling the bungs out
and removing the screws and horizontal teak pieces to drop the whole
headliner to where I need to be,  or can I just remove the fore and aft
teak cross pieces under the area I wish to access ?
�
Brian Gortney CMAT,C/R 38 # 150
��
--
You received this message because you are subscribed to the Google Groups "caborico" group.
To unsubscribe from this group and stop receiving emails from it, send an email to caborico+u...@googlegroups.com.
To post to this group, send email to cabo...@googlegroups.com.
Visit this group at http://groups.google.com/group/caborico.
For more options, visit https://groups.google.com/groups/opt_out.
�
�
--
You received this message because you are subscribed to a topic in the Google Groups "caborico" group.
To unsubscribe from this topic, visit https://groups.google.com/d/topic/caborico/W-SPccEV2WU/unsubscribe.
To unsubscribe from this group and all its topics, send an email to caborico+u...@googlegroups.com.
To post to this group, send email to cabo...@googlegroups.com.
Visit this group at http://groups.google.com/group/caborico.
For more options, visit https://groups.google.com/groups/opt_out.
�
�
--
Brian Gortney CMAT,
Brian's Automotive
3049 11th. St.S.W.
Canton, Ohio 44710
(330) 453-0432
Since 1975
www.briansautomotive.com
--
You received this message because you are subscribed to the Google Groups "caborico" group.
To unsubscribe from this group and stop receiving emails from it, send an email to caborico+u...@googlegroups.com.
To post to this group, send email to cabo...@googlegroups.com.
Visit this group at http://groups.google.com/group/caborico.
For more options, visit https://groups.google.com/groups/opt_out.
�
�
--
You received this message because you are subscribed to a topic in the Google Groups "caborico" group.
To unsubscribe from this topic, visit https://groups.google.com/d/topic/caborico/W-SPccEV2WU/unsubscribe.
To unsubscribe from this group and all its topics, send an email to caborico+u...@googlegroups.com.
To post to this group, send email to cabo...@googlegroups.com.
Visit this group at http://groups.google.com/group/caborico.
For more options, visit https://groups.google.com/groups/opt_out.
�
�
--
You received this message because you are subscribed to the Google Groups "caborico" group.
To unsubscribe from this group and stop receiving emails from it, send an email to caborico+u...@googlegroups.com.
To post to this group, send email to cabo...@googlegroups.com.
Visit this group at http://groups.google.com/group/caborico.
For more options, visit https://groups.google.com/groups/opt_out.
�
�
�
�
�
�
--
You received this message because you are subscribed to the Google Groups "caborico" group.
To unsubscribe from this group and stop receiving emails from it, send an email to caborico+u...@googlegroups.com.
To post to this group, send email to cabo...@googlegroups.com.
Visit this group at http://groups.google.com/group/caborico.
For more options, visit https://groups.google.com/groups/opt_out.
�
�

Kale Gorham
Sent from my iPad Kale Gorham
NC
BRIAN GORTNEY
Brian
Brian:The PSS goes by prop shaft size for the collars. �The size for the bellows is based on the outer o.d. of the stern tube, which if I remember right, �is 2 1/4". You'd really need to measure yours to be sure. �
They do make an insert for the bellows so you can neck it down, but you shouldn't need that if you take an accurate measurement. Unfortunately, I don't have a part #.
Cheers,
Nick
On Aug 9, 2013, at 2:26 PM, BRIAN GORTNEY wrote:
Nick:
Once again thank you for your help.� You are right on !�� I just ordered a "BITE" bearing from Deep Blue Yacht Supply in Florida for $59.95�� Now I will go shopping for a PSS seal, which one do I need Nick, if you remember or have the part # in your logs ?�� Don't know about cutting the shaft to accomodate the flex coupling, it would depend on how thick it was and how much prop clearance one had ?
Thanks You,
Brian
Good morning,
�To the best of my knowledge, Cabo Rico did use our 00STBO125 which used the COD (1-1/4� x 2� x 5�) bearing.� Please let me know if you need any further information or assistance.� Thank you for the inquiry!
�Best Regards,
�Lee DeBaca
Brian:If you have the oval flanged bearing housinng # OOstbo125 I think you need �the bearing called the "bite" made by Duramax (i.d. 1-1/4 in. o.d. 2 in. length 5 in.). There are other cutlass bearing manufacturers that fit the same dimensions as well. I haven't had any problems getting the Duramax from local marine suppliers. I think it cost somewhere between $65 and $80.00.�
I really can't speak for the traditional stuffing boxes since I never used one, although I have helped friends with there's. I'm partial to the PSS since they don't drip, so there is no water getting spun off of the shaft which seems to form into a little bit of a mist and get on surrounding parts. They are simple in design, so you can't knock that. I don't think you'll ever have to worry about scoring the shaft with a PSS which can happen more easily with a traditional box. I put a collar zinc on the shaft forward of the PSS collar to eliminate any possibility of it loosening and being pushed forward by the bellows which would allow water to get into the boat, but I ran it for years without the zinc and never had a problem. �
I've heard some positive things about the dampers but, I don't have any experience with them. I have an Aqua Drive unit on mine which isolates a lot of vibration. I'm also pretty mindful of avoiding gear shifts without pausing in neutral first. Do you have to cut the shaft to accommodate the rubber disc?�
I'm not familiar with Westerbekes but on some engines a�worn raw water pump inner seal will allow water to pass into the engine, as well as a crack in the oiler cooler, a bad exhaust elbow, a bad head gasket, or a sticking anti-siphon valve which is usually the first suspect. If an engine gets flooded with sea water and not flushed properly wouldn't some residual salt show up in the oil?�
Good Luck with it all,
Nick
On Aug 9, 2013, at 9:26 AM, BRIAN GORTNEY wrote:
Nick:
Thank you much.� I owe you one.� I have never taken one of these apart and want to have all of this sort of thing done before while the boat is sitting on blocks and stands.� I have a small machine shop here at my shop and planning on putting the shaft in the lathe and dial indicating it to check the run out etc.�� Can I just contact Algonquin and tell them I have a C/R 38� with an 1 1/4" shaft and they can send me the proper bearing based on that ?� I've got so much to do and so many things on my plate that I don't know when I'll ever get it all done . No point in pulling that tailpiece if I don't have to, sounds like a real pain. Thanks for saving me all of that suffering. � It will be a beautiful and great boat one I get her in order so will all be worth it.� While apart do you suggest just rebuilding the factory stuffing box or going to the PSS system ?�� I have a new ZF trans with about 6 hours on it and it appears a new coupling flange, but will check it closely upon removal. The trans was just replaced before I bought the boat . What are your thoughts on a rubber disc damper between the trans and shaft flanges ?�� The W46 has 1600 hrs on the clock and a new injector pump and 4 new injectors, runs well and has 400psi compression cold on all 4 lungs.� I did an oil analysis and it had 65 PPM sodium in it, all the other numbers were good.� What do you suspect, raw water pump inner seal ( it was just rebuilt prior to purchase) exhaust elbow. head gasket ?� I may pull the head and heat exchanger etc and go through it while its handy to do so.� Thanks for your help !
Best,
Brian
On 8/8/2013 10:50 PM, N C wrote:
Brian:
Here is the old post regarding the bearing removal.
You won't be able to remove the bearing�by leaving the prop shaft in place. The�bearing�once seated in the housing is extremely tight fitting and doesn't just slip out. Still the�bearing�isn't too difficult to remove. One method is to remove the prop, shaft and shaft log �(which I believe is a left handed thread) and then remove the�bearing�housing (there are probably 2 set screws in the housing that lock in the�bearing�that need to be removed before it is pressed or cut out). Once the housing is removed the old�bearing�can easily be pressed out and a new one pressed in. The�bearing�housing will have to be re-bedded and then re-installed etc. One potential problem is how the�bearing�housing is mounted Inside the boat. �If the bolt heads are imbedded in the glass and you can't place a wrench on them you risk spinning them when loosening the external nuts. If the heads are exposed then it will be easy to put a wrench on them to prevent the bolts from spinning. If the heads aren't exposed and you spin the bolts you will have some unnecessary work awaiting you.�
I think removing the housing is more work than necessary. Most yards will simply remove the prop and shaft. Then using a reciprocating saw, place the blade inside the�bearing�and cut the full length of it, being careful not to cut into the�bearing�housing (if you nick the housing slightly it's not going to be an issue). It's easiest to cut it in two locations such as a 12 o'clock and 9 o'clock position. Then taking a chisel you can easily collapse the�bearing�so that it will slide out of the housing. Installing the new�bearing�is fairly simple. Put it in the boat freezer over night, it will cause the�bearing�to contract. Remove the�bearing�from the freezer and promptly start it into the�bearing�housing. Placing a hardwood board over the end of the�bearing�and hitting the board with a heavy mallet a few times will seat it. You have to work fast once taking it out of the freezer so that it doesn't warm up and expand. Some people recommend packing the�bearing�in dry ice, I wouldn't do it that way since dry ice is extremely cold and may cause too much contraction which may separate the rubber from the bronze as well as making it brittle. Putting it in a freezer isn't going to harm it (after all, many boats are hauled in cold climates and subjected to freezing temperatures. I've done a few bearings in this manner and have had no issues. It's often much easier than removing the housing.�
The shaft can easily be removed with a slap hammer. When you reinstall the shaft into the new�cutlass�bearing�the fit will be real tight so a little soapy water will help.�
Make sure that the shaft is properly and squarely seated �into the coupling. I would have the shaft checked for trueness while you have it out as well as having the shaft end checked for a proper fit to the inside of the coupling face. It should fit squarely to the coupler face. Any good prop shop should be able to provide this service and it shouldn't cost too much. This will contribute to the longevity of your�cutlass�bearing�by ensuring that everything is within specs. Once the shaft is reinstalled you'll probably want to check the shaft alignment to insure that you won't have any vibration issues and premature wearing of the new�bearing.�
Good Luck,�
Nick �
Nick:
Thanks.� I was thinking along the same lines and hoping not to have to drop the rudder.� I've never had my shaft out (yet) .� Any pointers you can send along on the cutlass bearing replacement will be appreciated.� Is the cutlass bearing housed in the double nutted bronze assembly the shaft comes out of ?� I do want to take care of all of these items while hauled and working on the boat.� I have about .060" slop in the cutlass bearing to the shaft and think its time has come.
Best,
Brian
On 8/8/2013 8:57 PM, N C wrote:
Brian,I have the PSS and really like it. They are very low maintenance and easy to install.
I've had my shaft out twice to replace the cutlass bearing, but �I didn't have to drop the rudder to remove it. The cut-out on the leading edge of the rudder almost gave me enough room with the rudder turned hard to one side. I had to remove the rudder stops on the steering quadrant to give me the extra clearance.�
NickCR 38 #190
Dennis:
Do you have 38' ?� I am considering pulling my propshaft and replacing the cutlass bearing and replacing / rebuilding the stuffing box or just going with PSS dripless seal set up.� I hadn't considered having to drop the rudder but my rudder is stiff anyway and I need to find out why ?� I might just as well get on with it while boat is on the hard.�� How hard is it to change over to the PSS system ?�� Did you do anything with your shaft cutlass bearing or was it OK ?�� I spoke with Fraser Smith a couple weeks ago and he mentioned that the rudders were bult out of Corten steel, the stuff submarines are built of.� I haven't checked mine, I always just assumed it was fiberglass with some kind of core.� ?
Best,
Brian� CR 38 #150
On 8/8/2013 7:34 AM, dennis williamson wrote:
Anyone worried about their original rudder condition?
Had to drop mine in Greek boat yard last week to permit removal �of prop shaft for new PSS seal. �Was pleasantly surprised. �The shoe and ruder shaft were in excellent condition considering they were originals in 1982!
Can only conclude that quality of materials was high.
The nay problem we did have was removal of the prop shaft electrolysis made separation of shaft and coupling almost impossible, otherwise all went well. �Repacked the rudder gland and back on the water considerably better seal and ruder movement but also considerably worse off financially!
DennisPaloma de la Paz(Gouvia, Corfu Greece)
On 8 Aug 2013, at 04:20, BRIAN GORTNEY wrote:
Tom:
Mine are stainless for sure, no rust or corrosion after 20 + years at sea and a strong magnet has no attraction to them whatsoever.� No carbon in the metal, looks like a 316L type alloy.
Best,
Brian
On 8/7/2013 10:52 AM, Tom wrote:
On looking closer, I guess they are the original chromed bronze ABI ports. �The photo made them look like stainless. -Tom
On Wednesday, August 7, 2013 10:40:49 AM UTC-4, Tom wrote:
Thanks for that picture Alan. �Truly worth a thousand words. �It's a shame that the tracks on the coach roof didn't work for you. �I can tell you that tracks on the side decks are real toe killers. �WRT the headliner, �did you find that re-stapling the headliner brought it back to the original tautness? � I would really like to figure out a way to keep the deck hardware accessible and yet keep the same look of the headliner. �Pacific Seacraft has zippers in the headliner and I imagine if done well gives great access and looks good, but not great. �I'm thinking of replacing the bunged screws in the trim with screws and trim washers. �At least taking off the trim would then be easier. �BTW, when you said you had to remove the inner porthole hardware, I'm not sure what you meant. �Was it the hook that keeps the port open? �Also, looks like you replaced the ABI ports with Newfound Metals (I think). �Was that an easy switch-over?
Tom FuhsSV EclipseCR38 #115Rock Hall Md.
�
On Tuesday, August 6, 2013 6:47:47 PM UTC-4, Al wrote:
--TasmaniaKetteringBrite StarAlanCheersIt is a pain in the butt removing the teak and replacing and refinishing the bungs is another story, so as Thierry suggest, explore all alternatives before drilling anything out!I had to remove the inner porthole hardware as the teak trims that run fore and aft would not come out without doing so.I removed a section of my headling to fit backer plates for staysail tracks. It was a mistake as the tracks are too close to centreline but at least I did it properly!Hi BrianI have attached a picture of the headlining on Brite Star, which is a 1984 CR38 #82, showing the stapled joint under the athwartships teak trim.
Alan Gluyas
Director
Petrospection Pty Ltd
Marine & Cargo Surveyors, Petroleum Terminal Operators and Consultants, Tank Calibration & Hydrostatic Testing.
PO Box 216 Rockingham 6168
8 Edison Circuit Rockingham Western Australia 6168
Tel���������� 61 (0)8 9528 1888
Fax��������� 61(0)8 9528 1588
Mob:����� � 0419 916 712
Business Email:�� alan....@petrospection.com.au
Personal email:�� alang...@iinet.net.au
Web:������ www.petrospection.com.au
----- Original Message -----
From:cabo...@googlegroups.com
To:"cabo...@googlegroups.com" <cabo...@googlegroups.com>
Cc:
Sent:Tue, 6 Aug 2013 09:34:59 -0400
Subject:Re: [caborico] Introduction and Question
Brian:
Welcome to the group. There was an earlier post by one of the members who was planning on removing part of his headliner, but I don't recall �if he posted any follow up comments. If you do remove it let us know how it goes. Good luck.
Nick"RONIN" CR38 #190
Ron:
Thanks for the "Welcome" !� I have the boat at home on the hard and am not sure if I will be putting it in Lake Erie, or the Chesapeake when ready to splash ?� Time will tell.� I sent that question regarding the headliner to Fraser Smith last night but have not received a reply.�
All The Best,
Brian
On 8/5/2013 1:19 PM, ron acierno wrote:
i don't know the answer to your question, but welcome. where do you sail out of?
On Mon, Aug 5, 2013 at 12:06 PM, GARBOARD <go...@earthlink.net> wrote:
I've been a member of your board for over a year now and have yet to post anything.� I wanted to introduce myself and I'm sure in the future I will post�questions and also share what ever I can learn about these boats with the group.� I own�1991 C/R 38 Hull # 150, �it is a custom offshore model.� I am currently doing maintenance on the hard and need to drop at least a portion of the headliner to access the through bolts / nuts in order to replace a cracked mast pulpit mount.� I didn't find much in the threads regarding this.� My question is as follows:�
Is the headliner all one piece or does it separate in sections as I
remove the horizontal teak bars holding it up ? In other words do I
need to start at one end of the boat and begin drilling the bungs out
and removing the screws and horizontal teak pieces to drop the whole
headliner to where I need to be,  or can I just remove the fore and aft
teak cross pieces under the area I wish to access ?
�
Brian Gortney CMAT,C/R 38 # 150
��
--
You received this message because you are subscribed to the Google Groups "caborico" group.
To unsubscribe from this group and stop receiving emails from it, send an email to caborico+u...@googlegroups.com.
To post to this group, send email to cabo...@googlegroups.com.
Visit this group at http://groups.google.com/group/caborico.
For more options, visit https://groups.google.com/groups/opt_out.
�
�
--
You received this message because you are subscribed to a topic in the Google Groups "caborico" group.
To unsubscribe from this topic, visit https://groups.google.com/d/topic/caborico/W-SPccEV2WU/unsubscribe.
To unsubscribe from this group and all its topics, send an email to caborico+u...@googlegroups.com.
To post to this group, send email to cabo...@googlegroups.com.
Visit this group at http://groups.google.com/group/caborico.
For more options, visit https://groups.google.com/groups/opt_out.
�
�
--
Brian Gortney CMAT,
Brian's Automotive
3049 11th. St.S.W.
Canton, Ohio 44710
(330) 453-0432
Since 1975
www.briansautomotive.com
--
You received this message because you are subscribed to the Google Groups "caborico" group.
To unsubscribe from this group and stop receiving emails from it, send an email to caborico+u...@googlegroups.com.
To post to this group, send email to cabo...@googlegroups.com.
Visit this group at http://groups.google.com/group/caborico.
For more options, visit https://groups.google.com/groups/opt_out.
�
�
--
You received this message because you are subscribed to the Google Groups "caborico" group.
To unsubscribe from this group and stop receiving emails from it, send an email to caborico+u...@googlegroups.com.
To post to this group, send email to cabo...@googlegroups.com.
Visit this group at http://groups.google.com/group/caborico.
For more options, visit https://groups.google.com/groups/opt_out.
�
�
--
You received this message because you are subscribed to a topic in the Google Groups "caborico" group.
To unsubscribe from this topic, visit https://groups.google.com/d/topic/caborico/W-SPccEV2WU/unsubscribe.
To unsubscribe from this group and all its topics, send an email to caborico+u...@googlegroups.com.
To post to this group, send email to cabo...@googlegroups.com.
Visit this group at http://groups.google.com/group/caborico.
For more options, visit https://groups.google.com/groups/opt_out.
�
�
--
You received this message because you are subscribed to the Google Groups "caborico" group.
To unsubscribe from this group and stop receiving emails from it, send an email to caborico+u...@googlegroups.com.
To post to this group, send email to cabo...@googlegroups.com.
Visit this group at http://groups.google.com/group/caborico.
For more options, visit https://groups.google.com/groups/opt_out.
�
�
�
�
�
�
--
You received this message because you are subscribed to the Google Groups "caborico" group.
To unsubscribe from this group and stop receiving emails from it, send an email to caborico+u...@googlegroups.com.
To post to this group, send email to cabo...@googlegroups.com.
Visit this group at http://groups.google.com/group/caborico.
For more options, visit https://groups.google.com/groups/opt_out.
�
�
Kale Gorham
Sent from my iPad Kale Gorham
ron Gmail
Ron Acierno
Nick:
Once again thank you for your help. You are right on ! I just ordered a "BITE" bearing from Deep Blue Yacht Supply in Florida for $59.95 Now I will go shopping for a PSS seal, which one do I need Nick, if you remember or have the part # in your logs ? Don't know about cutting the shaft to accomodate the flex coupling, it would depend on how thick it was and how much prop clearance one had ?
Thanks You,
Brian
Good morning,
To the best of my knowledge, Cabo Rico did use our 00STBO125 which used the COD (1-1/4” x 2” x 5”) bearing. Please let me know if you need any further information or assistance. Thank you for the inquiry!
Best Regards,
Lee DeBacaV.P. Sales & Marketing
410.643.7145 Ph
<mime-attachment.jpg>

Stephen Brady
On Friday, August 9, 2013 at 12:50:41 PM UTC-4, Nick C wrote:
Brian:If you have the oval flanged bearing housinng # OOstbo125 I think you need the bearing called the "bite" made by Duramax (i.d. 1-1/4 in. o.d. 2 in. length 5 in.). There are other cutlass bearing manufacturers that fit the same dimensions as well. I haven't had any problems getting the Duramax from local marine suppliers. I think it cost somewhere between $65 and $80.00.I really can't speak for the traditional stuffing boxes since I never used one, although I have helped friends with there's. I'm partial to the PSS since they don't drip, so there is no water getting spun off of the shaft which seems to form into a little bit of a mist and get on surrounding parts. They are simple in design, so you can't knock that. I don't think you'll ever have to worry about scoring the shaft with a PSS which can happen more easily with a traditional box. I put a collar zinc on the shaft forward of the PSS collar to eliminate any possibility of it loosening and being pushed forward by the bellows which would allow water to get into the boat, but I ran it for years without the zinc and never had a problem.I've heard some positive things about the dampers but, I don't have any experience with them. I have an Aqua Drive unit on mine which isolates a lot of vibration. I'm also pretty mindful of avoiding gear shifts without pausing in neutral first. Do you have to cut the shaft to accommodate the rubber disc?I'm not familiar with Westerbekes but on some engines a worn raw water pump inner seal will allow water to pass into the engine, as well as a crack in the oiler cooler, a bad exhaust elbow, a bad head gasket, or a sticking anti-siphon valve which is usually the first suspect. If an engine gets flooded with sea water and not flushed properly wouldn't some residual salt show up in the oil?Good Luck with it all,Nick
...
N C
--
You received this message because you are subscribed to the Google Groups "caborico" group.
To unsubscribe from this group and stop receiving emails from it, send an email to caborico+u...@googlegroups.com.
To post to this group, send email to cabo...@googlegroups.com.
Visit this group at http://groups.google.com/group/caborico.
For more options, visit https://groups.google.com/d/optout.
Stephen Brady
N C
Brian Gortney
You received this message because you are subscribed to a topic in the Google Groups "caborico" group.
To unsubscribe from this topic, visit https://groups.google.com/d/topic/caborico/W-SPccEV2WU/unsubscribe.
To unsubscribe from this group and all its topics, send an email to caborico+u...@googlegroups.com.
Brian Gortney
I spoke to an engineer, Steve Gaston at Buck Algonquin about my tail piece and he told me Buck Algonquin made the tailpiece, but they did not produce the tube, or cut the left hand threads on it. He suspected that part was done by Fraser
s shop, or he had farmed it out ? Hope that info is of some use ? Steve also suggested honing the inside of the tailpiece so the cutlass bearing was much easier to change. The set screws will hold it.
Best,
Brian
On 3/14/2015 1:52 PM, N C wrote:
You received this message because you are subscribed to a topic in the Google Groups "caborico" group.
To unsubscribe from this topic, visit https://groups.google.com/d/topic/caborico/W-SPccEV2WU/unsubscribe.
To unsubscribe from this group and all its topics, send an email to caborico+u...@googlegroups.com.