Re: [caborico] Remove the cover over the holding and forward water tank

Cab...@aol.com

Mickey Panayiotakis
On my boat...
It's only over the water tank. I have to lift or remove the table. There are four visible screws but I think that part is the work of the previous owner.
I can send some pics if it helps or you tell me which pay to focus on. (no pun intended)
Y
Has anyone removed the 5ft By 4ft or so cover that is over the holding/water tank. I can't figure out how it is screwed down??Breck Caine CR 38 #19
--
You received this message because you are subscribed to the Google Groups "caborico" group.
To unsubscribe from this group and stop receiving emails from it, send an email to caborico+u...@googlegroups.com.
To post to this group, send email to cabo...@googlegroups.com.
Visit this group at http://groups.google.com/group/caborico?hl=en.
For more options, visit https://groups.google.com/groups/opt_out.

Bill Jones

Cab...@aol.com
Mickey Panayiotakis
Bill Jones
Bill Jones

Larry Barker
Sent from my iPhone
Bill Jones
Cab...@aol.com
pics, breck?
On Wed, Feb 27, 2013 at 11:42 PM, <Cab...@aol.com> wrote:
I found the six screws 3 each along the port and starboard sides, and got them out, but it still does not want to come up??? Also is it just over the water tank or the Holding tank too. If its not over the holding tank how do you get to that? Thanks
Breck Caine CR 38 #19
In a message dated 2/27/2013 10:02:05 P.M. Eastern Standard Time, bi...@billejones.com writes:
Cab...@aol.com
On my boat I would have to take up some the sole to get to the holding tank. Your cover is just really tight. You might have to cut some holes in one end and then install pull plates to cover up the holes and for future use. The sole boards are attached to a solid piece of plywood about 5/8" thinck. Not sure of the exact thickness. Last time I had my cover off I installed a Livorsi straight tube sending unit and a new Livorsi gauge adjacent to my other gauges. I also installed Livorsi senders and gauges in both diesel tanks.
Bill
Cab...@aol.com
You might try borrowing some of those large suction cups that glass shops use to carry sheets of glass. Give it a good yank upward. Just a thought!
Bill Jones
Alakazam
On Thu, Feb 28, 2013 at 6:33 AM, Larry Barker <ldcb...@aol.com> wrote:
BreckIf you are on the hard you may not be able to get it out. I know u are in the water most of the year. I did try to remove my panel out of the water one Spring. No way.LarryVenteux
Sent from my iPhone
The cover is a single piece dimensioned approximately one inch larger than the tank cavity. Approximately 1/2 inch lip for thes screws. I nave six screws in mine and they are visible. Your screws have probably been countersunk and filled with dowels so as not to be visible. You will have to figure out which ones they are and drill out the dowels and then remove the screws.BillAlakazan
CR38 #2.
On Wed, Feb 27, 2013 at 6:41 PM, Mickey Panayiotakis <svb...@gmail.com> wrote:
On my boat...
It's only over the water tank. I have to lift or remove the table. There are four visible screws but I think that part is the work of the previous owner.
I can send some pics if it helps or you tell me which pay to focus on. (no pun intended)
Y
On Feb 27, 2013 8:33 PM, <Cab...@aol.com> wrote:
Has anyone removed the 5ft By 4ft or so cover that is over the holding/water tank. I can't figure out how it is screwed down??Breck Caine CR 38 #19
--
Mickey Panayiotakis

Robert Benner
www.blackberry.com
To: "cabo...@googlegroups.com" <cabo...@googlegroups.com>
Sent: 28 February, 2013 2:11 PM
Subject: Re: [caborico] Remove the cover over the holding and forward water tank

Patrick
the first time. I did that right at the back of the mast-step where the
drain slot is that diverts water to the bilge and it is hidden under the
table. Once I got it levered up with heavy scrapers blades etc. it came
out. The first time I took it out I used a plane on the edges to make it
easier next time. Note that it is rather heavy as there are timbers
glued to the bottom that rest on the water tank to hold it in. See the
attached picture. During our Pacific crossing in heavy seas with the
boat rolling heavily we noticed some movement of the access panel. There
was also some leakage of the water tank at the gasket material (caulk)
between the top and bottom section. The way the factory installed it, at
least on my boat, the tank just sits down in the bilge and was free to
move fore and aft an inch of two and only held in place by the pressure
of the access panel. Not good in my view.
While here in New Zealand I pulled the tank, removed the top, which was
riveted on with 95 rivets, and cleaned the tank out. The baffles were
held in with caulk which was failing and contaminating the tank,
replaced all hoses etc. I elected to epoxy the baffles and top back on
since I installed clean-out ports. I also tabbed the tank in place with
fiberglass tape and epoxy so that it is properly attached to the boat.
You'll notice my cabin soles are badly in need of refinishing. I'll get
to them someday but sailing across the Pacific this past year has been
more important than dealing with the interior aesthetics.
Regarding the holding tank vent line... On my boat it is located on the
forward side pf the mast step and is inboard of the fill inlet hose.
That is accessed via the smaller sole access panel just outside the head
door. The vent is very hard to see because it is hidden by the inlet hose.
Patrick
S/V Silhouette
CR38, Hull #43
Currently hauled out Whangarei NZ
Cab...@aol.com
BreckMine's riveted. See some pics here:mickey
On Thu, Feb 28, 2013 at 2:11 PM, <Cab...@aol.com> wrote:
Thanks, crow bar first.
Breck Caine CR 38 #19
In a message dated 2/28/2013 12:05:13 P.M. Eastern Standard Time, bi...@billejones.com writes:
You might try borrowing some of those large suction cups that glass shops use to carry sheets of glass. Give it a good yank upward. Just a thought!
Bill Jones
Alakazam
On Thu, Feb 28, 2013 at 6:33 AM, Larry Barker <ldcb...@aol.com> wrote:
BreckIf you are on the hard you may not be able to get it out. I know u are in the water most of the year. I did try to remove my panel out of the water one Spring. No way.LarryVenteux
Sent from my iPhone
The cover is a single piece dimensioned approximately one inch larger than the tank cavity. Approximately 1/2 inch lip for thes screws. I nave six screws in mine and they are visible. Your screws have probably been countersunk and filled with dowels so as not to be visible. You will have to figure out which ones they are and drill out the dowels and then remove the screws.BillAlakazan
CR38 #2.
On Wed, Feb 27, 2013 at 6:41 PM, Mickey Panayiotakis <svb...@gmail.com> wrote:
On my boat...
It's only over the water tank. I have to lift or remove the table. There are four visible screws but I think that part is the work of the previous owner.
I can send some pics if it helps or you tell me which pay to focus on. (no pun intended)
Y
On Feb 27, 2013 8:33 PM, <Cab...@aol.com> wrote:
Has anyone removed the 5ft By 4ft or so cover that is over the holding/water tank. I can't figure out how it is screwed down??
Breck Caine CR 38 #19
--
Cab...@aol.com
Those suction cup handles are also a great tool for cleaning the hull
Bob CR35 #100
Sent from my BlackBerry® PlayBook™
www.blackberry.com
From: "Cab...@aol.com" <Cab...@aol.com>
To: "cabo...@googlegroups.com" <cabo...@googlegroups.com>
Sent: 28 February, 2013 2:11 PM
Subject: Re: [caborico] Remove the cover over the holding and forward water tank
Mickey Panayiotakis
Robert Benner
Subject: Re: [caborico] Remove the cover over the holding and forward water tank
Those suction cup handles are also a great tool for cleaning the hull
Bob CR35 #100
Sent from my BlackBerry® PlayBook™
www.blackberry.com
From: "Cab...@aol.com" <Cab...@aol.com>
To: "cabo...@googlegroups.com" <cabo...@googlegroups.com>
Sent: 28 February, 2013 2:11 PM
Subject: Re: [caborico] Remove the cover over the holding and forward water tank
Cab...@aol.com
Cab...@aol.com
That and providing a secure handhold when cleaning the waterline.
Sent from my BlackBerry® PlayBook™
www.blackberry.com
From: "Cab...@aol.com" <Cab...@aol.com>
To: "cabo...@googlegroups.com" <cabo...@googlegroups.com>
Sent: 28 February, 2013 2:44 PM
Subject: Re: [caborico] Remove the cover over the holding and forward water tank
Holding yourself down when under water?
Breck Caine CR 38 #19
In a message dated 2/28/2013 2:35:50 P.M. Eastern Standard Time, skippe...@gmail.com writes:
Those suction cup handles are also a great tool for cleaning the hull
Bob CR35 #100
Sent from my BlackBerry® PlayBook™
www.blackberry.com
From: "Cab...@aol.com" <Cab...@aol.com>
To: "cabo...@googlegroups.com" <cabo...@googlegroups.com>
Sent: 28 February, 2013 2:11 PM
Subject: Re: [caborico] Remove the cover over the holding and forward water tank
Thanks, crow bar first.
Breck Caine CR 38 #19
In a message dated 2/28/2013 12:05:13 P.M. Eastern Standard Time, bi...@billejones.com writes:
You might try borrowing some of those large suction cups that glass shops use to carry sheets of glass. Give it a good yank upward. Just a thought!
Bill Jones
Alakazam
On Thu, Feb 28, 2013 at 6:33 AM, Larry Barker <ldcb...@aol.com> wrote:
BreckIf you are on the hard you may not be able to get it out. I know u are in the water most of the year. I did try to remove my panel out of the water one Spring. No way.LarryVenteux
Sent from my iPhone
The cover is a single piece dimensioned approximately one inch larger than the tank cavity. Approximately 1/2 inch lip for thes screws. I nave six screws in mine and they are visible. Your screws have probably been countersunk and filled with dowels so as not to be visible. You will have to figure out which ones they are and drill out the dowels and then remove the screws.BillAlakazan
CR38 #2.
On Wed, Feb 27, 2013 at 6:41 PM, Mickey Panayiotakis <svb...@gmail.com> wrote:
On my boat...
It's only over the water tank. I have to lift or remove the table. There are four visible screws but I think that part is the work of the previous owner.
I can send some pics if it helps or you tell me which pay to focus on. (no pun intended)
Y
On Feb 27, 2013 8:33 PM, <Cab...@aol.com> wrote:
Has anyone removed the 5ft By 4ft or so cover that is over the holding/water tank. I can't figure out how it is screwed down??
Breck Caine CR 38 #19
--
You received this message because you are subscribed to the Google Groups "caborico" group.
To unsubscribe from this group and stop receiving emails from it, send an email to caborico+u...@googlegroups.com.
To post to this group, send email to cabo...@googlegroups.com.
Visit this group at http://groups.google.com/group/caborico?hl=en.
For more options, visit https://groups.google.com/groups/opt_out.
--
Mickey Panayiotakis

Alan Gluyas
It is possible that I might have a small hole in the top of my holding tank. Someone a few years ago posted that they had a similar problem due to the cabin sole screws going right through into the tank.
My understanding of the construction is that the holding tank is a structural part of the hull that also serves as the mast step. Essentially, the holding tank is formed from two (or three?) transverse structural bulkheads and a glassed on top. On Brite Star, the teak sole does not appear to be removable and it looks as though the only way to access the inside of the holding tank (if you would want to) would be to remove the water tank and cut an access hole in through the front bulkhead. Yuk.
At some stage I am going to have to look at the possible screw hole in mine, as currently I have bypassed the holding tank and cleaned and dried it out. This has fixed the smell and where we are living here is Tasmania, pumping overboard is not a major environmental issue, at least not yet. We don’t have that many people here.
Cheers
Al
Brite Star
CR38 #82
Kettering Tasmania
From:
cabo...@googlegroups.com [mailto:cabo...@googlegroups.com] On Behalf Of Mickey Panayiotakis
Sent: Friday, 1 March 2013 4:02 AM
To: cabo...@googlegroups.com
Subject: Re: [caborico] Remove the
cover over the holding and forward water tank
I
Patrick
fiberglass U channels that appear to be part of the structure that spans
the boat for mast-step support. If you Search this group you will find
comments about some extra long screws used in installing the interior
that penetrated the tank on several boats.
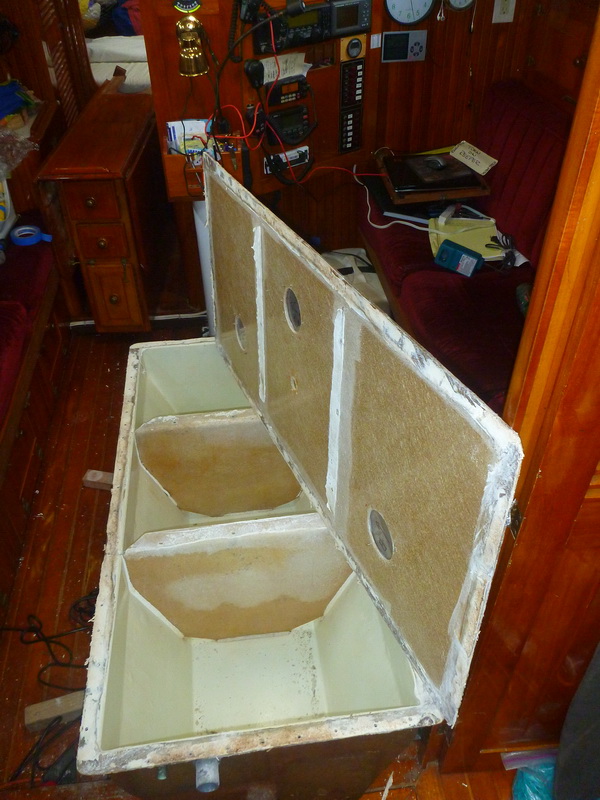
BTW, I've attached a picture to this note that shows the water tank
opened up just after removing the top. As with the fuel tank rebuild I
did, that is also documented in this group, the baffles drop down into
channels molded into the bottom section. I cleaned everything out and
then epoxied the baffles in place with just enough epoxy to keep them
from rattling. When I glued the top on I also epoxied the top flange of
the baffles to the top which stiffened the tank a lot. Before I buttoned
everything up I pressure tested the tank by filling the tank so that the
fill hose was full to deck level. That gave me a five+ foot high column
of water that provided close to 2.5 PSI, the pressure used to test fuel
and water tanks for recreational vessels. (.433 X 5 = 2.165 PSI) No
leaks so I added the tabbing to hold the tank in place and put the sole
and table back together.
Regarding the table once you get it out you might want to reenforce the
sides to bottom interface. On our table, after having bounced off it
once or twice in 20 foot seas there was movement as the sides of the
table box are only fastened to the bottom by the thickness of the bottom
plywood. I epoxied doublers along the inside of those joints all the way
around and that stiffened things up nicely.
Patrick
S/V Silhouette
Mickey Panayiotakis
--
You received this message because you are subscribed to the Google Groups "caborico" group.
To unsubscribe from this group and stop receiving emails from it, send an email to caborico+unsubscribe@googlegroups.com.
Patrick
Sorry no pictures.
In the case of the drain slot I can't take a picture because the forward
end of my table sits within a 1/2" of the aft edge of the mast step so
the groove wouldn't be visible. I should also mention that rather than
an Isomat spar I have a Bainbridge section. The mast is an elliptical
section and the mast step is rectangular. There is a raised central
section the same same shape as the inside of the mast that protrudes up
into the mast by about 1 1/2". There is a raised edge around the mast
step that essentially creates a "moat" at the base of the mast. On the
aft end there is a small hole that leads to a groove in the sole and a
hole that is under the forward edge of the removal-able sole panel. Any
water that comes down inside the mast drains out the bottom and
eventually into the bilge. Not an elegant approach but it works. When I
first got the boat there was a lot of water coming in the mast however
after I re-did the rig and all the wiring I caulked things up well
enough that we only see water in the worst weather. I suspect it is
driven inside the sheave box at the masthead since my last inspection of
the rig didn't reveal any issues with the caulk at the wire penetrations.
Sorry, but the inside of the table is loaded with stuff and I'm too busy
with my haul-out to unload it for a picture. Basically the sides of the
table extend down around the outside edges of the bottom. As a result
the only thing holding the sides to the bottom is glue and a few small
screws. As a result bumping up against the top edge of the table or
bracing ones-self against it in a seaway provides a far bit of lever arm
for such a small joint. I used a Fien Multimaster with a sanding head to
sand the horizontal surface of the bottom and the adjacent vertical
surfaces of the sides to get a clean finish free surface where the two
come together. I then epoxied in 1 X 1 strips to beef up that joint. In
other words if you look down into the forward section of the table by
pulling out both the top and lower level shelf section inside the table
you'll see the strips glued all around the inside perimeter where the
sides meet the bottom. I did the same thing on the aft end where the
door is. Made a big difference.
Patrick

Jamie opus CR38 #26
On Wednesday, February 27, 2013 8:33:50 PM UTC-5, Breck wrote:
Has anyone removed the 5ft By 4ft or so cover that is over the holding/water tank. I can't figure out how it is screwed down??

Jakesamberg
Sent from my iPad
--
You received this message because you are subscribed to the Google Groups "caborico" group.
To unsubscribe from this group and stop receiving emails from it, send an email to caborico+u...@googlegroups.com.
Patrick
A few things to consider regarding the composting head option based on
my experience with one here on my CR38, Silhouette and one on a previous
boat. My unit is a Natures Head but these comments would also apply to
the Airhead unit.
* The composting process slows and then stops when the ambient
temperature drops much below 50 degrees F. Depending on what part of the
country you live in that can be an issue.
* If the unit is used full-time by two people, as in a long cruise or
living aboard situation, the solids side will need to be dealt with on a
weekly basis. It can not and will not compost fast enough, no matter the
temperature, to handle two people full time. Going out for a two week
cruise? You'll need to empty it twice.
* If used by two people full-time then the liquid side needs to be dealt
with on a daily basis. No, we aren't big beer drinkers, and it was a
surprise to discover just how much liquid flows through one's system.
(The Nature's Head liquid tank is 2.2 gallons.)
* The liquid issue is easily dealt with and while it may be technically
illegal to discharge it, in reality it is essentially a sterile solution
and low risk. The solids are another issue all together. If you're at a
facility that has a "Porta-Potty" arrangement as part of their pump-out
station that's great, no problem. However, it is a significant problem,
at least if one wishes to deal with it ethically, in port or an
anchorages where no such facility exists. A sea we just dump it
overboard, but dealing with it while in port or in a crowded anchorage
is frequently a serious hassle.
* If it is installed on a CR38 so that it is mounted atwartships, about
the only way you can mount one with the standard head layout, then you
will have a problem when the boat is on a port tack as the liquid will
not drain into the holes in the front of the unit but rather will pool
at the back. The "trap door" that closes the solids side has a raised
lip around it that when the unit is reasonably level, diverts the liquid
into the bottle. However, it is easily overwhelmed when the boat is
heeled and then the liquid ends up in the solids side. We've been on
port tack for days at a time and this becomes a serious problem when it
comes time to empty the solids side. Tacking whenever you need to use
the head is one option of course.
Having said all that, I still think that for coastal and weekend
cruising the composting head may be a reasonable option for some people
if the limitations noted above are taken into consideration. However,
one of the projects I'm working on during my haul-out here in New
Zealand is to re-install a sea-cock on what was the blanked-off head
discharge thru-hull so that I can go back to a standard head
arrangement. I'll be installing a Lavac to replace the Nature's Head as
we just haven't found the composting arrangement to work that well for
us while out here doing long distance ocean cruising. I've done some
testing of the holding tank and hopefully it is leak free but I'll admit
that there is some risk that I'll have similar problems that others have
reported.
Didn't want to rain on your parade but thought I should mention a few
things that you might want to consider based on my experience over
several years of use.
Patrick
S/V Silhouette
Currently Whangarei, NZ
Jamie opus CR38 #26
Patrick
years, but in the long run I found that it is a lot of trouble. If I
wasn't a full-time live-aboard and only spent weekends on the boat it
might be a different story. The marina I used at home had a good
Porta-Potty setup and that made dealing with things pretty easy.
BTW, at sea, we make the daily task of dealing with the liquid side a
part of the first night watch duties. That way it is dealt with before
dark so that the off-watch person isn't disturbed and there are no
overflows. The latter only needs to happen once or twice for one to
become habitual about dealing with the task.
Patrick
Patrick
fiberglass U channels that appear to be part of the structure that spans
the boat for mast-step support. If you Search this group you will find
comments about some extra long screws used in installing the interior
that penetrated the tank on several boats.
BTW, I've attached a picture to this note that shows the water tank
opened up just after removing the top. As with the fuel tank rebuild I
then epoxied the baffles in place with just enough epoxy to keep them
from rattling. When I glued the top on I also epoxied the top flange of
the baffles to the top which stiffened the tank a lot. Before I buttoned
everything up I pressure tested the tank by filling the tank so that the
fill hose was full to deck level. That gave me a five+ foot high column
PSI) No leaks so I added the tabbing to hold the tank in place and put
the sole and table back together.
Regarding the table once you get it out you might want to reenforce the
sides to bottom interface. On our table, after having bounced off it
once or twice in 20 foot seas there was movement as the sides of the
table box are only fastened to the bottom by the thickness of the
around and that stiffened things up nicely.
Patrick
S/V Silhouette
On 3/1/2013 8:49 AM, Cab...@aol.com wrote:
LDCB...@aol.com
Cab...@aol.com

davo
We'd like to do the same thing to remove all the hoses and permanently shut down the thru hulls but when I measured the space available, I couldn't see how the base would fit on the raised section the current manual toilet is sitting on.
The raised section is only flat for a short distance before it starts sloping up and as far as I can see, the air head won't fit without blocking access to the shower. I'm not even sure if I can fit an electric toilet with a macerator pump as the pump sticks out quite a way at the rear.
ciao
dave

Pete Smith
I was trying to find out if someone on the group has installed a composting head on their CR38's.
It seems there is some who has done this, but unfortunately not too much info/ The search capability on Google groups really sucks, so not sure how much has been discussed here.
Anyone currently have one of these installed? Are you happy with it?
I would be interested to hear how it was installed - the space where the current head is does not exactly lends itself to an airhead or natures head
Pete